 July 12, 2010 at 17:12
NerdDinner. Step 1: New Project
- Transfer
This is the first step of the free NerdDinner tutorial , which shows how to build a small but complete web application using ASP. NET MVC.
Let's start our NerdDinner app (dinner for nerds) by choosing File> New Project.
We will see the “New Project” window. To create an ASP.NET MVC application, we will select the “Web” item on the left side of the window, and then the “ASP.NET MVC Web Application” project template on the right side. Make sure you install ASP. NET MVC, otherwise you will not see this item in the " New Project". This can also be done via the Microsoft the Web Platform Installer ( the ASP. NET
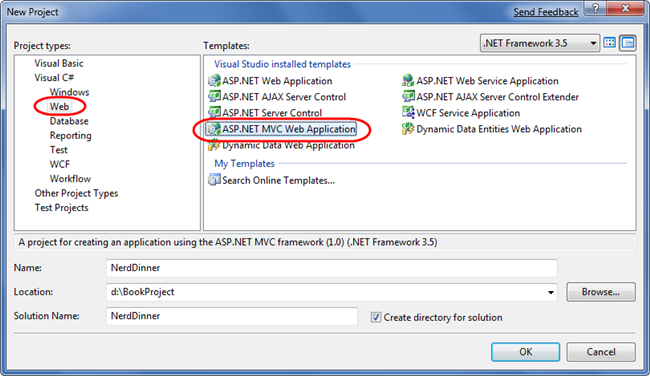
MVC is available in the section “Web Platform> Frameworks and Runtimes”)
We will name the new project “NerdDinner”. After clicking “OK”, Visual Studio will offer to selectively create a unit testing project for a new project. This project allows us to create automated tests that test the functionality and behavior of our application (we will consider this topic in the next steps). The “Test framework” drop-down list contains all the available unit test project templates for ASP.NET MVC on this machine. You can use Nunit, MBUnit and XUnit, as well as the built-in Visual Studio Unit Test framework. Visual Studio Unit Test framework is available in Professional version and above, for Standard and
![clip_image002 [6]](https://habrastorage.org/getpro/habr/post_images/8c5/ca7/f3b/8c5ca7f3b529f3f528b4d02c9cf9e25c.png "clip_image002 [6]")
Express versions need to install a third-party add-on. If no test framework is installed, the selection window does not appear.
We will use the default test project name - “NerdDinner.Tests” and select the “Visual Studio Unit Test” framework. After confirmation, Visual Studio will create a solution with two projects, one for the web application, the second for unit testing:
![clip_image003 [8]](https://habrastorage.org/getpro/habr/post_images/95b/cd2/0fe/95bcd20fe191407389c903e311d8b8c1.png "clip_image003 [8]")
When you create a new ASP.NET MVC application with Visual Studio, it automatically adds the necessary list of directories and files to the project: An ASP.NET MVC project has six high-level directories by default: / Controllers - Where do you put the Controller classes to handle URL requests / Models - Where do you place classes for presenting and manipulating data / Views - Where do you store UI template files that are responsible for rendering the result / Scripts - Where do you place JavaScript library files and scripts (.js) / Content - Where do you place CSS files and images as well as other art atic objects. /
![clip_image004 [6]](https://habrastorage.org/getpro/habr/post_images/990/e05/e7f/990e05e7fc90d50157cb2806319d8059.png "clip_image004 [6]")
App_ Data - Where you store data files for writing and reading.
ASP.NET MVC does not require you to adhere to this structure. In fact, when working on large applications, developers typically split the application into several projects for flexibility. For example: classes of data models are placed in a separate library project. Nevertheless, the default project structure provides a convenient solution for maintaining the purity and transparency of the structure.
When we open the / Controllers directory, we find that Visual Studio added two classes of the controller - HomeController and AccountController, by default: There are three in the / Views directory subdirectories: / Home, / Account and / Shared, as well as several template files in each:
![clip_image005 [6]](https://habrastorage.org/getpro/habr/post_images/c16/f23/6ba/c16f236ba2f6f167f98ad3626a57b15d.png "clip_image005 [6]")
![clip_image006 [6]](https://habrastorage.org/getpro/habr/post_images/90b/d72/d58/90bd72d5839ca6196887f68fd355e5c6.png "clip_image006 [6]")
The / Content and / Scripts directories store the Site.css file, which is used to style all the HTML on the site, as well as the JavaScript libraries that provide the application with jQuery and ASP.NET AJAX support: The NerdDinner.Test project stores just two classes that contain unit tests for our controller classes: The listed files, which Visual Studio adds to the project by default, provide us with the basic structure of a working application, supplementing it with the home page, about page, pages for registering / logging in / out and a page of unhandled errors.
![clip_image007 [6]](https://habrastorage.org/getpro/habr/post_images/907/91a/6e9/90791a6e9c1c246fd377868b7365f4c7.png "clip_image007 [6]")
![clip_image008 [6]](https://habrastorage.org/getpro/habr/post_images/23b/01c/7cc/23b01c7cc43764493516fe2ee4892740.png "clip_image008 [6]")
We can start the project by choosing Debug> StartDebugging or Debug> Start Without Debugging in the menu : The project will be launched using the built-in Visual Studio ASP.NET Web server: Below is the home page of our new project (URL: “/”) after launch: By clicking on the “About” link, you will see about the page (URL: “/ Home / About”): By clicking on “Log On” in the upper right corner, we will be redirected to the authorization page (URL: “/ Account / LogOn”): If we have no login, we can go to registration (URL: “/ Account / Register”):
![clip_image009 [6]](https://habrastorage.org/getpro/habr/post_images/c59/e77/924/c59e77924dac3485c217806d8355b41b.png "clip_image009 [6]")
![clip_image010 [6]](https://habrastorage.org/getpro/habr/post_images/62c/d34/52f/62cd3452f880cc693de6154f0a29ea5d.png "clip_image010 [6]")
![clip_image011 [6]](https://habrastorage.org/getpro/habr/post_images/773/789/b23/773789b2372702d004dde817ecb3803d.png "clip_image011 [6]")
![clip_image012 [6]](https://habrastorage.org/getpro/habr/post_images/6ea/077/14c/6ea07714c8dc14c703a52d4a66a029af.png "clip_image012 [6]")
![clip_image013 [6]](https://habrastorage.org/getpro/habr/post_images/8a3/d1b/dbb/8a3d1bdbbc2f19cb6084c6c46b9e282c.png "clip_image013 [6]")
![clip_image014 [7]](https://habrastorage.org/getpro/habr/post_images/cf2/d2b/c0c/cf2d2bc0cc8f11d28c595fa14b47f186.png "clip_image014 [7]")
The code that is responsible for implementing the home, about and logout / register functionality is added by default during project creation. You will use it as a starting point in our project.
If we use the Professional version of Visual Studio and higher, then we can use the built-in unit testing support in the IDE: Choosing one of the options will open the Test Results panel, which provides us with the status of each of the 27 built-in unit tests in the form Pass / Fail . Later in this guide, we will talk about automated testing and add additional unit tests that will cover the functionality of the applications implemented by us.
![clip_image016 [7]](https://habrastorage.org/getpro/habr/post_images/148/118/862/148118862c167eff02079fc35f0d2b15.png "clip_image016 [7]")
![clip_image017 [6]](https://habrastorage.org/getpro/habr/post_images/867/790/7a6/8677907a62045084e641a488c0d3ef89.png "clip_image017 [6]")
And so, we have the basic structure of the application and can move on to creating a database for storing application data.
Let's start our NerdDinner app (dinner for nerds) by choosing File> New Project.
We will see the “New Project” window. To create an ASP.NET MVC application, we will select the “Web” item on the left side of the window, and then the “ASP.NET MVC Web Application” project template on the right side. Make sure you install ASP. NET MVC, otherwise you will not see this item in the " New Project". This can also be done via the Microsoft the Web Platform Installer ( the ASP. NET
MVC is available in the section “Web Platform> Frameworks and Runtimes”)
We will name the new project “NerdDinner”. After clicking “OK”, Visual Studio will offer to selectively create a unit testing project for a new project. This project allows us to create automated tests that test the functionality and behavior of our application (we will consider this topic in the next steps). The “Test framework” drop-down list contains all the available unit test project templates for ASP.NET MVC on this machine. You can use Nunit, MBUnit and XUnit, as well as the built-in Visual Studio Unit Test framework. Visual Studio Unit Test framework is available in Professional version and above, for Standard and
Express versions need to install a third-party add-on. If no test framework is installed, the selection window does not appear.
We will use the default test project name - “NerdDinner.Tests” and select the “Visual Studio Unit Test” framework. After confirmation, Visual Studio will create a solution with two projects, one for the web application, the second for unit testing:
Exploring the NerdDinner Directory Structure
When you create a new ASP.NET MVC application with Visual Studio, it automatically adds the necessary list of directories and files to the project: An ASP.NET MVC project has six high-level directories by default: / Controllers - Where do you put the Controller classes to handle URL requests / Models - Where do you place classes for presenting and manipulating data / Views - Where do you store UI template files that are responsible for rendering the result / Scripts - Where do you place JavaScript library files and scripts (.js) / Content - Where do you place CSS files and images as well as other art atic objects. /
App_ Data - Where you store data files for writing and reading.
ASP.NET MVC does not require you to adhere to this structure. In fact, when working on large applications, developers typically split the application into several projects for flexibility. For example: classes of data models are placed in a separate library project. Nevertheless, the default project structure provides a convenient solution for maintaining the purity and transparency of the structure.
When we open the / Controllers directory, we find that Visual Studio added two classes of the controller - HomeController and AccountController, by default: There are three in the / Views directory subdirectories: / Home, / Account and / Shared, as well as several template files in each:
The / Content and / Scripts directories store the Site.css file, which is used to style all the HTML on the site, as well as the JavaScript libraries that provide the application with jQuery and ASP.NET AJAX support: The NerdDinner.Test project stores just two classes that contain unit tests for our controller classes: The listed files, which Visual Studio adds to the project by default, provide us with the basic structure of a working application, supplementing it with the home page, about page, pages for registering / logging in / out and a page of unhandled errors.
Launch NerdDinner Application
We can start the project by choosing Debug> StartDebugging or Debug> Start Without Debugging in the menu : The project will be launched using the built-in Visual Studio ASP.NET Web server: Below is the home page of our new project (URL: “/”) after launch: By clicking on the “About” link, you will see about the page (URL: “/ Home / About”): By clicking on “Log On” in the upper right corner, we will be redirected to the authorization page (URL: “/ Account / LogOn”): If we have no login, we can go to registration (URL: “/ Account / Register”):
The code that is responsible for implementing the home, about and logout / register functionality is added by default during project creation. You will use it as a starting point in our project.
Testing NerdDinner Applications
If we use the Professional version of Visual Studio and higher, then we can use the built-in unit testing support in the IDE: Choosing one of the options will open the Test Results panel, which provides us with the status of each of the 27 built-in unit tests in the form Pass / Fail . Later in this guide, we will talk about automated testing and add additional unit tests that will cover the functionality of the applications implemented by us.
The next step
And so, we have the basic structure of the application and can move on to creating a database for storing application data.









