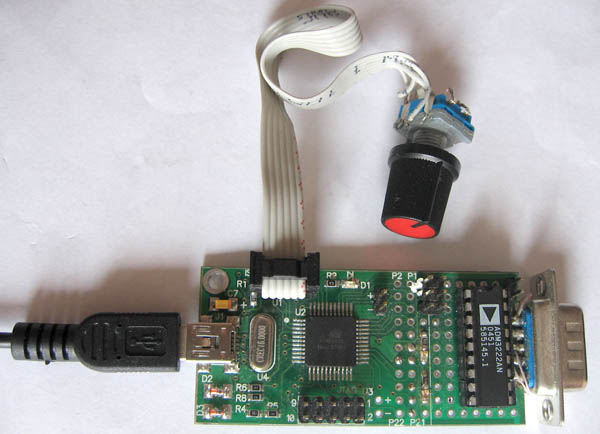
Connecting the rotary encoder to a computer via USB
I have long wanted to adapt a volume control made of an encoder to a laptop . You will need to connect this regulator to USB, so that everything is “in an adult way” (and in no other way you can connect an external device to the laptop). Turn the encoder to the left - the volume should decrease, to the right - should increase. Press down the encoder knob - start some useful program, or switch to tone control.
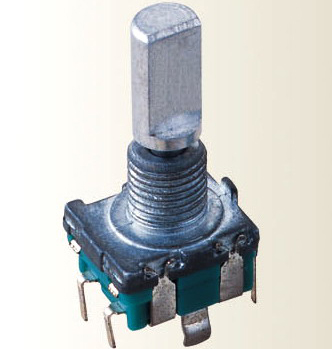
For those who do not know what an encoder is, it is such a twist, such as a volume knob based on a conventional resistor, only this twist has no boundary positions - how much does it fit in any direction. The encoder turns with pleasant soft clicks, and looks like a normal variable resistor.
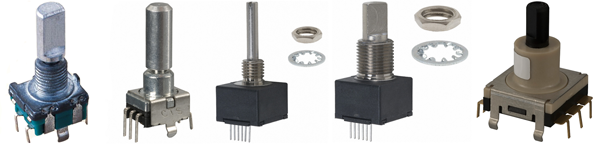
Such devices are not uncommon in modern car radios and any household devices, the user interface of which is processed by a microcontroller (which is read by any household appliances), and where smooth adjustment or adjustment is needed. The third contact is often built into the encoder, which acts as a button on the handle - when we push the encoder handle down (along the axis), this button works. It greatly enriches the capabilities of the user interface - on one encoder you can build the entire control system of an electronic device (but hemorrhoid is added to the programmer, but these are trifles). I just had such an encoder.
The principle of operation of the encoder is quite simple - it has only two contacts (the button on the handle does not count), which begin to close as soon as the user starts to turn the encoder knob. The contacts are connected to two legs of the microcontroller (operating as digital inputs), and when the encoder knob rotates, pulses appear on these legs, the phase and quantity of which the microcontroller determines the direction of rotation and the angle of rotation of the encoder knob.
In order for the volume control to work, you need to solve at least three engineering tasks:
Step 1 . Creating a low-speed USB device on a breadboard.
Step 2 . Connect an encoder to this USB device, make sure that the microcontroller processes it, and transfers information about the rotation of the encoder to the computer.
Step 3. Understand how you can programmatically control the volume control. Surely there is some kind of multimedia API that allows you to do this. Minimum program - you need to write a program that will receive signals from a USB device and control the volume. It would be nice, of course, to write a driver, but it’s scary to take on. Better leave for later.
So, I will describe the process of creating a regulator in steps. I omit the details, otherwise it will be too boring. To whom it is interesting, see source codes [6] and documentation on links.
[ Step 1. Creating a low-speed USB device on a breadboard ]
This step passed without even starting - somehow too simple and corny. Stupidly downloaded an example project from the link [1]. Corrected the usbconfig.h file - for Pontus called my device ENCODER DEMO, for more imagination was not enough. I checked the type of processor (ATmega16) in the Makefile, the frequency of quartz (16 MHz) - to match my AVR-USB-MEGA16 breadboard. I compiled the project in AVRStudio, flashed the mock-up, connected it to the computer — everything started up in a half-turn, my USB device worked properly as a virtual COM port — everything was exactly as it was written in the article [1].
[ Step 2. Connect the encoder to the USB device ]
This step caused me the greatest fears that everything would work as it should. I didn’t doubt that I would connect the encoder and be able to read it. There were doubts that I could read it qualitatively when the USB protocol processing also works in the background - after all, this is not an easy task for the microcontroller (as it turned out later, I was completely worried).
As usual, he began to rummage around the Internet in search of ready-made routines for reading the encoder. I found very quickly what I needed - namely for AVR, a very simple C code [2], encoder.c and encoder.h files. Say what you like, but open source is a cool thing.
I attached two indicator LEDs - GREEN and YELLOW - to indicate the direction of rotation of the encoder. I connected the encoder for convenience directly to the ISP connector, taking advantage of the fact that the MOSI, MISO and SCK signals are just the legs of PB5, PB6 and PB7 of the ATmega16 microcontroller (I connected phases A and B, as well as the encoder button).
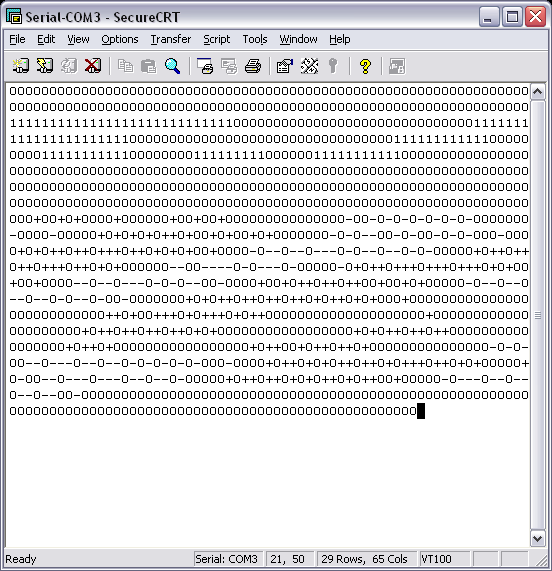
Corrected the definitions of the legs, added the initialization code. Attached the encoder.c module to the project. Added control of the green and yellow LEDs to the main main loop when infa comes from the encoder. The RED LED is tied to the encoder button - when we press it, the red LED lights up, release - goes out. Compiled, flashed - it works. I turn the knob to the left, and a green LED flashes in time with the clicks of the encoder. I turn the knob to the right - a yellow LED flashes. Despite the fact that the encoder is read using the polling method, thanks to the efficient code for reading the encoder, there are NO complaints, even while working with the V-USB library (respect, Pashgan!). Added output of information from the encoder to the virtual COM port (twist the encoder to the left I bring the minus signs '-' to the console, turn it to the right I bring the pluses '+' to the console). On the timer, every 10 ms I display the status of the encoder button and display it with a red LED (the button is pressed - I transmit the symbol '1', released - '0'). Everything works. Boredom.
In conclusion, he threw the cmd.c, crc16.c, eepromutil.c, strval.c modules. The amount of code dropped to 3 kilobytes - great, now it will fit in ATtiny45 memory (you can use the AVR-USB-TINY45 breadboard in the future, it is smaller and cheaper).
[ Step 3. Understand how to programmatically control the volume control ]
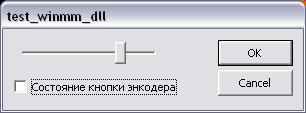
As usual, I googled the question. Sifted out a bunch of garbage, and finally raked a pearl - [3]. Next is a matter of technology. I get my favorite children's designer - Visual Studio. Without thinking of anything, a wizard generates a dialog-based application. I throw the volume control slider on the panel, bind a variable to it, add an engine position handler. When the application starts, I set the engine to minimum 0 and maximum 65535 (so that it matches the volume limits that the mixer control libraries manipulate). I read the current volume value with the mixerGetControlDetails function , and put the slider in the appropriate position. In the engine position handler, the opposite is true - I read the engine position and the mixerSetControlDetails functionset the desired volume. I do volume control exactly as it is written in the article [3]. Checked - it works.
Now the only thing left is to read what comes from the virtual COM port (we have a freshly baked USB device with an encoder on it). If a minus sign (-) has come, then we move the engine to the left (decrease the volume), plus sign (+), then we move the engine to the right (increase the volume). If the characters 0 and 1 come, then we respectively control the state of the checkbox (just for indication - the encoder button is pressed or not). You can work with the COM port as with a regular file (see [4]). We initialize the connection to the COM port as opening a file (by calling :: CreateFile ) in blocking mode. We start a separate thread, add a file reading to it in an endless loop (with a blocking call:: ReadFile ) one character at a time, and this character is parsed. By the character that came, we turn the slider engine in the right direction (the volume will be adjusted by the slider handler) or update the state of the checkbox. Checked - it works.
That's all, actually. Then you can engage in endless (and probably useless) improvement. Make an automatic search for the desired virtual COM port (now, for simplification, the name of the COM port is transmitted through the command line). Convert USB device from CDC class to HID- this can simplify the code of the USB device, as well as simplify the programmatic search and opening of the device on the computer by VID and HID. Or write a service instead of a program (so that you do not have to run a separate program). Or even a driver. This is very interesting, but I can’t (maybe one of the residents of the city will teach mind-wisdom? ..). Screw an action to the encoder button. Well and so on ad infinitum.
I hope someone my research will be useful in their own development. If I missed something, I will be glad to hear comments in the comments.
[ UPD120803 ]
One literate person assembled a volume control on an AVR microcontroller - a USB HID device that emulates a standard multimedia keyboard(as suggested in the comments). Such a keyboard has the ability to adjust the volume without additional software, all the necessary work is performed by the operating system driver.

[ Links ]
1 . USB console for controlling amateur radio devices .
2 . Then I found the code for the encoder . Here is the author's description of the algorithm .
3 . Description of how to work with a sound card mixer through mixerSetControlDetails .
4 . How to work with a COM port in Windows .
5 . A video demonstrating the operation of the volume control.
6 . Sources of the ENCODER DEMO project (AVRStudio project and Visual Studio project).
For those who do not know what an encoder is, it is such a twist, such as a volume knob based on a conventional resistor, only this twist has no boundary positions - how much does it fit in any direction. The encoder turns with pleasant soft clicks, and looks like a normal variable resistor.
Such devices are not uncommon in modern car radios and any household devices, the user interface of which is processed by a microcontroller (which is read by any household appliances), and where smooth adjustment or adjustment is needed. The third contact is often built into the encoder, which acts as a button on the handle - when we push the encoder handle down (along the axis), this button works. It greatly enriches the capabilities of the user interface - on one encoder you can build the entire control system of an electronic device (but hemorrhoid is added to the programmer, but these are trifles). I just had such an encoder.
The principle of operation of the encoder is quite simple - it has only two contacts (the button on the handle does not count), which begin to close as soon as the user starts to turn the encoder knob. The contacts are connected to two legs of the microcontroller (operating as digital inputs), and when the encoder knob rotates, pulses appear on these legs, the phase and quantity of which the microcontroller determines the direction of rotation and the angle of rotation of the encoder knob.
In order for the volume control to work, you need to solve at least three engineering tasks:
Step 1 . Creating a low-speed USB device on a breadboard.
Step 2 . Connect an encoder to this USB device, make sure that the microcontroller processes it, and transfers information about the rotation of the encoder to the computer.
Step 3. Understand how you can programmatically control the volume control. Surely there is some kind of multimedia API that allows you to do this. Minimum program - you need to write a program that will receive signals from a USB device and control the volume. It would be nice, of course, to write a driver, but it’s scary to take on. Better leave for later.
So, I will describe the process of creating a regulator in steps. I omit the details, otherwise it will be too boring. To whom it is interesting, see source codes [6] and documentation on links.
[ Step 1. Creating a low-speed USB device on a breadboard ]
This step passed without even starting - somehow too simple and corny. Stupidly downloaded an example project from the link [1]. Corrected the usbconfig.h file - for Pontus called my device ENCODER DEMO, for more imagination was not enough. I checked the type of processor (ATmega16) in the Makefile, the frequency of quartz (16 MHz) - to match my AVR-USB-MEGA16 breadboard. I compiled the project in AVRStudio, flashed the mock-up, connected it to the computer — everything started up in a half-turn, my USB device worked properly as a virtual COM port — everything was exactly as it was written in the article [1].
[ Step 2. Connect the encoder to the USB device ]
This step caused me the greatest fears that everything would work as it should. I didn’t doubt that I would connect the encoder and be able to read it. There were doubts that I could read it qualitatively when the USB protocol processing also works in the background - after all, this is not an easy task for the microcontroller (as it turned out later, I was completely worried).
As usual, he began to rummage around the Internet in search of ready-made routines for reading the encoder. I found very quickly what I needed - namely for AVR, a very simple C code [2], encoder.c and encoder.h files. Say what you like, but open source is a cool thing.
I attached two indicator LEDs - GREEN and YELLOW - to indicate the direction of rotation of the encoder. I connected the encoder for convenience directly to the ISP connector, taking advantage of the fact that the MOSI, MISO and SCK signals are just the legs of PB5, PB6 and PB7 of the ATmega16 microcontroller (I connected phases A and B, as well as the encoder button).
Corrected the definitions of the legs, added the initialization code. Attached the encoder.c module to the project. Added control of the green and yellow LEDs to the main main loop when infa comes from the encoder. The RED LED is tied to the encoder button - when we press it, the red LED lights up, release - goes out. Compiled, flashed - it works. I turn the knob to the left, and a green LED flashes in time with the clicks of the encoder. I turn the knob to the right - a yellow LED flashes. Despite the fact that the encoder is read using the polling method, thanks to the efficient code for reading the encoder, there are NO complaints, even while working with the V-USB library (respect, Pashgan!). Added output of information from the encoder to the virtual COM port (twist the encoder to the left I bring the minus signs '-' to the console, turn it to the right I bring the pluses '+' to the console). On the timer, every 10 ms I display the status of the encoder button and display it with a red LED (the button is pressed - I transmit the symbol '1', released - '0'). Everything works. Boredom.
In conclusion, he threw the cmd.c, crc16.c, eepromutil.c, strval.c modules. The amount of code dropped to 3 kilobytes - great, now it will fit in ATtiny45 memory (you can use the AVR-USB-TINY45 breadboard in the future, it is smaller and cheaper).
[ Step 3. Understand how to programmatically control the volume control ]
As usual, I googled the question. Sifted out a bunch of garbage, and finally raked a pearl - [3]. Next is a matter of technology. I get my favorite children's designer - Visual Studio. Without thinking of anything, a wizard generates a dialog-based application. I throw the volume control slider on the panel, bind a variable to it, add an engine position handler. When the application starts, I set the engine to minimum 0 and maximum 65535 (so that it matches the volume limits that the mixer control libraries manipulate). I read the current volume value with the mixerGetControlDetails function , and put the slider in the appropriate position. In the engine position handler, the opposite is true - I read the engine position and the mixerSetControlDetails functionset the desired volume. I do volume control exactly as it is written in the article [3]. Checked - it works.
Now the only thing left is to read what comes from the virtual COM port (we have a freshly baked USB device with an encoder on it). If a minus sign (-) has come, then we move the engine to the left (decrease the volume), plus sign (+), then we move the engine to the right (increase the volume). If the characters 0 and 1 come, then we respectively control the state of the checkbox (just for indication - the encoder button is pressed or not). You can work with the COM port as with a regular file (see [4]). We initialize the connection to the COM port as opening a file (by calling :: CreateFile ) in blocking mode. We start a separate thread, add a file reading to it in an endless loop (with a blocking call:: ReadFile ) one character at a time, and this character is parsed. By the character that came, we turn the slider engine in the right direction (the volume will be adjusted by the slider handler) or update the state of the checkbox. Checked - it works.
That's all, actually. Then you can engage in endless (and probably useless) improvement. Make an automatic search for the desired virtual COM port (now, for simplification, the name of the COM port is transmitted through the command line). Convert USB device from CDC class to HID- this can simplify the code of the USB device, as well as simplify the programmatic search and opening of the device on the computer by VID and HID. Or write a service instead of a program (so that you do not have to run a separate program). Or even a driver. This is very interesting, but I can’t (maybe one of the residents of the city will teach mind-wisdom? ..). Screw an action to the encoder button. Well and so on ad infinitum.
I hope someone my research will be useful in their own development. If I missed something, I will be glad to hear comments in the comments.
[ UPD120803 ]
One literate person assembled a volume control on an AVR microcontroller - a USB HID device that emulates a standard multimedia keyboard(as suggested in the comments). Such a keyboard has the ability to adjust the volume without additional software, all the necessary work is performed by the operating system driver.
[ Links ]
1 . USB console for controlling amateur radio devices .
2 . Then I found the code for the encoder . Here is the author's description of the algorithm .
3 . Description of how to work with a sound card mixer through mixerSetControlDetails .
4 . How to work with a COM port in Windows .
5 . A video demonstrating the operation of the volume control.
6 . Sources of the ENCODER DEMO project (AVRStudio project and Visual Studio project).