We start DAB multiplex at home
Hi, Geektimes.
Digital broadcasting is gradually being introduced in various countries. In Europe and Australia it is the DAB / DAB + standard , in the USA HD Radio , in China the CDR (China Digital Radio). Of the benefits to the user is a cleaner sound due to the digital stream, additional services (for example, the name of the song and the name of the artist on the receiver screen), and, in the case of DAB, a greater number of stations than FM. Receivers with digital radio support are already relatively inexpensive, their price starts from about $ 40.
Russia has not officially joined any of the standards, but if this happens, most likely it will be DAB. Its test operation has already been carried out in Moscow, and the receivers of the European market for the Russian Federation are geographically more accessible than the American ones. New European cars (which, again, more than American) are often already equipped with a DAB receiver. In the meantime, for test purposes, run DAB at home, if there is an SDR transceiver, anyone can.
(Image Source / Getty)
Details under the cut (carefully, many long and boring configs).
Unfortunately, different standards are incompatible with each other.
European DAB is an MP2 or AAC stream transmitted using ODFM on channels with frequencies from 174 to 239 MHz. As much as possible more than 30 channels , the width of each is about 1.5 MHz, several stations can be simultaneously transmitted in a channel. According to Wikipedia , using DAB when using a bitrate of 192kbps is 3 times more efficient in terms of the number of stations than conventional FM.
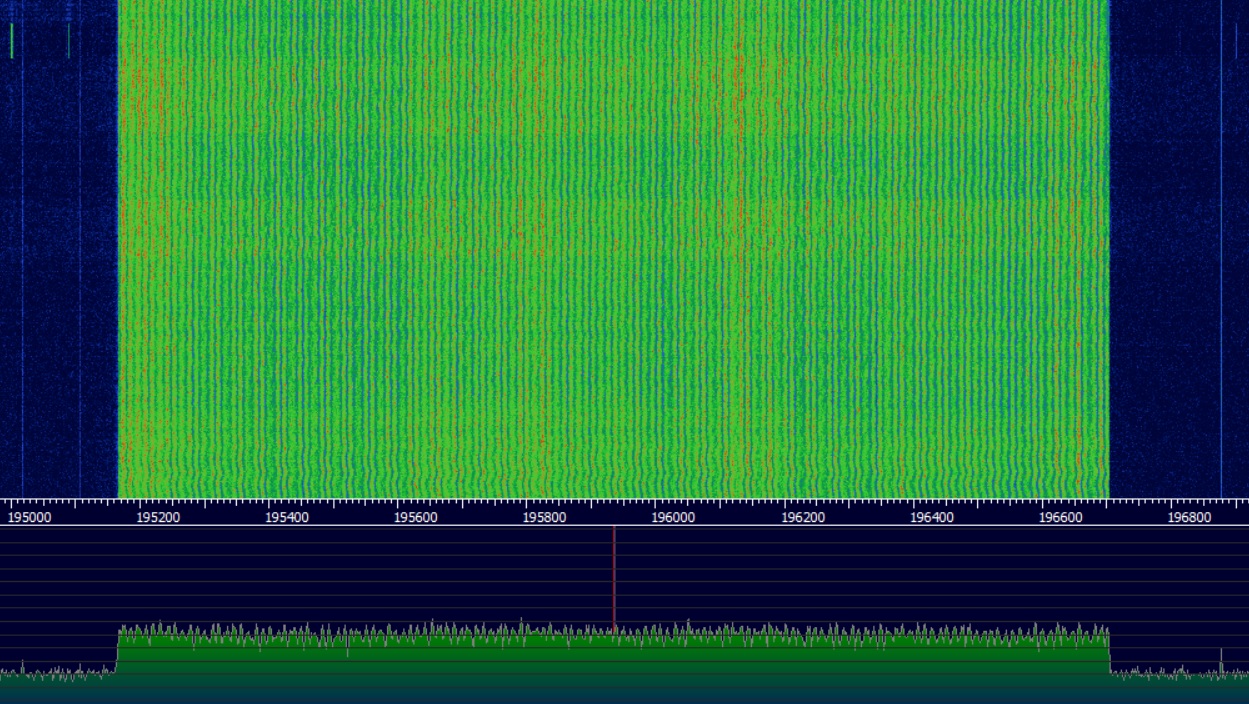
The spectrum of a single DAB channel on the SDR screen looks like this:
For comparison, this is how the FM stations look at the same scale:

In American Radio HDwent the other way - digital channels added "on the side" to existing FM stations. This made it possible not to allocate new frequencies and to maintain compatibility with old receivers. The downside is that in major cities the FM broadcast is already busy. On the other hand, even the maximum number of 50 stations for FM is quite good, the listeners are more likely not to.
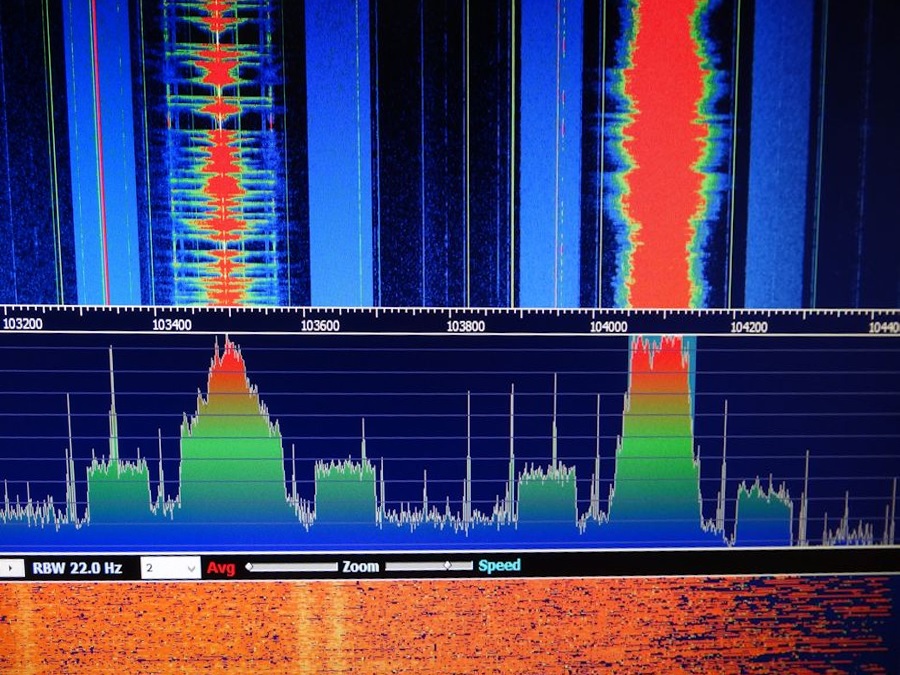
The spectrum of HD Radio looks like this (screenshot from youtube): The
Chinese CDR decided to copy the American approach , alas, my zero knowledge of Chinese is not enough to find more detailed information on it.
As for the receivers, their price for amazon ranges from $ 30 for the simplest models, up to> $ 100 for more advanced ones with a touchscreen, Wifi or color screen.

But “Chukchi is not a reader”, so we will launch the test radio in the DAB / DAB + format ourselves. Alas, HD Radio will not be launched, the format is closed, and there are no available coders for it.
The process is actually not complicated, but very painstaking in terms of creating the necessary configs. For the test, we need Linux and SDR with the ability to transfer, such as HackRF or USRP.
Linux is needed to compile the encoder. I used Ubunty, the ready image for VirtualBox was downloaded from http://www.osboxes.org/ubuntu/ .
Compiling ODR-AudioEnc
First you need to compile the DAB / DAB + audio encoder, you can find it on the page github.com/Opendigitalradio/ODR-AudioEnc .
Compile ODR-DabMux
ODR-DabMux combines digital streams into one multiplex. Learn more at github.com/Opendigitalradio/ODR-DabMux .
Compile ODR-DabMod
This is a modulator that actually sends data to the transmitter. The principle of assembly is the same, the command to download:
If the assembly does not have enough of any libraries, you need to put them using apt-get.
Now all parts of the project are assembled,and with all this we will try to take off .
Unfortunately, USRP did not work in a virtual machine, and it was too lazy to put a full-fledged Linux on the disk. Therefore, I did not consider streaming mode - the multiplex was assembled from pre-prepared mp3-files, and the resulting IQ-file was launched under Windows. Yes, in general, there is no need for streaming for the house, there was no task to do a “pirate station”.
More details on the various settings are described here: http://opendigitalradio.github.io/mmbtools-doc/mmbtools.pdf .
Data preparation
In our multiplex there will be 2 channels for which I downloaded 2 mp3 files from youtube and named them (who would have guessed) sound01.mp3 and sound02.mp3, respectively.
Convert files to WAV with a bitrate of 48000:
ffmpeg -i sound01.mp3 -ar 48000 sound01.wav
ffmpeg -i sound02.mp3 -ar 48000 sound02.wav
Convert them to DAB format:
odr-audioenc --dab -b 128 -i sound01.wav -o prog1.mp2
odr-audioenc --dab -b 128 -i sound02. wav -o prog2.mp2
The output should be 2 files prog1.mp2 and prog2.mp2.
Creating a multiplex
First you need to create a file that describes the configuration of our "radio station". Let me remind you that there can be many stations in one DAB channel, each with its own parameters.
Create a file "config.mux" with the following text:
The config describes the channels that will be in the multiplex and their data sources. The nbframes parameter indicates how many frames to create, 2000 frames corresponds to approximately one minute of playback.
When the file is saved, create a multiplex:
The output should be the file output.eti , in my case its size was 12MB.
Transfer
There are two possibilities. In the “real” Linux, the odr-dabmod can directly transfer data to the transceiver, but under the VM it did not work. Therefore, I specified a raw file as an output parameter that will contain data compatible with Gnu Radio.
Create a config.ini file:
Here the key point is the output format and its type. For USRP, I use the complexf_normalized format, for HackRF, in theory, an 8-bit s8 will do.
Save the config, run the conversion:
Everything! The output should be config.iq, in my case about 700MB in size for one minute of recording (IQ float format). We copy it to the "main" computer, and Linux can be closed.
As I said earlier, I don’t have a DAB receiver, I don’t listen to the Chukchi, I don’t listen to the radio at all :) For testing, I used the RTL-SDR “whistle” and the free program Welle.io .
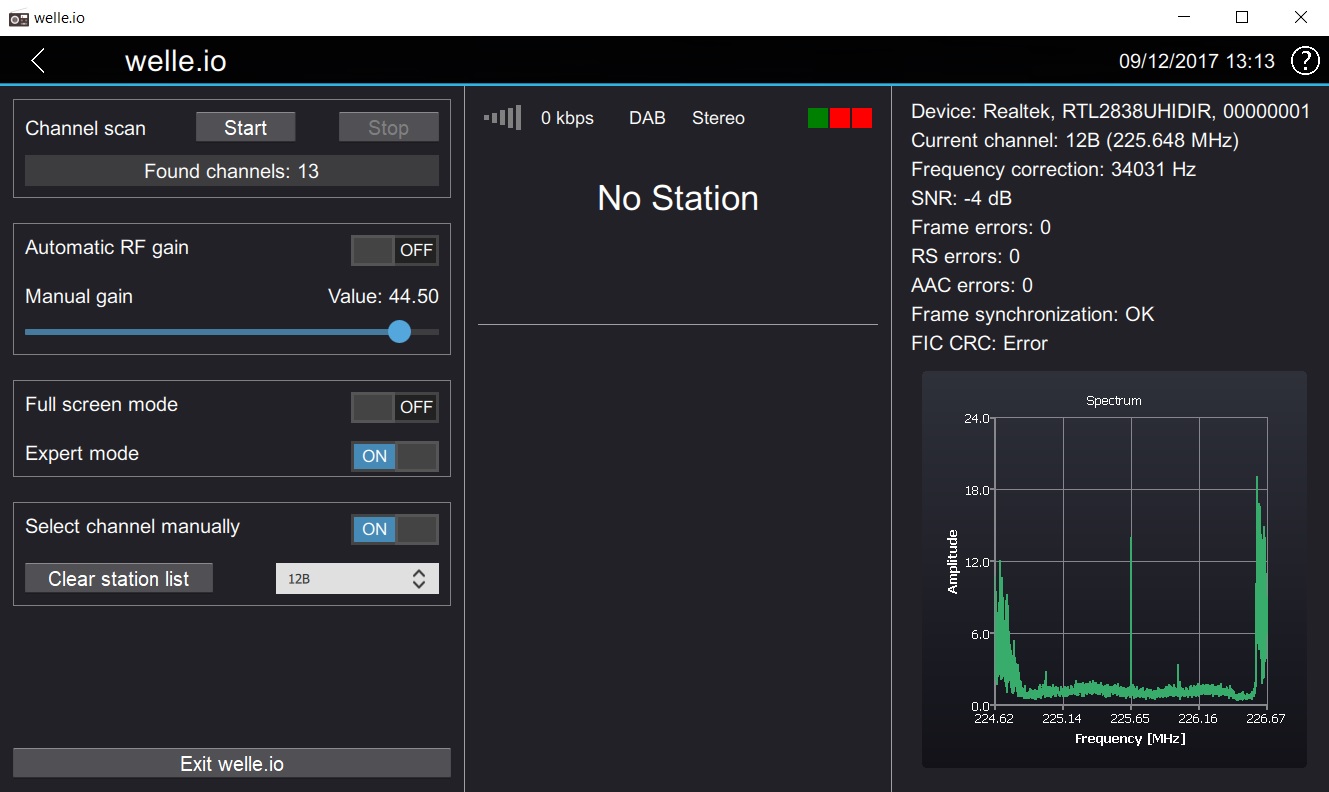
First of all, we connect the receiver, we start Welle.io and we find the free channel. In my case, they were affected by 12B: We
memorize the frequency, and we create the simplest graph for transmission to Gnu Radio:
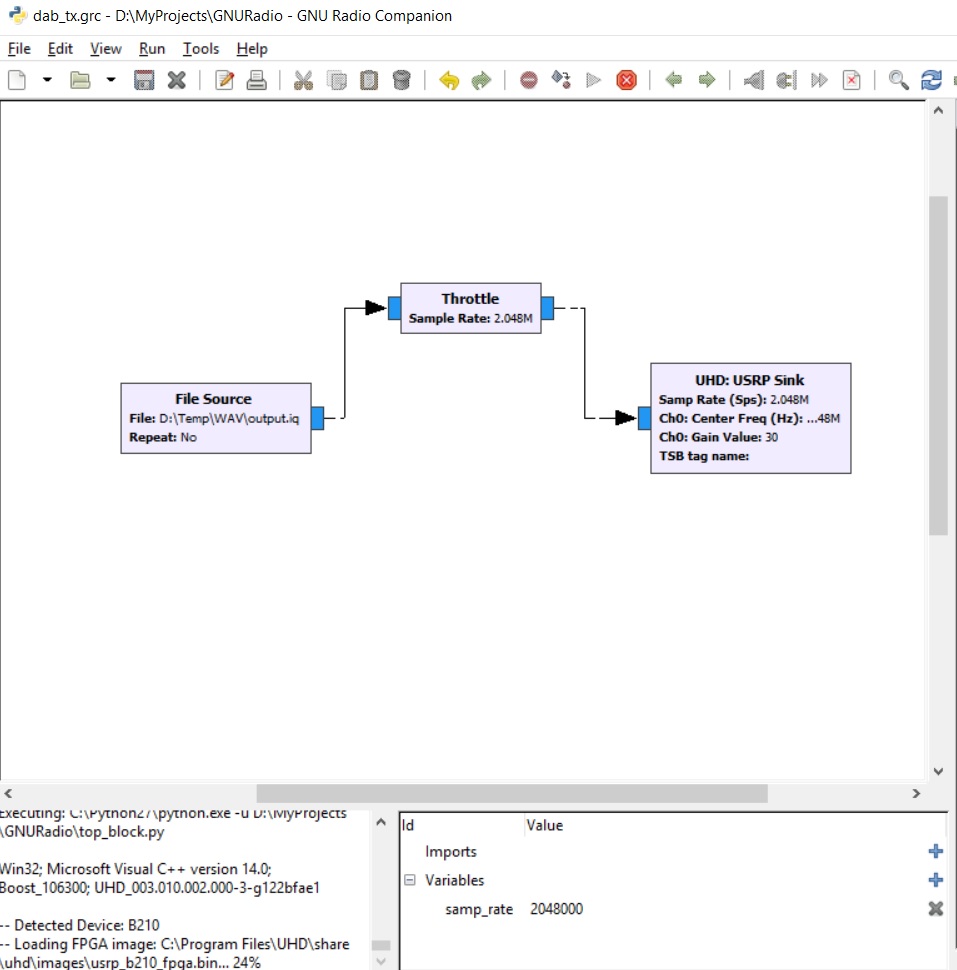
We launch, wait for a few seconds, and ... hear the recorded music through welle.io.

We are convinced that the number of channels and their names correspond to those specified in the config.
Yes, the whole "transmitting complex" looks like this:

Not gods burn pots, and it is quite possible to touch the modern technology at home, without departing from the desktop.
The antenna, of course, was not tuned to the desired frequency (and I don’t have an antenna analyzer), the maximum power from USB3 is probably no more than 1W, and even then it is distributed over a 1.5 MHz band. So the maximum transmission distance was about 0.5m.
If someone wants to repeat experiments with more power, a search on ebay with the word “RF Power Amplifier” gives many useful links (officially a license is needed for broadcasting, of course, well, you should make sure that no interference is caused to other services).
Digital broadcasting is gradually being introduced in various countries. In Europe and Australia it is the DAB / DAB + standard , in the USA HD Radio , in China the CDR (China Digital Radio). Of the benefits to the user is a cleaner sound due to the digital stream, additional services (for example, the name of the song and the name of the artist on the receiver screen), and, in the case of DAB, a greater number of stations than FM. Receivers with digital radio support are already relatively inexpensive, their price starts from about $ 40.
Russia has not officially joined any of the standards, but if this happens, most likely it will be DAB. Its test operation has already been carried out in Moscow, and the receivers of the European market for the Russian Federation are geographically more accessible than the American ones. New European cars (which, again, more than American) are often already equipped with a DAB receiver. In the meantime, for test purposes, run DAB at home, if there is an SDR transceiver, anyone can.
(Image Source / Getty)
Details under the cut (carefully, many long and boring configs).
How it works
Unfortunately, different standards are incompatible with each other.
European DAB is an MP2 or AAC stream transmitted using ODFM on channels with frequencies from 174 to 239 MHz. As much as possible more than 30 channels , the width of each is about 1.5 MHz, several stations can be simultaneously transmitted in a channel. According to Wikipedia , using DAB when using a bitrate of 192kbps is 3 times more efficient in terms of the number of stations than conventional FM.
The spectrum of a single DAB channel on the SDR screen looks like this:
For comparison, this is how the FM stations look at the same scale:
In American Radio HDwent the other way - digital channels added "on the side" to existing FM stations. This made it possible not to allocate new frequencies and to maintain compatibility with old receivers. The downside is that in major cities the FM broadcast is already busy. On the other hand, even the maximum number of 50 stations for FM is quite good, the listeners are more likely not to.
The spectrum of HD Radio looks like this (screenshot from youtube): The
Chinese CDR decided to copy the American approach , alas, my zero knowledge of Chinese is not enough to find more detailed information on it.
As for the receivers, their price for amazon ranges from $ 30 for the simplest models, up to> $ 100 for more advanced ones with a touchscreen, Wifi or color screen.
But “Chukchi is not a reader”, so we will launch the test radio in the DAB / DAB + format ourselves. Alas, HD Radio will not be launched, the format is closed, and there are no available coders for it.
Run DAB / DAB +
The process is actually not complicated, but very painstaking in terms of creating the necessary configs. For the test, we need Linux and SDR with the ability to transfer, such as HackRF or USRP.
1. Compile the project
Linux is needed to compile the encoder. I used Ubunty, the ready image for VirtualBox was downloaded from http://www.osboxes.org/ubuntu/ .
Compiling ODR-AudioEnc
First you need to compile the DAB / DAB + audio encoder, you can find it on the page github.com/Opendigitalradio/ODR-AudioEnc .
git clone https://github.com/Opendigitalradio/ODR-AudioEnc.git
cd ODR-AudioEnc/
./bootstrap
./configure --enable-alsa --enable-vlc
make
sudo make install
Compile ODR-DabMux
ODR-DabMux combines digital streams into one multiplex. Learn more at github.com/Opendigitalradio/ODR-DabMux .
git clone https://github.com/Opendigitalradio/ODR-DabMux.git
cd ODR-DabMux/
./bootstrap.sh
./configure
make
sudo make install
Compile ODR-DabMod
This is a modulator that actually sends data to the transmitter. The principle of assembly is the same, the command to download:
git clone https://github.com/Opendigitalradio/ODR-DabMod.git
If the assembly does not have enough of any libraries, you need to put them using apt-get.
Now all parts of the project are assembled,
2. Configuration
Unfortunately, USRP did not work in a virtual machine, and it was too lazy to put a full-fledged Linux on the disk. Therefore, I did not consider streaming mode - the multiplex was assembled from pre-prepared mp3-files, and the resulting IQ-file was launched under Windows. Yes, in general, there is no need for streaming for the house, there was no task to do a “pirate station”.
More details on the various settings are described here: http://opendigitalradio.github.io/mmbtools-doc/mmbtools.pdf .
Data preparation
In our multiplex there will be 2 channels for which I downloaded 2 mp3 files from youtube and named them (who would have guessed) sound01.mp3 and sound02.mp3, respectively.
Convert files to WAV with a bitrate of 48000:
ffmpeg -i sound01.mp3 -ar 48000 sound01.wav
ffmpeg -i sound02.mp3 -ar 48000 sound02.wav
Convert them to DAB format:
odr-audioenc --dab -b 128 -i sound01.wav -o prog1.mp2
odr-audioenc --dab -b 128 -i sound02. wav -o prog2.mp2
The output should be 2 files prog1.mp2 and prog2.mp2.
Creating a multiplex
First you need to create a file that describes the configuration of our "radio station". Let me remind you that there can be many stations in one DAB channel, each with its own parameters.
Create a file "config.mux" with the following text:
general {
    dabmode 1
    nbframes 2000
    ; Set to true to enable logging to syslog
    syslog false
    ; Enable timestamp definition necessary for SFN
    ; This also enables time encoding using the MNSC.
    tist false
}
remotecontrol { telnetport 0 }
ensemble {
  id 0x4fff
  ecc 0xec ; Extended Country Code
  local-time-offset auto
  international-table 1
  label "mmbtools"
  shortlabel "mmbtools"
}
services {
  srv-p1 { label "Station1" }
  srv-p2 { label "Station2" }
}
subchannels {
 sub-p1 {
  type audio
  inputfile "prog1.mp2"
  bitrate 128
  id 10
  protection 4
 }
 sub-p2 {
  type audio
  inputfile "prog2.mp2"
  bitrate 128
  id 11
  protection 4
 }
}
components {
 comp-p1 {
  service srv-p1
  subchannel sub-p1
 }
 comp-p2 {
  service srv-p2
  subchannel sub-p2
 }
}
outputs { output1 "file://output.eti?type=raw" }
The config describes the channels that will be in the multiplex and their data sources. The nbframes parameter indicates how many frames to create, 2000 frames corresponds to approximately one minute of playback.
When the file is saved, create a multiplex:
odr-dabmux config.muxThe output should be the file output.eti , in my case its size was 12MB.
Transfer
There are two possibilities. In the “real” Linux, the odr-dabmod can directly transfer data to the transceiver, but under the VM it did not work. Therefore, I specified a raw file as an output parameter that will contain data compatible with Gnu Radio.
Create a config.ini file:
[input]
transport = file
source = output.eti
loop=0
[modulator]
digital_gain=0.9
rate=2048000
[output]
output = file
[fileoutput]
format = complexf_normalised
;format = s8
filename = output.iq
Here the key point is the output format and its type. For USRP, I use the complexf_normalized format, for HackRF, in theory, an 8-bit s8 will do.
Save the config, run the conversion:
odr-dabmod config1.iniEverything! The output should be config.iq, in my case about 700MB in size for one minute of recording (IQ float format). We copy it to the "main" computer, and Linux can be closed.
3. Testing
As I said earlier, I don’t have a DAB receiver, I don’t listen to the Chukchi, I don’t listen to the radio at all :) For testing, I used the RTL-SDR “whistle” and the free program Welle.io .
First of all, we connect the receiver, we start Welle.io and we find the free channel. In my case, they were affected by 12B: We
memorize the frequency, and we create the simplest graph for transmission to Gnu Radio:
We launch, wait for a few seconds, and ... hear the recorded music through welle.io.
We are convinced that the number of channels and their names correspond to those specified in the config.
Yes, the whole "transmitting complex" looks like this:
Conclusion
Not gods burn pots, and it is quite possible to touch the modern technology at home, without departing from the desktop.
The antenna, of course, was not tuned to the desired frequency (and I don’t have an antenna analyzer), the maximum power from USB3 is probably no more than 1W, and even then it is distributed over a 1.5 MHz band. So the maximum transmission distance was about 0.5m.
If someone wants to repeat experiments with more power, a search on ebay with the word “RF Power Amplifier” gives many useful links (officially a license is needed for broadcasting, of course, well, you should make sure that no interference is caused to other services).