We take pictures of gadgets for a review or site in a quick
- Tutorial
Topics with reviews of various gadgets appear on the hub quite often and perhaps my story will seem useful just for such a case - to take a photo of the gadget for review. Here I will tell you how to quickly take a picture of a small gadget with the highest possible quality. In extreme cases, this can even be done with the camera of the phone, I will do so. Since the technical means in this topic are limited, almost any improvement in the technology used will lead to an increase in the quality of the result.
And so the first thing to understand, the main thing in photography is light. Logically true? ;) But as they say devil in details. Firstly, there should be enough light. Even the hi-end matrices of digital cameras are very fond of light, not to mention soap dishes and camera phones. For the latter, light is the only option to get a decent photo. Secondly, light from one source will make our photo a little less than a cavity similar to a portrait on a carpet background. This does not suit us, the light should fill the entire space around our gadget, as well as this will allow to remove ugly sharp shadows. And finally, it would be nice to have some kind of background, so as not to take pictures of our gadget against the background of old wallpapers or even worse. Of course the photos of the gadget in the interior are also interesting, but you need an interesting interior and normal lighting.
We all see professional photographs of various gadgets, but what do subject photography professionals use to make such beautiful photographs? They use various options for lightboxes ( photoboxing , lightbox ).
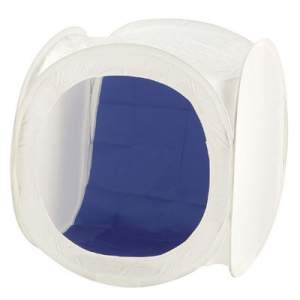
As you can see, nothing complicated - in fact, a box with white walls + background. The essence of light box is that light, repeatedly reflected from all walls (or through walls, if you have good additional light sources) fall on our gadget from all sides, creating the feeling that the light is coming from everywhere and at the same time will prevent sharp shadows and bright glare. It’s not at all difficult to make the lightbox itself; the network is full of photo and video instructions .
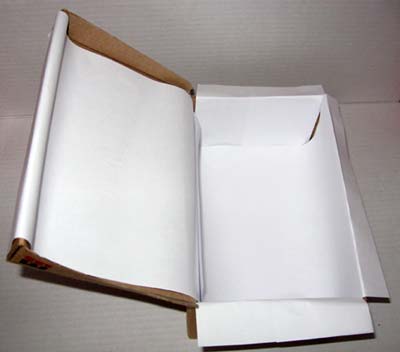
I'll take an ordinary box for example and make a lightbox in 2 minutes. This is ideal if you need to take a couple of photos once a year.

Here is the box itself, then we put ordinary white paper there (I didn’t even stick it, I attached only the edge of the sheet to the box lid).
Lightbox is ready, but we are faced with a second problem. Where to get the light in the box? An ordinary (normal;) person is unlikely to have an external flash with an infrared sensor. We are shooting a phone with a camera (the same story with soap dishes), and there is nothing more to synchronize the flashes. So we will use the flash built into the phone. Incandescent lamps and other light sources will not be considered yet.
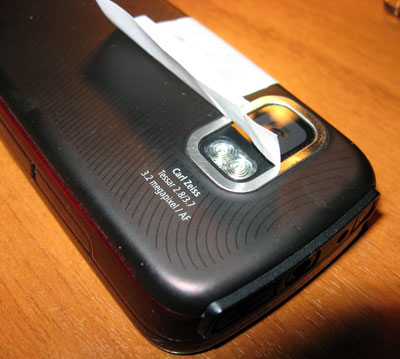
Shooting a flash in the forehead is not the best idea, so we will divert light from the built-in flash. How? Yes, very simple, a reflector. The easiest option is a strip of white paper.
We take a strip and glue a masking tape to the phone (so as not to spoil the phone), but you can also not stick it - just hold it with your hand (but it’s inconvenient).
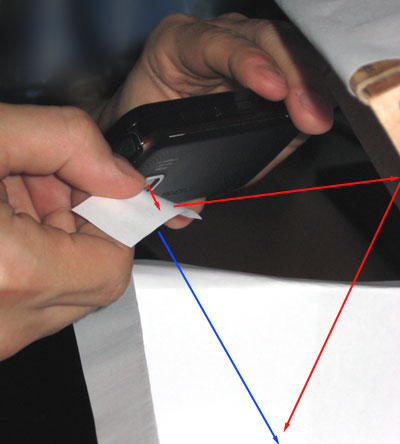
We recall physics for how light is reflected, and try to get this effect: the light from the flash built into the phone hits the reflector that is attached to the phone and is reflected on the cover of our lightbox and then reflected on our gadget from the cover. Here is an example diagram (angles of incidence and reflection of light are not respected!). This diagram is for reference only. Red lines indicate how the light goes. A blue line indicates where the camera is directed.
As a result, instead of a dull photo with a flash in the forehead:

We get a pretty good photo. And the time spent only 5-7 minutes.
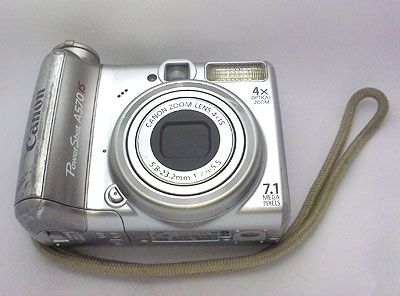
Photos of the gadget (Canon Powershot a570) were made by the built-in camera of the nokia 5800 phone, no additional lighting except the phone’s flash was used.
And so the first thing to understand, the main thing in photography is light. Logically true? ;) But as they say devil in details. Firstly, there should be enough light. Even the hi-end matrices of digital cameras are very fond of light, not to mention soap dishes and camera phones. For the latter, light is the only option to get a decent photo. Secondly, light from one source will make our photo a little less than a cavity similar to a portrait on a carpet background. This does not suit us, the light should fill the entire space around our gadget, as well as this will allow to remove ugly sharp shadows. And finally, it would be nice to have some kind of background, so as not to take pictures of our gadget against the background of old wallpapers or even worse. Of course the photos of the gadget in the interior are also interesting, but you need an interesting interior and normal lighting.
We all see professional photographs of various gadgets, but what do subject photography professionals use to make such beautiful photographs? They use various options for lightboxes ( photoboxing , lightbox ).
As you can see, nothing complicated - in fact, a box with white walls + background. The essence of light box is that light, repeatedly reflected from all walls (or through walls, if you have good additional light sources) fall on our gadget from all sides, creating the feeling that the light is coming from everywhere and at the same time will prevent sharp shadows and bright glare. It’s not at all difficult to make the lightbox itself; the network is full of photo and video instructions .
I'll take an ordinary box for example and make a lightbox in 2 minutes. This is ideal if you need to take a couple of photos once a year.
Here is the box itself, then we put ordinary white paper there (I didn’t even stick it, I attached only the edge of the sheet to the box lid).
Lightbox is ready, but we are faced with a second problem. Where to get the light in the box? An ordinary (normal;) person is unlikely to have an external flash with an infrared sensor. We are shooting a phone with a camera (the same story with soap dishes), and there is nothing more to synchronize the flashes. So we will use the flash built into the phone. Incandescent lamps and other light sources will not be considered yet.
Shooting a flash in the forehead is not the best idea, so we will divert light from the built-in flash. How? Yes, very simple, a reflector. The easiest option is a strip of white paper.
We take a strip and glue a masking tape to the phone (so as not to spoil the phone), but you can also not stick it - just hold it with your hand (but it’s inconvenient).
We recall physics for how light is reflected, and try to get this effect: the light from the flash built into the phone hits the reflector that is attached to the phone and is reflected on the cover of our lightbox and then reflected on our gadget from the cover. Here is an example diagram (angles of incidence and reflection of light are not respected!). This diagram is for reference only. Red lines indicate how the light goes. A blue line indicates where the camera is directed.
As a result, instead of a dull photo with a flash in the forehead:
We get a pretty good photo. And the time spent only 5-7 minutes.
Photos of the gadget (Canon Powershot a570) were made by the built-in camera of the nokia 5800 phone, no additional lighting except the phone’s flash was used.