Mantis + Subversion on your computer with Windows XP. Step-by-step instructions for convenient organization of work with the code

Historically, the bug tracker in our team is Mantis . For working on bugs, a very good and easy-to-learn system. Literally sit down and work. But for a convenient organization of work, she clearly lacks a bunch with Subversion. In a bunch of Subversion + Mantis help organize the work with the code of a small team of programmers. In more detail about the organization of work with us, I described in a previous article .
Now let's talk how to install Subversion on your computer and associate it with Mantis on the server.
1. Download the necessary software
We need to load the server itself and the client to work with it. As a client, I recommend using tortoiseSVN , which the beginner will quickly and easily understand. In addition, Russian is available for this client.
So, download the latest stable version of the server, the client and Russification to it.
This is for Subversion itself. Additionally, we need the following software:
- No-IP Client is a small program that will allow us to get rid of the need to have a dedicated IP address.
- SVN + Mantis tools , which include:
- SVN + Mantis Shell is my proprietary program that allows me to combine the work of Subvesion and Mantis.
- SVNcheckin - a modified PHP script from Mantis for the same purpose
- post-commit - BAT file for organizing Mantis + Subvesion communication on Windows XP.
2. Register on No-IP and install No-IP Client
If you have a dedicated IP, then this is not necessary. You can get to your computer through it, and if the hoster forms the IP address dynamically for you, then you can not do without such a program. The essence of the service is that you install a program on your computer that constantly learns your IP address and, if it changes, sends data to the server. The appeal occurs through the address that you select on the server. Thus, it goes to your computer through a permanent "server address", which is associated with your current real IP address.
We go to http://www.no-ip.com and create a free account there. In the account, click on Add Host. As HostName we drive the name of your company. In the drop-down list, select the domain name you like. For example, no-ip.biz.
We put the No-IP Client and drive the data of the newly created account into it. That's it, now in order for someone to access your computer, it’s enough to drive an address like
YourCompanyName.no-ip.biz 3. Install the Subversion server and client
Installation is easy and easy, just click “Next” everywhere. First you need to install the server, then the client, then, if necessary, Russification to the client. I do not use Russification. I do not like.
During installation, do not change the standard paths that the installer offers.
4. Create the first repository (repository)
Create a folder C: \ svn-store \
Go to the console (Start-> Run, cmd) and write:
svnadmin create c:/svn-store/my_project Pay attention to the slashes! They should be pointed out that way, in the manner of unix. If the repository is successfully created, no errors will appear.
Open the file C: /svn-store/my_project/conf/svnserve.conf and uncomment the lines: i.e. we allow only registered users to download / upload files from the repository. Anonymous users generally do not have access to the repository. It’s such a policy that is most often used by tellers. User data is in the file, which is indicated in the line (which also needs to be uncommented):
 anon-access = none


auth-access = write
password-db = passwd Those. so we show that in the folder C: \ svn-store \ my_project \ conf lies the passwd file with the usernames and passwords of registered users.
We go to C: \ svn-store \ my_project \ conf \ passwd, opening it with any text editor, and create user accounts in the users section. Their format is as follows:
 UserName1 = UserPassword1

UserName2 = UserPassword2
5. Fill the repository with raw data
We need to import, the initial content of our repository. To do this, create the folder C: \ Repository, and in it there are three empty subfolders: trunk, branches and tags. We go into the C: \ Repository folder, right-click on an empty spot and select TortoiseSVN-> Import ...

As the URL, enter:
svn://YourCompanyName.no-ip.biz/my_project/ As you can see, this is the URL that we defined in the second step, plus the name of the folder where the repository is stored.
Click OK. You should be asked for a username and password. Indicate the data that you entered in C: \ svn-store \ my_project \ conf \ passwd. If instead of a window for entering your login and password you did not see, go back to the points for editing C: \ svn-store \ my_project \ conf \ svnserve.conf and C: \ svn-store \ my_project \ conf \ passwd - you either did not uncomment the lines , or did not specify usernames / passwords.
If successful, you will see something like this:

6. Configuring Subversion to work with Mantis
1) Create a temporary folder C: \ Temp. Select the folder with the right mouse button and select SVN Checkout in the context menu ...
For the URL of repository, enter svn: // YourCompanyName.no-ip.biz/my_project/. Checkout directory should be equal to C: \ Temp. Do not change other settings and click OK. As a result, three folders created in the last step and a service folder .svn will appear in the C: \ Temp folder. Do not touch her in the future.
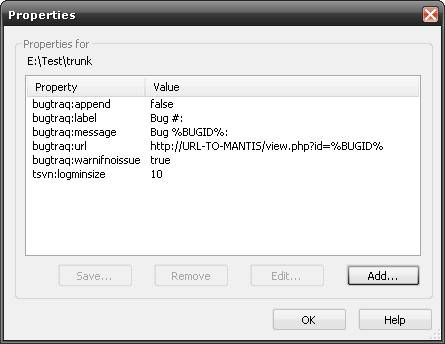
2) Right-click again on C: \ Temp and select TortoiseSVN-> Properties. In the window that appears, set the properties as shown in the figure. At the same time, it is MANDATORY when adding each new property, check the "Apply property recursively" checkbox:
Now right-click on C: \ Temp and select SVN Commit ...

After entering the comment as in the figure, click OK. TortoiseSVN swears that we did not enter an error number. Ignore this.
3) Pour the svncheckin.php script onto the server. It should be located in the core subfolder of the folder where Mantis is installed. As a result, the path to the script will look like:
URL-TO-MANTIS/core/svncheckin.php 4) We go to the folder C: \ svn-store \ my_project \ hooks and copy the files there
- post-commit.bat
- svn_checkin_shell.exe
- svn_checkin_shell.ini
Open svn_checkin_shell.ini and insert the correct path to svncheckin.php there. Checking other paths in the INI file. If you did everything, as I wrote earlier, then nothing needs to be changed. If you changed any paths, then they will also need to be corrected in the post-commit.bat file.
5) We go to Mantis, log in to it under the administrator and create a new user: “SVN Bot”. We assign him Developer rights and assign him to ALL active projects. All automatic comments will now be written on behalf of SVN Bot.
We also create a new bug in our project. We call it, for example, “Testing the SVN + Mantis bundle”. Remember the bug number.
7. Import the project source code into the repository
The process is similar to step 5. 1) We go to the folder with the project, right-click on an empty spot and select TortoiseSVN-> Import ...
As the URL, enter:
svn://YourCompanyName.no-ip.biz/my_project/trunk Please note, the trunk folder is indicated at the end. Click OK.
Now the data is uploaded to the repository. If you have a large project and many files, then most likely it will take a lot of time.
After you see the inscription “Completed At revision ...” you can breathe a sigh of relief. The preparatory phase of the work is over :).
Everyday work with tortoiseSVN
We have completed all the necessary steps. Now I will briefly talk about the routine: everyday work.
All work with the code takes place in working copies of the project. Each of the developers has its own working copy. Therefore, the first thing a developer must do in order to start working on a project is to create a local working version.
Then, each time before starting work on a new feature or bug, the programmer updates the working copy (SVN Update). After the code changes are completed, the developer makes an SVN Commit. If this is done, then several people can work calmly on the project. This is very brief. Read more in the tortoiseSVN e-book. A link to it is located at the end of the article.
Well, let's do one iteration in order to verify that everything is configured correctly.
1. Create a working copy of the repository on the local computer.
Create an empty folder and call in it with the right mouse button “SVN Checkout ...”. The URL is the same:
svn:// YourCompanyName.no-ip.biz/my_project/trunk So you upload to this folder a working copy of the project from the repository. In addition to the project files, a hidden “.svn” folder will appear in it - do not touch it in any case, it is used by SVN when committing changes to the repository.
Now all folders are marked with green ticks. This means that no file has been modified. When we make changes to one of the files, it will automatically be marked with a red exclamation mark. It is very comfortable.

2. We make changes to the project to make sure that SVN works correctly
You can do at least something (apart from the .svn folder and its contents that you can’t touch) - create / edit / delete project files. I limited myself to changing the contents of one text file.
To record changes to the repository, right-click in the folder and select “SVN Commit ...”. Enter the description of the kamit in the Message field and MANDATORY the number of the test buggy that we created in Mantis.

Click OK.
After the end of adding data to the repository, open Mantis and go into the test bug. The last comment will be an automatically generated report on gamma from SVN Bot. There will be something like this:

That's all. Good luck to you, dear Habrvchane. :)
PS Maybe someone knows whether it is somehow possible to send an ACTUAL “slice” of changes in each kamita to Mantis. Something in the spirit of how WebSVN does, but only to be used when the Subversion server is on your PC?