Zabbix, connect any piece of hardware with a MIB
The construction of the FTTB began, and new equipment from the manufacturer Edge-core appeared. Naturally I wanted to screw the new hardware to Zabbix. Earlier I acted simply - set snmpwalk on a piece of iron and analyzed the received data. This path is long enough, as the result can be under several megabytes of text and it is quite difficult to find the desired values. But there is another way - to use MIB devices. But Zabbix is not able to work directly with MIB files. What to do?
I found a wonderful SNMP Builder for Zabbix utility on the zabix forum . Using it, you can make a basic device template with its MIB and then finish it with pens to a normal state.
I will tell you how to do this with the example of Edge-core hardware.
You can download it from the blog of the developer of this utility or directly here . The blog has brief instructions for installing and using it. But I will repeat it briefly.
1. Download the archive. The archive contains a directory and one snmp_builder.php file.
2. Unpack the archive into the directory with the frontend.
3. Open snmp_builder.php and, if necessary, adjust the path to the location of the mib files.
4. Add the menu item Snmp Builder to the "Administration" menu of the front-end.
To do this, open include / menu.inc.php and in the region of 203 lines (in my version it was not 203 lines) we change the code to such
The first thing we are looking for is the MIB of iron. The manufacturer, unlike Siemens, did not hide his mibs. I downloaded them freely from the official website www.edge-core.ru .
Next, the downloaded MIB is placed in any of the directories indicated in paragraph 3.
We open in the Administration / Snmp Builder menu.
We will see a similar picture:
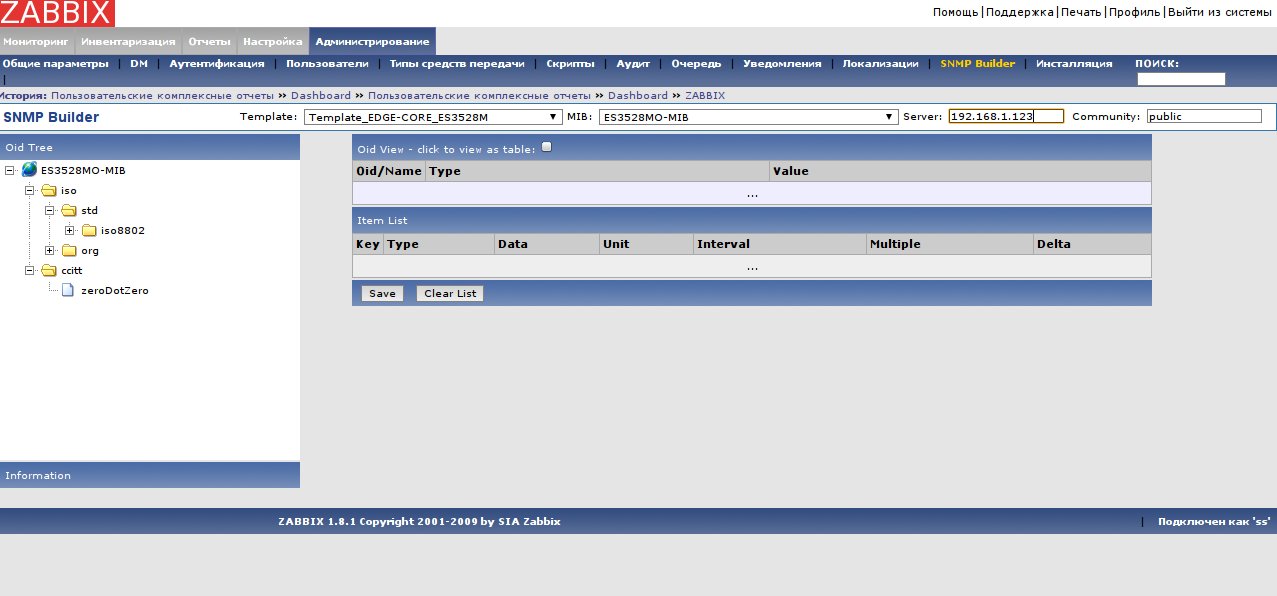
In the Template list, select the template in which we will add new items. I created a new empty template in advance. In the MIB list, select the mib of our device, in the Server field enter ip devices, in the Community fieldenter the snmp community string of the device. If everything is correct, then we get the above picture. A situation may arise when there are not enough built-in mibs

As you can see from the text, the CISCO-SMI mib is missing, as they say google in the teeth and look for the missing MIB, after finding it, put it in the MIB search paths indicated in paragraph 3 above. We repeat the operation until the errors about the missing mibs disappear.
In some cases (in mine too), you need to adjust the snmp_builder.php code starting at line 315
If all of the above helped, then you will see the OID tree.

In this tree, select the desired table and it will be displayed at the top. In this table, it is enough to select the necessary parameters by clicking on either the field or the column heading to select all the parameters for this column. The selected items and their settings are displayed at the bottom of the screen. You can delete them either one by one by clicking on the line with the parameter, or by clicking Clear List all at once . If the added items suit you, then click the Save button . After clicking the items from the bottom table will be added as new item to the existing selected template.
We repeat this operation until all the necessary elements are selected.
For the selected switch, I added interface counters for their descriptions and their status. Also, the state of the STP protocol was added (interface state, root port number, device weight and the number of topology changes), etc.
After adding all the items we need, it would be nice to edit them. By default, the polling interval for all items is 60 seconds, which is clearly unnecessary. For non-critical data, for example, host name, firmware version, alias interfaces, you can set the interval 84600 seconds (24 hours).
The situation with the counters is a bit more complicated: the acceptable polling interval for the interfaces, in my opinion, is 300 seconds, and it is necessary to change the storage format to “delta per second”.
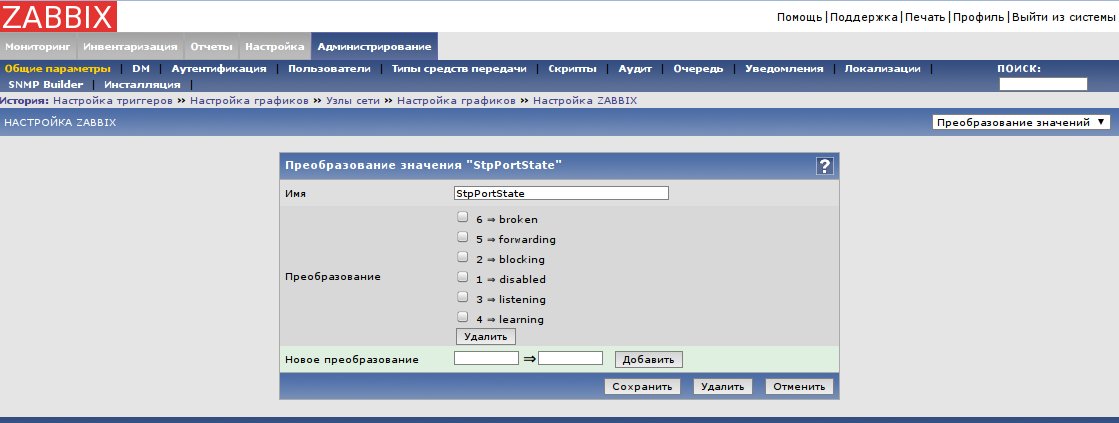
With the value “StpPortState”, it is also necessary to convert the values into a human-readable form.
First, we’ll configure the conversion of digital values to text in the Administration / General Settings / Converting values of code-value pairs we pull from the MIB.
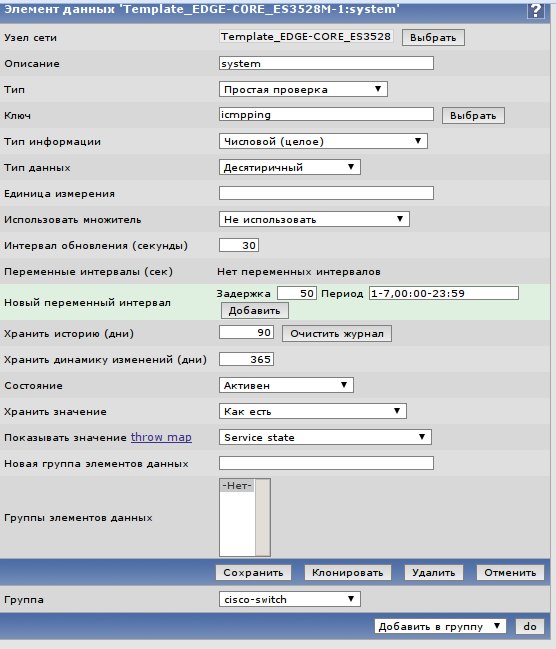
In the item setting, select this.

To the template, at least you need to add a simple ping check.
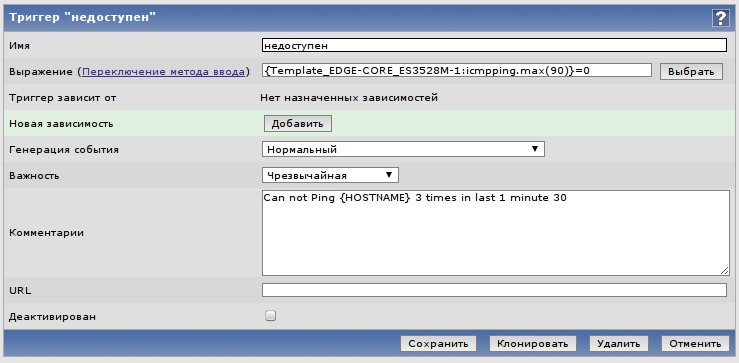
For this check you need to hang a trigger that will work in if the piece of iron is not available for more than 90 seconds.
You can draw graphs of loading interfaces on counters. IfOctets OutOctets.

The following triggers and graphs are done by analogy.
For example, I added triggers that trigger when the interface loads by more than 80%, when the role of the interface in STP changes, with a low runtime.
I hope that this information will help you add any hardware with a MIB to the Zabbix monitoring system.
I found a wonderful SNMP Builder for Zabbix utility on the zabix forum . Using it, you can make a basic device template with its MIB and then finish it with pens to a normal state.
I will tell you how to do this with the example of Edge-core hardware.
Utility installation
You can download it from the blog of the developer of this utility or directly here . The blog has brief instructions for installing and using it. But I will repeat it briefly.
1. Download the archive. The archive contains a directory and one snmp_builder.php file.
2. Unpack the archive into the directory with the frontend.
3. Open snmp_builder.php and, if necessary, adjust the path to the location of the mib files.
define('MIBS_ALL_PATH', '/home/zabbix/public_html/snmp_builder/mibs:/usr/share/snmp/mibs');4. Add the menu item Snmp Builder to the "Administration" menu of the front-end.
To do this, open include / menu.inc.php and in the region of 203 lines (in my version it was not 203 lines) we change the code to such
               'label'=>S_NOTIFICATIONS

          ),

        array('url'=>'locales.php',

            'label'=>S_LOCALES

          ),

        array('url'=>'snmp_builder.php',

            'label'=>'SNMP Builder'

          ),

        array('url'=>'instal.php',

            'label'=>S_INSTALLATION,

            'sub_pages'=>array('setup.php','warning.php')

          )

        )


* This source code was highlighted with Source Code Highlighter.
Create Template
The first thing we are looking for is the MIB of iron. The manufacturer, unlike Siemens, did not hide his mibs. I downloaded them freely from the official website www.edge-core.ru .
Next, the downloaded MIB is placed in any of the directories indicated in paragraph 3.
We open in the Administration / Snmp Builder menu.
We will see a similar picture:
In the Template list, select the template in which we will add new items. I created a new empty template in advance. In the MIB list, select the mib of our device, in the Server field enter ip devices, in the Community fieldenter the snmp community string of the device. If everything is correct, then we get the above picture. A situation may arise when there are not enough built-in mibs
.Cannot find module (CISCO-SMI): At line 21 in / home / zabbix: At line 21 in / home / zabbix / public_html / snmp_builder / mibs / CISCO-IP-IF-MIB mib Cannot find module (CISCO-SMI): At line 21 in / home / zabbix /public_html/snmp_builder/mibs/CISCO-IP-IF-MIB.mib
As you can see from the text, the CISCO-SMI mib is missing, as they say google in the teeth and look for the missing MIB, after finding it, put it in the MIB search paths indicated in paragraph 3 above. We repeat the operation until the errors about the missing mibs disappear.
In some cases (in mine too), you need to adjust the snmp_builder.php code starting at line 315
  foreach(glob($path."/*.mib") as $filename){

   if (preg_match('/^'.preg_quote($path,'/').'\/(.+)\.mib$/',$filename,$matches)){

    $result=exec("cat ".$filename."| grep -i 'DEFINITIONS.*::=.*BEGIN'|awk '{print $1}'");

    $cmbMibs->addItem($result,$result);

   }

  }


* This source code was highlighted with Source Code Highlighter.
If all of the above helped, then you will see the OID tree.
In this tree, select the desired table and it will be displayed at the top. In this table, it is enough to select the necessary parameters by clicking on either the field or the column heading to select all the parameters for this column. The selected items and their settings are displayed at the bottom of the screen. You can delete them either one by one by clicking on the line with the parameter, or by clicking Clear List all at once . If the added items suit you, then click the Save button . After clicking the items from the bottom table will be added as new item to the existing selected template.
We repeat this operation until all the necessary elements are selected.
For the selected switch, I added interface counters for their descriptions and their status. Also, the state of the STP protocol was added (interface state, root port number, device weight and the number of topology changes), etc.
After adding all the items we need, it would be nice to edit them. By default, the polling interval for all items is 60 seconds, which is clearly unnecessary. For non-critical data, for example, host name, firmware version, alias interfaces, you can set the interval 84600 seconds (24 hours).
The situation with the counters is a bit more complicated: the acceptable polling interval for the interfaces, in my opinion, is 300 seconds, and it is necessary to change the storage format to “delta per second”.
With the value “StpPortState”, it is also necessary to convert the values into a human-readable form.
First, we’ll configure the conversion of digital values to text in the Administration / General Settings / Converting values of code-value pairs we pull from the MIB.
In the item setting, select this.
To the template, at least you need to add a simple ping check.
For this check you need to hang a trigger that will work in if the piece of iron is not available for more than 90 seconds.
You can draw graphs of loading interfaces on counters. IfOctets OutOctets.
The following triggers and graphs are done by analogy.
For example, I added triggers that trigger when the interface loads by more than 80%, when the role of the interface in STP changes, with a low runtime.
I hope that this information will help you add any hardware with a MIB to the Zabbix monitoring system.