AudioKit and sound synthesis in iOS / OSX
- Transfer
- Tutorial
AudioKit is an audio framework developed by audio engineers, programmers and musicians specifically for iOS and OSX. It provides tools for processing and synthesizing sound. Under the hood is a mix of Swift, Objective-C, C ++ and C, and Apple's Audio Unit API. Stunning (and rather complex) technologies are wrapped in a very friendly Swift API, which can be accessed directly from Xcode Playgrounds!
In this tutorial we will go on a trip to AudioKit, and at the same time the history of synthesizing sound. You will learn about the basics of sound physics and how the first synthesizers worked, such as Hammond Organ. There will also be considered and modern technology, for example, sampling.
Prepare your favorite drink, sit back and forth!
First step
Starting with AudioKit 3.6, setting up playgrounds for working with the framework has become quite simple. Download and unzip the start playground by the link .
The journey will begin with several steps for setting up playgrounds for working with AudioKit.
Open the AudioKitPlaygrounds.xcodeproj file in Xcode. Click the + button in the lower left corner of the screen, select File ... and then Blank in the Playground section , save the new file in the Playgrounds folder along with the demo playgrounds.
The newly added playground will start and will look something like this:

Replace the generated code with the following:
import AudioKitPlaygrounds
import AudioKit
let oscillator = AKOscillator()

AudioKit.output = oscillator
tryAudioKit.start()
oscillator.start()
sleep(10)
The Playground will not run until you at least once build a project, for this you can use the menu item Product / Build or the -B key combination . After that, start the playground again and hear the sound that is buzzing for 10 seconds. (Approx. Translator: sometimes the error does not disappear, and you need to go to another playground, and go back to make it work). You can use the Play / Stop button at the bottom left of the playground window to stop the playground or start it again.
Note: If you still see errors, try restarting Xcode. Unfortunately, frameworks and playgrounds are not good friends with each other and can behave unpredictably.
Oscillators and sound physics
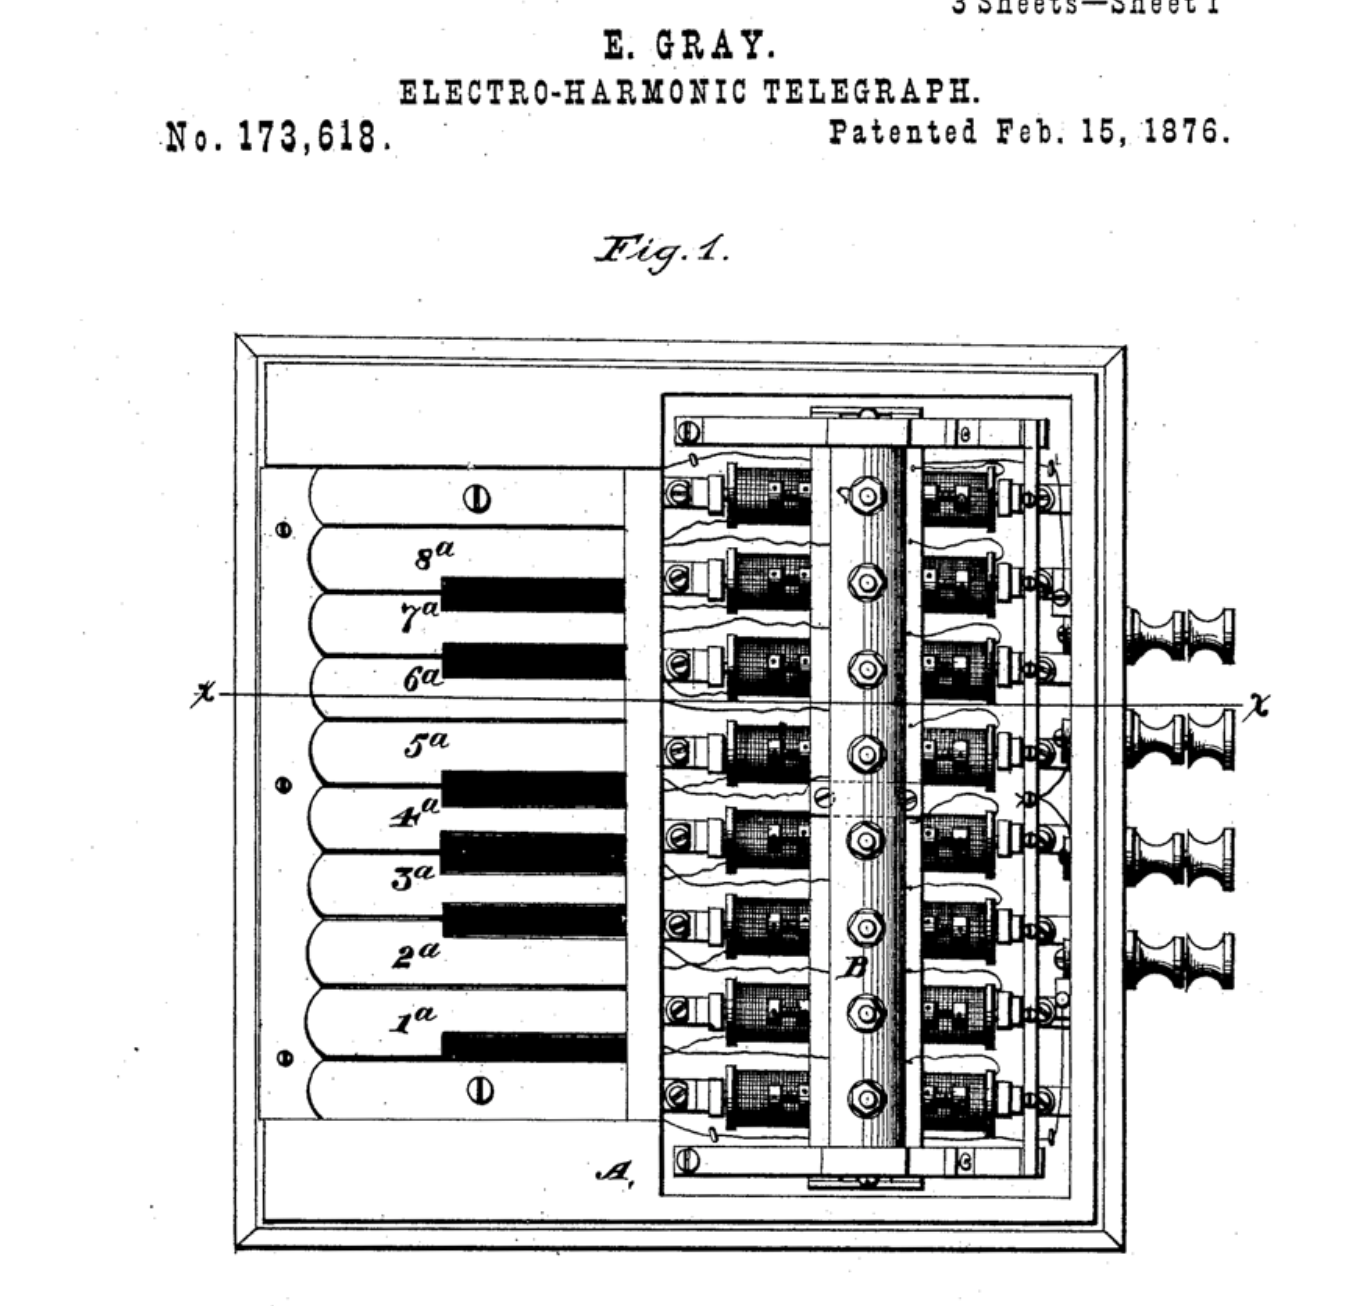
Humanity has been playing music through various physical objects for thousands of years. Many familiar instruments for us, such as guitar or drums, are hundreds of years old. The first recorded experience of using electronic circuits for sound generation was conducted in 1874 by Elisha Gray. Elisha worked in the field of telecommunications, and he invented the oscillator - the simplest of musical synthesizers. With him we will begin our dive.
Right-click on your Playground, select New Playground Page and replace the generated code with the one below:
import AudioKitPlaygrounds
import AudioKit
import PlaygroundSupport

// 1. Create an oscillatorlet oscillator = AKOscillator()

// 2. Start the AudioKit 'engine'AudioKit.output = oscillator
tryAudioKit.start()

// 3. Start the oscillator
oscillator.start()

PlaygroundPage.current.needsIndefiniteExecution = true
The playground will begin to generate a continuous buzz - it was intended. You can click stop to stop it.
This is practically the same as we did in the previous playground, but this time we will dive into the details.
Consider all the steps in order:
- Here we create an oscillator. The oscillator is the heir
AKNode. Nodes are the elements from which the audio chain is built, which generates and modifies the sound. - Here we connect the output of our latest node to the AudioKit engine. In our case, only one node. Further the framework will direct the output of the node to the audio playback device.
- Well, let's start the oscillator, it starts sending a sound wave to the output.
The oscillator generates a repeating signal that does not stop. In this playground it
AKOscillatorgenerates a sine wave. A digital sine wave with AudioKit is sent to the speakers or headphones. As a result, we hear a sound that oscillates at the same frequency as the sinusoid generated by us. This sinusoid is not very musical. 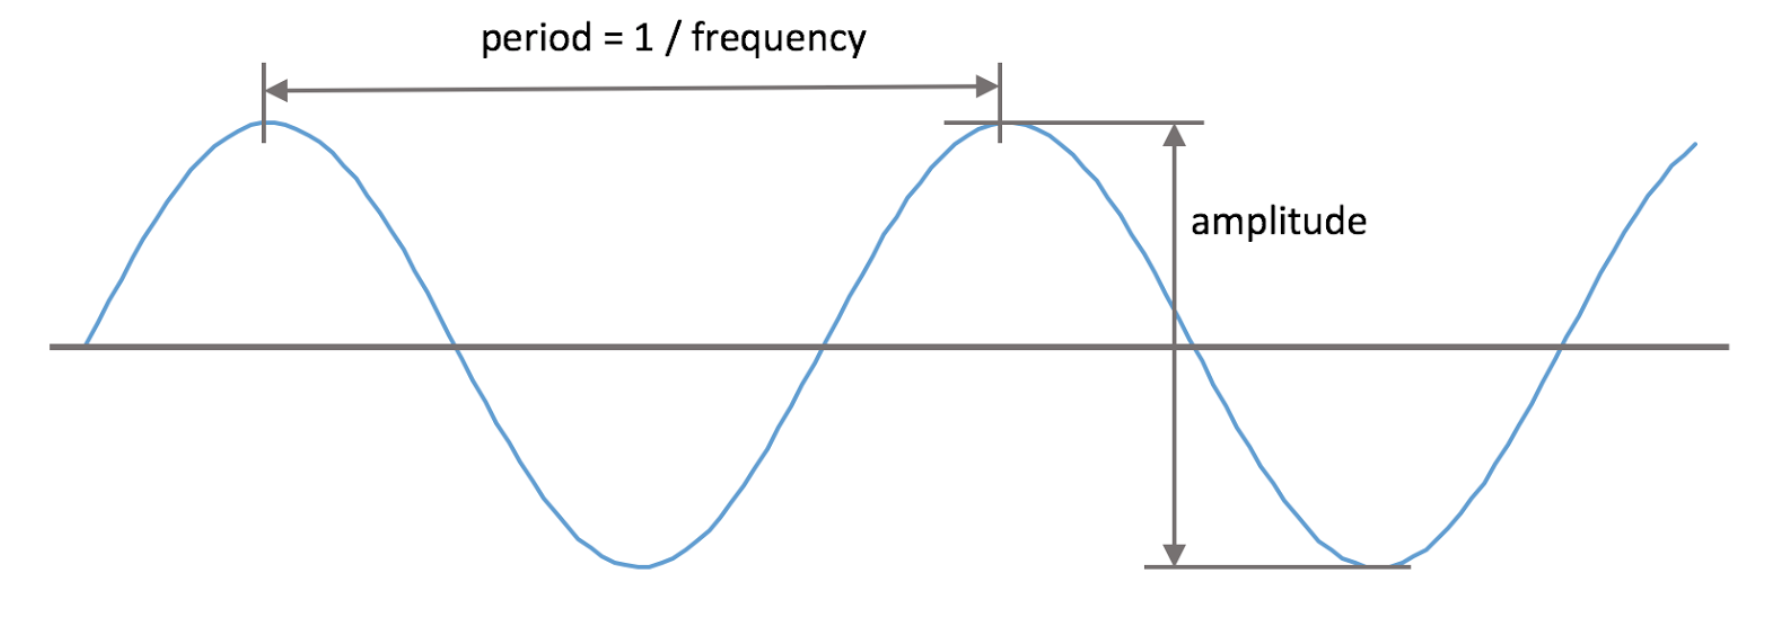
Two parameters are responsible for the sound of this oscillator: amplitude - the height of the sinusoid, determines the sound volume and frequency - the height of the sound depends on it.
In the playground, add the following lines of code right after creating the oscillator:
oscillator.frequency = 300
oscillator.amplitude = 0.5
The sound has changed, now it sounds twice as quiet and much lower. The frequency (frequency) of a signal is measured in Hertz (the number of repetitions per second) and determines the height of the note. Amplitude (amplitude) is set from 0 to 1 and is responsible for the volume.
The invention of Elisha Gray was recorded in the first patent in the history of an electronic musical instrument.
Many years later, Lev Theremin invented a slightly strange musical instrument used to this day - the Theremin. In theremin you can change the frequency of the sound with the movements of your hands above the instrument. In order to understand how the there sounds, you can listen to the composition of the Vibrations of the Beach Boys team, the sound of the theremin will not mix up with anything.
You can simulate the sound of the theremin, for this add the following code to the settings of the oscillator:
oscillator.rampDuration = 0.2And replace the line that starts AudioKit (
try AudioKit.start()) with the following:let performance = AKPeriodicFunction(every: 0.5) {
oscillator.frequency =
oscillator.frequency == 500 ? 100 : 500
}
tryAudioKit.start(withPeriodicFunctions: performance)
performance.start()The property
rampDurationallows the oscillator to smoothly change the values of its parameters (for example, frequency or amplitude). AKPeriodicFunction - A useful utility from AudioKit for periodic code execution. In our example, it changes the frequency of the sine wave from 500Hz to 100Hz every 0.5 seconds. Congratulations! You have just made your first theremin. A simple oscillator can generate musical notes, but it doesn’t sound very pleasant. There are many factors that affect the sound of physical instruments, such as, for example, a piano. And then we look at some of them.
Sound envelopes
When a musical instrument plays a note, the volume of its sound changes with time, and the nature of the changes differs from instrument to instrument. A model that can mimic this effect is called Attack-Decay-Sustain-Release (ADSR) envelope (Approx. Lane: synthesizers available for purchase are never localized, so the curve name is what you can see on the panel of a real synthesizer).
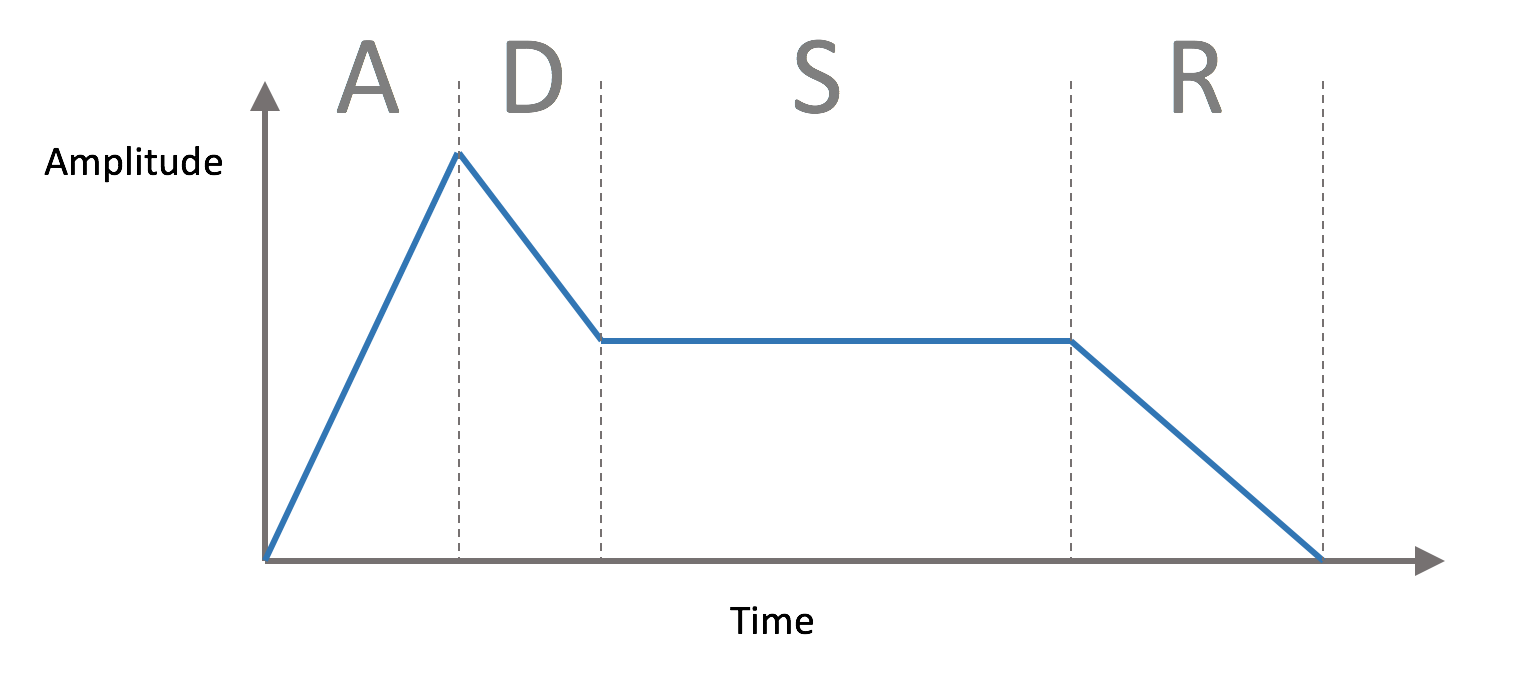
The ADSR envelope consists of:
- Attack : attack or time during which the sound reaches its maximum volume.
- Decay : wild or time for which the volume will fall from maximum to main
- Sustain: основная громкость, в отличие от предыдущих двух параметров не является временем, после того, как атака и дикей пройдут и до того, как вы отпустите клавишу синтезатора звук будет генерироваться с этой громкостью
- Release: релиз или время, за которое громкость станет нулевой
In the piano, the sound is extracted by hammers knocking on the strings, and therefore in it there are quick or, they say, short attacks and wilds. A violin can have a long attack, a wild and a sustain, a musician can influence these parameters by the way he uses the bow.
One of the first electronic musical instruments was Hammond Novachord. This tool was made in 1939, consisted of 163 vacuum tubes and more than 1000 capacitors, and it weighed 230 kilograms. Unfortunately, only a few hundred copies were made, and he never received commercial success.

Right click on the Journey Playground , select New Playground Page and create a new page with the name ADSR . Replace the generated code with the following:
import AudioKitPlaygrounds
import AudioKit
import PlaygroundSupport

let oscillator = AKOscillator()
It just creates an oscillator with which we are already familiar. Next, add the following code to the end of the playground:
let envelope = AKAmplitudeEnvelope(oscillator)
envelope.attackDuration = 0.01
envelope.decayDuration = 0.1
envelope.sustainLevel = 0.1
envelope.releaseDuration = 0.3
Here is created
AKAmplitudeEnvelope, which sets the ADSR-envelope. Parameters duration (attackDuration, decayDuration, releaseDuration) specified in seconds, and the volume (sustainLevel) is set in the range from 0 to 1. AKAmplitudeEnvelope - is the successor AKNodein the same way as AKOscillator.In the above code oscillator we pass to node initializer envelope, thereby connecting node. Next, add the following code:
AudioKit.output = envelope
let performance = AKPeriodicFunction(every: 0.5) {
    if (envelope.isStarted) {
        envelope.stop()
    } else {
        envelope.start()
    }
}
tryAudioKit.start(withPeriodicFunctions: performance)
performance.start()
oscillator.start()
PlaygroundPage.current.needsIndefiniteExecution = true
It will launch AudioKit, but this time at its input we are outputting from the ADSR node. In order to hear the ADSR effect, we constantly turn the node on and off with
AKPeriodicFunction. 
Now you can hear the note play cyclically, but this time it sounds a bit more like a piano.
The loop runs twice a second at each iteration, starting or stopping ADSR. When the ADSR starts with a fast attack, the volume reaches its maximum in 0.01 second, then the volume in 0.1 seconds goes down to the main level and stays there in 0.5 seconds, and at the end fades out in 0.3 seconds.
You can play with the parameters yourself and try to play, for example, the sound of a violin.
The sounds we met are based on the sine wave that it generates
AKOscillator. Despite the fact that ASDR helps smooth out a sharp sound, it is still impossible to call these sounds musical. Next we look at how to get a deeper sound.
Additive synthesis
Each musical instrument has its own special sound or timbre. The timbre is what distinguishes the sound of the piano from the sound of the violin, even though they can play the same note. An important timbre parameter is the sound spectrum. The sound spectrum describes the range of reproducible frequencies, which, summing up, give a note. Our current playground uses an oscillator that sounds only on one frequency, and it sounds rather artificial.
You can get a more lively sound using a set of oscillators to play a single note. This approach is known as additive synthesis, and this is the topic of our next playground.
Right-click on the playground, select New Playground Page and create a new page calledAdditive Synthesis . Replace the generated code with the following:
import AudioKitPlaygrounds
import AudioKit
import AudioKitUI
import PlaygroundSupport
funccreateAndStartOscillator(frequency: Double) -> AKOscillator {
  let oscillator = AKOscillator()
  oscillator.frequency = frequency
  return oscillator
}
For additive synthesis you will need several oscillators, for this we will use.
createAndStartOscillatorNext, add the code:
let frequencies = (1...5).map { $0 * 261.63 }Here we take the interval of numbers from 1 to 5 and multiply each by the number 261.53 - the frequency of the note Do. The resulting multiple frequencies are called harmonics.
Now add the code:
let oscillators = frequencies.map {
  createAndStartOscillator(frequency: $0)
}
Here we created an oscillator for each of the frequencies we use.
To combine oscillators add this code:
let mixer = AKMixer()
oscillators.forEach { $0.connect(to: mixer) }
AKMixer - this is another kind of audiokit-node. It accepts input from one or several nodes and combines them into one. Add this code:
let envelope = AKAmplitudeEnvelope(mixer)
envelope.attackDuration = 0.01
envelope.decayDuration = 0.1
envelope.sustainLevel = 0.1
envelope.releaseDuration = 0.3AudioKit.output = envelope
let performance = AKPeriodicFunction(every: 0.5) {
    if (envelope.isStarted) {
        envelope.stop()
    } else {
        envelope.start()
    }
}
tryAudioKit.start(withPeriodicFunctions: performance)
performance.start()
oscillators.forEach { $0.start() }
With this code, everything should be clear: add ADSR to the output of the mixer, output via AudioKit and periodically turn on / off.
In order to deal well with additive synthesis, it will be useful to play with various combinations of these frequencies. And in this we are ideally suited such a possibility playgrounds as Live View.
To do this, add the code:
classLiveView: AKLiveViewController{
    overridefuncviewDidLoad() {
        addTitle("Harmonics")
        oscillators.forEach {
            oscillator inlet harmonicSlider = AKSlider(
                property: "\(oscillator.frequency) Hz",
                value: oscillator.amplitude
            ) { amplitude in
                oscillator.amplitude = amplitude
            }
            addView(harmonicSlider)
        }
    }
}
PlaygroundPage.current.needsIndefiniteExecution = truePlaygroundPage.current.liveView = LiveView()
In AudioKit there are classes specifically for convenient work in playgrounds. We in our example use
AKLiveViewController, with the help of it we vertically place the elements. And also for each oscillator we create AKSlider. Sliders are initialized by the values of the frequency and amplitude of the oscillators, and cause a block when interacting with them. In the block of each slider, we change the amplitude of the corresponding oscillator. So you can easily add interactivity to your playgrounds. In order to see the results of the playground, the Live View needs to be displayed on the screen. To do this, select the button with intersecting circles in the upper right part of the window and make sure that the correct playground is selected for Live View.
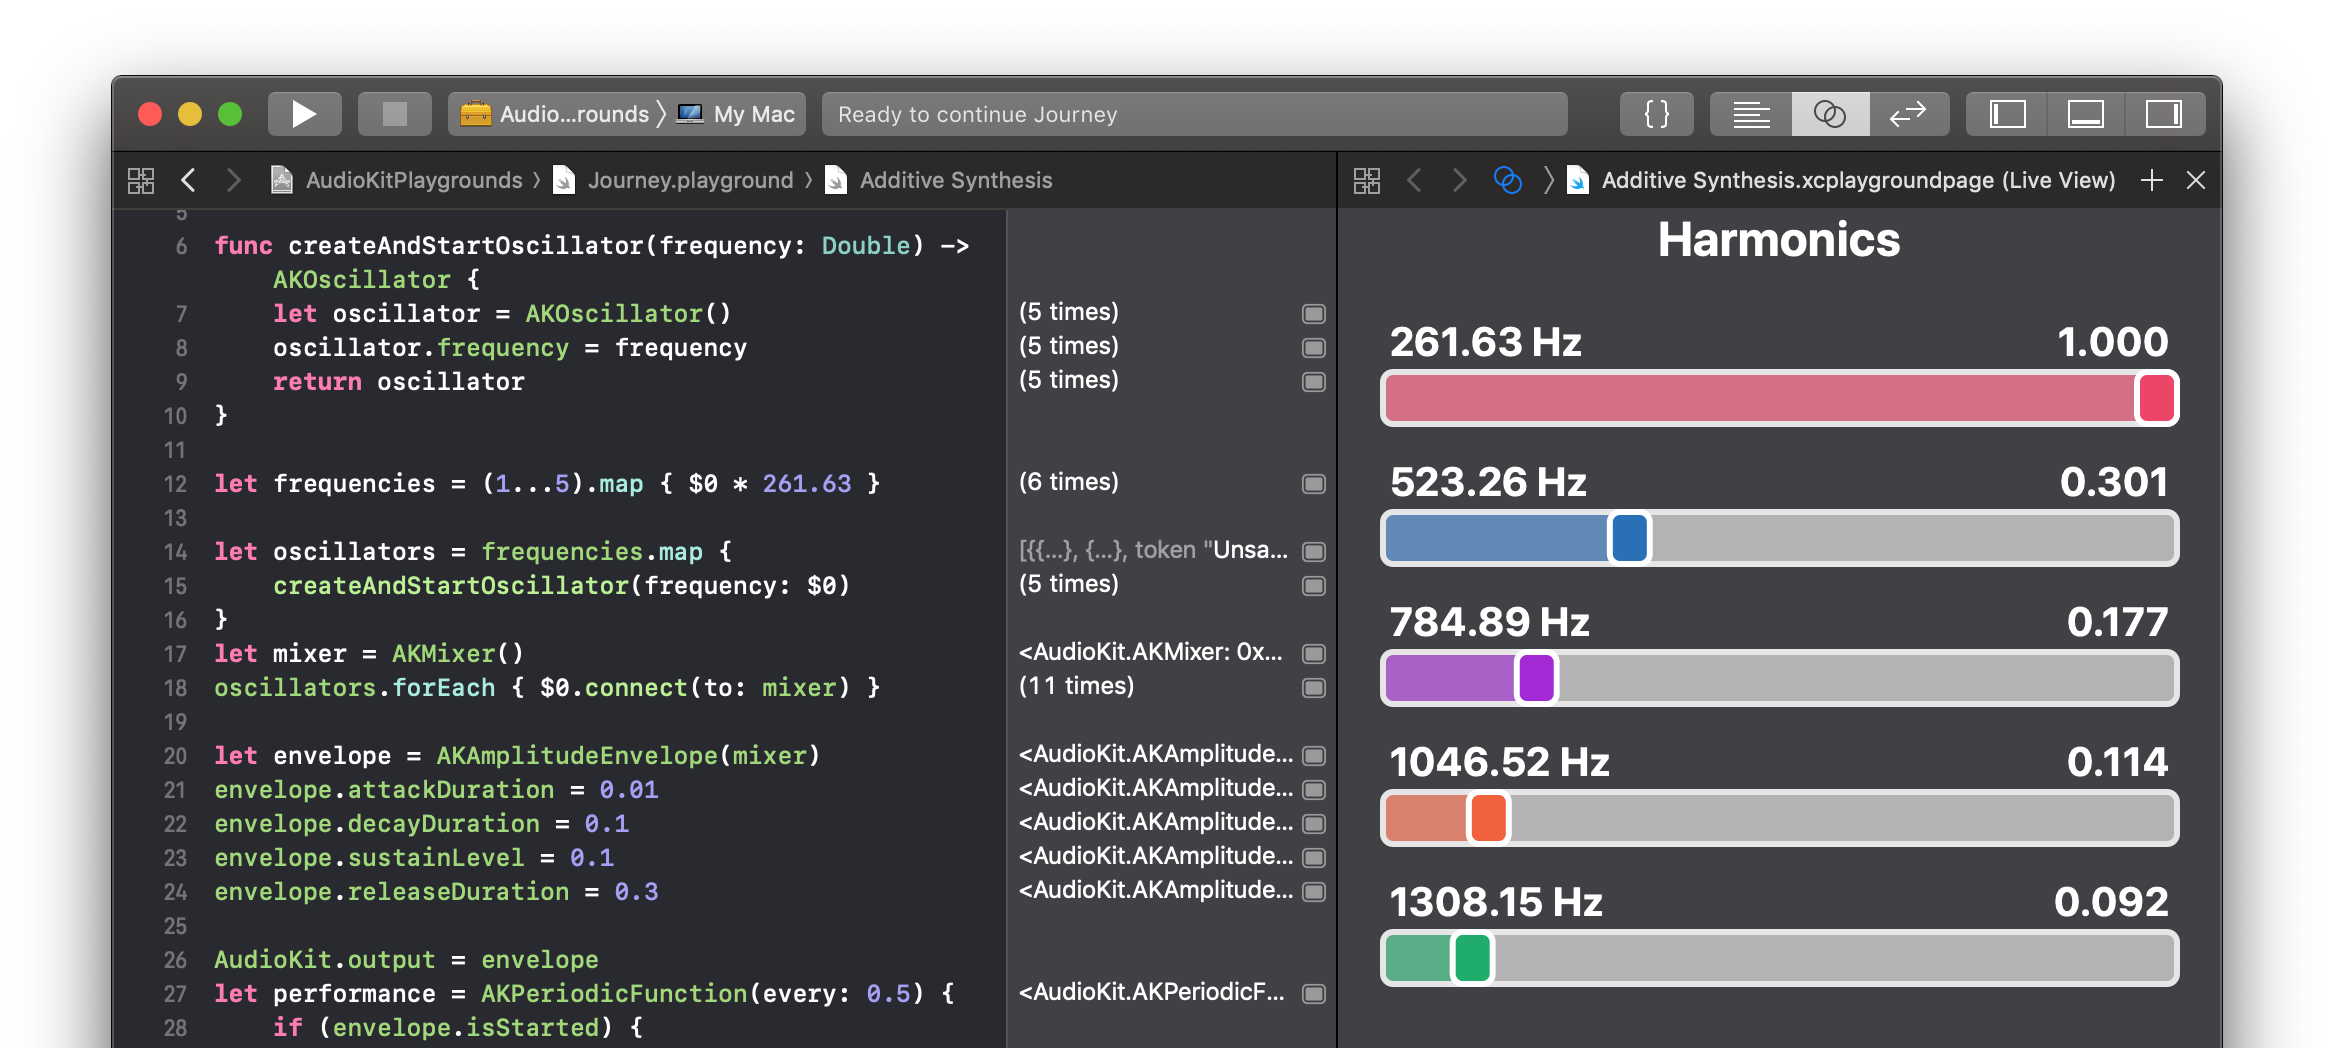
In order to change the timbre of your instrument, you can change the values of each slider separately. For realistic sound, I suggest you try the configuration shown in the screenshot above.
One of the first synthesizers that used additive synthesis was the Teleharmonium and it weighed 200 tons! His incredible weight and size, most likely, and became the cause of his obscurity. The more successful Hammond organ used similar tone wheels, but was much smaller. Invented in 1935, it is still widely known as a tool popular in the era of progressive rock.
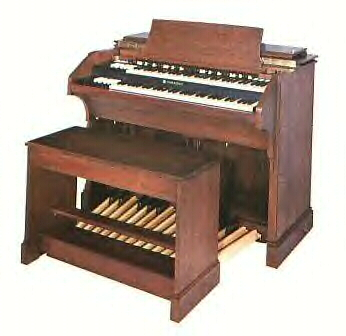
The tone wheel is a rotating disc with small cavities around the edge and a pickup located near the edge. The Hammond organ had a whole set of tone wheels that could rotate at different speeds. A rather unusual way to generate sound is rather electromechanical than electronic.
In order to generate a more realistic sound spectrum, there are several other techniques: frequency modulation (Frequency Modulation or FM) and pulse-width modulation (Pulse Width Modulation or PWM), both techniques are available in AudioKit in classes
AKFMOscillatorand, AKPWMOscillatorrespectively. I suggest you try both, substituting them instead AKOscillator, which we used earlier.Polyphony
In the 1970s, movement began from modular synthesizers, consisting of separate oscillators of envelopes and filters, to microprocessor ones. Instead of using analogue circuits, the sound began to be generated in digital format. This allowed us to make synthesizers cheaper and more compact, and synthesizers of brands such as Yamaha - very popular.

All of our playgrounds were limited to playing one note at a time. Many instruments are able to play more than one note at a time, they are called polyphonic . Instruments that are capable of playing only one note are called monophonic .
In order to get a polyphonic sound, you can create several oscillators and send them to the mixer, but in AudioKit there is a more suitable way for this.
Create a new page in the playground and name it Polyphony. Replace the generated code with the following:
import AudioKitPlaygrounds
import AudioKit
import AudioKitUI
import PlaygroundSupport
let bank = AKOscillatorBank()
AudioKit.output = bank
tryAudioKit.start()
Here we created a bank of oscillators
AKOscillatorBank. If you go to the class declaration, you can find that it is the heir AKPolyphonicNode, which, in turn, is the heir of the already known to us AKNode, and also implements the protocol AKPolyphonic. As a result, the bank of oscillators is the same AudioKit-node as the ones we reviewed earlier. Its output can be sent to mixers, envelopes, or any other filters and effects. The protocol
AKPolyphonicdescribes how to play notes on a polyphonic node, consider it in more detail. In order to test our oscillator, we need a way to play several notes at the same time. It is not difficult at all!
Add the following code to the playground and make sure the Live View is open:
classLiveView: AKLiveViewController, AKKeyboardDelegate{
    overridefuncviewDidLoad() {
        let keyboard = AKKeyboardView(width: 440, height: 100)
        addView(keyboard)
    }
}
PlaygroundPage.current.liveView = LiveView()
PlaygroundPage.current.needsIndefiniteExecution = true
When the playground is compiled, you will see the following:
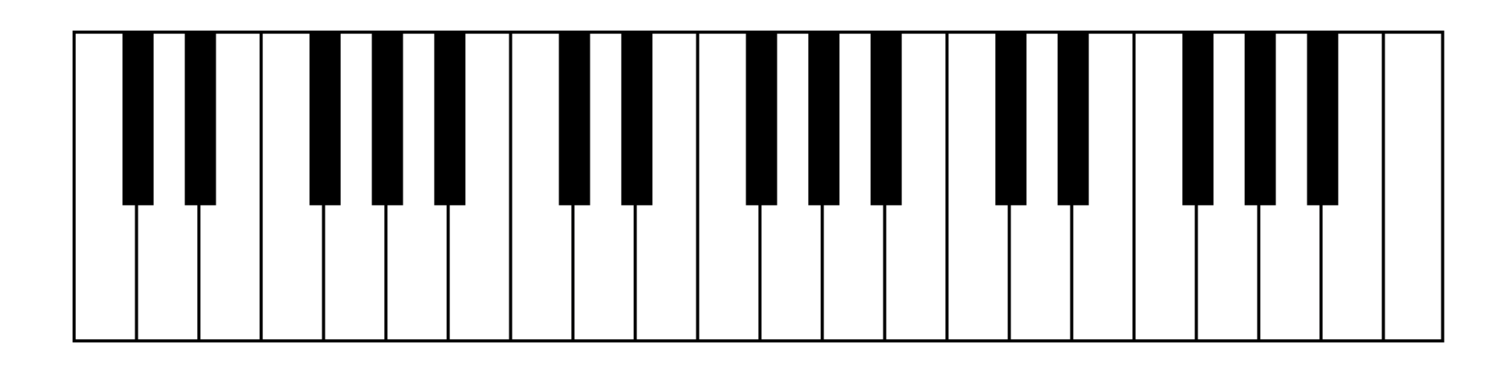
Cool, yes? Music keyboard right in the playground!
AKKeyboardView- This is another utility from AudioKit, which simplifies the study of the capabilities of the framework. Click on the keys and you will find that they do not make any sounds. Update
setUpyours PlaygroundViewto the following:let keyboard = AKKeyboardView(width: 440, height: 100)
keyboard.delegate = self
addView(keyboard)This will make our
PlaygroundViewkeyboard delegate and allow you to respond to keystrokes. Update the class declaration as follows:
classLiveView: AKLiveViewController, AKKeyboardDelegateAlso add a couple of methods right after
setUp:funcnoteOn(note: MIDINoteNumber) {
bank.play(noteNumber: note, velocity: 80)
}
funcnoteOff(note: MIDINoteNumber) {
bank.stop(noteNumber: note)
}Every time you press a key, a method is called
noteOn, all it does is tell the oscillator bank to start playing the note, respectively, the method noteOffstops playing the note. Hold the mouse and swipe along the keys; you will hear a beautiful crescendo (a musical term for a gradual increase in sound intensity). The bank of oscillators already contains a built-in ADSR effect, as a result, the attenuation of one note is mixed with the attack of the next and sounds pretty nice.
You may have noticed that the notes that gave us the keys did not come in the form of frequency. They are declared as
MIDINoteNumber. If you go to an ad of this type, you will see the following:publictypealiasMIDINoteNumber = IntMIDI stands for Musical Instrument Digital Interface (digital musical instrument interface). This is a widespread format for the interaction of musical instruments with each other. Note numbers correspond to notes on a standard music keyboard. The second parameter - this velocity (velocity) corresponds to the strength of the impact on the key. The lower the value, the softer the touch on the key, the quieter the final sound.
At the end you need to turn on the polyphonic mode on the keys. Add the following code to the method
setUp:keyboard.polyphonicMode = trueNow you can play several notes at the same time, as shown in the picture:
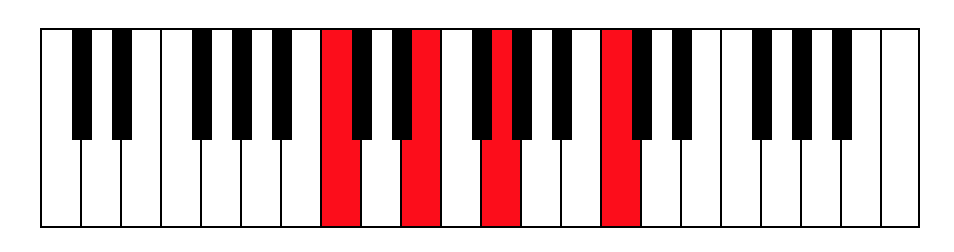
This is, by the way, C major :)
AudioKit began its history quite a while ago. Today it uses Soundpipe and code from Csound (the MIT project, which was launched in 1985). Surprisingly, the code that we are now running in the playgrounds and adding to the iPhone was written almost 30 years ago.
Sampling
The sound synthesizing techniques that we investigated earlier try to recreate realistic sound using simple basic blocks: oscillators, filters, and mixers. In the early 1970s, the development of computer power led to the emergence of a new approach — sound sampling, the purpose of which is to create a digital copy of sound.
Sampling is a fairly simple technology, similar to digital photography. In the process of sampling at regular intervals, the amplitude of the sound waves is recorded:
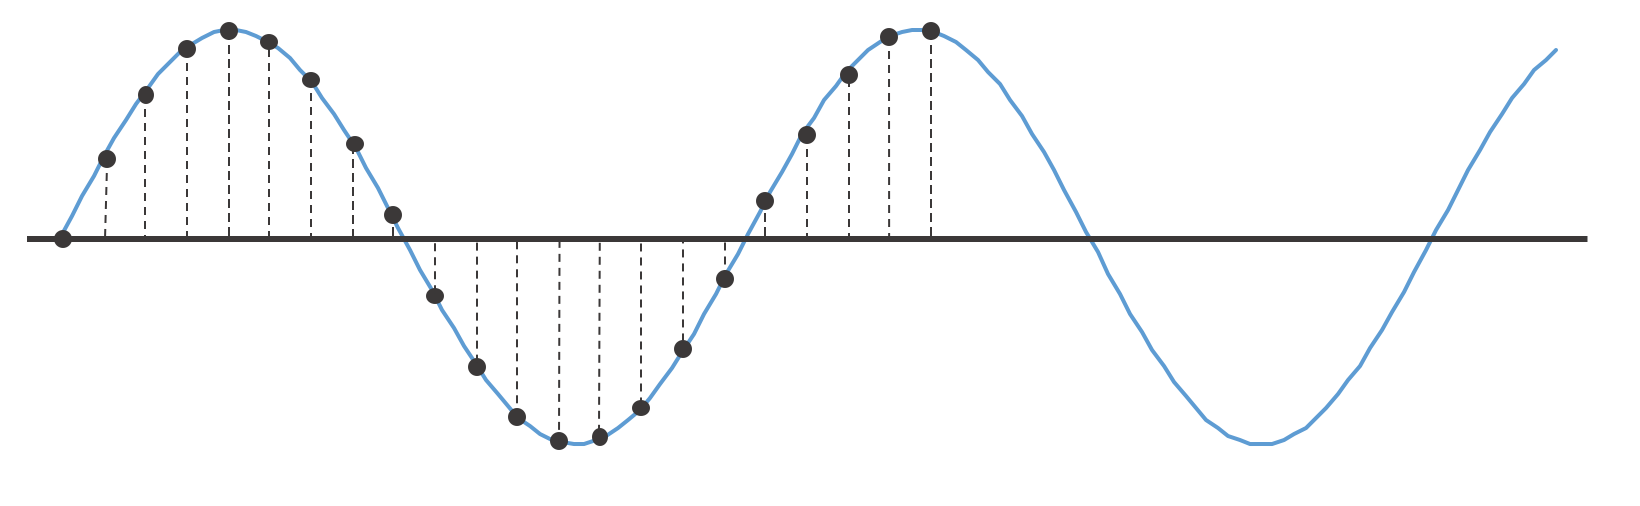
Two parameters affect how accurately the sound was recorded:
- Bit depth : or bit depth, the number of separate volume levels that the sampler can reproduce.
- Sample rate : or sampling rate, tells how often amplitude measurements are made. Measured in hertz.
Let's explore these properties in the new playground. Create a new page and name it “Samples”. Replace the generated code with the following:
import AudioKitPlaygrounds
import AudioKit
import PlaygroundSupport
let file = tryAKAudioFile(readFileName: "climax-disco-part2.wav", baseDir: .resources)
let player = tryAKAudioPlayer(file: file)
player.looping = true
The code above loads the sample, creates an audio player and puts it to endless playback.
An archive with a .wav file for this tutorial is available here . Download it and unzip to the Resources folder of your playground.
Then add the following code to the end of the playground:
AudioKit.output = player
tryAudioKit.start()
player.play()
PlaygroundPage.current.needsIndefiniteExecution = true
This will connect your audio player with AudioKit, it remains only to turn up the volume and enjoy!
This small sample consists of a large set of sounds, which would be a real challenge with the help of oscillators.
The MP3 sound we usually hear uses a high bit width and sample rate, so the sound is very bright and clear. To experiment with these parameters, add the following code immediately after the audio player creation code:
let bitcrusher = AKBitCrusher(player)
bitcrusher.bitDepth = 16
bitcrusher.sampleRate = 40000
Also correct the output in AudioKit:
AudioKit.output = bitcrusherThe sound of our playground has changed. This is the same sample, but now it sounds completely flat.
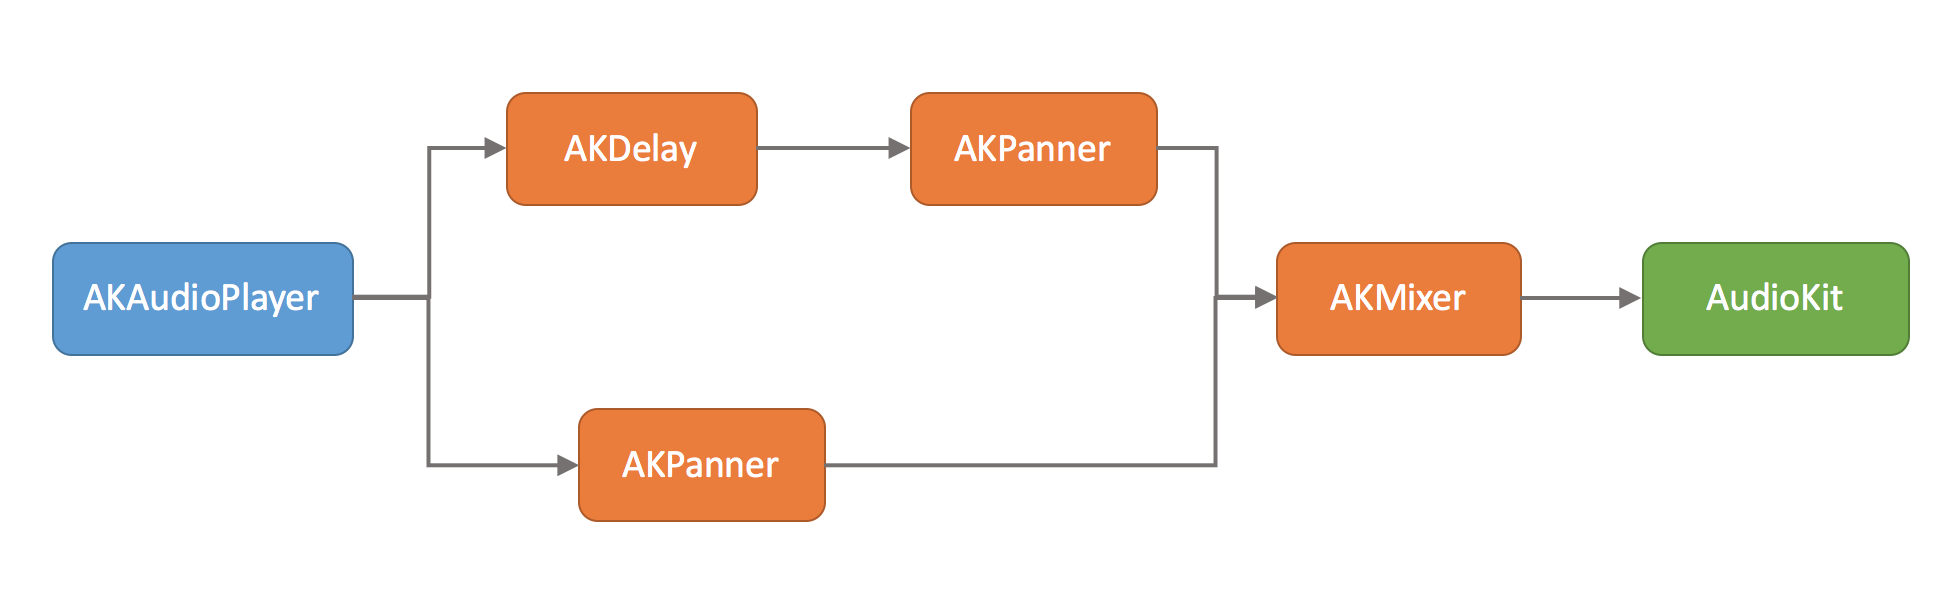
AKBitCrusher- This is the effect of AudioKit, which emulates the reduction of bit depth and sampling rate. Sounds that are similar to those produced by old computers like the ZX Spectrum or BBC Micro. They had only a few kilobytes of memory and much slower processors than today's ones. In our last experiment, we will put together a few nodes in order to get the effect of stereo delay (ang. Delay). To get started, delete the three lines in which we created and customized
AKBitCrusher. And then add the following:let delay = AKDelay(player)
delay.time = 0.1
delay.dryWetMix = 1This will create a 0.1 second delay effect with our sample as input. The parameter
dryWetMixsays how to mix the original signal and the signal with a delay. In our case, the value 1 says that at the output we will hear only the signal with a delay. Next, add the following:
let leftPan = AKPanner(player, pan: -1)
let rightPan = AKPanner(delay, pan: 1)AKPannerallows you to move the sound to the right, left, or somewhere in the middle. In our example, we output the sound with a delay to the left and the original sound to the right. The last step is to mix both signals and output them to AudioKit. Replace the line that was displayed
AKBitCrusherin AudioKit with this code:let mix = AKMixer(leftPan, rightPan)
AudioKit.output = mixThus, we will lose our sample, but with a slight delay between the right and left channels.
What's next?
In this tutorial, we touched on a very small piece of the AudioKit features. Try exploring various filters, pitch shifter, reverb, graphic equalizer to see what other effects are there. With a bit of creativity, you can create your own sounds, electronic instruments or game effects.
The completed playground can be found at the link .