DNS Amplification (DNS Amplification)
Not so long ago I ran into a problem (and its solution), considering the relevance of this topic recently, as well as how many people are suffering from this disaster now, I decided to combine the information in one article. Maybe someone else will find it useful.
A couple of weeks ago, I noticed a strange activity directed to my DNS server. I’ll say right away that I’m using a Linux gateway, accordingly the bind DNS server is installed there. The activity was that several UDP packets per second were
sent to port 53 (DNS) of my server from various IP addresses: 10: 41: 42.163334 IP 89.149.221.182.52264> MY_IP.53: 22912+ NS ?. (17)
10: 41: 42.163807 IP MY_IP.53> 89.149.221.182.52264: 22912 Refused- 0/0/0 (17)
To which, as can be seen from the log, the server responded with failures. Naturally, it became interesting to me that for my IP addresses I was pecking my DNS. After looking at several addresses through whois, I determined that these are large hosting companies, I wrote a request to stop the attack on my server in the technical support of some of them. In response, I received a reply that this type of attack refers to the fact that they cannot block, and that they themselves suffer from this abnormal activity. It was decided to deal with everything himself.
The type of attack itself is not new - it was known about it back in 2006, details in English can be viewed here , however, they began to use it relatively recently. In January-February 2009, several online publications published information about the large-scale use by cybercriminals of this type of DDOS, which can be found here and in English here
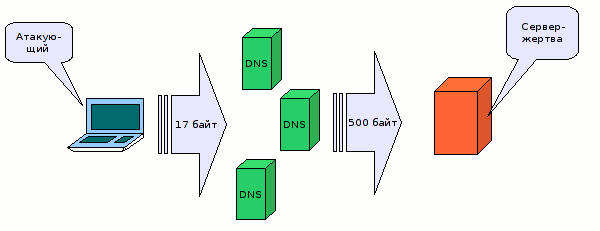
To put it plainly, the essence of the gain is that an attacker sends a (usually short) request to a vulnerable DNS server that responds to the request with a significantly larger packet. If you use the address of the victim's computer (ip spoofing) as the source IP address when sending the request, the vulnerable DNS server will send a large number of unnecessary packets to the victim computer until it completely paralyzes its operation.
This type of attack is most effective on an old (unpatched) or improperly configured DNS server, which, as has already been said, responds to short requests by cybercriminals in large packets.
Here is an example of such interaction (by the way, attackers most often use such requests): We
send the request to the NS server with the command where SERVER_IP is the IP address of the server. As a result, in the log on server port 53 we get: 11: 08: 47.994604 IP MY_IP.47816> SERVER_IP.53: 5655+ NS ?. (17) i.e. just those 17 bytes of the request that we wanted to send. In response, in the same log, we see: 11: 08: 47.995853 IP 192.168.100.254.53> 192.168.100.100.47816: 5655 13/0/6 NS C.ROOT-SERVERS.NET., [| Domain]
those. the server answered us with a hint in the form of the addresses of the root DNS servers, which is already 360 bytes. These are the lengths of the DNS request and response, the total packet length is 60 and 402 bytes, respectively. The gain is obvious.
First, of course, check the relevance of the version of your DNS server, regardless of which platform it runs on. Secondly, make sure that the server is configured securely enough and does not respond to “left” requests to everyone. You can find a lot of manuals and recommendations about this on the net. I ’ll mention here only one document that I found not so long ago .
In my case, there was already nothing special to do. If you look at the very first log that I cited, it is clear that the attacker sends a request with a length of 17 bytes and receives a REJECT of the same length (17 bytes), i.e. no gain occurs. But, apparently, the “ddos-ers” are not particularly in a hurry to remove the addresses of DNS servers that are not affected by this vulnerability from their lists and continue to bother them with their swotting ... This situation did not suit me. It’s unpleasant that someone receives unnecessary traffic from my address on my server (even if I’m not to blame for this).
At first, I began to put the addresses of senders in a black list, but it wasn’t there, the attack stopped from the old addresses, but more and more appeared. It was decided to use more sophisticated filtering methods and use the iptables modules on my Linux server, which I couldn’t reach before. Kill, so to speak, two birds with one stone - and attacker do -1 and deal with a couple of iptables modules.
Of course, I could not completely close port 53 (DNS) - I have many clients who need it. I decided to filter packets by the contents of DNS queries and remove those that contain attacking queries, and they all contained “NS” as one. The iptables string module is suitable for this task, which just allows you to look into the contents of packages.
In order to understand what to filter, let's look at the attacker's package through wireshark.
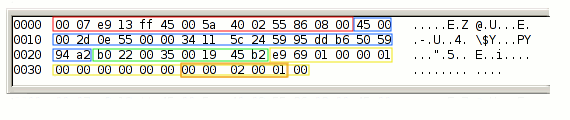
Here and hereyou can read about the structure of UDP packets and the DNS frame format, respectively. For the sake of brevity, I will say that the first 14 bytes of the packet are occupied by Ethernet protocol data (shown in red), then 20 bytes of the IP protocol header (shown in blue), then 8 bytes are the UDP header (shown in green), after which they begin DNS protocol data (shown in yellow). The first 12 bytes of the DNS frame is occupied by the header, after which, finally, the DNS Query field begins (that is, the query itself, in orange). The packets sent to the attacker starting from the 54th (14 + 20 + 8 + 12) byte contain the following data: 00 00 02 00 01 (in hexadecimal code), which corresponds to the “NS” request that I mentioned earlier. Thus, it is necessary to select packets that contain these bytes starting from 54 bytes. It will look like this: I will explain a little.
--in-interface - indicates on which interface to catch packets. You need to put only the external interface that the attack is on (there is no need to infringe on users in the network).
--match state --state NEW - we catch packets only with the NEW state, so as not to check all transactions in a row, but only initiating packets (you never know what can be transmitted on port 53).
Then comes the fun part - we use the sting module. We use the following parameters:
--algo - indicates the search algorithm, in fact it is not important, I indicated kmp, but you can also specify bm;
--hex-string - the very hexadecimal string we are looking for is written;
--from 40 - we are looking starting from 40 bytes (note, not from 54 because string starts the search, and, accordingly, the countdown from the first byte of the IP protocol, i.e. Ethernet protocol is thrown, whose length is 14 bytes (in the figure above red ). Total 54 - 14 = 40);
--to 45 - search for up to 45 bytes of the packet, respectively.
This could already be stopped. Packages will no longer reach bind, but I was still not reassured by the thought that I had barred EVERYONE from accessing NS queries to my DNS server, so I decided to use one more iptables module, recent.
This module allows you to create dynamic tables of IP addresses depending on certain conditions, and then set the allowing and prohibiting rules for these tables.
Consider a simple two-line example of recent:
Let's start with the second rule. Everyone who tries to log in (log in, because we use --state NEW) on port 22 (SSH) is skipped (--jump ACCEPT), but his IP address falls into a table called SSHT. When they try to connect again from this address, the first rule starts working, the meaning of which is to update the (--update) record in the table and at the same time check when this record was installed / updated for the last time. If the record was installed / updated less than 30 seconds ago (--seconds 30), --jump DROP is triggered and the packet is discarded. Thus, brute forcers trying to crash on the SSH port will be discarded if the frequency of sending their packets exceeds 1 packet in 30 seconds.
Let's try using recent for our needs:
Thus, I allow making NS requests to the external interface no more than 1 time in 10 minutes.
After adding these rules to the / proc / net / xt_recent of my server, a DNST file appeared, in which the IP addresses of the attackers began to be recorded. And the DNS server stopped giving in to provocations:
14: 10: 19.011818 IP 89.149.221.182.40320> MY_IP.53: 23508+ NS ?. (17)
14: 10: 25.243499 IP 89.149.221.182.64984> MY_IP.53: 25306+ NS ?. (17)
14: 11: 08.832827 IP 89.149.221.182.15864> MY_IP.53: 48029+ NS ?. (17)
14: 11: 15.063058 IP 89.149.221.182.30959> MY_IP.53: 64444+ NS ?. (17)
After several days of the rules, the number of packets from the attackers decreased several times. Now I get 2-3 packets per minute, which are immediately discarded by the firewall.
UPD: In the last block of code, I hurried and wrote an error, I already fixed it, thanks for noticing
Start
A couple of weeks ago, I noticed a strange activity directed to my DNS server. I’ll say right away that I’m using a Linux gateway, accordingly the bind DNS server is installed there. The activity was that several UDP packets per second were
sent to port 53 (DNS) of my server from various IP addresses: 10: 41: 42.163334 IP 89.149.221.182.52264> MY_IP.53: 22912+ NS ?. (17)
10: 41: 42.163807 IP MY_IP.53> 89.149.221.182.52264: 22912 Refused- 0/0/0 (17)
To which, as can be seen from the log, the server responded with failures. Naturally, it became interesting to me that for my IP addresses I was pecking my DNS. After looking at several addresses through whois, I determined that these are large hosting companies, I wrote a request to stop the attack on my server in the technical support of some of them. In response, I received a reply that this type of attack refers to the fact that they cannot block, and that they themselves suffer from this abnormal activity. It was decided to deal with everything himself.
DNS Amplification (DNS Amplification). Theory
The type of attack itself is not new - it was known about it back in 2006, details in English can be viewed here , however, they began to use it relatively recently. In January-February 2009, several online publications published information about the large-scale use by cybercriminals of this type of DDOS, which can be found here and in English here
To put it plainly, the essence of the gain is that an attacker sends a (usually short) request to a vulnerable DNS server that responds to the request with a significantly larger packet. If you use the address of the victim's computer (ip spoofing) as the source IP address when sending the request, the vulnerable DNS server will send a large number of unnecessary packets to the victim computer until it completely paralyzes its operation.
Practice
This type of attack is most effective on an old (unpatched) or improperly configured DNS server, which, as has already been said, responds to short requests by cybercriminals in large packets.
Here is an example of such interaction (by the way, attackers most often use such requests): We
send the request to the NS server with the command where SERVER_IP is the IP address of the server. As a result, in the log on server port 53 we get: 11: 08: 47.994604 IP MY_IP.47816> SERVER_IP.53: 5655+ NS ?. (17) i.e. just those 17 bytes of the request that we wanted to send. In response, in the same log, we see: 11: 08: 47.995853 IP 192.168.100.254.53> 192.168.100.100.47816: 5655 13/0/6 NS C.ROOT-SERVERS.NET., [| Domain]
#dig @SERVER_IP NSthose. the server answered us with a hint in the form of the addresses of the root DNS servers, which is already 360 bytes. These are the lengths of the DNS request and response, the total packet length is 60 and 402 bytes, respectively. The gain is obvious.
What to do?
First, of course, check the relevance of the version of your DNS server, regardless of which platform it runs on. Secondly, make sure that the server is configured securely enough and does not respond to “left” requests to everyone. You can find a lot of manuals and recommendations about this on the net. I ’ll mention here only one document that I found not so long ago .
What else can be done?
In my case, there was already nothing special to do. If you look at the very first log that I cited, it is clear that the attacker sends a request with a length of 17 bytes and receives a REJECT of the same length (17 bytes), i.e. no gain occurs. But, apparently, the “ddos-ers” are not particularly in a hurry to remove the addresses of DNS servers that are not affected by this vulnerability from their lists and continue to bother them with their swotting ... This situation did not suit me. It’s unpleasant that someone receives unnecessary traffic from my address on my server (even if I’m not to blame for this).
At first, I began to put the addresses of senders in a black list, but it wasn’t there, the attack stopped from the old addresses, but more and more appeared. It was decided to use more sophisticated filtering methods and use the iptables modules on my Linux server, which I couldn’t reach before. Kill, so to speak, two birds with one stone - and attacker do -1 and deal with a couple of iptables modules.
String module
Of course, I could not completely close port 53 (DNS) - I have many clients who need it. I decided to filter packets by the contents of DNS queries and remove those that contain attacking queries, and they all contained “NS” as one. The iptables string module is suitable for this task, which just allows you to look into the contents of packages.
In order to understand what to filter, let's look at the attacker's package through wireshark.
Here and hereyou can read about the structure of UDP packets and the DNS frame format, respectively. For the sake of brevity, I will say that the first 14 bytes of the packet are occupied by Ethernet protocol data (shown in red), then 20 bytes of the IP protocol header (shown in blue), then 8 bytes are the UDP header (shown in green), after which they begin DNS protocol data (shown in yellow). The first 12 bytes of the DNS frame is occupied by the header, after which, finally, the DNS Query field begins (that is, the query itself, in orange). The packets sent to the attacker starting from the 54th (14 + 20 + 8 + 12) byte contain the following data: 00 00 02 00 01 (in hexadecimal code), which corresponds to the “NS” request that I mentioned earlier. Thus, it is necessary to select packets that contain these bytes starting from 54 bytes. It will look like this: I will explain a little.
iptables -A INPUT --in-interface eth1 --protocol udp --dport 53 --match state --state NEW --match string --algo kmp --hex-string "|00 00 02 00 01|" --from 40 --to 45 --jump DROP
--in-interface - indicates on which interface to catch packets. You need to put only the external interface that the attack is on (there is no need to infringe on users in the network).
--match state --state NEW - we catch packets only with the NEW state, so as not to check all transactions in a row, but only initiating packets (you never know what can be transmitted on port 53).
Then comes the fun part - we use the sting module. We use the following parameters:
--algo - indicates the search algorithm, in fact it is not important, I indicated kmp, but you can also specify bm;
--hex-string - the very hexadecimal string we are looking for is written;
--from 40 - we are looking starting from 40 bytes (note, not from 54 because string starts the search, and, accordingly, the countdown from the first byte of the IP protocol, i.e. Ethernet protocol is thrown, whose length is 14 bytes (in the figure above red ). Total 54 - 14 = 40);
--to 45 - search for up to 45 bytes of the packet, respectively.
Recent Module
This could already be stopped. Packages will no longer reach bind, but I was still not reassured by the thought that I had barred EVERYONE from accessing NS queries to my DNS server, so I decided to use one more iptables module, recent.
This module allows you to create dynamic tables of IP addresses depending on certain conditions, and then set the allowing and prohibiting rules for these tables.
Consider a simple two-line example of recent:
iptables -A INPUT --protocol tcp --match state --state NEW --dport 22 --match recent --update --seconds 30 --name SSHT --jump DROP

iptables -A INPUT --protocol tcp --match state --state NEW --dport 22 --match recent --set --name SSHT --jump ACCEPT
Let's start with the second rule. Everyone who tries to log in (log in, because we use --state NEW) on port 22 (SSH) is skipped (--jump ACCEPT), but his IP address falls into a table called SSHT. When they try to connect again from this address, the first rule starts working, the meaning of which is to update the (--update) record in the table and at the same time check when this record was installed / updated for the last time. If the record was installed / updated less than 30 seconds ago (--seconds 30), --jump DROP is triggered and the packet is discarded. Thus, brute forcers trying to crash on the SSH port will be discarded if the frequency of sending their packets exceeds 1 packet in 30 seconds.
Let's try using recent for our needs:
iptables -A INPUT --in-interface eth1 --protocol udp --dport 53 --match state --state NEW --match string --algo kmp --hex-string "|00 00 02 00 01|" --from 40 --to 45 --match recent --name DNST --update --seconds 600 --jump DROP

iptables -A INPUT --in-interface eth1 --protocol udp --dport 53 --match state --state NEW --match string --algo kmp --hex-string "|00 00 02 00 01|" --from 40 --to 45 --match recent --name DNST --set --jump ACCEPT
Thus, I allow making NS requests to the external interface no more than 1 time in 10 minutes.
After adding these rules to the / proc / net / xt_recent of my server, a DNST file appeared, in which the IP addresses of the attackers began to be recorded. And the DNS server stopped giving in to provocations:
14: 10: 19.011818 IP 89.149.221.182.40320> MY_IP.53: 23508+ NS ?. (17)
14: 10: 25.243499 IP 89.149.221.182.64984> MY_IP.53: 25306+ NS ?. (17)
14: 11: 08.832827 IP 89.149.221.182.15864> MY_IP.53: 48029+ NS ?. (17)
14: 11: 15.063058 IP 89.149.221.182.30959> MY_IP.53: 64444+ NS ?. (17)
After several days of the rules, the number of packets from the attackers decreased several times. Now I get 2-3 packets per minute, which are immediately discarded by the firewall.
UPD: In the last block of code, I hurried and wrote an error, I already fixed it, thanks for noticing









