 January 3, 2009 at 18:13
Automation utorrent'a
Once set up, then do not touch for a long, long time - the dream of any optimizer. So you can configure the torrent client to work automatically so as not to waste time visiting sites trackers.
Utorrent has the ability to process the RSS feed of the tracker and use filters to download only what is needed, as well as the ability to flexibly use the scheduler. Surely many already know about the setting, some do not need this in principle. The article is aimed at those who did not know about these opportunities or did not reach their hands to try, figure out, configure.
Automatically take torrents from the tracker
First, add the RSS feed we need. For example, tokyotosho it looks like this:

Feed url - address of the tape;
Custom alias- the name of the tape, you can assign any;
Subscription - a subscription, here it’s best not to download everything in a row, the disk space is not rubber, but to filter it;
Next, we proceed to configure the filters, the menu is called up by the combination of Ctrl + R:

Filter - what exactly are we looking for in the RSS feed. If we take [Eclipse] * Toaru * Majutsu * no * Index * as an example, it turns out that we are looking for all files starting with [Eclipse] and containing the words Toaru, Majutsu, no, Index
Not - exceptions, here you can specify MKV or AVI, or resolution;
Save in - a specific place to save (if not specified, use what is written in your settings);
Feed- indicate the tape that we are processing (in the example, the tokyotosho channel with a subtitled anime);
Episode number - made in order not to download old episodes (not a very useful option for anime series, in principle);
Don't start downloads automatically - the included option will prevent the download from starting automatically (to the user's taste);
Filter matches original name instead of decoded name - usually requires inclusion, since the names in the rss tape and those that fall into the database do not always match;
Give download highest priority - gives the highest priority, puts the download number 1 (this is not a force mode);
Smart ep. filter - allows you to download only one version of the episode (again, at the choice of the user);
Minimum interval - since the last match, the torrent client will not search for matches by filter in the stream;
Label for new torrents - you can assign a label to each series or direction, which in itself is quite convenient;
We can easily download both series releases of all groups in a row, and individual fansab groups.
It is possible to use several conditions, separating them with the symbol "|". On the lostfilm tracker, I use this set of conditions: * Heroes * | * Star * Wars * The * Clone * Wars * | * Sarah * Connor * Chronicles * |
* Terminator * The * Sarah * Connor * Chronicles * | * The * IT * Crowd * | * House * M * D * |
* Fringe * | * Knight * Rider * | * Legend * of * the * Seeker * | * Nowhere * Man * |
* BattleStar * Galactica *
In History, you can check the results of successful selections from the feed:

Close-up torrent client:

Small tricks with paths and tags:
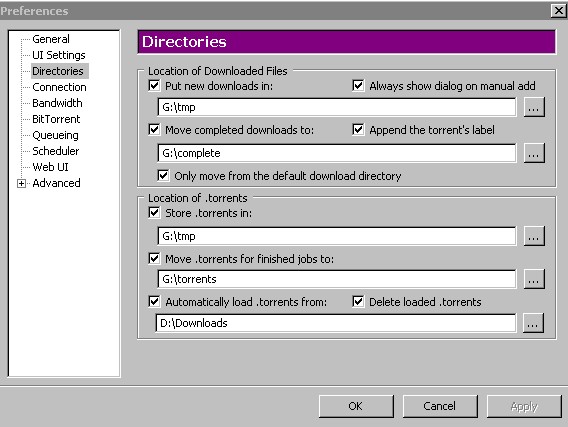
In the menu, we choose where and how to direct our files and torrents. An example in order from the screenshot
G: \ tmp - new torrents fall into a temporary directory;
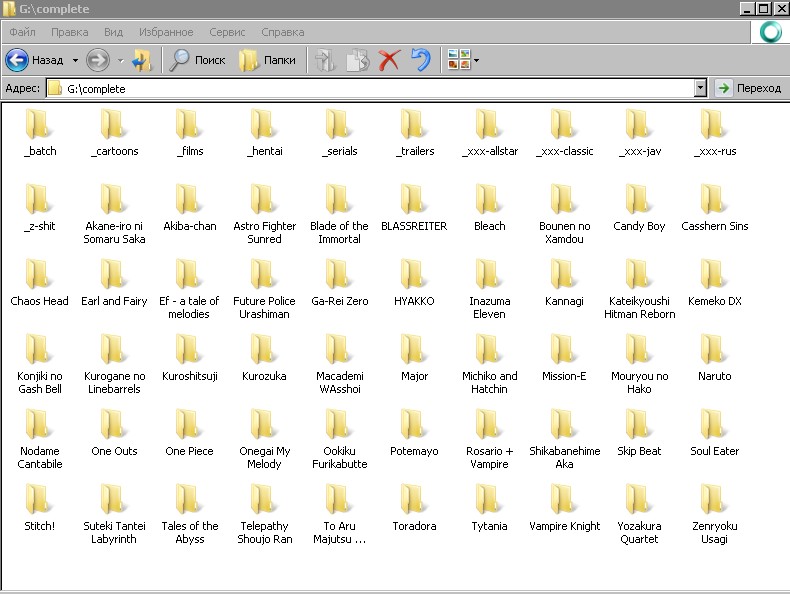
G: \ complete - move the downloaded files here (pay attention to the append the torrent's label option, it gives us the opportunity to get neat directories, as in the following screenshot);
G: \ tmp - the place where we store torrents;
G: \ torrents - and here we store completed torrents;
D: \ Downloads - where to get new torrents from;
The output is neat directories:
PS: There is a little trick when working with lostfilm. Using the link to the RSS feed simply will not work, so you need to use its modified version: lostfilm.tv/rssdd.xml : COOKIE: uid = indicate your; pass = indicate your. uid and pass can be viewed using Mozilla Firefox (Tools -> Settings -> Privacy -> Show cookies -> look for lostfilm.tv).
The work of the scheduler.
My computer works around the clock, almost 24/7. Constantly one of the torrents sways and surrenders. For convenience, I began to use the scheduler in my favorite torrent client. The benefits of use are tangible. You can plan when to download, when to give out, and when to relax.
It is activated quite simply:
Options -> Preferences -> Scheduler -> Enable Scheduler
Legend:
Full speed - download in full pairs;
Limited - we include limits on downloading and distribution;
Turn off - turn off completely;
Seeding Only - only distribution;
Imagine, from work you may need a computer to control it remotely, you can disable or limit downloads. You go home - downloads resume, come - everything stops, you can use the channel for other purposes. Absolutely wonderful mode “Seeding Only”, an ideal opportunity to restore or raise the rating on trackers.
The only remark is that the scheduler rules do not apply to Force downloads and distributions.
Remote Access, WebUI
It was necessary to configure remote control of the favorite torrent client, uTorrent. The fact is that sometimes it accelerates very strongly, clogging the channel and other applications no longer respond. And so it would be possible to limit the speed or stop the download remotely. Enabled Web UI (Web User Interface) in Option -> Preferences -> Advanced -> WebUI, but could not get access.
It turned out that the setup is a little more interesting:
1-2 - optional, for versions below 1.8.x (added in the versions above)
1. First, download an additional plug-in for WebUI - ((http://download.utorrent.com/beta/ webui_v0.310_beta_2.rar webui_v0.310_beta_2.rar))
2. Copy the zip archive inside to the folder where uTorrent holds its settings; navigate to settings.dat. Usually in Documents and Settings:
1-2 - optional, for versions below 1.8.x (in versions above this feature was added)
3. In Option -> Preferences -> Advanced -> WebUI enable the option, specify the port and access details:
4. Open the port on the router (optional);
5. We look at the web interface: localhost : port / gui / - locally (step 4 is not needed), your ip : port / gui / - remotely.
UPD: Added about WebUI, thanks VSOP_juDGe
UPD2: Sorry that I do not mark successful messages with pluses, the system writes that “there is not enough charge”. :-(
Utorrent has the ability to process the RSS feed of the tracker and use filters to download only what is needed, as well as the ability to flexibly use the scheduler. Surely many already know about the setting, some do not need this in principle. The article is aimed at those who did not know about these opportunities or did not reach their hands to try, figure out, configure.
Automatically take torrents from the tracker
First, add the RSS feed we need. For example, tokyotosho it looks like this:
Feed url - address of the tape;
Custom alias- the name of the tape, you can assign any;
Subscription - a subscription, here it’s best not to download everything in a row, the disk space is not rubber, but to filter it;
Next, we proceed to configure the filters, the menu is called up by the combination of Ctrl + R:
Filter - what exactly are we looking for in the RSS feed. If we take [Eclipse] * Toaru * Majutsu * no * Index * as an example, it turns out that we are looking for all files starting with [Eclipse] and containing the words Toaru, Majutsu, no, Index
Not - exceptions, here you can specify MKV or AVI, or resolution;
Save in - a specific place to save (if not specified, use what is written in your settings);
Feed- indicate the tape that we are processing (in the example, the tokyotosho channel with a subtitled anime);
Episode number - made in order not to download old episodes (not a very useful option for anime series, in principle);
Don't start downloads automatically - the included option will prevent the download from starting automatically (to the user's taste);
Filter matches original name instead of decoded name - usually requires inclusion, since the names in the rss tape and those that fall into the database do not always match;
Give download highest priority - gives the highest priority, puts the download number 1 (this is not a force mode);
Smart ep. filter - allows you to download only one version of the episode (again, at the choice of the user);
Minimum interval - since the last match, the torrent client will not search for matches by filter in the stream;
Label for new torrents - you can assign a label to each series or direction, which in itself is quite convenient;
We can easily download both series releases of all groups in a row, and individual fansab groups.
It is possible to use several conditions, separating them with the symbol "|". On the lostfilm tracker, I use this set of conditions: * Heroes * | * Star * Wars * The * Clone * Wars * | * Sarah * Connor * Chronicles * |
* Terminator * The * Sarah * Connor * Chronicles * | * The * IT * Crowd * | * House * M * D * |
* Fringe * | * Knight * Rider * | * Legend * of * the * Seeker * | * Nowhere * Man * |
* BattleStar * Galactica *
In History, you can check the results of successful selections from the feed:
Close-up torrent client:
Small tricks with paths and tags:
In the menu, we choose where and how to direct our files and torrents. An example in order from the screenshot
G: \ tmp - new torrents fall into a temporary directory;
G: \ complete - move the downloaded files here (pay attention to the append the torrent's label option, it gives us the opportunity to get neat directories, as in the following screenshot);
G: \ tmp - the place where we store torrents;
G: \ torrents - and here we store completed torrents;
D: \ Downloads - where to get new torrents from;
The output is neat directories:
PS: There is a little trick when working with lostfilm. Using the link to the RSS feed simply will not work, so you need to use its modified version: lostfilm.tv/rssdd.xml : COOKIE: uid = indicate your; pass = indicate your. uid and pass can be viewed using Mozilla Firefox (Tools -> Settings -> Privacy -> Show cookies -> look for lostfilm.tv).
The work of the scheduler.
My computer works around the clock, almost 24/7. Constantly one of the torrents sways and surrenders. For convenience, I began to use the scheduler in my favorite torrent client. The benefits of use are tangible. You can plan when to download, when to give out, and when to relax.
It is activated quite simply:
Options -> Preferences -> Scheduler -> Enable Scheduler
Legend:
Full speed - download in full pairs;
Limited - we include limits on downloading and distribution;
Turn off - turn off completely;
Seeding Only - only distribution;
Imagine, from work you may need a computer to control it remotely, you can disable or limit downloads. You go home - downloads resume, come - everything stops, you can use the channel for other purposes. Absolutely wonderful mode “Seeding Only”, an ideal opportunity to restore or raise the rating on trackers.
The only remark is that the scheduler rules do not apply to Force downloads and distributions.
Remote Access, WebUI
It was necessary to configure remote control of the favorite torrent client, uTorrent. The fact is that sometimes it accelerates very strongly, clogging the channel and other applications no longer respond. And so it would be possible to limit the speed or stop the download remotely. Enabled Web UI (Web User Interface) in Option -> Preferences -> Advanced -> WebUI, but could not get access.
It turned out that the setup is a little more interesting:
1-2 - optional, for versions below 1.8.x (added in the versions above)
1. First, download an additional plug-in for WebUI - ((http://download.utorrent.com/beta/ webui_v0.310_beta_2.rar webui_v0.310_beta_2.rar))
2. Copy the zip archive inside to the folder where uTorrent holds its settings; navigate to settings.dat. Usually in Documents and Settings:
1-2 - optional, for versions below 1.8.x (in versions above this feature was added)
3. In Option -> Preferences -> Advanced -> WebUI enable the option, specify the port and access details:
4. Open the port on the router (optional);
5. We look at the web interface: localhost : port / gui / - locally (step 4 is not needed), your ip : port / gui / - remotely.
UPD: Added about WebUI, thanks VSOP_juDGe
UPD2: Sorry that I do not mark successful messages with pluses, the system writes that “there is not enough charge”. :-(









