October 23, 2008 at 16:53
Install OS Inferno New Edition
OUTDATED: This article is outdated; for installation under modern OS, see the new article .
Update: Added installation description for Windows XP SP2 .
Update: Added installation description for Mac OS X 10.4.8 Tiger .
Update: Added installation description for Mac OS X 10.5.5 Leopard .
Yes, the version in svn calls itself that way! Install, launch the browser (Charon) and see for yourself. (In principle, the latest release is “ Fourth Edition ”, but in practice it has long been the same svn - “Fourth Edition” was released around 2004, and now an offsite under the guise of “Fourth Edition” has a svn snapshot from 20071003.)
The svn version is absolutely stable, and, unlike the Fourth Edition installer, it is much easier to update. To install it on a battle server or release your application, it is no less convenient. In general, the only drawback is the need to have subversion and a compiler to build the system, all the rest are pluses.
So, we put a fresh OS Inferno from SVN, in hosted mode (i.e. as an emulator working under another OS).
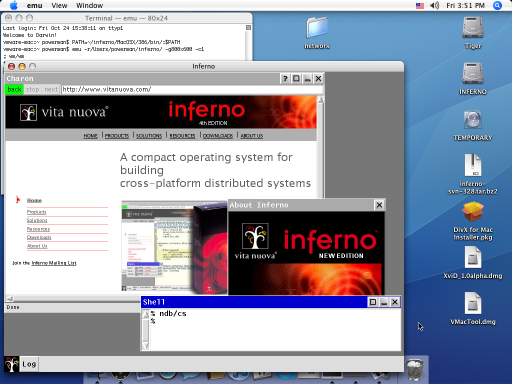
Although Inferno should be installed and work the same way in all systems, we all know very well that there are always nuances. I tested the installation on Hardened Gentoo Linux and on Ubuntu 8.04. I hope this choice of systems will cover most of the nuances of installation in other Linux distributions.
There will be no problems with the compiler and .h files in Gentoo, I assure you. :) But Hardened will add a little work. The fact is that it
That's what is not here ... uh ... there is nothing here. :) No Hardened, no subversion, no libraries, no .h files. I have to put:
It may be necessary to connect additional repositories, I won’t say for sure - I already had them connected to install other applications.
The following describes the installation from root, into the directory
The time / traffic / disk space costs are approximately the following:
Download. All commands, unless otherwise stated, are executed as root. When installed in the home directory, set INFERNO_ROOT, for example:
We configure compilation options. Instead,
Putting the system together. Remember, it is
Configure emu settings. It is advisable to register this command in
Configure the user inferno. When installed in the home directory, these commands do not need to be executed. The second chown is needed when TPE is enabled.
Update: see comment on / tmp setting .
Basically, at this point OS Inferno is installed, and it can be used. But Fourth Edition includes additional fonts (B&H Lucida), which, due to licensing restrictions, Google does not allow to upload to svn on code.google.com. In principle, most applications will work without them. In addition, they can be replaced with alternative free fonts (as they seem to have done in the Acme SAC project ). But I did not understand this. Therefore, we now, quickly, deflate and install the Fourth Edition into the temporary directory, and extract these fonts from it. :)
The semicolon at the beginning of lines is an invitation to Inferno-vsky sh. Finishing work with Inferno - in text mode, either Ctrl-D or Ctrl-C, in graphic mode - closes the Inferno graphic window. (The graphical environment is started by the command
Login as user inferno. When installing in the home directory, skip this step.
Log in as a regular user. The command will
At startup, the
When installing in the home directory, the configuration ends here - there is no point in setting up three authorization subjects with a bunch of passwords when working under a single account.
First you need to explain what is configured and why. Authorization works as follows: the client and the service mutually authorize each other using certificates based on private / public keys - everything is almost like ssh or https. Almost because they authorize each other really mutually . To do this, they both must obtain their certificates from the same CA (certificate authority), which both trust. So it is the CA, issuing or not issuing these certificates, determines whether the client will have access to the service or not.
Thus, we need to configure three different systems - the authorization server, some useful service, and the client terminal. To do this, we can run three independent
First of all, you need to register the address (hostname or IP) of the authorization server on the client and service machines.But, since they have the same files in our configuration, it’s enough to edit one file / usr / local / inferno / lib / ndb / local (you can enter 127.0.0.1):
Next, run the authorization server. It will be launched under the user inferno, and all files with CA keys and certificates will be accessible only to this user.
... clear the key database
... we generate a certificate of our CA, to the specified name (any)
... we start the authorization service, and you will need to set a password, which in the future will need to be entered each time this service is launched - this is necessary because keys in files will be encrypted with this password
... now we can get real user accounts on our authorization service, with passwords, finally :) - one for the inferno user (just to not have a third user, he will use the second server to start useful services) and the second for the user powerman (which will use the client terminal on the third server to connect to the useful service on the second server)
... well, let’s admire the TCP services running on this “server”
We leave the authorization server to work, and launch the next
... ndb / cs is something like a universal resolver, without it you won’t work much with Inferno (there is still ndb / dns, but in hosted mode you can not start it and use the host OS dns resolver)
... we turn to the authorization service (the first server), introduce ourselves under our username / password, and get our certificate from it (this is a one-time operation, provided that the certificate is not expired and no one will delete the file where the certificate will be saved now).
... now, having a certificate, you can start a useful service - for example rstyx, which allows you to remotely execute commands on this server - an analogue of ssh
We leave it to work and launch the third one
... now we can connect to the second server and execute a command on it. for example, let's see the list of processes first on this terminal, and then on the second server
Everything is absolutely trivial here:
RTFM RTFM And again RTFM. The system is very different from traditional ones. Moreover, do not count on reading the documentation - you need to read the source, everything is most important there. :)
When there is an understanding that how it works - write to Limbo. (I do not advise writing on sh - it is too slow, which is rather strange, by the way.) Write network services, distributed systems, or full-fledged GUI applications.
Good luck :)
Update: Added installation description for Windows XP SP2 .
Update: Added installation description for Mac OS X 10.4.8 Tiger .
Update: Added installation description for Mac OS X 10.5.5 Leopard .
New edition
Yes, the version in svn calls itself that way! Install, launch the browser (Charon) and see for yourself. (In principle, the latest release is “ Fourth Edition ”, but in practice it has long been the same svn - “Fourth Edition” was released around 2004, and now an offsite under the guise of “Fourth Edition” has a svn snapshot from 20071003.)
The svn version is absolutely stable, and, unlike the Fourth Edition installer, it is much easier to update. To install it on a battle server or release your application, it is no less convenient. In general, the only drawback is the need to have subversion and a compiler to build the system, all the rest are pluses.
So, we put a fresh OS Inferno from SVN, in hosted mode (i.e. as an emulator working under another OS).
Features of installation in different systems
Although Inferno should be installed and work the same way in all systems, we all know very well that there are always nuances. I tested the installation on Hardened Gentoo Linux and on Ubuntu 8.04. I hope this choice of systems will cover most of the nuances of installation in other Linux distributions.
Hardened Gentoo Linux
There will be no problems with the compiler and .h files in Gentoo, I assure you. :) But Hardened will add a little work. The fact is that it
emucan work both in the bytecode interpretation mode of the Dis virtual machine and in JIT mode . And Hardened (more precisely, PaX included in it) really does not like generating code on the fly with passing control to it. Therefore, to run emuin JIT mode for it, you will need to partially disable PaX. This is done by teams paxctland chpax. On systems without PaX, these commands are most likely not, and you do not need to execute them. Another nuance arises when Trusted Path Execution (TPE) is enabled, but usually it’s enough to make sure that the permissions for the emu directory are root. How to deal with SeLinux - figure it out for yourself. :)Ubuntu 8.04
That's what is not here ... uh ... there is nothing here. :) No Hardened, no subversion, no libraries, no .h files. I have to put:
apt-get install subversion build-essential
apt-get install libx11-dev libxext-dev x11proto-xext-dev
It may be necessary to connect additional repositories, I won’t say for sure - I already had them connected to install other applications.
Install OS Inferno
The following describes the installation from root, into the directory
/usr/local/inferno, in full multi-user mode . ~/inferno/I will mention the differences during installation from the regular user in the course of the process - basically they come down to the fact that some of the commands are meaningless and / or not necessary. The time / traffic / disk space costs are approximately the following:
- the version archive from svn takes about 30 MB , but it is clear that svn will pump much more traffic
- the system is completely [re] assembled on my Core2Duo 6600 in about two minutes
- when installed on disk, it takes about 250 MB
Download. All commands, unless otherwise stated, are executed as root. When installed in the home directory, set INFERNO_ROOT, for example:
/home/powerman/inferno. And, of course, execute all commands from a regular user.export INFERNO_ROOT = / usr / local / inferno svn checkout http://inferno-os.googlecode.com/svn/trunk/ $ INFERNO_ROOT cd $ INFERNO_ROOT
We configure compilation options. Instead,
perl -i -peyou can start your favorite text editor and edit with mkconfigpens.export PATH = $ INFERNO_ROOT / Linux / 386 / bin: $ PATH
perl -i -pe 's / ^ ROOT =. * / ROOT = $ ENV {INFERNO_ROOT} / m' mkconfig
perl -i -pe 's / ^ SYSHOST =. * / SYSHOST = Linux / m' mkconfig
perl -i -pe 's / ^ OBJTYPE =. * / OBJTYPE = 386 / m' mkconfig
Putting the system together. Remember, it is
paxctlneeded only on PaX-protected systems and only to run in JIT mode.sh makemk.sh mk nuke mk install paxctl -psmxe Linux / 386 / bin / emu
Configure emu settings. It is advisable to register this command in
~/.bashrc- in order not to pass these parameters at each start emu. (By the way, it is still very desirable to ~/.bashrcprescribe export PATH=/usr/local/inferno/Linux/386/bin:$PATH- it will be more convenient to run emuand limbo.) Of course, the dimensions of the Inferno window system need to be set to your convenience, not necessarily 1024x768. In principle, it is more convenient when the size of the Inferno window is less than the host OS resolution. The parameter -c0disables JIT (just enable it to enable emu -c1). The fact is that when JIT is enabled, it is more difficult to debug your applications - the debugger does not work, the boundaries of arrays are less well controlled, etc. And the speed at Inferno without JIT is more than impressive.export EMU = "- r $ INFERNO_ROOT -g1024x768 -c0"
Configure the user inferno. When installed in the home directory, these commands do not need to be executed. The second chown is needed when TPE is enabled.
groupadd inferno
useradd -m -s / bin / bash -g inferno inferno
chown -R inferno: inferno $ INFERNO_ROOT
chown -R root: root $ INFERNO_ROOT / Linux / 386 / bin /
echo exec $ INFERNO_ROOT / Linux / 386 / bin / emu $ EMU >> ~ inferno / .bashrc
mv usr usr.skel
ln -s / home usr
cp -a usr.skel / inferno / * ~ inferno /
Update: see comment on / tmp setting .
Fonts
Basically, at this point OS Inferno is installed, and it can be used. But Fourth Edition includes additional fonts (B&H Lucida), which, due to licensing restrictions, Google does not allow to upload to svn on code.google.com. In principle, most applications will work without them. In addition, they can be replaced with alternative free fonts (as they seem to have done in the Acme SAC project ). But I did not understand this. Therefore, we now, quickly, deflate and install the Fourth Edition into the temporary directory, and extract these fonts from it. :)
mkdir / tmp / inferno
cd / tmp / inferno
wget http://www.vitanuova.com/dist/4e/20071003/inferno.tgz
wget http://www.vitanuova.com/dist/4e/20071003/Linux.tgz
tar xzf inferno.tgz
tar xzf Linux.tgz
chown -R root: root / tmp / inferno
chpax -psmxe Linux / 386 / bin / emu
sh install / Linux-386.sh / tmp / inferno /
cp -r fonts / {lucida, lucidasans, lucm, pelm, LICENCE} / usr / local / inferno / fonts /
rm -rf / tmp / inferno
Testing
The semicolon at the beginning of lines is an invitation to Inferno-vsky sh. Finishing work with Inferno - in text mode, either Ctrl-D or Ctrl-C, in graphic mode - closes the Inferno graphic window. (The graphical environment is started by the command
wm/wm.) Login as user inferno. When installing in the home directory, skip this step.
# su - inferno
; cd
; pwd
/ usr / inferno
; cat / dev / user
inferno
Log in as a regular user. The command will
cpinitialize your home directory; it is not necessary to repeat it in the future before starting Inferno. The installation of PATH and EMU is also better to register in ~/.bashrc. Then to start Inferno it will be enough to start emu.$ cp -r /usr/local/inferno/usr.skel/inferno/* ~ / $ export PATH = / usr / local / inferno / Linux / 386 / bin: $ PATH $ export EMU = "- r / usr / local / inferno / -g1024x768 -c0" $ emu ; cd ; pwd / usr / powerman ; cat / dev / user powerman
Initial setup of Inferno
At startup, the
emusystem is minimally initialized, after which it starts sh, which runs /lib/sh/profileto further initialize the system. I usually write in it:- Setting the time zone. In principle, this can be done once by copying the file, but use
bindis more Infern-ish. :) - Go to the current user's home directory (by default, the system is in the root directory).
- If the appropriate files are configured in the user's home directory, continue to initialize the system with these files.
bind / locale / Moscow / locale / timezone
cd
load std
and {ftest -e namespace} {nsbuild}
and {ftest -e profile} {run profile}
When installing in the home directory, the configuration ends here - there is no point in setting up three authorization subjects with a bunch of passwords when working under a single account.
Authorization Setup
First you need to explain what is configured and why. Authorization works as follows: the client and the service mutually authorize each other using certificates based on private / public keys - everything is almost like ssh or https. Almost because they authorize each other really mutually . To do this, they both must obtain their certificates from the same CA (certificate authority), which both trust. So it is the CA, issuing or not issuing these certificates, determines whether the client will have access to the service or not.
Thus, we need to configure three different systems - the authorization server, some useful service, and the client terminal. To do this, we can run three independent
emuon your machine - from the point of view of Inferno, these will be three different servers on which different applications will be launched. Of course, with this option there are some limitations - for example, it is impossible to start two identical network services in different ones emu- they will have a conflict when trying to open a TCP port. Well, the files on the disk they have in common, of course - but this does not apply to the "virtual" files (a la / proc and / dev in Linux), which are used very actively in Inferno . So the differences between the three are emuenough for you to perceive them as truly different and independent servers. First of all, you need to register the address (hostname or IP) of the authorization server on the client and service machines.But, since they have the same files in our configuration, it’s enough to edit one file / usr / local / inferno / lib / ndb / local (you can enter 127.0.0.1):
SIGNER = powerman.name
Next, run the authorization server. It will be launched under the user inferno, and all files with CA keys and certificates will be accessible only to this user.
# su - inferno
; cat / dev / user; echo
inferno
... clear the key database
; cp / dev / null / keydb / keys; chmod 600 / keydb / keys
... we generate a certificate of our CA, to the specified name (any)
; auth / createsignerkey powerman.name
... we start the authorization service, and you will need to set a password, which in the future will need to be entered each time this service is launched - this is necessary because keys in files will be encrypted with this password
; svc / auth
Key:
Confirm key:
... now we can get real user accounts on our authorization service, with passwords, finally :) - one for the inferno user (just to not have a third user, he will use the second server to start useful services) and the second for the user powerman (which will use the client terminal on the third server to connect to the useful service on the second server)
; auth / changelogin inferno
new account
secret:
confirm:
expires [DDMMYYYY / permanent, return = 23102009]: permanent
change written
; auth / changelogin powerman
new account
secret:
confirm:
expires [DDMMYYYY / permanent, return = 23102009]: permanent
change written
... well, let’s admire the TCP services running on this “server”
; netstat
tcp / 0 inferno Announced 0.0.0.0! 6673 ::! 0
tcp / 1 inferno Announced 0.0.0.0! 6677 ::! 0
tcp / 2 inferno Announced 0.0.0.0! 6671 ::! 0
tcp / 3 inferno Announced 0.0.0.0! 6672 ::! 0
;
We leave the authorization server to work, and launch the next
emuone with a useful service.# su - inferno ; cat / dev / user; echo inferno
... ndb / cs is something like a universal resolver, without it you won’t work much with Inferno (there is still ndb / dns, but in hosted mode you can not start it and use the host OS dns resolver)
; ndb / cs
... we turn to the authorization service (the first server), introduce ourselves under our username / password, and get our certificate from it (this is a one-time operation, provided that the certificate is not expired and no one will delete the file where the certificate will be saved now).
; getauthinfo default
use signer [$ SIGNER]:
remote user name [inferno]:
password:
save in file [yes]:
... now, having a certificate, you can start a useful service - for example rstyx, which allows you to remotely execute commands on this server - an analogue of ssh
; svc / rstyx
; netstat
tcp / 0 inferno Announced 0.0.0.0! 6668 ::! 0
;
We leave it to work and launch the third one
emu- the terminal of the user powerman.$ emu ; cat / dev / user; echo powerman ; ndb / cs ; getauthinfo default use signer [$ SIGNER]: remote user name [powerman]: password: save in file [yes]:
... now we can connect to the second server and execute a command on it. for example, let's see the list of processes first on this terminal, and then on the second server
; ps
       1 1 powerman 0: 00.0 release 74K Sh [$ Sys]
       8 7 powerman 0: 00.0 alt 17K Cs
      11 1 powerman 0: 00.0 ready 74K Ps [$ Sys]
; cpu powerman.name ps
       1 1 inferno 0: 00.0 release 83K Bufio [$ Sys]
       8 7 inferno 0: 00.0 alt 17K Cs
      13 1 inferno 0: 00.0 alt 9K Listen
      15 1 inferno 0: 00.0 release 9K Listen [$ Sys]
      22 1 powerman 0: 00.0 ready 1K Ps [$ Sys]
;
System update
Everything is absolutely trivial here:
cd / usr / local / inferno
svn up
mk install
What's next?
RTFM RTFM And again RTFM. The system is very different from traditional ones. Moreover, do not count on reading the documentation - you need to read the source, everything is most important there. :)
When there is an understanding that how it works - write to Limbo. (I do not advise writing on sh - it is too slow, which is rather strange, by the way.) Write network services, distributed systems, or full-fledged GUI applications.
Good luck :)