IoT project for smart home: building a prototype
- Transfer
Recently, we talked about the approach to working on IoT projects. Last time, we were most interested in the methodology, the stages of turning an idea first into a prototype, and then into a product ready for production. Today we suggest delving into technical details. Namely, let's talk about how to create a functional prototype of a smart home.
The project involves the Intel IoT Commercial Development Kit, the Intel NUC Kit DE3815TYKHE small form factor computer, the Arduino 101 board and some additional components. Having mastered this material, you can do the same as we did, even if your experience in creating IoT solutions is small.
Here's what you learn by mastering this guide:
Code and additional documentation can be found on GitHub .
Our project is a working model of a smart home, namely, the following is implemented here:
The smart home system that we are talking about works based on the following information that the sensors supply it with:
Data is exchanged in the system through the cloud. For example, if the owner of the house opens the garage door, the corresponding command is transferred to the cloud, and from there - already to the garage door mechanisms. This approach allows you to process information about the state of the system in the cloud, makes it possible to remotely access them. So, if the owner of the house does not remember whether he closed the garage door, he can find out from anywhere, and if the door is still not closed, he can remotely close it.
In this example, we restrict ourselves to the above features, not including additional functionality. But it can be implemented by expanding the system (in particular, using cloud resources).
Consider installing the Intel IoT Gateway Software Suite on the Intel NUC Kit DE3815TYKHE. Please note that since the size of the device’s built-in storage system is limited, we recommend that you do not create a recovery partition on it. You can return to the factory image of the system by downloading it from a USB drive.
After installing the system, you can connect to the NUC, which will act as an IoT gateway, from the developer's computer if the devices are on the same network. If you plan to connect the gateway to the Intel IoT Gateway Developer Hub, then to connect to the gateway, you will need to enter the appropriate IP address in the browser and go through the initial setup procedure.
In addition, if the gateway is connected to the Intel network, you will need to configure a proxy server.
Let's set up Intel NUC.
Here is a list of the components that are part of our project.
And here is how it all looks assembled:
Prototype system for smart home
Intel XDK IoT Edition supports JavaScript and Node.js development for IoT projects.
Please note that if you are using Windows, we recommend installing Bonjour Print Services software on your computer. This will allow the Intel XDK to automatically detect IoT devices connected to the network. Bonjour installation is optional, but it makes the job easier. You can connect to the device by manually entering the IP address and the necessary information for the connection. If you work on a corporate network, the firewall may block Bonjour.
Follow these steps to install Intel XDK:
Here we will talk about how to create a Bluemix application, how to connect MongoDB and work with data.
First, create a Bluemix application using MongoLab.

BlueMix User Interface
To do this, follow these steps:
Before you get started with Cloud Foundry, you need to install the cf command-line interface. It should be noted that working with this interface does not support Cygwin. Therefore, when working with Cloud Foundry on Windows, you need to use a different command line interpreter.
After installation, if you are not familiar with Cloud Foundry, follow the manual on this system to download the source code, and figure out how to send IBM Bluemix applications to the cloud.
After that, the application should start on the gateway.
The Node.js application for Bluemix uses MongoDB to store data and provides a REST API for working with them. In addition, it uses web sockets to transfer new information in real time to client and mobile applications.
This Node.js application runs on the Intel NUC, which acts as a gateway. The Arduino 101 board is connected to it, which allows the gateway to interact with sensors and other peripheral devices. The gateway also sends sensor readings to an application that runs in the IBM Bluemix cloud, and it, in turn, saves them.
The main communication protocol is web sockets. This allows the client (Intel NUC and Arduino 101) to interact with the cloud application. If a cloud connection is not available, the application uses SQLite to store data locally and sends it to the cloud when the connection is restored. In addition, this application, when the cloud is not available, interacts with the mobile application (recall - when there is communication with the cloud, the mobile application works with the system through it).
This application allows the user to interact with a touch sensor and a buzzer that simulate a doorbell, an ambient light sensor that can detect the presence of objects, a servo motor to simulate raising and lowering the garage door, and a rotation angle sensor that supplies the system with information about closing and opening the front door .
Administrative and mobile applications are tightly integrated with the application that runs on the Intel NUC. Instead of providing several versions of programs in the form of full-featured clients for various platforms (or complicating work on the project due to the need to develop cross-platform solutions), the project team decided to implement these applications in HTML5 and JavaScript using Intel XDK IoT Edition. This approach allowed us to create one version of each application that can run on different hardware platforms used by system administrators and its end users.
The administrative application displays information from sensors in a mode almost corresponding to real time, and also displays an event log using the REST API. It works on an ordinary computer or tablet and gives a complete overview of what is happening in a smart home, including information about events and conditions of objects. The application allows you to view logs and work with cloud data and analytical information.
The mobile application allows the user to open and close the garage door using web sockets. It works on a smartphone or other mobile device, allowing the user, in addition to opening and closing the garage door, to monitor how this happens, and also to find out if the door is locked.
In this material, we demonstrated the process of creating a prototype IoT-system, which literally anyone can reproduce.
Using the Intel IoT Commercial Developer Kit, Intel NUC, and Arduino 101, development teams can quickly create relatively inexpensive prototypes of IoT projects.
Additional components for such projects can be found, for example, in the Grove Starter Kit Plus IoT Edition. The cloud part can be implemented on IBM Bluemix. Software, including both server and client applications, can be prepared in Intel XDK IoT Edition.
We told you about the tools for creating IoT solutions and about approaches to working on them. Now it's up to you. Happy development!
- How to Handle an Intel NUC Kit DE3815TYKHE Computer
- How to manage Intel NUC I / O ports and work with various sensors using MRAA and UPM from Intel IoT Development Kit. This is a self-contained hardware and software solution that is designed to help developers explore the IoT field and create innovative projects.
- How to write and run code in Intel XDK IoT Edition. This IDE is designed to create applications that interact with sensors and actuators. It allows you to quickly start developing software for Intel IoT platforms.
- How to configure and connect to the cloud services of the IBM Bluemix platform. Among these services are data warehouses, analytical tools, tools for connecting devices to the cloud. Our project makes extensive use of the capabilities of Bluemix.
Code and additional documentation can be found on GitHub .
About Functionality
Our project is a working model of a smart home, namely, the following is implemented here:
- Observation of the front door. When the state of the front door changes, information about it is displayed in the administrative application. The system monitors the following door conditions: open, closed, locked and not locked.
- Doorbell monitoring. When someone presses the doorbell button mounted on the model, the corresponding notification is displayed in the administrative application.
- Observation and management of the garage door. The user, using a mobile application, can send commands to the system, in response to which the garage door rises or lowers. The mobile application shows the process of moving the door when it is opened or closed, and also notifies the user that the door is blocked by something and cannot be closed.
How the system works
The smart home system that we are talking about works based on the following information that the sensors supply it with:
- Garage door conditions: open, closed, locked or not locked.
- Events: doorbell triggering, locking and unlocking the front door, closing and opening the front door, closing and opening the garage door, locking the garage door.
Data is exchanged in the system through the cloud. For example, if the owner of the house opens the garage door, the corresponding command is transferred to the cloud, and from there - already to the garage door mechanisms. This approach allows you to process information about the state of the system in the cloud, makes it possible to remotely access them. So, if the owner of the house does not remember whether he closed the garage door, he can find out from anywhere, and if the door is still not closed, he can remotely close it.
In this example, we restrict ourselves to the above features, not including additional functionality. But it can be implemented by expanding the system (in particular, using cloud resources).
Configuring Intel NUC and Arduino 101
Consider installing the Intel IoT Gateway Software Suite on the Intel NUC Kit DE3815TYKHE. Please note that since the size of the device’s built-in storage system is limited, we recommend that you do not create a recovery partition on it. You can return to the factory image of the system by downloading it from a USB drive.
After installing the system, you can connect to the NUC, which will act as an IoT gateway, from the developer's computer if the devices are on the same network. If you plan to connect the gateway to the Intel IoT Gateway Developer Hub, then to connect to the gateway, you will need to enter the appropriate IP address in the browser and go through the initial setup procedure.
In addition, if the gateway is connected to the Intel network, you will need to configure a proxy server.
Let's set up Intel NUC.
- If you do not have an account in the Intel IoT Platform Marketplace yet , create one.
- Order the Intel IoT Gateway Software Suite and, following the instructions received by e-mail, download the image file.
- Unzip the downloaded archive and write the IMG file to a USB drive of at least 4 GB in size.
- To burn the image to disk, if you are working in Windows, you can use the Win32 Disk Imager application .
- On Linux, use the command:sudo dd if=GatewayOS.img of=/dev/ sdX bs=4M; sync
Here the USB drive is sdX. - After image capture is complete, disconnect the drive from your computer and connect to the NUC. You will also need to connect a monitor, keyboard and power cable to it.
- Turn on the Intel NUC, and, at boot time, press F2 to enter the BIOS.
- Configure booting from a USB drive. To do this:
- In the Advanced menu, select Boot .
- In the Boot Configuration property of the OS Selection section, select Linux .
- Make sure that the USB checkbox is checked in the Boot Devices section . - Save the changes and reboot the system. - Press F10 to enter the boot menu and select the USB drive there. - Log in (username and password are root).
- Install on the local Wind River Linux drive:
~# deploytool -d /dev/mmcblk0 --lvm 0 --reset-media –F - Use the command
poweroffto disconnect the gateway, then disconnect the USB drive from it and turn it on again. The device will boot from the local drive. - Connect the Ethernet cable to the NUC and use the ifconfig eth0 command to find out the IP address assigned to the gateway (it is assumed that the network to which the gateway is connected is configured to automatically configure new devices connected to it).
- Use the Intel IoT Gateway Developer Hub to update the MRAA and UPM repositories to the latest version, which is taken from the official source https://01.org . The same result can be achieved by executing the following commands:
~# smart update ~# smart upgrade ~# smart install upm - Connect the Arduino 101 board to the gateway and restart the NUC. On the Arduino 101, the Firmata sketch will be flashed, after which you can use MRAA and UPM with it.
- Configure the board using these instructions.
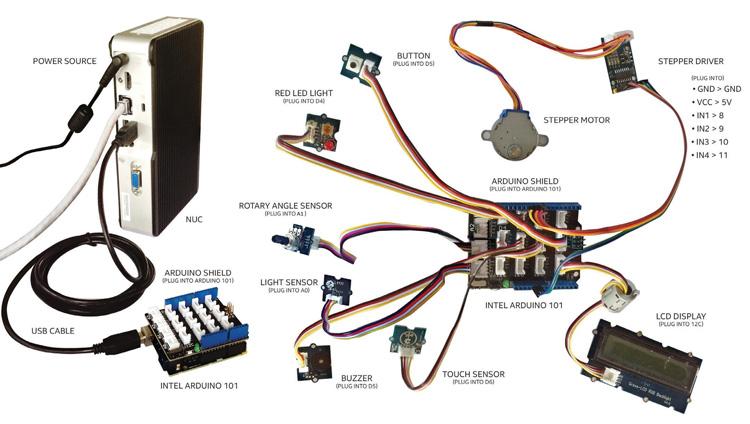
Hardware components
Here is a list of the components that are part of our project.
- Main system:
- Intel NUC Kit DE3815TYKHE .
- Arduino 101 .
- USB cable AB to connect the Arduino 101 board to the NUC. - Components from Grove Starter Kit Plus IoT Edition.
- Base Shield V2 (base expansion board).
- Gear Stepper Motor with Driver (stepper motor with control board).
- Button Module .
- Touch Sensor Module .
- Light Sensor Module (light sensor module).
- Rotary Sensor Module .
- Red LED (red LED).
- LCD with RGB Backlight Module (LCD with color backlight).
- Buzzer Module (buzzer).
And here is how it all looks assembled:
Prototype system for smart home
Install Intel XDK IoT Edition
Intel XDK IoT Edition supports JavaScript and Node.js development for IoT projects.
Please note that if you are using Windows, we recommend installing Bonjour Print Services software on your computer. This will allow the Intel XDK to automatically detect IoT devices connected to the network. Bonjour installation is optional, but it makes the job easier. You can connect to the device by manually entering the IP address and the necessary information for the connection. If you work on a corporate network, the firewall may block Bonjour.
Follow these steps to install Intel XDK:
- Download the IDE installer for your OS from this page. You can select the desired OS from the list.
- If you are running Windows or Mac OS, run the installer. Namely
- For Windows, right-click on the downloaded file and select Run as administrator in the menu that appears . If necessary, confirm the launch of the program.
- For Mac OS, double-click on the downloaded .DMG file in order to extract the installer. After that, run the extracted .PKG file. - If you use Linux, follow these steps:
- Launch a terminal
- Navigate to the folder in which the downloaded archives with the installer are located. For example, if this file is located in the Desktop folder , use the commandcd ~/Desktop/
- To unzip a file (suppose its name is -installername), enter a command of the formtar zxvf installername.
- Go to the folder where the files extracted from the archive are located.
- Run the installation command./install.sh - Now, following the instructions of the Installation Wizard, you can install the Intel XDK IoT Edition on your system.
- Install (this step is recommended only for Windows) Bonjour Print Services. To do this, follow these steps:
- Download the installer from this site.
- Run the downloaded BonjourPSSetup.exe file as administrator.
- Follow the instructions of the installation wizard. - In order for the Intel XDK IoT Edition to be able to detect the Intel NUC, you first need to install the xdk-daemon package on it, which is available in the official package repository . If this package is already installed, check if it is updated to version 0.0.35 or higher. Here you can use the following commands:
~# smart update ~# smart install xdk-daemon - After installing or updating xdk-daemon, restart the Intel NUC to start the corresponding service. Now you can add a gateway to the Intel XDK and remotely execute programs on it.
Configure IBM Bluemix
Here we will talk about how to create a Bluemix application, how to connect MongoDB and work with data.
Creating a Bluemix Application
First, create a Bluemix application using MongoLab.
BlueMix User Interface
To do this, follow these steps:
- Log in to the Bluemix console .
- After entering you will see the control panel (DASHBOARD).
- Click CREATE APP.
- Select the type of WEB application.
- Select the SDK for Node.js and click on the CONTINUE button.
- Give the application a name and click on the FINISH button.
- After the application is created in the IBM cloud, click on the ADD A SERVICE OR API button.
- In the Data & Analytics section, select MongoLab.
- Click BI to confirm the creation of the service.
- After the service is created, a pop-up window will appear asking you to restart the application. Click the RESTAGE button.
- Wait until the application restarts. When this process is completed, a message will be displayed.
Deploying an IBM Bluemix Application with Cloud Foundry
Before you get started with Cloud Foundry, you need to install the cf command-line interface. It should be noted that working with this interface does not support Cygwin. Therefore, when working with Cloud Foundry on Windows, you need to use a different command line interpreter.
After installation, if you are not familiar with Cloud Foundry, follow the manual on this system to download the source code, and figure out how to send IBM Bluemix applications to the cloud.
Connect to Intel's IoT Gateway and Launch Applications
- In Intel XDK, in the Develop window, click Serial Terminal.
- Select a board from the drop-down menu associated with the Port label.
- Click the Connect button to establish a connection. At the same time, use root as the user name, and your own password as the password.
- Enter the command
ifconfigin order to see the IP address of the system. - Select Add Manual Connection and enter the IP address and password.
- After the connection is established, click the button with the arrow pointing down to upload the project to the device.
- Click on the Run button.
After that, the application should start on the gateway.
Application Details
Cloud Application for IBM Bluemix
The Node.js application for Bluemix uses MongoDB to store data and provides a REST API for working with them. In addition, it uses web sockets to transfer new information in real time to client and mobile applications.
Prototype Application for Intel NUC Arduino 101 Connected to
This Node.js application runs on the Intel NUC, which acts as a gateway. The Arduino 101 board is connected to it, which allows the gateway to interact with sensors and other peripheral devices. The gateway also sends sensor readings to an application that runs in the IBM Bluemix cloud, and it, in turn, saves them.
The main communication protocol is web sockets. This allows the client (Intel NUC and Arduino 101) to interact with the cloud application. If a cloud connection is not available, the application uses SQLite to store data locally and sends it to the cloud when the connection is restored. In addition, this application, when the cloud is not available, interacts with the mobile application (recall - when there is communication with the cloud, the mobile application works with the system through it).
This application allows the user to interact with a touch sensor and a buzzer that simulate a doorbell, an ambient light sensor that can detect the presence of objects, a servo motor to simulate raising and lowering the garage door, and a rotation angle sensor that supplies the system with information about closing and opening the front door .
Administrative and mobile applications
Administrative and mobile applications are tightly integrated with the application that runs on the Intel NUC. Instead of providing several versions of programs in the form of full-featured clients for various platforms (or complicating work on the project due to the need to develop cross-platform solutions), the project team decided to implement these applications in HTML5 and JavaScript using Intel XDK IoT Edition. This approach allowed us to create one version of each application that can run on different hardware platforms used by system administrators and its end users.
The administrative application displays information from sensors in a mode almost corresponding to real time, and also displays an event log using the REST API. It works on an ordinary computer or tablet and gives a complete overview of what is happening in a smart home, including information about events and conditions of objects. The application allows you to view logs and work with cloud data and analytical information.
The mobile application allows the user to open and close the garage door using web sockets. It works on a smartphone or other mobile device, allowing the user, in addition to opening and closing the garage door, to monitor how this happens, and also to find out if the door is locked.
conclusions
In this material, we demonstrated the process of creating a prototype IoT-system, which literally anyone can reproduce.
Using the Intel IoT Commercial Developer Kit, Intel NUC, and Arduino 101, development teams can quickly create relatively inexpensive prototypes of IoT projects.
Additional components for such projects can be found, for example, in the Grove Starter Kit Plus IoT Edition. The cloud part can be implemented on IBM Bluemix. Software, including both server and client applications, can be prepared in Intel XDK IoT Edition.
We told you about the tools for creating IoT solutions and about approaches to working on them. Now it's up to you. Happy development!