We program lighting control by motion and lighting sensors on Node-RED
On the Russian-language Internet, there are still few articles about such a programming environment as Node-RED . This article will reveal the secret of the veil about this product and show, using the example of creating a lighting control algorithm using motion sensors, how simple it is with the help of Node-RED you can implement various scenarios and rules for automating a smart home in a fully graphical form without writing any code.
IBM, like other big companies, is trying to find its niche in the developing Internet of things. This is usually associated with the release of open-source applications and products in order to popularize their paid platforms. For example, in IBM a paid platform is Bluemix.
Node-RED is an open-source brainchild of IBM and, as it is simply written on the site, is a tool that serves to communicate hardware, API and services in new and interesting ways.
These methods are based on the use of graphic communication lines, on which messages are sent between nodes. Thus, it is possible to link various blocks simply with a mouse without using programming.
Development in Node-RED is carried out through an ordinary browser, the kernel itself can be run on various platforms - PC, RPi, cloud, etc.
I decided to try Node-RED to write scripts and rules for the smart home. That is for automation. My connection with various actuators, web services and sensors is made on OpenHAB. Why I decided not to do automation in the same place? Several reasons:
- In OpenHAB, scripts and rules are written in their own language. I did not want to study it only for the sake of one application.
- The very debugging of the rules is almost impossible - if the rule does not work, it is difficult to figure out why
- I would like my rules to be independent of hardware, communication channels, platforms and the software itself for communicating with devices. So that I can easily switch to another UD platform, for example Domoticz, MajorDomo, FHEM and take my rules with me, and not rewrite them again under a new UD platform.
So proceed to implement. The original task itself is simple and trivial:
I have LED spots for lighting in the corridor. I want the light to illuminate the movement and turn off itself after 10 seconds.
Let's complicate the task a bit:
- The light should turn on only when it is dark outside
- The light intensity should depend on time - until 9 o'clock the light should turn on with full intensity, and then only by 10%, like a backlight.
I will not describe the protocols and communication options with sensors and actuators here. Suffice it to say that in my smart home, all these protocols are reduced to one thing - MQTT, and through it there is already communication with the Node-RED.
And so what kind of sensors and actuators do I have?
1. Motion sensor. It publishes the message OPEN in the topic / myhome / state / Hall_motion, when it detects movement and CLOSED, if there is no movement within 2 seconds.
2. Light sensor. It measures the brightness of street lighting in the range of 0-1000 lux. Publishes a message once a minute to the topic / myhome / state / Lumin_Hall with the current light level.
3. Dimmer control LED lamps. It is subscribed to the topic / myhome / command / Light_Hall / state. If you write there 0 - the light turns off. 100 - turns on at maximum brightness. 1-99 - will change the intensity of the lighting. For night illumination enough intensity 1.
It is assumed that you have already installed Node-RED. If not, click on the link above and install any option that is convenient for you - on your computer, Raspberry, clowd, etc. In my case, Node-RED is installed on RPi2 (to mine, it is even included in the Raspbian distribution, so nothing needs to be installed at all). This flow does not require the installation of any additional libraries.
First of all, we create the necessary inputs and outputs for our algorithm. These will be MQTT clients subscribing to the relevant topics. Drag them from the library to the left and customize.
Note: The displayed block names can be changed in their settings.
For the light sensor, we create a Hall Light Sensor node from MQTT Input:

In its configuration, it is enough to register the broker's MQTT address and topic.

My broker is spinning on the same platform, so it’s enough to leave localhost.
For the motion sensor, create the Hall Motion Sensor node:

It is all the same, just prescribe another topic / myhome / state / Hall_motion.

As you can see, the broker’s address and parameters have already learned this node from the previous one, so you don’t need to enter them by the new one.
It remains to add the MQTT Output to make an output for the LED dimmer. Drag the MQTT Output and call it the Hall Light Dimmer.

In the parameters, you need only to specify the necessary topic, into which messages to control the dimmer will be sent - / myhome / command / Light_Hall / state

As a result, we received three nodes for our Flow.

It would not hurt to check their functionality. It is easy.
We connect Debug output to Input blocks.

And we connect Inject Input to the output block.

In the settings of this node, you need to change the payload to the level of the desired brightness of the lamp. For example, in this case it is 100. By

copy-paste we can create several identical Inject blocks, change the brightness, and connect to the output like this:

So it will work too. It's time to check. Poking the Deploy button:

Under the MQTT nodes, you should have a small message:

This means that they have connected to the MQTT broker. If everything went according to plan, then in the right tab of the debug you should begin to receive messages from the sensors, and if you click the rectangles to the left of the Inject nodes with the mouse, the lighting intensity of the luminaire connected to the dimmer should change. If everything works, you can go further.
For simplicity, I will call separate interconnected blocks chains. First of all, let's try to make a simple circuit that would turn on the light by the motion sensor and turn it off after a while. To do this, according to the Node-RED concept, we need the message from the motion sensor to reach the dimmer through certain blocks and have certain text. First, let's deal with the inclusion of light.
First of all, select from all the messages from the motion sensor a message with the text OPEN - this means that the movement has appeared. For this we use the switch block. We connect it to the output of the Hall Motion Sensor block we have already created.

Set it up so that the block only allows messages with the text OPEN to exit.

As can be seen from the picture, the block will compare payload with the text OPEN and send messages to output one if the text is the same.
Our dimmer requires that messages with the required brightness of 0 ... 100 are sent to the input. The text OPEN he will not understand. Therefore, we use the Change block to change the message text.


In the settings of this block we record the required change - message payload is changed to 100 - the required illumination intensity.
And finally, we connect all this to the input of our dimmer:

If we start this circuit, we can make sure that it is working - the light will turn on in motion. It remains to make it even turned off.
To do this, use the Trigger block and connect it to the output of the motion sensor.

Block trigger allows you to generate messages with a delay, and can also be reset by a specific message. Set it this way:

This setting means that when the first message arrives, the trigger does not send anything, but triggers the time delay at 8s and when it expires sends a message with the text 0. Also, the trigger is reset if it receives a message with the text OPEN at the input. What does this mean in our case?
Suppose a motion sensor has issued an OPEN message. This message will return the trigger to its original state without any reaction. Then, after some time, the motion sensor will display the message CLOSED. This message will start the time delay and after 8 seconds the trigger will give the message 0.
If during this time the OPEN message is received again, the trigger will again return to its original state and wait for the next message (which will logically be CLOSED). In this case, the trigger will not give any messages.
That is, in this way we created a timer that will serve us to automatically turn off the light after a given shutter speed. If you recall the description of the motion sensor, it becomes clear why it is set to 8 seconds, and not 10 - 2 seconds is added due to the exposure of the motion sensor itself.
It remains to connect the trigger output to the dimmer and you can run the circuit for testing.

I note that for simplicity, I post screenshots of already debugged chains. You can block your chain with Debug blocks to deal with the principle of operation and your chain can look like this:

And there is nothing wrong with that.
And you can do it like this:

And then, clicking on the rectangles to the left of the Inject blocks, you can debug the circuit without iron at all - on your laptop during a trip to the subway or even a tablet.
Now we need to make sure that the light does not turn on if it is too light outside. To do this, we need to add another chain and slightly change the main chain to take into account this factor.
First, take the block switch that is already familiar to us and connect it to the output of the light sensor.

We will configure this block so that it directs messages from the light sensor to one of the outputs, depending on the current illumination.

The condition above means that if the illumination is less than 10 lux, the message will be sent to output 1. Otherwise, it will go to output 2. Do not forget that you need to select the

Option so that the message is directed only to one of the outputs.
Based on the principle of operation, it is logical that if the message appeared on the first (upper) output, we need to turn on motion detection, and if on the second, turn it off.
Here, of course, 1000 and 1 methods are possible, the simplest of which is to simply block the message to turn on the light from the motion sensor, if it is light outside. We realize it.
It should be noted that the Node-RED implementation mechanism is based on messages. Those. no message - no event, no reaction. This imposes a certain specificity in case different messages arrive asynchronously, that is, at different points in time. For example, in this case, the message from the light sensor is asynchronous with respect to the messages from the motion sensor. Therefore, in order to take into account the effect of the light sensor, we need to remember the information that was in his message and then apply it the next time the message comes from the motion sensor.
The context comes to the rescue in this case - a field where you can store information during the execution of the flow. The context is global in relation to the whole environment, or local in relation to a specific flow or in general only in relation to a specific block.
In our case, we will use a context local to this flow. Those. variables will be visible to all blocks in this flow. Create a change block and connect it to the first output of the Light Threshold Detector.

As we recall, a message appears on this output if the light sensor reports that the lighting on the street is less than 10 Lux. Consider the change block configuration.

In this case, we use the Set rule to set the variable flow.Light_enabled to Yes. So we assigned the value of a global variable, which we can use in other blocks.
Similarly, create a second change block and connect it to the second output.

Its configuration will be as follows:

To find out whether such a detector works correctly, we can create a simple circuit with Inject and Debug blocks.

At the same time, in the settings of the Inject block, we indicate that it should output the value of the flow variable every second. Light_enabled

Then the result of the light sensor can be easily observed in the Debug tab.

The total light on / off circuit of the light sensor will look like this.

Now, to take this effect into account the control circuit of the motion sensor, we just insert the switch block in the circuit of the path of inclusion of light.

And set it up so that it misses messages from the motion sensor only if our global variable is flow. Light_enabled is set to Yes — that is, It is dark outside.

Done! Now our flow looks like this:

There are very few. We want to change the intensity of the LED lamp. Those. if we are dark, but until 9 pm, the light should be turned on at full power. But after nine - only at low power, like a night light.
To do this, create a block Inject:

It can be configured so that it displays a message at a certain time. Set it up at 21:00 each day.

In this case, we note that it will issue a message with a value of 1. This will be our desired intensity of illumination in the night mode. To use this value in the light control circuit, use the same trick with global variables. Create a change block:

And set it up so that the variable flow.Light_Brightness is assigned a value from the message.

To return the original brightness in the morning, create a second inject block that will run at 6 o'clock in the morning and give a brightness value of 100. Connect it to the same place.

Thus, the variable flow.Light_brightness will be assigned the value 1 every evening at 9 o'clock, and the value 100 every morning at 6 o'clock. It remains only to apply it in the main chain. To do this, we already have a Light Brightness Adjustment block:

For which we only need to change the setting so that it assigns not a constant, but the value of the flow.Light_brightness variable.

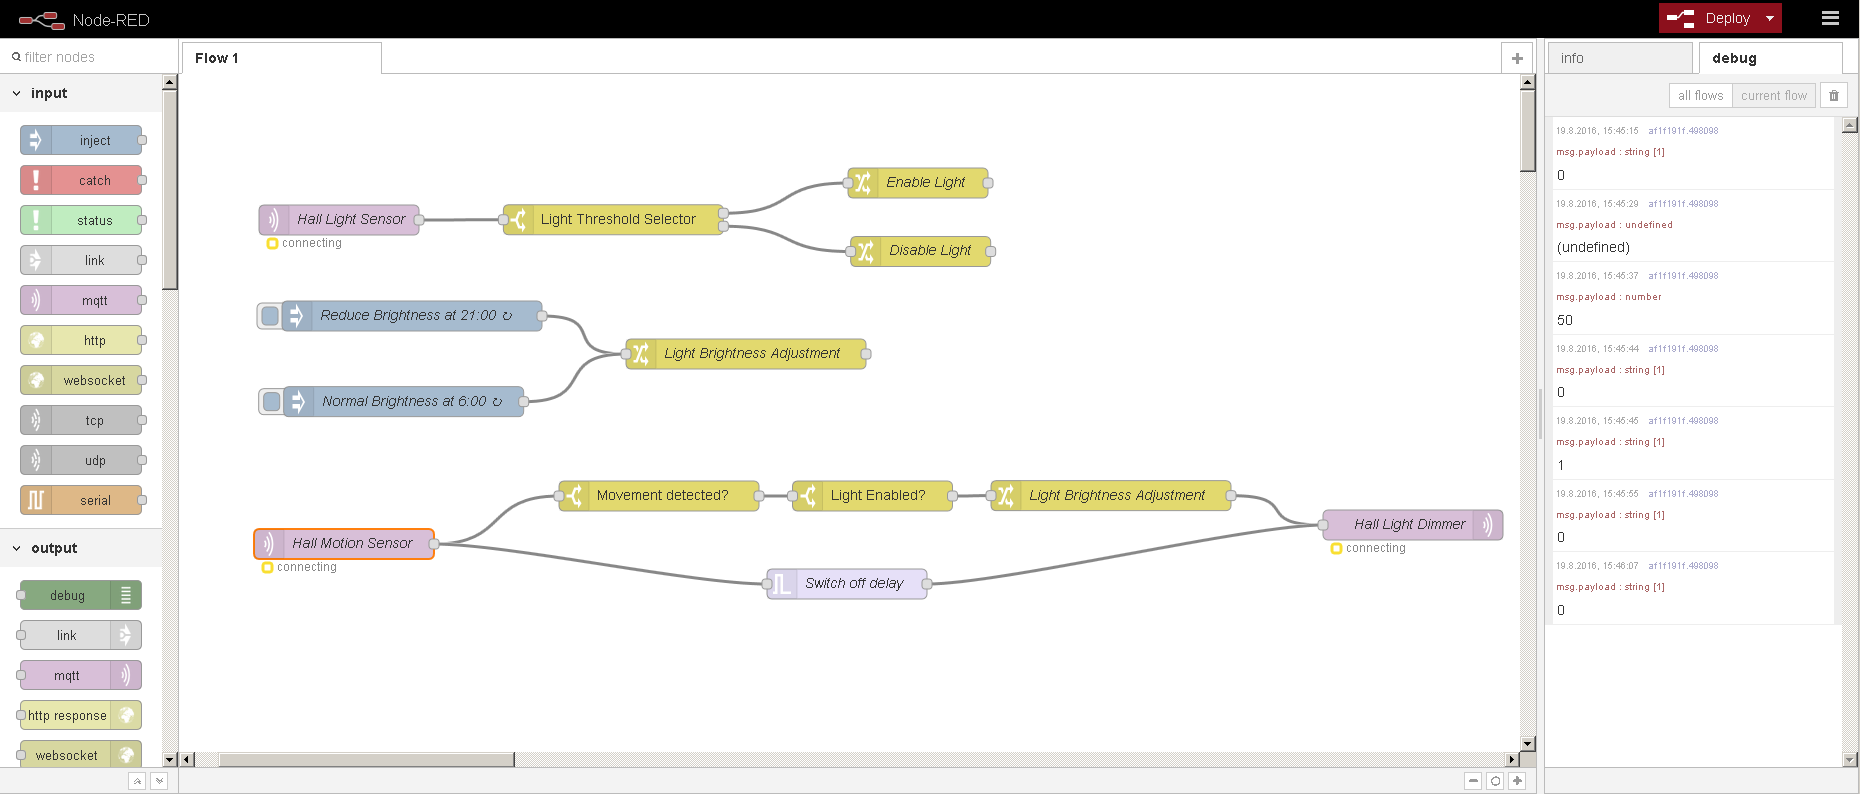
The resulting flow, cleared from debug blocks, looks neat and clean. When creating, we used only standard blocks from the Node-RED installation. At flows.nodered.org , however, there are over 800 additional blocks and libraries that allow you to add many different things.

For those who are interested in repeating this algorithm, I post the flow that I used for debugging:

And also its json code, which can be easily imported into any version of Node-RED and tested.
In this article I tried to demonstrate and tell how easy it is to implement everyday home automation algorithms in the Node-RED environment. I also tried to show the main advantages of this programming environment, such as:
- a logical graphical representation of links and functions
- ease of programming and easy debugging of user scripts
- hardware and platform independence of the algorithms obtained - this script will work equally well with OpenHAB and with ioBroker and with any other smart home platforms that support the MQTT protocol.
- easy exchange of ready-made algorithms between users thanks to Copy-Paste JSON code and the availability of an online platform for the exchange of successful solutions.
Node-RED can and much more - for example, to receive weather from the Internet, send notifications on Twitter or work with Nest thermostats. And based on this, you can create many other interesting and useful automation algorithms. But these are topics for the following articles.
What is Node-RED
IBM, like other big companies, is trying to find its niche in the developing Internet of things. This is usually associated with the release of open-source applications and products in order to popularize their paid platforms. For example, in IBM a paid platform is Bluemix.
Node-RED is an open-source brainchild of IBM and, as it is simply written on the site, is a tool that serves to communicate hardware, API and services in new and interesting ways.
These methods are based on the use of graphic communication lines, on which messages are sent between nodes. Thus, it is possible to link various blocks simply with a mouse without using programming.
Development in Node-RED is carried out through an ordinary browser, the kernel itself can be run on various platforms - PC, RPi, cloud, etc.
Node-red for smart home
I decided to try Node-RED to write scripts and rules for the smart home. That is for automation. My connection with various actuators, web services and sensors is made on OpenHAB. Why I decided not to do automation in the same place? Several reasons:
- In OpenHAB, scripts and rules are written in their own language. I did not want to study it only for the sake of one application.
- The very debugging of the rules is almost impossible - if the rule does not work, it is difficult to figure out why
- I would like my rules to be independent of hardware, communication channels, platforms and the software itself for communicating with devices. So that I can easily switch to another UD platform, for example Domoticz, MajorDomo, FHEM and take my rules with me, and not rewrite them again under a new UD platform.
Lighting control by motion and light sensors
So proceed to implement. The original task itself is simple and trivial:
I have LED spots for lighting in the corridor. I want the light to illuminate the movement and turn off itself after 10 seconds.
Let's complicate the task a bit:
- The light should turn on only when it is dark outside
- The light intensity should depend on time - until 9 o'clock the light should turn on with full intensity, and then only by 10%, like a backlight.
Sensors, performers and others. Iron
I will not describe the protocols and communication options with sensors and actuators here. Suffice it to say that in my smart home, all these protocols are reduced to one thing - MQTT, and through it there is already communication with the Node-RED.
And so what kind of sensors and actuators do I have?
1. Motion sensor. It publishes the message OPEN in the topic / myhome / state / Hall_motion, when it detects movement and CLOSED, if there is no movement within 2 seconds.
2. Light sensor. It measures the brightness of street lighting in the range of 0-1000 lux. Publishes a message once a minute to the topic / myhome / state / Lumin_Hall with the current light level.
3. Dimmer control LED lamps. It is subscribed to the topic / myhome / command / Light_Hall / state. If you write there 0 - the light turns off. 100 - turns on at maximum brightness. 1-99 - will change the intensity of the lighting. For night illumination enough intensity 1.
Flow Description in Node-RED
It is assumed that you have already installed Node-RED. If not, click on the link above and install any option that is convenient for you - on your computer, Raspberry, clowd, etc. In my case, Node-RED is installed on RPi2 (to mine, it is even included in the Raspbian distribution, so nothing needs to be installed at all). This flow does not require the installation of any additional libraries.
Inputs and Outputs
First of all, we create the necessary inputs and outputs for our algorithm. These will be MQTT clients subscribing to the relevant topics. Drag them from the library to the left and customize.
Note: The displayed block names can be changed in their settings.
For the light sensor, we create a Hall Light Sensor node from MQTT Input:
In its configuration, it is enough to register the broker's MQTT address and topic.
My broker is spinning on the same platform, so it’s enough to leave localhost.
For the motion sensor, create the Hall Motion Sensor node:
It is all the same, just prescribe another topic / myhome / state / Hall_motion.
As you can see, the broker’s address and parameters have already learned this node from the previous one, so you don’t need to enter them by the new one.
It remains to add the MQTT Output to make an output for the LED dimmer. Drag the MQTT Output and call it the Hall Light Dimmer.
In the parameters, you need only to specify the necessary topic, into which messages to control the dimmer will be sent - / myhome / command / Light_Hall / state
As a result, we received three nodes for our Flow.
It would not hurt to check their functionality. It is easy.
We connect Debug output to Input blocks.
And we connect Inject Input to the output block.
In the settings of this node, you need to change the payload to the level of the desired brightness of the lamp. For example, in this case it is 100. By
copy-paste we can create several identical Inject blocks, change the brightness, and connect to the output like this:
So it will work too. It's time to check. Poking the Deploy button:
Under the MQTT nodes, you should have a small message:
This means that they have connected to the MQTT broker. If everything went according to plan, then in the right tab of the debug you should begin to receive messages from the sensors, and if you click the rectangles to the left of the Inject nodes with the mouse, the lighting intensity of the luminaire connected to the dimmer should change. If everything works, you can go further.
Light control circuit by motion sensor
For simplicity, I will call separate interconnected blocks chains. First of all, let's try to make a simple circuit that would turn on the light by the motion sensor and turn it off after a while. To do this, according to the Node-RED concept, we need the message from the motion sensor to reach the dimmer through certain blocks and have certain text. First, let's deal with the inclusion of light.
First of all, select from all the messages from the motion sensor a message with the text OPEN - this means that the movement has appeared. For this we use the switch block. We connect it to the output of the Hall Motion Sensor block we have already created.
Set it up so that the block only allows messages with the text OPEN to exit.
As can be seen from the picture, the block will compare payload with the text OPEN and send messages to output one if the text is the same.
Our dimmer requires that messages with the required brightness of 0 ... 100 are sent to the input. The text OPEN he will not understand. Therefore, we use the Change block to change the message text.
In the settings of this block we record the required change - message payload is changed to 100 - the required illumination intensity.
And finally, we connect all this to the input of our dimmer:
If we start this circuit, we can make sure that it is working - the light will turn on in motion. It remains to make it even turned off.
To do this, use the Trigger block and connect it to the output of the motion sensor.
Block trigger allows you to generate messages with a delay, and can also be reset by a specific message. Set it this way:
This setting means that when the first message arrives, the trigger does not send anything, but triggers the time delay at 8s and when it expires sends a message with the text 0. Also, the trigger is reset if it receives a message with the text OPEN at the input. What does this mean in our case?
Suppose a motion sensor has issued an OPEN message. This message will return the trigger to its original state without any reaction. Then, after some time, the motion sensor will display the message CLOSED. This message will start the time delay and after 8 seconds the trigger will give the message 0.
If during this time the OPEN message is received again, the trigger will again return to its original state and wait for the next message (which will logically be CLOSED). In this case, the trigger will not give any messages.
That is, in this way we created a timer that will serve us to automatically turn off the light after a given shutter speed. If you recall the description of the motion sensor, it becomes clear why it is set to 8 seconds, and not 10 - 2 seconds is added due to the exposure of the motion sensor itself.
It remains to connect the trigger output to the dimmer and you can run the circuit for testing.
I note that for simplicity, I post screenshots of already debugged chains. You can block your chain with Debug blocks to deal with the principle of operation and your chain can look like this:
And there is nothing wrong with that.
And you can do it like this:
And then, clicking on the rectangles to the left of the Inject blocks, you can debug the circuit without iron at all - on your laptop during a trip to the subway or even a tablet.
Circuit on / off light depending on the brightness of street lighting
Now we need to make sure that the light does not turn on if it is too light outside. To do this, we need to add another chain and slightly change the main chain to take into account this factor.
First, take the block switch that is already familiar to us and connect it to the output of the light sensor.
We will configure this block so that it directs messages from the light sensor to one of the outputs, depending on the current illumination.
The condition above means that if the illumination is less than 10 lux, the message will be sent to output 1. Otherwise, it will go to output 2. Do not forget that you need to select the
Option so that the message is directed only to one of the outputs.
Based on the principle of operation, it is logical that if the message appeared on the first (upper) output, we need to turn on motion detection, and if on the second, turn it off.
Here, of course, 1000 and 1 methods are possible, the simplest of which is to simply block the message to turn on the light from the motion sensor, if it is light outside. We realize it.
It should be noted that the Node-RED implementation mechanism is based on messages. Those. no message - no event, no reaction. This imposes a certain specificity in case different messages arrive asynchronously, that is, at different points in time. For example, in this case, the message from the light sensor is asynchronous with respect to the messages from the motion sensor. Therefore, in order to take into account the effect of the light sensor, we need to remember the information that was in his message and then apply it the next time the message comes from the motion sensor.
The context comes to the rescue in this case - a field where you can store information during the execution of the flow. The context is global in relation to the whole environment, or local in relation to a specific flow or in general only in relation to a specific block.
In our case, we will use a context local to this flow. Those. variables will be visible to all blocks in this flow. Create a change block and connect it to the first output of the Light Threshold Detector.
As we recall, a message appears on this output if the light sensor reports that the lighting on the street is less than 10 Lux. Consider the change block configuration.
In this case, we use the Set rule to set the variable flow.Light_enabled to Yes. So we assigned the value of a global variable, which we can use in other blocks.
Similarly, create a second change block and connect it to the second output.
Its configuration will be as follows:
To find out whether such a detector works correctly, we can create a simple circuit with Inject and Debug blocks.
At the same time, in the settings of the Inject block, we indicate that it should output the value of the flow variable every second. Light_enabled
Then the result of the light sensor can be easily observed in the Debug tab.
The total light on / off circuit of the light sensor will look like this.
Now, to take this effect into account the control circuit of the motion sensor, we just insert the switch block in the circuit of the path of inclusion of light.
And set it up so that it misses messages from the motion sensor only if our global variable is flow. Light_enabled is set to Yes — that is, It is dark outside.
Done! Now our flow looks like this:
Changing the brightness of the lamp depending on the time
There are very few. We want to change the intensity of the LED lamp. Those. if we are dark, but until 9 pm, the light should be turned on at full power. But after nine - only at low power, like a night light.
To do this, create a block Inject:
It can be configured so that it displays a message at a certain time. Set it up at 21:00 each day.
In this case, we note that it will issue a message with a value of 1. This will be our desired intensity of illumination in the night mode. To use this value in the light control circuit, use the same trick with global variables. Create a change block:
And set it up so that the variable flow.Light_Brightness is assigned a value from the message.
To return the original brightness in the morning, create a second inject block that will run at 6 o'clock in the morning and give a brightness value of 100. Connect it to the same place.
Thus, the variable flow.Light_brightness will be assigned the value 1 every evening at 9 o'clock, and the value 100 every morning at 6 o'clock. It remains only to apply it in the main chain. To do this, we already have a Light Brightness Adjustment block:
For which we only need to change the setting so that it assigns not a constant, but the value of the flow.Light_brightness variable.
Final result
The resulting flow, cleared from debug blocks, looks neat and clean. When creating, we used only standard blocks from the Node-RED installation. At flows.nodered.org , however, there are over 800 additional blocks and libraries that allow you to add many different things.
For those who are interested in repeating this algorithm, I post the flow that I used for debugging:
And also its json code, which can be easily imported into any version of Node-RED and tested.
[{"id":"5afd41b4.d61318","type":"switch","z":"2384634b.17767c","name":"Movement detected?","property":"payload","propertyType":"msg","rules":[{"t":"eq","v":"OPEN","vt":"str"}],"checkall":"false","outputs":1,"x":562,"y":285,"wires":[["381b0d6d.a0bd7a"]]},{"id":"35bac8e.57dd5b8","type":"trigger","z":"2384634b.17767c","op1":"5","op2":"0","op1type":"nul","op2type":"val","duration":"8","extend":false,"units":"s","reset":"OPEN","name":"Switch off delay","x":750,"y":373,"wires":[["e995e130.1e2118","af1f191f.498098"]]},{"id":"d85623d1.29b058","type":"change","z":"2384634b.17767c","name":"Light Brightness Adjustment","rules":[{"t":"set","p":"payload","pt":"msg","to":"Light_brightness","tot":"flow"}],"action":"","property":"","from":"","to":"","reg":false,"x":1013.9999389648438,"y":284.63330078125,"wires":[["e995e130.1e2118","af1f191f.498098"]]},{"id":"934ff922.ca34f","type":"inject","z":"2384634b.17767c","name":"","topic":"","payload":"OPEN","payloadType":"str","repeat":"","crontab":"","once":false,"x":258.5,"y":408,"wires":[["5afd41b4.d61318"]]},{"id":"ea0e2e99.52a6f8","type":"inject","z":"2384634b.17767c","name":"","topic":"","payload":"CLOSED","payloadType":"str","repeat":"","crontab":"","once":false,"x":269,"y":459,"wires":[["35bac8e.57dd5b8","5afd41b4.d61318"]]},{"id":"4187db59.93c2dc","type":"mqtt in","z":"2384634b.17767c","name":"Hall Light Sensor","topic":"/myhome/state/Lumin_Hall","qos":"2","broker":"bfc8eee2.a46c9","x":243,"y":146,"wires":[["c94e7c4.849f48"]]},{"id":"c94e7c4.849f48","type":"switch","z":"2384634b.17767c","name":"Light Threshold Selector","property":"payload","propertyType":"msg","rules":[{"t":"lt","v":"10","vt":"num"},{"t":"else"}],"checkall":"false","outputs":2,"x":517.3333129882812,"y":145.7166748046875,"wires":[["48e6a07a.962798"],["ca8b6623.f11c7"]]},{"id":"381b0d6d.a0bd7a","type":"switch","z":"2384634b.17767c","name":"Light Enabled?","property":"Light_enabled","propertyType":"flow","rules":[{"t":"eq","v":"Yes","vt":"str"}],"checkall":"true","outputs":1,"x":775.5,"y":285,"wires":[["d85623d1.29b058"]]},{"id":"48e6a07a.962798","type":"change","z":"2384634b.17767c","name":"Enable Light","rules":[{"t":"set","p":"Light_enabled","pt":"flow","to":"Yes","tot":"str"}],"action":"","property":"","from":"","to":"","reg":false,"x":822,"y":109,"wires":[[]]},{"id":"ca8b6623.f11c7","type":"change","z":"2384634b.17767c","name":"Disable Light","rules":[{"t":"set","p":"Light_enabled","pt":"flow","to":"No","tot":"str"}],"action":"","property":"","from":"","to":"","reg":false,"x":824.6666259765625,"y":177.51666259765625,"wires":[[]]},{"id":"b6ea27c1.c33cd","type":"inject","z":"2384634b.17767c","name":"","topic":"","payload":"Light_enabled","payloadType":"flow","repeat":"1","crontab":"","once":false,"x":330.5,"y":678,"wires":[["db66aec8.b3abc"]]},{"id":"db66aec8.b3abc","type":"debug","z":"2384634b.17767c","name":"Light_enabled","active":false,"console":"false","complete":"payload","x":670.5,"y":679,"wires":[]},{"id":"fa4b50b8.e6e0f","type":"inject","z":"2384634b.17767c","name":"","topic":"","payload":"5","payloadType":"num","repeat":"","crontab":"","once":false,"x":233.5,"y":212,"wires":[["c94e7c4.849f48"]]},{"id":"e7b1a39.f9e596","type":"inject","z":"2384634b.17767c","name":"","topic":"","payload":"100","payloadType":"num","repeat":"","crontab":"","once":false,"x":235,"y":266,"wires":[["c94e7c4.849f48"]]},{"id":"4b2f3c6f.de9aac","type":"mqtt in","z":"2384634b.17767c","name":"Hall Motion Sensor","topic":"/myhome/state/Hall_motion","qos":"2","broker":"87b370d1.dd497","x":247,"y":334,"wires":[["5afd41b4.d61318","35bac8e.57dd5b8"]]},{"id":"e995e130.1e2118","type":"mqtt out","z":"2384634b.17767c","name":"Hall Light Dimmer ","topic":"/myhome/command/Light_Hall/state","qos":"0","retain":"true","broker":"87b370d1.dd497","x":1310,"y":315,"wires":[]},{"id":"781e72a7.3c0abc","type":"inject","z":"2384634b.17767c","name":"Reduce Brightness at 21:00","topic":"Night Brightness","payload":"1","payloadType":"str","repeat":"","crontab":"00 21 * * *","once":false,"x":339,"y":517,"wires":[["adbf1e2e.3f5ae"]]},{"id":"aa444315.a48ad8","type":"inject","z":"2384634b.17767c","name":"Normal Brightness at 6:00","topic":"Night Brightness","payload":"50","payloadType":"num","repeat":"","crontab":"00 6 * * *","once":false,"x":349.6666259765625,"y":604.683349609375,"wires":[["adbf1e2e.3f5ae"]]},{"id":"adbf1e2e.3f5ae","type":"change","z":"2384634b.17767c","name":"Light Brightness Adjustment","rules":[{"t":"set","p":"Light_brightness","pt":"flow","to":"payload","tot":"msg"}],"action":"","property":"","from":"","to":"","reg":false,"x":692,"y":554,"wires":[[]]},{"id":"af1f191f.498098","type":"debug","z":"2384634b.17767c","name":"","active":true,"console":"false","complete":"false","x":1303.5,"y":429,"wires":[]},{"id":"bfc8eee2.a46c9","type":"mqtt-broker","z":"2384634b.17767c","broker":"localhost","port":"1883","clientid":"","usetls":false,"verifyservercert":true,"compatmode":true,"keepalive":"60","cleansession":true,"willTopic":"","willQos":"0","willRetain":null,"willPayload":"","birthTopic":"","birthQos":"0","birthRetain":null,"birthPayload":""},{"id":"87b370d1.dd497","type":"mqtt-broker","z":"2384634b.17767c","broker":"localhost","port":"1883","clientid":"","usetls":false,"verifyservercert":true,"compatmode":true,"keepalive":"60","cleansession":true,"willTopic":"","willQos":"0","willRetain":null,"willPayload":"","birthTopic":"","birthQos":"0","birthRetain":null,"birthPayload":""}]
Results
In this article I tried to demonstrate and tell how easy it is to implement everyday home automation algorithms in the Node-RED environment. I also tried to show the main advantages of this programming environment, such as:
- a logical graphical representation of links and functions
- ease of programming and easy debugging of user scripts
- hardware and platform independence of the algorithms obtained - this script will work equally well with OpenHAB and with ioBroker and with any other smart home platforms that support the MQTT protocol.
- easy exchange of ready-made algorithms between users thanks to Copy-Paste JSON code and the availability of an online platform for the exchange of successful solutions.
Node-RED can and much more - for example, to receive weather from the Internet, send notifications on Twitter or work with Nest thermostats. And based on this, you can create many other interesting and useful automation algorithms. But these are topics for the following articles.