SwiftUI and Auto-Renewable Subscriptions
- Tutorial
Hello! Connected Denis from Apphud - a service for the analysis of renewable subscriptions for iOS-applications.
As you know, at WWDC 2019, Apple announced its new declarative SwiftUI framework. In this article I will try to tell how to use SwiftUI to make payment screens and implement the functionality of auto-renewable subscriptions.
If you are not already familiar with SwiftUI, you can read a short introductory article . And if you want to learn more about subscriptions and how to implement them correctly, then read this article .
You need Xcode 11 to work . Create a new project and make sure that there is a check mark next to “Use SwiftUI”.
SwiftUI is a framework for writing an interface, and therefore we cannot create a purchasing manager using it. But we will not write our manager, but use a ready-made solution, which we will supplement with our code. You can use, for example, SwiftyStoreKit . In our example, we will use the class from our previous article .
The products will be initialized on the main screen, the expiration date of our subscriptions and the button for switching to the purchase screen will also be displayed there.
ProductsStore.shared.initializeProducts()
if let windowScene = scene as? UIWindowScene {
    let window = UIWindow(windowScene: windowScene)
    window.rootViewController = UIHostingController(rootView: ContentView(productsStore: ProductsStore.shared))
    self.window = window
    window.makeKeyAndVisible()
}
Consider the class SceneDelegate. In it, we create a singleton class ProductsStorein which the products are initialized. After that, create our root one ContentViewand specify singleton as an input parameter.
Consider the class ProductsStore:
class ProductsStore : ObservableObject {
    static let shared = ProductsStore()
    @Published var products: [SKProduct] = []
    @Published var anyString = "123" // little trick to force reload ContentView from PurchaseView by just changing any Published value
    func handleUpdateStore(){
        anyString = UUID().uuidString
    }
    func initializeProducts(){
        IAPManager.shared.startWith(arrayOfIds: [subscription_1, subscription_2], sharedSecret: shared_secret) { products in
            self.products = products
        }
    }
}
This is a small class, a kind of "add-on" over IAPManager, serves to update ContentViewwhen updating the list of products. The class ProductsStoresupports the protocol ObservableObject.
What is ObservableObjectand @Published?
ObservableObject- This is a special protocol for observing objects and tracking changes in its properties. Properties must be marked with an attribute @Published. In the example, a notification is sent when the array changes products, but you can add this notification for any methods and properties of the object.
Product loading itself can be done in any way, but at the end of this request, you must assign the product array to a variable products. How to listen to changes? This is done using a key parameter @ObservedObject:
@ObservedObject var productsStore : ProductsStoreSimply put, this is something similar to the Notification Center. And for your to Viewreceive these notifications, you must have a variable of this object with an attribute @ObservedObject.
Back to the class logic ProductsStore. Its main purpose is to download and store a list of products. But the array of products is already stored in IAPManager, duplication occurs. This is not good, but, firstly, in this article I wanted to show you how object binning is implemented, and, secondly, it is not always possible to change the finished class of the purchase manager. For example, if you use third-party libraries, you will not be able to add a protocol ObservableObjectand send notifications.
It is worth noting that in addition to the attribute, @ObservedObjectthere is also an attribute @Statethat helps to track changes in simple variables (for example, Stringor Int) and a more global @EnvironmentObjectone that can update everything Viewin the application at once without the need to transfer a variable between objects.
Let's move on to the start screen ContentView:
struct ContentView : View {
    @ObservedObject var productsStore : ProductsStore
    @State var show_modal = false
    var body: some View {
        VStack() {
            ForEach (productsStore.products, id: \.self) { prod in
                Text(prod.subscriptionStatus()).lineLimit(nil).frame(height: 80)
            }
            Button(action: {
                print("Button Pushed")
                self.show_modal = true
            }) {
                Text("Present")
            }.sheet(isPresented: self.$show_modal) {
                 PurchaseView()
            }
        }
    }
}
Let's figure out the code. With the help ForEachwe create text View, the number of which is equal to the number of products. Since we bind the variable productsStore, it Viewwill be updated whenever the array of products in the class changes ProductsStore.
The method subscriptionStatusis included in the class extension SKProductand returns the desired text depending on the expiration date of the subscription:
func subscriptionStatus() -> String {
    if let expDate = IAPManager.shared.expirationDateFor(productIdentifier) {
        let formatter = DateFormatter()
        formatter.dateStyle = .medium
        formatter.timeStyle = .medium
        let dateString = formatter.string(from: expDate)
        if Date() > expDate {
            return "Subscription expired: \(localizedTitle) at: \(dateString)"
        } else {
            return "Subscription active: \(localizedTitle) until:\(dateString)"
        }
    } else {
        return "Subscription not purchased: \(localizedTitle)"
    }
}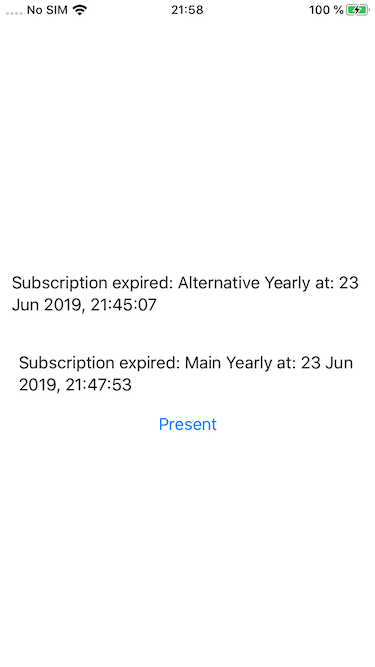
This is our start screen
Now go to the subscription screen. Since, according to Apple’s rules, the payment screen should have a long text of the conditions of purchase, it will be wise to use ScrollView.
var body: some View {
    ScrollView (showsIndicators: false) {
        VStack {
            Text("Get Premium Membership").font(.title)
            Text("Choose one of the packages above").font(.subheadline)
            self.purchaseButtons()
            self.aboutText()
            self.helperButtons()
            self.termsText().frame(width: UIScreen.main.bounds.size.width)
            self.dismissButton()
            }.frame(width : UIScreen.main.bounds.size.width)
        }.disabled(self.isDisabled)
}
In this example, we created two text views with a different font. Further, all other views are highlighted in their own methods. This is done for three reasons:
The code becomes more readable and understandable for study.
At the time of this writing, Xcode 11 Beta often freezes and cannot compile code, and putting parts of the code into functions helps the compiler.
Show that the view can be carried out in separate functions, making it easier
body.
Consider the method purchaseButtons():
func purchaseButtons() -> some View {
    // remake to ScrollView if has more than 2 products because they won't fit on screen.
    HStack {
        Spacer()
        ForEach(ProductsStore.shared.products, id: \.self) { prod in
            PurchaseButton(block: {
                self.purchaseProduct(skproduct: prod)
            }, product: prod).disabled(IAPManager.shared.isActive(product: prod))
        }
        Spacer()
    }
}
Here we create a horizontal stack and in a loop ForEachcreate a custom PurchaseButtonone into which we pass the product and callback block.
Grade PurchaseButton:
struct PurchaseButton : View {
    var block : SuccessBlock!
    var product : SKProduct!
    var body: some View {
        Button(action: {
            self.block()
        }) {
        Text(product.localizedPrice()).lineLimit(nil).multilineTextAlignment(.center).font(.subheadline)
            }.padding().frame(height: 50).scaledToFill().border(Color.blue, width: 1)
    }
}
This is a normal button that stores and calls the block passed when creating the object. A rounding stroke is applied to it. We display the price of the product and the length of the subscription period in the method as text localizedPrice().
Subscription purchase is implemented as follows:
func purchaseProduct(skproduct : SKProduct){
    print("did tap purchase product: \(skproduct.productIdentifier)")
    isDisabled = true
    IAPManager.shared.purchaseProduct(product: skproduct, success: {
        self.isDisabled = false
        ProductsStore.shared.handleUpdateStore()
        self.dismiss()
    }) { (error) in
        self.isDisabled = false
        ProductsStore.shared.handleUpdateStore()
    }
}
As you can see, after the purchase is completed, the method is called handleUpdateStoreby which an update notification is sent ContentView. This is done so that the ContentViewstatus of subscriptions is updated when hiding the modal screen. The method dismisshides the modal window.
Since SwiftUI is a declarative framework, hiding a modal window is not implemented as usual. We must call the method dismiss()on the variable wrapper presentationMode, declaring it with an attribute @Environment:
struct PurchaseView : View {
    @State private var isDisabled : Bool = false
    @Environment(\.presentationMode) var presentationMode
    private func dismiss() {
        self.presentationMode.wrappedValue.dismiss()
    }
    func dismissButton() -> some View {
        Button(action: {
            self.dismiss()
        }) {
            Text("Not now").font(.footnote)
            }.padding()
    }
...
The variable presentationModeis part of Environment Values - special sets of global methods and properties. In SwiftUI, almost all actions occur when changing the values of variables, you can’t do anything in runtime in the literal sense of the word - everything is bounded in advance. And in order to do something in runtime, you need to use wrappers.

Subscription purchase screen
Conclusion
I hope this article will be useful to you. Apple loves when developers use its latest technology. If you release an app for iOS 13 using SwiftUI, there is a potential likelihood of being an infamous Apple. So do not be afraid of new technologies - use them. You can download the full project code here .
Want to implement subscriptions in your iOS app in 10 minutes? Integrate Apphud and:
- Make purchases using only one method;
- automatically track the status of each user's subscription;
- Integrate Subscription Offers easily
- send subscription events to Amplitude, Mixpanel, Slack and Telegram taking into account the user's local currency;
- decrease the Churn rate in applications and return unsubscribed users.