Introduction to Unit Testing in Unity
- Transfer
Are you curious how unit testing works in Unity? Not sure what unit testing in general is? If you answered positively to these questions, then this tutorial will be useful to you. From it you will learn the following about unit testing:
- What it is
- Its benefit
- Advantages and disadvantages
- How it works in Unity using Test Runner
- How to write and execute unit tests that will be tested
Note : this tutorial assumes that you are familiar with the C # language and the basics of development in Unity. If you are new to Unity, then check out the other tutorials on this engine first .
What is a unit test?
Before delving into the code, it is important to get a clear understanding of what unit testing is. Simply put, unit testing is testing ... units.
The unit test (ideally) is designed to test a separate code unit. The composition of a “unit” may vary, but it is important to remember that unit testing must test exactly one “element” at a time.
Unit tests need to be created to verify that a small logical piece of code in a particular scenario runs exactly as you expect. This can be difficult to understand before you start writing your own unit tests, so let's look at an example:
You have written a method that allows the user to enter a name. The method is written so that numbers are not allowed in the name, and the name itself can consist of only ten or less characters. Your method intercepts the keystroke of each key and adds the corresponding character to the field
name:public string name = ""
public void UpdateNameWithCharacter(char: character)
{
// 1
if (!Char.IsLetter(char))
{
return;
}
// 2
if (name.Length > 10)
{
return;
}
// 3
name += character;
}What's going on here:
- If the character is not a letter, then the code pre-exits the function and does not add the character to the string.
- If the name is ten or more characters long, the code does not allow the user to add another character.
- If these two checks are passed, the code adds a character to the end of the name.
This unit can be tested, because it is a "module" of the work performed. Unit tests enforce method logic.
Unit Test Example
How do we write unit tests for a method
UpdateNameWithCharacter? Before we start implementing these unit tests, we need to carefully consider what these tests do and come up with names for them.
Take a look at the unit test name examples below. From the names it should be clear that they check:
UpdateNameDoesntAllowCharacterAddingToNameIfNameIsTenOrMoreCharactersInLengthUpdateNameAllowsLettersToBeAddedToNameUpdateNameDoesntAllowNonLettersToBeAddedToNameFrom these names of test methods it can be seen that we really check whether the unit is executed by the method
UpdateNameWithCharacter. These test names may seem too long and detailed, but it’s good for us. Each unit test you write is part of a suite of tests. Test suitecontains all unit tests related to the functional logical group (for example, “battle unit tests”). If any test from the kit fails the test, then the entire test suite fails.

Game launch
Open the Crashteroids Starter project (you can download it from here ), and then open the Game scene from the Assets / RW / Scenes folder .
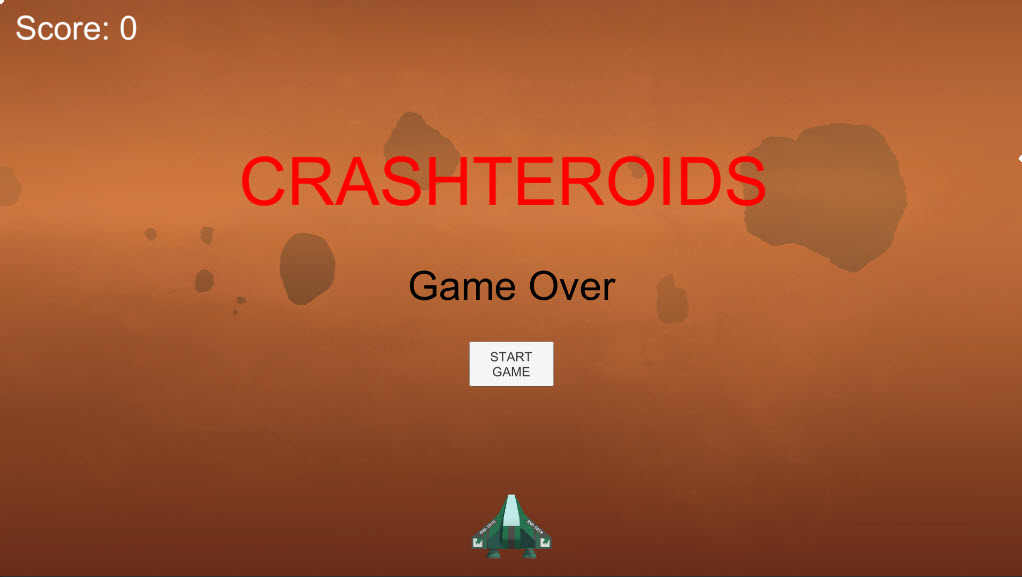
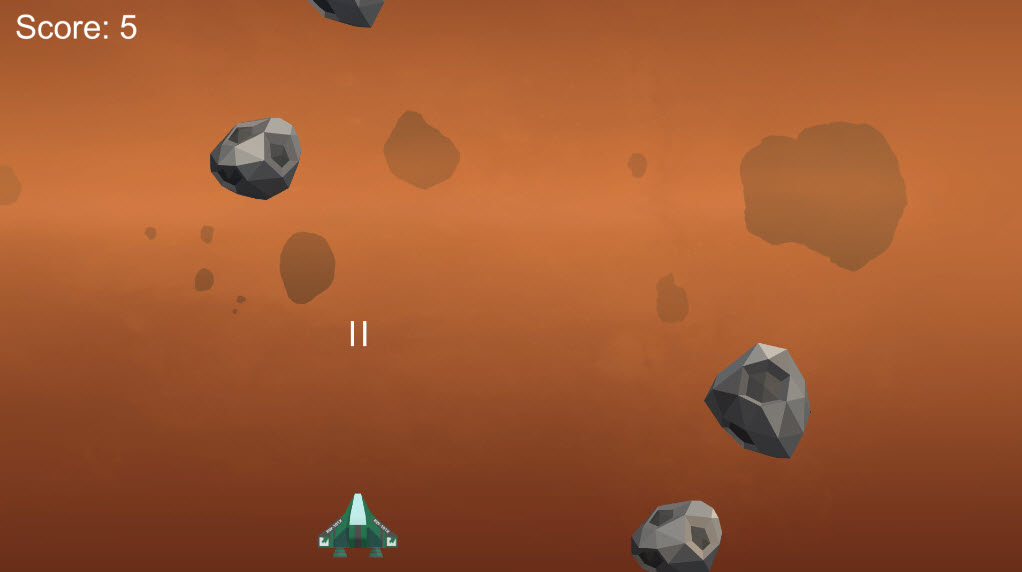
Click on Play to launch Crashteroids, and then click on the Start Game button . Move the spaceship with the left and right arrows on the keyboard.
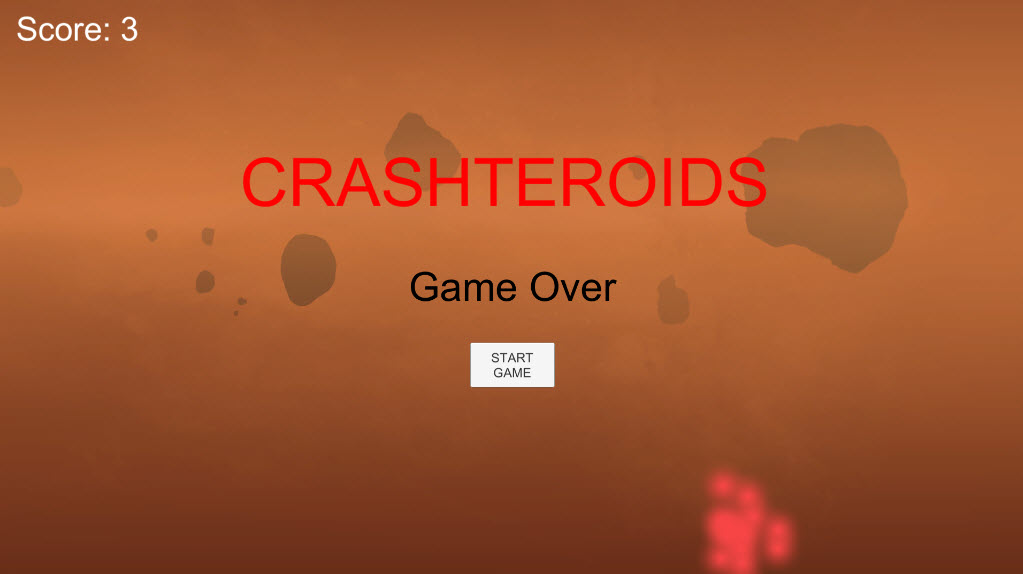
To fire a laser beam, press the spacebar . If the beam hits the asteroid, then the score will increase by one. If an asteroid collides with a ship, the ship explodes and the game ends (with the ability to start again).
Try to play a little and make sure that after the collision of the asteroid with the ship appears the inscription Game Over.
Getting started with Unity Test Runner
Now that we know how the game runs, it's time to write unit tests to verify that everything works as it should. Thus, if you (or someone else) decide to update the game, you will be sure that the update will not break anything that worked before.
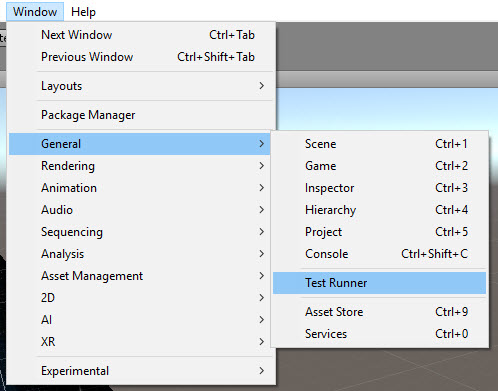
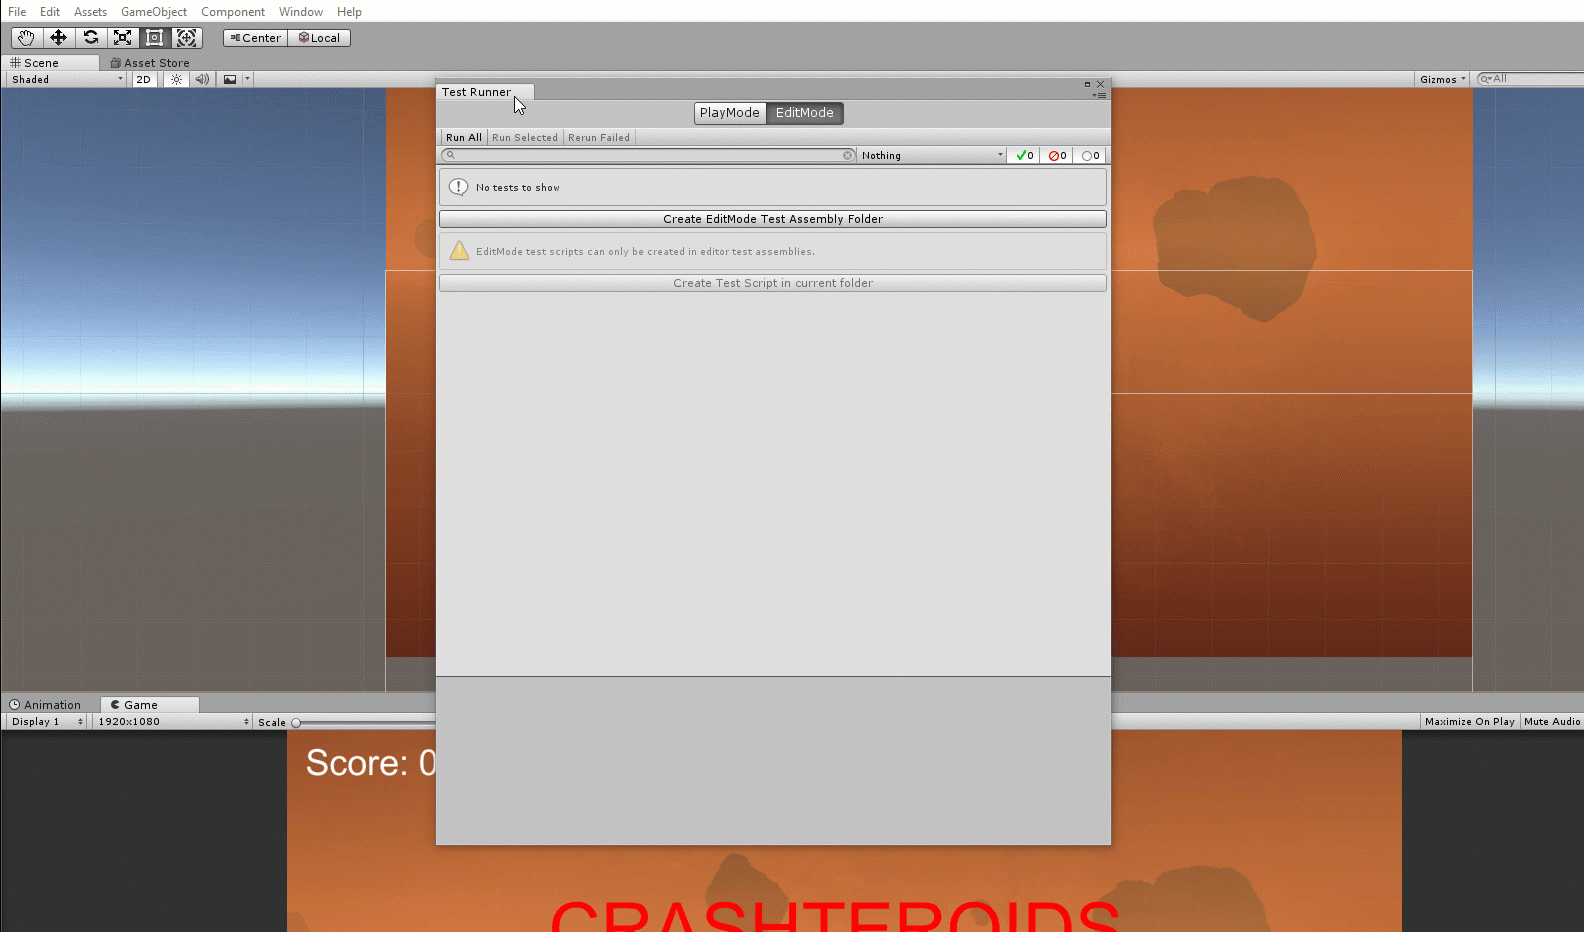
To write tests, you first need to learn about the Unity Test Runner. Test Runner allows you to run tests and check if they pass successfully. To open the Unity Test Runner, select Window ▸ General ▸ Test Runner .
After the Test Runner opens in a new window, you can simplify your life by clicking on the Test Runner window and dragging it to the place next to the Scene window.
Preparing NUnit and Test Folders
Test Runner is a unit testing feature provided by Unity, but it uses the NUnit framework . When you start working with unit tests more seriously, I recommend studying the wiki on NUnit to learn more. About everything you need for the first time will be discussed in this article.
To run the tests, we first need to create a test folder in which the test classes will be stored.
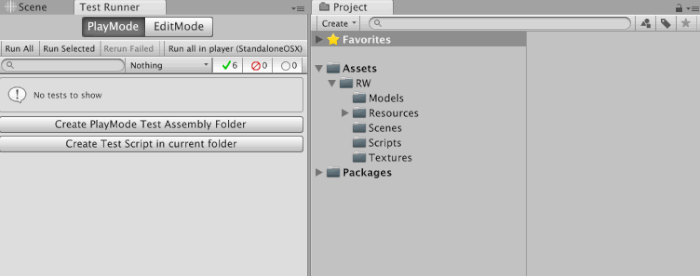
In the Project window , select the RW folder . Take a look at the Test Runner window and make sure PlayMode is selected .
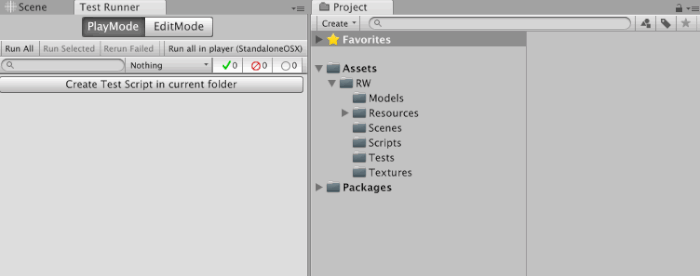
Click the button called Create PlayMode Test Assembly Folder. You will see a new folder appear in the RW folder. We are satisfied with the standard name Tests , so you can just press Enter .
You might be wondering what these two different tabs are inside Test Runner.
The PlayMode tab is used for tests performed in the Play mode (when the game is running in real time). The tests on the EditMode tab are run outside of Play mode, which is convenient for testing things like custom behaviors in the Inspector.
In this tutorial, we will cover the PlayMode tests. But when you get comfortable, you can try experimenting with testing in EditMode. When working with Test Runner in this tutorial, always ensure that the PlayMode tab is selected .
What is in the test suite?
As we learned above, a unit test is a function that tests the behavior of a small specific piece of code. Since the unit test is a method, to run it, it must be in the class file.
Test Runner bypasses all test class files and performs unit tests from them. A class file containing unit tests is called a test suite.
In the test suite, we logically subdivide our tests. We must separate the test code into separate logical sets (for example, a set of tests for physics and a separate set for battle). In this tutorial we need only one set of tests, and it is time to create one.
Preparing a test assembly and test suite
Select the Tests folder and in the Test Runner window click on the Create Test Script in current folder button . Name the new TestSuite file .
In addition to the new C # file, the Unity engine also creates another file called Tests.asmdef . This is the assembly definition file , which is used to show Unity where the dependencies of the test file are. This is necessary because the finished application code is contained separately from the test code.
If you have a situation where Unity cannot find test files or tests, then make sure that there is an assembly definition file that includes your test suite. The next step is to configure it.
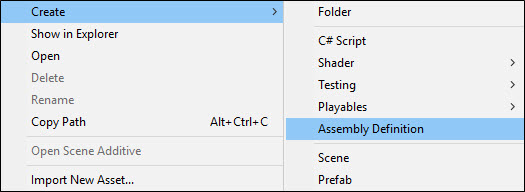
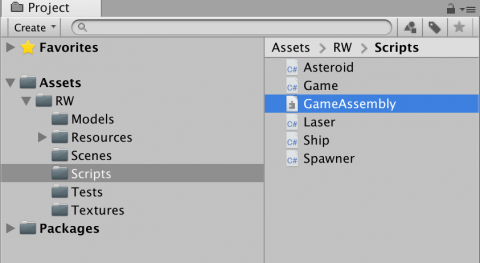
In order for the test code to have access to the game classes, we will create an assembly of the class code and set the link in the Tests assembly. Click on the Scripts folder to select it. Right-click on this folder and selectCreate ▸ Assembly Definition .
Name the file GameAssembly .
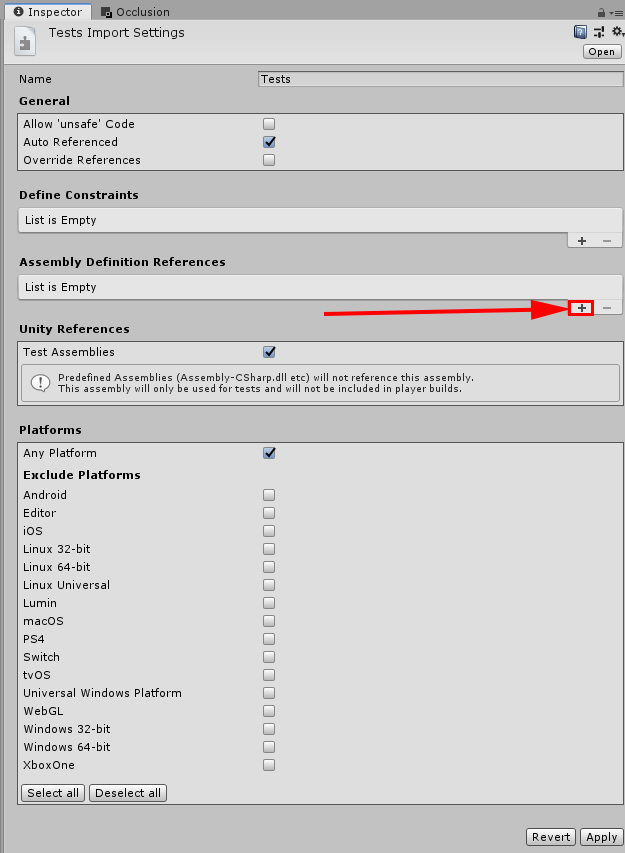
Click the Tests folder , and then the Tests build definition file . In the Inspector, click the plus button under the Assembly Definition References heading .
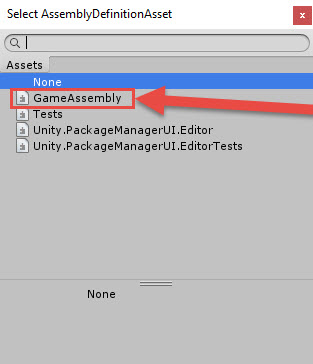
You will see the Missing Reference field . Click on the dot next to this field to open the selection window. Select the GameAssembly file .
You should see the GameAssembly assembly file in the links section. Click on the Apply button to save these changes.
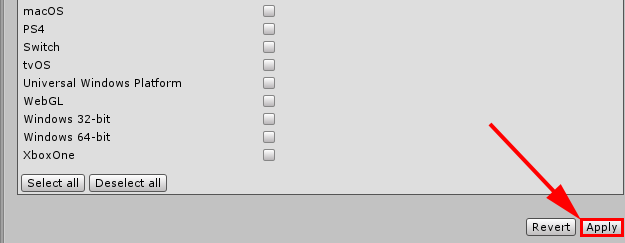
If you do not follow these steps, you will not be able to reference the game's class files inside the unit test files. Having dealt with this, you can proceed to the code.
We write the first unit test
Double-click on the TestSuite script to open it in the code editor. Replace all the code with this:
using UnityEngine;
using UnityEngine.TestTools;
using NUnit.Framework;
using System.Collections;
public class TestSuite
{
}
What tests do we need to write? Honestly, even in a tiny game like Crashteroids, you can write quite a few tests to verify that everything is working as it should. In this tutorial, we restrict ourselves to only key areas: collision recognition and basic game mechanics.
Note : when it comes to writing unit tests of a product at a production level, you should pay enough time to take into account all the boundary cases that need to be tested in all areas of the code.
As a first test, it’s nice to check if the asteroids are really moving down. It will be difficult for them to collide with the ship if they move away from it! Add the following method and private variable to the TestSuite script :
private Game game;
// 1
[UnityTest]
public IEnumerator AsteroidsMoveDown()
{
    // 2
    GameObject gameGameObject =
        MonoBehaviour.Instantiate(Resources.Load("Prefabs/Game"));
    game = gameGameObject.GetComponent();
    // 3
    GameObject asteroid = game.GetSpawner().SpawnAsteroid();
    // 4
    float initialYPos = asteroid.transform.position.y;
    // 5
    yield return new WaitForSeconds(0.1f);
    // 6
    Assert.Less(asteroid.transform.position.y, initialYPos);
    // 7
    Object.Destroy(game.gameObject);
}
There are only a few lines of code, but they do a lot of things. So let's stop and deal with each part:
- This is an attribute . Attributes define specific compiler behaviors. This attribute tells the Unity compiler that the code is a unit test. Due to this, it will appear in the Test Runner when starting the tests.
- Create an instance of Game. Everything else is embedded in the game, so when we create it, it will contain everything that needs to be tested. In a production environment, most likely all elements will not be inside the same prefab. Therefore, you will need to recreate all the objects needed in the scene.
- Here we create an asteroid so that we can monitor whether it is moving. The method
SpawnAsteroidreturns an instance of the created asteroid. The Asteroid component has a methodMove(if you are curious how the movement works, you can take a look at the Asteroid script inside RW / Scripts ). - Tracking the starting position is necessary in order to make sure that the asteroid has moved down.
- All Unity unit tests are coroutines, so you need to add a soft return. We also add a time step of 0.1 seconds to simulate the passage of time for which the asteroid was supposed to move down. If you do not need to simulate a time step, you can return null.
- This is the assertion stage , in which we claim that the position of the asteroid is less than the initial position (that is, it has moved down). Understanding assertions is an important part of unit testing, and NUnit provides various assertion methods. Passing or not passing the test is determined by this line.
- Of course, no one will scold you for the mess left after the completion of the tests, but other tests may fail due to it. It is always important to clean up (delete or reset) the code after the unit test, so that when you run the next unit test there are no artifacts left that could affect this test. It is enough for us to simply delete the game object, because for each test we create a completely new instance of the game.
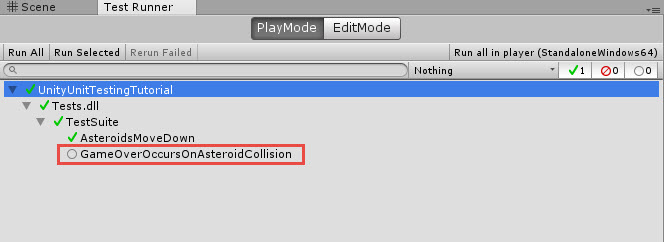
Passing tests
Well, you wrote your first unit test, but how do you know if it works? Of course, with Test Runner! In the Test Runner window, expand all lines with arrows. You should see the test
AsteroidsMoveDownin the list with gray circles: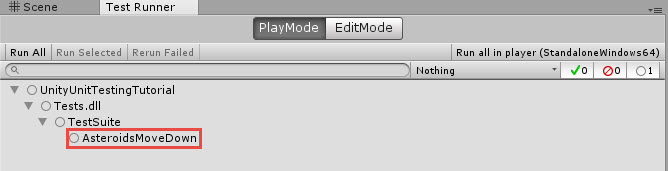
A gray circle indicates that the test has not yet been completed. If the test has been started and passed, then a green arrow is shown next to it. If the test failed, then a red X will be displayed next to it. Run the test by clicking on the RunAll button .
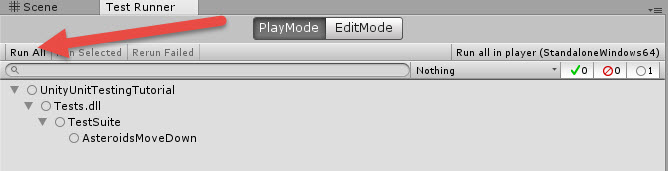
This will create a temporary scene and run the test. Upon completion, you should see that the test passed.
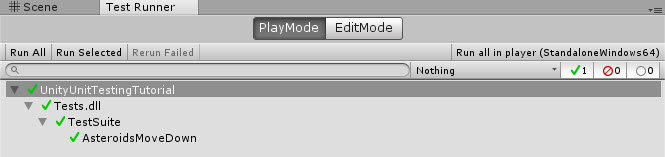
You have successfully written your first unit test stating that the created asteroids are moving down.
Note : before you start writing your own unit tests, you need to understand the implementation you are testing. If you are curious how the logic you are testing is working, then study the code in the RW / Scripts folder .
Using integration tests
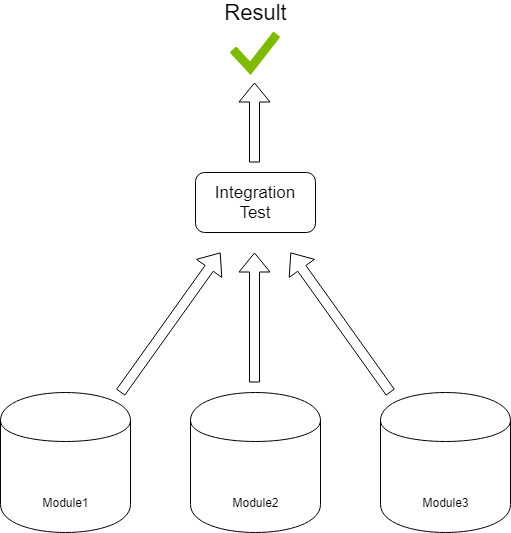
Before moving deeper into the rabbit hole of unit tests, it's time to tell what integration tests are and how they differ from unit testing.
Integration tests are tests that verify how the "modules" of the code work together. “Module” is another fuzzy term. An important difference is that integration tests must test the operation of the software in real production (i.e. when a player really plays a game).
Let's say you made a battle game where a player kills monsters. You can create an integration test to make sure that when a player kills 100 enemies, an achievement is opened (“Achievement”).
This test will affect several code modules. Most likely, it will concern the physical engine (recognition of collisions), enemy dispatchers (monitoring the health of the enemy and processing damage, as well as passing to other related events) and an event tracker that tracks all triggered events (for example, “the monster is killed”). Then, when it is time to unlock the achievement, he can call the achievement manager.
The integration test will simulate the player killing 100 monsters and check if the achievement is unlocked. It is very different from the unit test because it tests large code components that work together.
In this tutorial, we will not study integration tests, but this should show the difference between the unit of work (and why it is being tested unit) and the module of the code (and why it is being tested integration).
Adding a test to a test suite
The next test will test the end of the game when the ship collides with an asteroid. With TestSuite open in the code editor , add the test shown below under the first unit test and save the file:
[UnityTest]
public IEnumerator GameOverOccursOnAsteroidCollision()
{
    GameObject gameGameObject =
       MonoBehaviour.Instantiate(Resources.Load("Prefabs/Game"));
    Game game = gameGameObject.GetComponent();
    GameObject asteroid = game.GetSpawner().SpawnAsteroid();
    //1
    asteroid.transform.position = game.GetShip().transform.position;
    //2
    yield return new WaitForSeconds(0.1f);
    //3
    Assert.True(game.isGameOver);
    Object.Destroy(game.gameObject);
}
We already saw most of this code in the previous test, but there are some differences:
- We force the asteroid and the ship to collide, clearly giving the asteroid the same position as the ship. This will create a collision of their hitboxes and lead to the end of the game. If you're curious how this code works, take a look at the Ship , Game , and Asteroid files in the Scripts folder.
- A time step is necessary for the Collision event of the physical engine to fire, so a delay of 0.1 seconds is returned.
- This statement is true, and it verifies that the flag
gameOverin the Game script is true. The flag takes true during game operation, when the ship is destroyed, that is, we test to make sure that it is set to true after the destruction of the ship.
Return to the Test Runner window and you will see that a new unit test has appeared there.
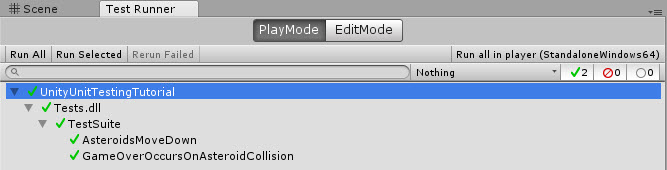
This time we will run this one instead of the entire test suite. Click on GameOverOccursOnAsteroidCollision , and then on the Run Selected button .
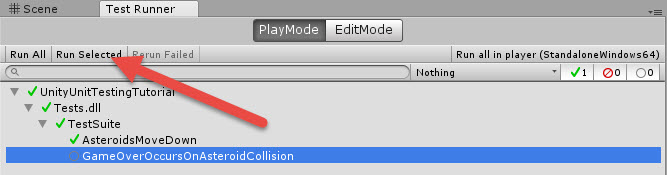
And voila, we passed another test.
Stages of tuning and destruction
You may have noticed that in our two tests there is repeating code: where the Game object is created and where a link to the Game script is set:
GameObject gameGameObject = MonoBehaviour.Instantiate(Resources.Load("Prefabs/Game"));
game = gameGameObject.GetComponent();
You will also notice that there is a repeat in the destruction of the Game object:
Object.Destroy(game.gameObject);When testing this happens very often. When it comes to running unit tests, there are actually two phases: the Setup phase and the Tear Down phase .
All code inside the Setup method will be executed before the unit test (in this set), and all code inside the Tear Down method will be executed after the unit test (in this set).
It is time to simplify our lives by moving the setup and tear down code to special methods. Open the code editor and add the following code at the beginning of the TestSuite file , right before the first [UnityTest] attribute:
[SetUp]
public void Setup()
{
    GameObject gameGameObject =
        MonoBehaviour.Instantiate(Resources.Load("Prefabs/Game"));
    game = gameGameObject.GetComponent();
}
The attribute
SetUpindicates that this method is called before each test runs. Then add the following method and save the file:
[TearDown]
public void Teardown()
{
    Object.Destroy(game.gameObject);
}
The attribute
TearDownindicates that this method is called after each test runs. Having prepared the setup and destruction code, delete the lines of code that are present in these methods and replace them with calls to the corresponding methods. After that, the code will look like this:
public class TestSuite
{
    private Game game;
    [SetUp]
    public void Setup()
    {
        GameObject gameGameObject =
            MonoBehaviour.Instantiate(Resources.Load("Prefabs/Game"));
        game = gameGameObject.GetComponent();
    }
    [TearDown]
    public void Teardown()
    {
        Object.Destroy(game.gameObject);
    }
    [UnityTest]
    public IEnumerator AsteroidsMoveDown()
    {
        GameObject asteroid = game.GetSpawner().SpawnAsteroid();
        float initialYPos = asteroid.transform.position.y;
        yield return new WaitForSeconds(0.1f);
        Assert.Less(asteroid.transform.position.y, initialYPos);
    }
    [UnityTest]
    public IEnumerator GameOverOccursOnAsteroidCollision()
    {
        GameObject asteroid = game.GetSpawner().SpawnAsteroid();
        asteroid.transform.position = game.GetShip().transform.position;
        yield return new WaitForSeconds(0.1f);
        Assert.True(game.isGameOver);
    }
}
Testing Game Over and Laser Shooting
Having prepared the tuning and destruction methods that simplify our lives, we can begin to add new tests in which they are used. The next test is to verify that when a player clicks New Game , the value of gameOver bool is not true. Add such a test to the end of the file and save it:
[UnityTest]
public IEnumerator NewGameRestartsGame()
{
    //1
    game.isGameOver = true;
    game.NewGame();
    //2
    Assert.False(game.isGameOver);
    yield return null;
}
This should seem familiar to you already, but the following is worth mentioning:
- This piece of code prepares this test for the boolean flag
gameOverto be true. When the method is called,NewGameit must again set the flag to a valuefalse. - Here we argue that bool
isGameOveris equalfalse, which should be true when invoking a new game.
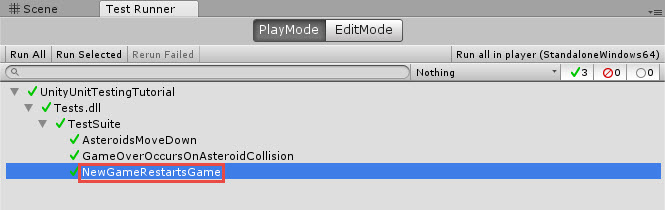
Return to Test Runner and you should see that there is a new test NewGameRestartsGame . Run this test, as we did before, and you will see that it runs successfully:
Laser Beam Statement
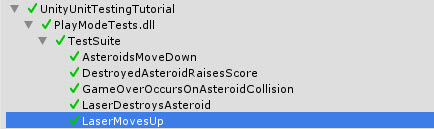
The next test is to add the test that the laser beam fired by the ship is flying up (similar to the first unit test we wrote). Open the TestSuite file in the editor . Add the following method and save the file:
[UnityTest]
public IEnumerator LaserMovesUp()
{
      // 1
      GameObject laser = game.GetShip().SpawnLaser();
      // 2
      float initialYPos = laser.transform.position.y;
      yield return new WaitForSeconds(0.1f);
      // 3
      Assert.Greater(laser.transform.position.y, initialYPos);
}
Here is what this code does:
- Gets a link to the generated laser beam emitted from the ship.
- The starting position is recorded so that we can verify that it is moving up.
- This statement is consistent with the statement from the unit test
AsteroidsMoveDown, only now we claim that the value is greater (that is, the laser moves up).
Save the file and return to Test Runner. Run the LaserMovesUp test and observe how it passes:
Now you should already begin to understand how everything works, so it's time to add the last two tests and complete the tutorial.
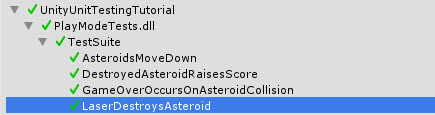
Verifying that the laser destroys asteroids
Next, we will make sure that when hit, the laser destroys the asteroid. Open the editor and add the following test to the end of TestSuite , and then save the file:
[UnityTest]
public IEnumerator LaserDestroysAsteroid()
{
    // 1
    GameObject asteroid = game.GetSpawner().SpawnAsteroid();
    asteroid.transform.position = Vector3.zero;
    GameObject laser = game.GetShip().SpawnLaser();
    laser.transform.position = Vector3.zero;
    yield return new WaitForSeconds(0.1f);
    // 2
    UnityEngine.Assertions.Assert.IsNull(asteroid);
}
Here's how it works:
- We create an asteroid and a laser beam, and assign them the same position to trigger a collision.
- This is a special test with an important distinction. See that we explicitly use UnityEngine.Assertions for this test ? This is because Unity has a special Null class that is different from the “regular” Null class. A NUnit framework statement
Assert.IsNull()will not work in Unity checks for null. When checking for null in Unity, you must explicitly use UnityEngine.Assertions.Assert, not Assert from NUnit.
Return to Test Runner and run a new test. You will see a green icon pleasing us.
To test or not to test - that is the question
The decision to stick to unit tests is not an easy decision and should not be taken lightly. However, the benefits of tests are worth the effort. There is even a development methodology, called test-driven development (Test Driven Development, TDD).
Working within the framework of TDD, you write tests before writing the application logic itself. First, you create tests, make sure that the program does not pass them, and then write only code designed to pass the tests. This may be a very different approach to coding, but it ensures that you write the code in a manner suitable for testing.
Keep this in mind when you begin work on your next project. But for now, it's time to write your own unit tests, for which you need a game that we have provided for you.
Примечание: нужно принять решение — тестировать только общие методы, или ещё и частные. Некоторые люди считают, что частные методы должны тестироваться только через использующие их общие методы. Это может сделать «юнит» кода, который нужно протестировать, довольно большим и может оказаться нежелательным. С другой стороны, тестирование частных методов может быть проблематичным и требовать особых фреймворков или инструментов рефлексии. Каждый из вариантов имеет свою плюсы и минусы, рассмотрение которых не входит в рамки данного туториала. В этом туториале все методы сделаны общими, чтобы их проще было отслеживать, поэтому не берите его в качестве примера при написании кода для продакшена.
Testing can be a big investment, so consider the advantages and disadvantages of adding unit testing to your project:
Unit Testing Advantages
Unit testing has many important advantages, including the following:
- It gives confidence that the method behaves as expected.
- Serves as documentation for new people studying the code base (unit tests are great for teaching).
- Makes you write code in a testable way.
- Allows isolating and fixing errors faster.
- It does not allow future updates to add new bugs to the old working code (they are called regression errors).
Unit Testing Disadvantages
However, you may not have time or budget for unit testing. Here are its disadvantages to consider:
- Writing tests can take longer than the code itself.
- Плохие или неточные тесты создают ложную уверенность.
- Для правильной реализации нужно больше знаний.
- Возможно, важные части кодовой базы нельзя будет покрыть тестами.
- Некоторые фреймворки не позволяют с лёгкостью тестировать частные методы, что может усложнить юнит-тестирование.
- Если тесты слишком хрупки (их слишком легко не пройти по ошибочным причинам), то на обслуживание может уйти много времени.
- Юнит-тесты не отлавливают интеграционные ошибки.
- UI тестировать сложно.
- Неопытные разработчики могут тратить зря время на тестирование не тех аспектов.
- Иногда тестирование элементов с внешними зависимостями или зависимостями времени выполнения может быть очень сложным.
Тестирование того, что при уничтожении астероидов увеличивается счёт
It is time to write the last test. Open the code editor, add the code below to the end of the TestSuite file and save it:
[UnityTest]
public IEnumerator DestroyedAsteroidRaisesScore()
{
    // 1
    GameObject asteroid = game.GetSpawner().SpawnAsteroid();
    asteroid.transform.position = Vector3.zero;
    GameObject laser = game.GetShip().SpawnLaser();
    laser.transform.position = Vector3.zero;
    yield return new WaitForSeconds(0.1f);
    // 2
    Assert.AreEqual(game.score, 1);
}
This is an important test, verifying that when a player destroys an asteroid, the score increases. This is what it consists of:
- We create an asteroid and a laser beam, and put them in one position. Due to this, a collision arises that triggers an increase in the score.
- The statement that game.score is now 1 (and not 0, as it was at the beginning).
Save the code and go back to Test Runner to run this last test and see if it runs the game:
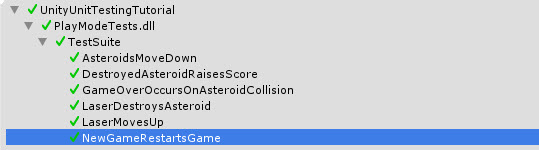
Awesome! All tests passed.
Where to go next?
In the article we examined a large amount of information. If you want to compare your work with the final project, then look at it in the archive , a link to which is also indicated at the beginning of the article.
In this tutorial, you learned what unit tests are and how to write them in Unity. In addition, you wrote six unit tests that successfully passed the code, and got acquainted with some of the pros and cons of unit testing.
Feeling confident? Then you can write many more tests. Examine the game's class files and try writing unit tests for other parts of the code. Consider adding tests for the following scenarios:
- Each type of asteroid when you touch the ship leads to the end of the game.
- Starting a new game resets the score.
- Movement left and right for the ship is working correctly.
If you want to increase your knowledge of unit testing, then it is worth exploring the implementation of dependencies and frameworks for working with mock objects . This can greatly simplify test setup.
Also read the NUnit documentation to learn more about the NUnit framework.
And feel free to share your thoughts and questions on the forums.
Successful testing!