How to make two applications from one. Tinkoff Junior Experience
Hi, my name is Andrey and I am working on the Tinkoff and Tinkoff Junior applications for the Android platform. I want to talk about how we collect two similar applications from one code base.
Тинькофф Джуниор — это мобильное банковское приложение, ориентированное на детей до 14 лет. Оно похоже на обычное приложение для взрослых, только в него добавлены некоторые функции (например, темы оформления), а другие, наоборот, выключены (например, кредитки).
 .
. 
At the start of the project, we considered various options for its implementation and made a number of decisions. It immediately became apparent that the two applications (Tinkoff and Tinkoff Junior) would have a significant portion of the common code. We did not want to fork from the old application, and then copy the bug fixes and the new common functionality. To work with two applications at once, we considered three options: Gradle Flavors, Git Submodules, Gradle Modules.
Gradle flavors
Many of our developers have already tried using Flavors, plus we could use multi-dimensional flavors for use with existing flavors.
However, Flavors have one fatal flaw. Android Studio considers the code only the code of the active flavor - that is, what lies in the main folder and in the flavor folder. The rest of the code is considered text along with comments. This imposes restrictions on some studio tools: code usage search, refactoring, and others.
Git submodules
Another option for implementing our idea is to use the submodules of the git: put the general code into a separate repository and connect it as a submodule to two repositories with the code for a specific application.
This approach increases the complexity of working with the source code of the project. Also, developers would still have to work with all three repositories to make edits when changing the API of the common module.
Multi-module architecture
The final option is to switch to multi-module architecture. This approach is free from the disadvantages that the other two have. However, the transition to a multi-module architecture requires time-consuming refactoring.
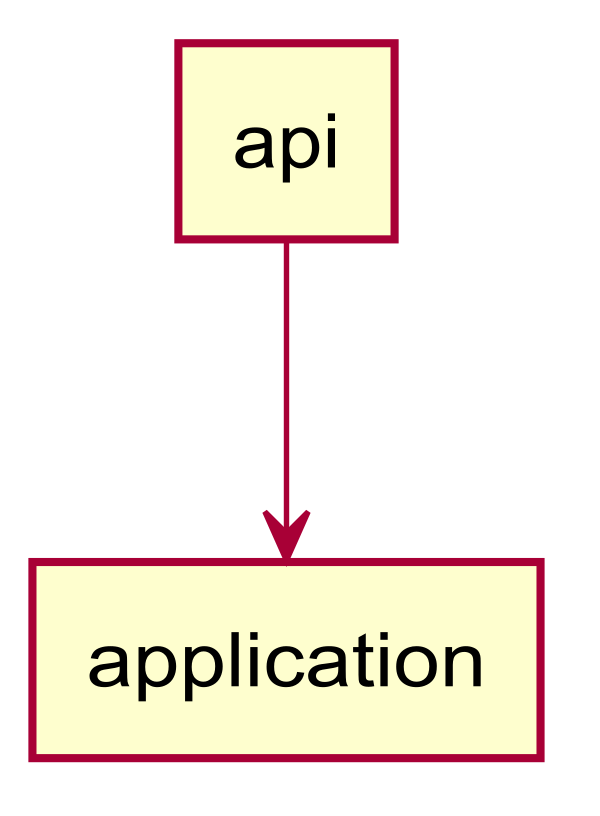
At the time we started working on Tinkoff Junior, we had two modules: a small API module that describes how to work with the server, and a large monolithic application module, in which the bulk of the project code was concentrated.

As a result, we wanted to get two application modules: adult and junior and some common core module. We have identified two options:
- The imposition of a common code into a common module common all . This approach is “more correct", but it takes more time. We estimated code reuse volumes at approximately 80%.

- Convert the application module into a library and connect this library to the thin adult and junior modules . This option is faster, but it will bring code to Tinkoff Junior that will never be executed.
We had time in reserve, and we decided to start development according to the first option (the common module ) with the condition to switch to the quick option when we run out of time for refactoring.
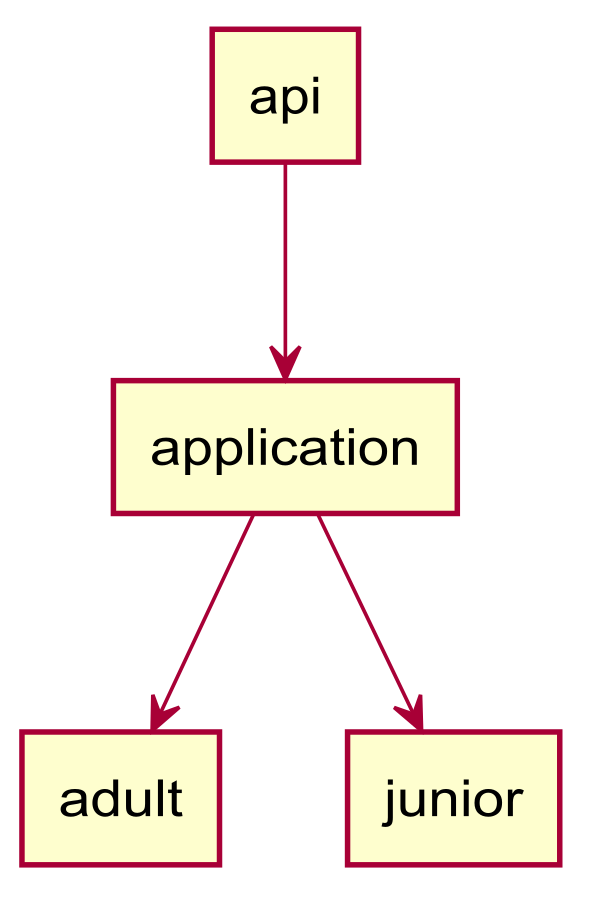
In the end, this happened: we transferred part of the project to the common module , and then turned the remaining application module into a library. As a result, now we have the following project structure:
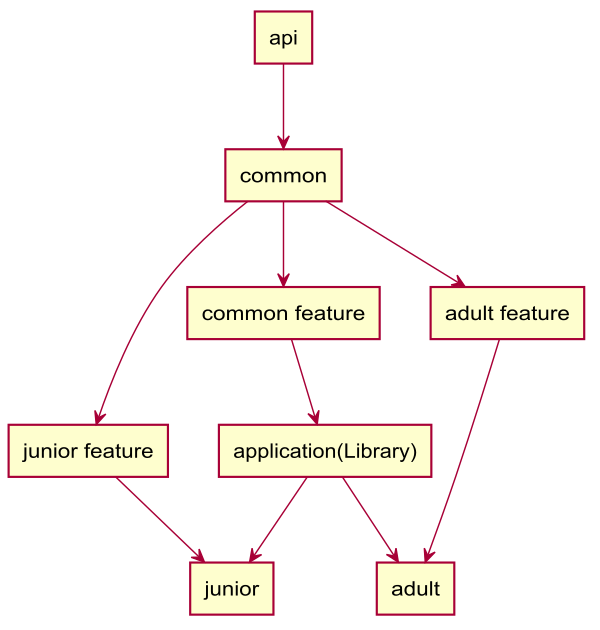
We have modules with features, which allows us to distinguish between an "adult", general or "children's" code. However, the application module is still large enough, and now about half of the project is stored there.
Turning the application into a library
The documentation has simple instructions for turning an application into a library. It contains four simple points and, it would seem, no difficulties should be:
- Open
build.gradlemodule file - Remove
applicationIdfrom module configuration - At the beginning of the file, replace
apply plugin: 'com.android.application'withapply plugin: 'com.android.library' - Save changes and synchronize the project in Android Studio ( File> Sync Project with Gradle Files )
However, the conversion took several days and the resulting diff turned out like this:
- 183 files changed
- 1601 insertions (+)
- 1920 deletions (-)
What went wrong?
First of all, in libraries, resource identifiers are not constants . In libraries, as in applications, an R.java file is generated with a list of resource identifiers. And in libraries, identifier values are not constant. Java does not allow you to switch on non-constant values, and all switches must be replaced with if-else.
// Application
int id = view.getId();
switch(id) {
   case R.id.button1:
       action1();
       break;
   case R.id.button2:
       action2();
       break;
}
// Library
int id = view.getId();
if (id == R.id.button1) {
   action1();
} else if (id == R.id.button2) {
   action2();
}
Next, we came across a package collision.
Suppose you have a library that has package = com.example , and the application with package = com.example.app depends on this library . Then, in the library will be generated class com.example.R , and annex, respectively, com.example.app.R . Now let's create com.example.MainActivity activity in the application , in which we will try to access the R-class. Without explicit import, the R-class of the library will be used, in which the application resources are not specified, but only the library resources. However, Android Studio does not highlight the error, and when you try to switch from code to a resource, everything will be okay.
Dagger
We use Dagger as a framework for dependency injection.
In each module containing activity, fragments, and services, we have the usual interfaces that describe the inject methods for these entities. In application modules ( adult and junor ), the dagger component interfaces inherit from these interfaces. In the modules, we bring the components to the interfaces necessary for this module.
Multibindings
The development of our project is greatly simplified by the use of multibindings.
In one of the common modules, we define an interface. In each application module ( adult , junior ) we describe the implementation of this interface. Using the annotation, we @Bindsindicate to the dagger that every time instead of an interface, it is necessary to inject its specific implementation for a child or adult application. We also often collect a collection of interface implementations (Set or Map), and such implementations are described in different application modules.
Flavors
For different purposes, we collect several application options. The flavors described in the base module must also be described in the dependent modules. Also, for Android Studio to work correctly, it is necessary that compatible assembly options be selected in all project modules.
conclusions
In a short time we have implemented a new application. Now we ship the new functionality in two applications, writing it once.
At the same time, we spent some time refactoring, simultaneously reducing technical debt, and switched to a multi-module architecture. Along the way, we encountered restrictions from the Android SDK and Android Studio, which we successfully managed.