Robo soccer player from beginners. Competitions at MIPT. Android & Arduino & Bluetooth
This article is a semi-sequel to the work of Love, Death and Robots, “The Arduino-based machine controlled by the Android device via Bluetooth is a full cycle” consisting of two parts ( one , two ). The things described there were slightly modified, redone, and the robot itself from a traveling machine turned into a football player. In general, there is interesting material on how to do it.
The previous instruction was divided into two parts: software and physical. There were not so many changes in both directions, so this time everything is in one copy. I will briefly remind you why the described part is needed, but for a complete understanding it is better to go over the first two parts.
Based on all the same principles described in the first article:
And here are the changes:
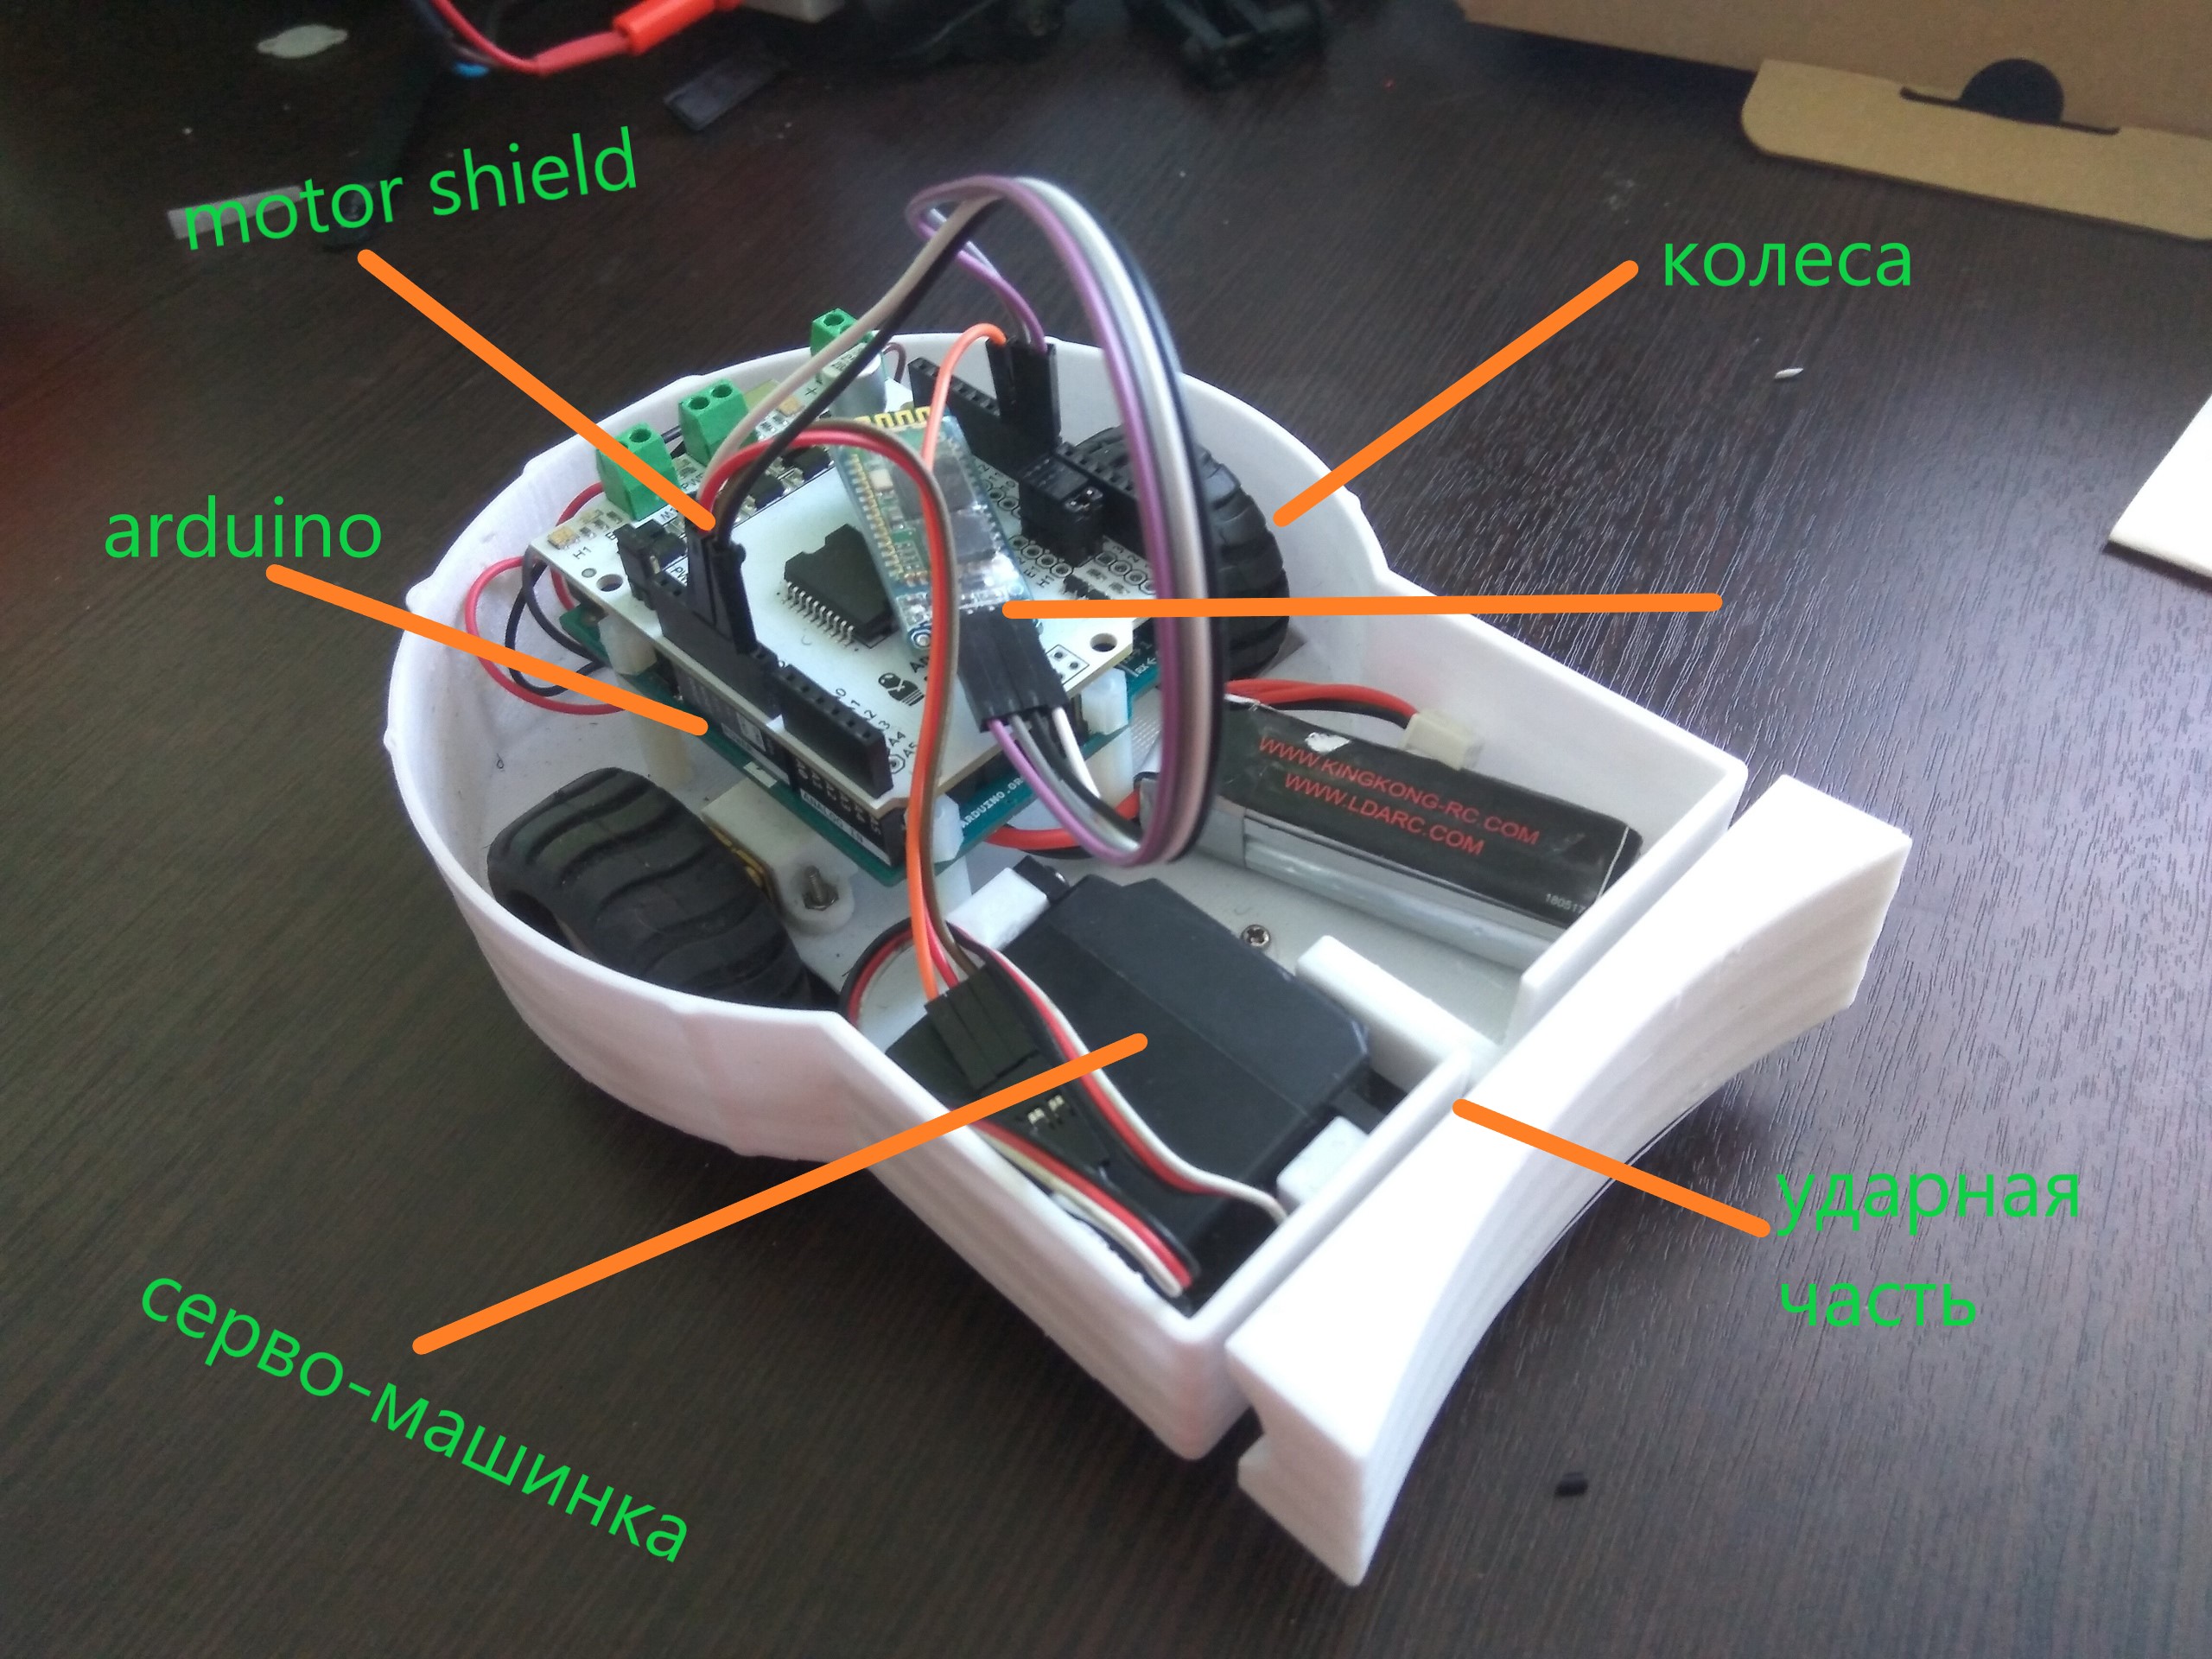
A form is a circle in which both the board and two wheels fit. Extension for the part where the impact force will stand.

When designing this, pay attention to:

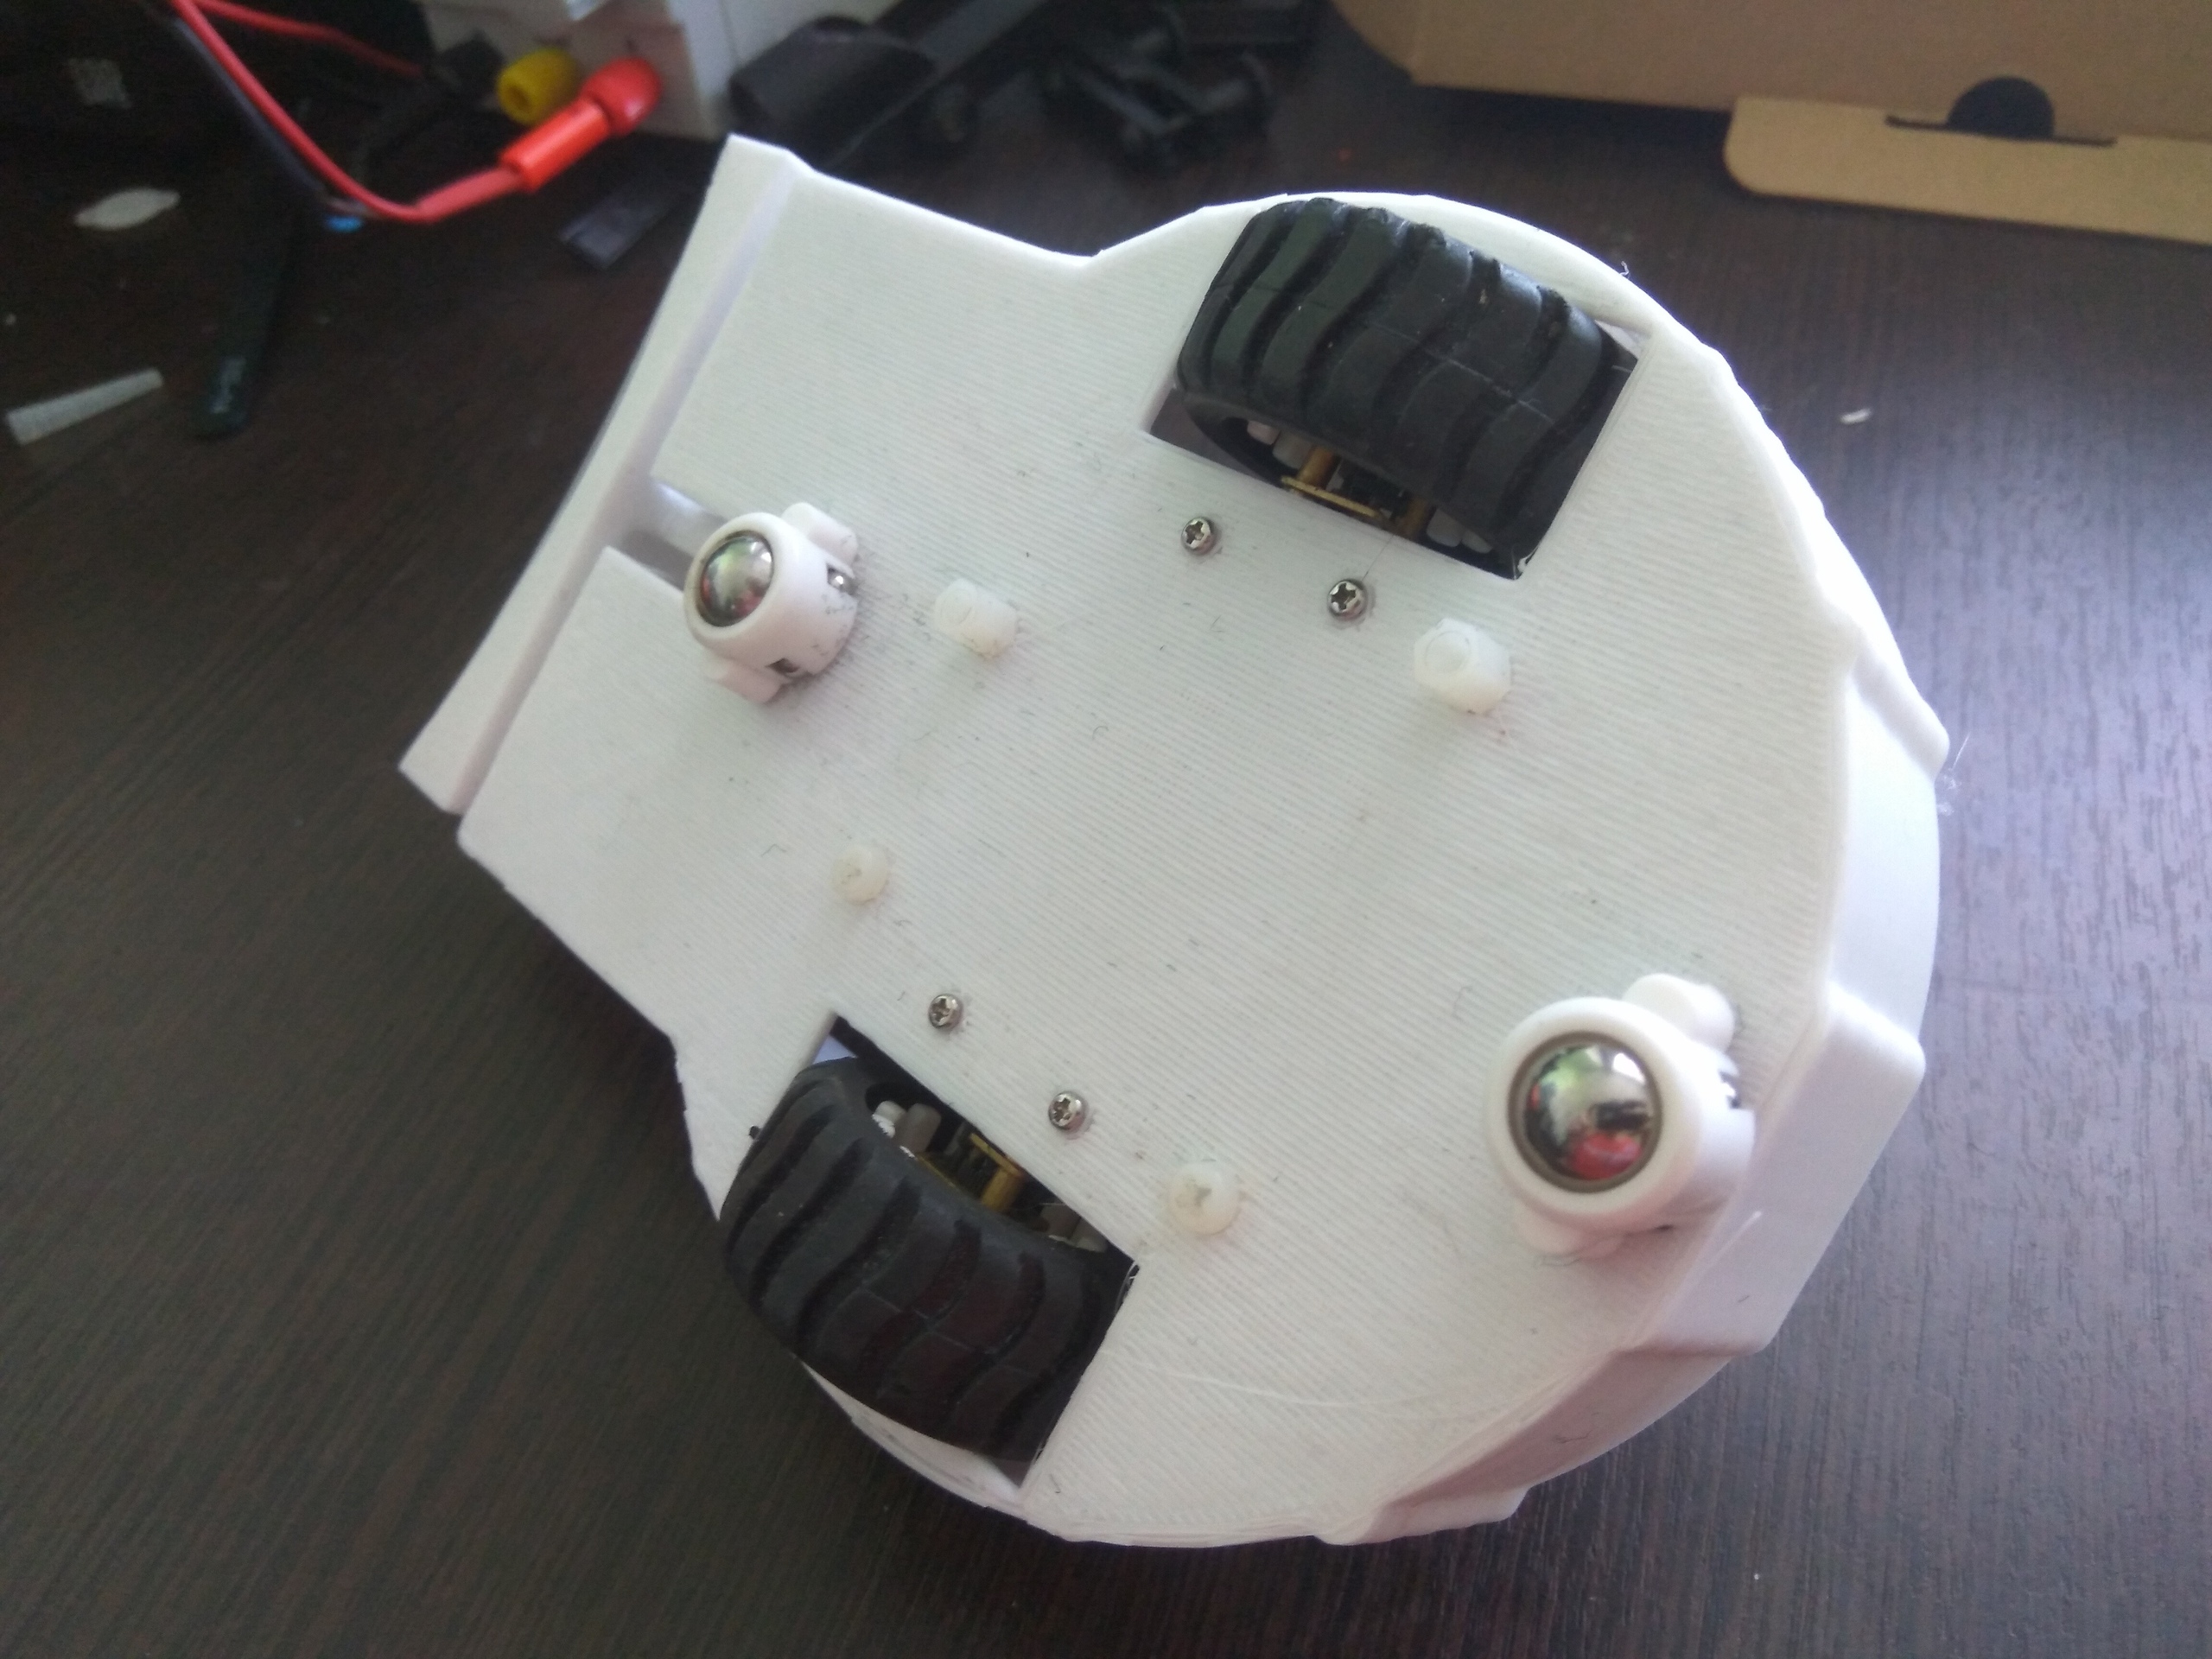
Balls added for lack of “pecking” raised the platform so that the wheels did not reach the floor. To avoid this, we either use larger diameter wheels or shorten the supporting structures. In general, we calculate this in advance!
Shock part. She does not hit. Beats, but not cool enough. In our first model, there was a servo machine, to which a part similar to a snowplow bucket was connected. By changing the position of the servo (from 0 to 30 degrees), you can simulate a blow. But the servos turned out to be slow, so the blow goes to the deuce.
There are two ways out: add a jerk on impact or replace servos with solenoids. The first option - you can increase the momentum by applying speed to the wheels during a stroke. In practice, this is as follows: the user presses the hit button, the robot starts from the spot (slightly) and at the same time make a strike.
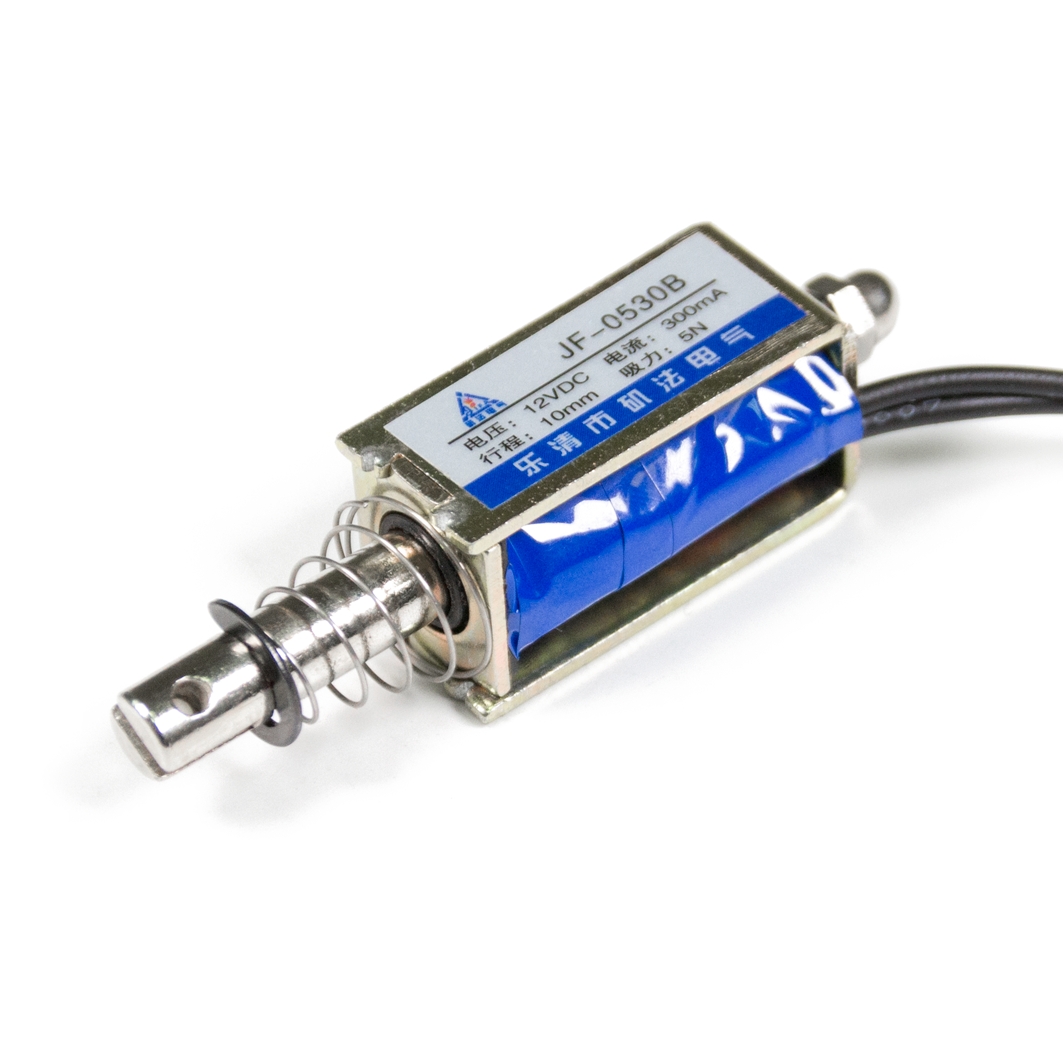
The second option - the solenoids push the shock part, and here everything depends on the power (speed) of the shock, which in turn depends on the characteristics of the solenoid.

By a good tradition, which is already one article, we will divide this section into two parts. First an Android app, then an Arduino sketch.
Let me remind you, the application was written by me from scratch. Over the past six months, I understood a little more in this matter, so I will describe whatDopper thought of.
First, let's go to simplification. Now the communication protocol is as follows: “opening character” + “value” + “closing character” (To understand how I get these values and what I’m talking about, see the full analysis of the application here ). This works for both speed and angle. Since there is only one type of strike, he does not need such wisdom, so the team consists of one “/” character (about the hit team through the paragraph).
A typical command would look like this: # 125 # @ 180 @, where 125 is speed and 180 is angle. Of course, this can be simplified yet, but one of the tasks was to maintain lightness and readability, so that later it could be easily explained, including to children.
A new sendHit () command has appeared, which is triggered when the “Hit” button is clicked. She sends one "/" sign. Since ordinary bluetooth 2.0+ does not suffer from data received at the same time, that is, it knows how to queue them and not lose, we do not need to control this. If you are going to work with Bluetooth Low Energy 4.0+ (well, all of a sudden), there already the queue will need to be organized manually, otherwise the data will be lost.
So the protocol for sending commands has changed, the reception algorithm has also changed. He simplified. One if tracking kick was added as well. A complete analysis of the sketch is here .
bt.read () reads one character. If it is equal to "#", then the speed symbols begin. We read them until the closing character "#" appears. The for loop cannot be used here, because the speed length is not known in advance (it can be a single-digit, two-digit or three-digit number). The resulting value is written to the variable.
The same thing happens with a turn. After both speed and angle are read, we pass everything to the function turn (int speed, int angle).
The turn () function determines which direction to move (forward, backward) and where to turn (right, left, straight). The restriction if (speed> 0 && speed <70) is necessary so that the robot does not slow down if bytes are lost. Faced this when I increased the transmission speed (played with delays of 100-300ms between teams) - sometimes the speed value did not reach and turned into 0, 40 (although, for example, 240 was actually sent). Crutch, but it works.
It can be called "protection against uncontrolled factors."
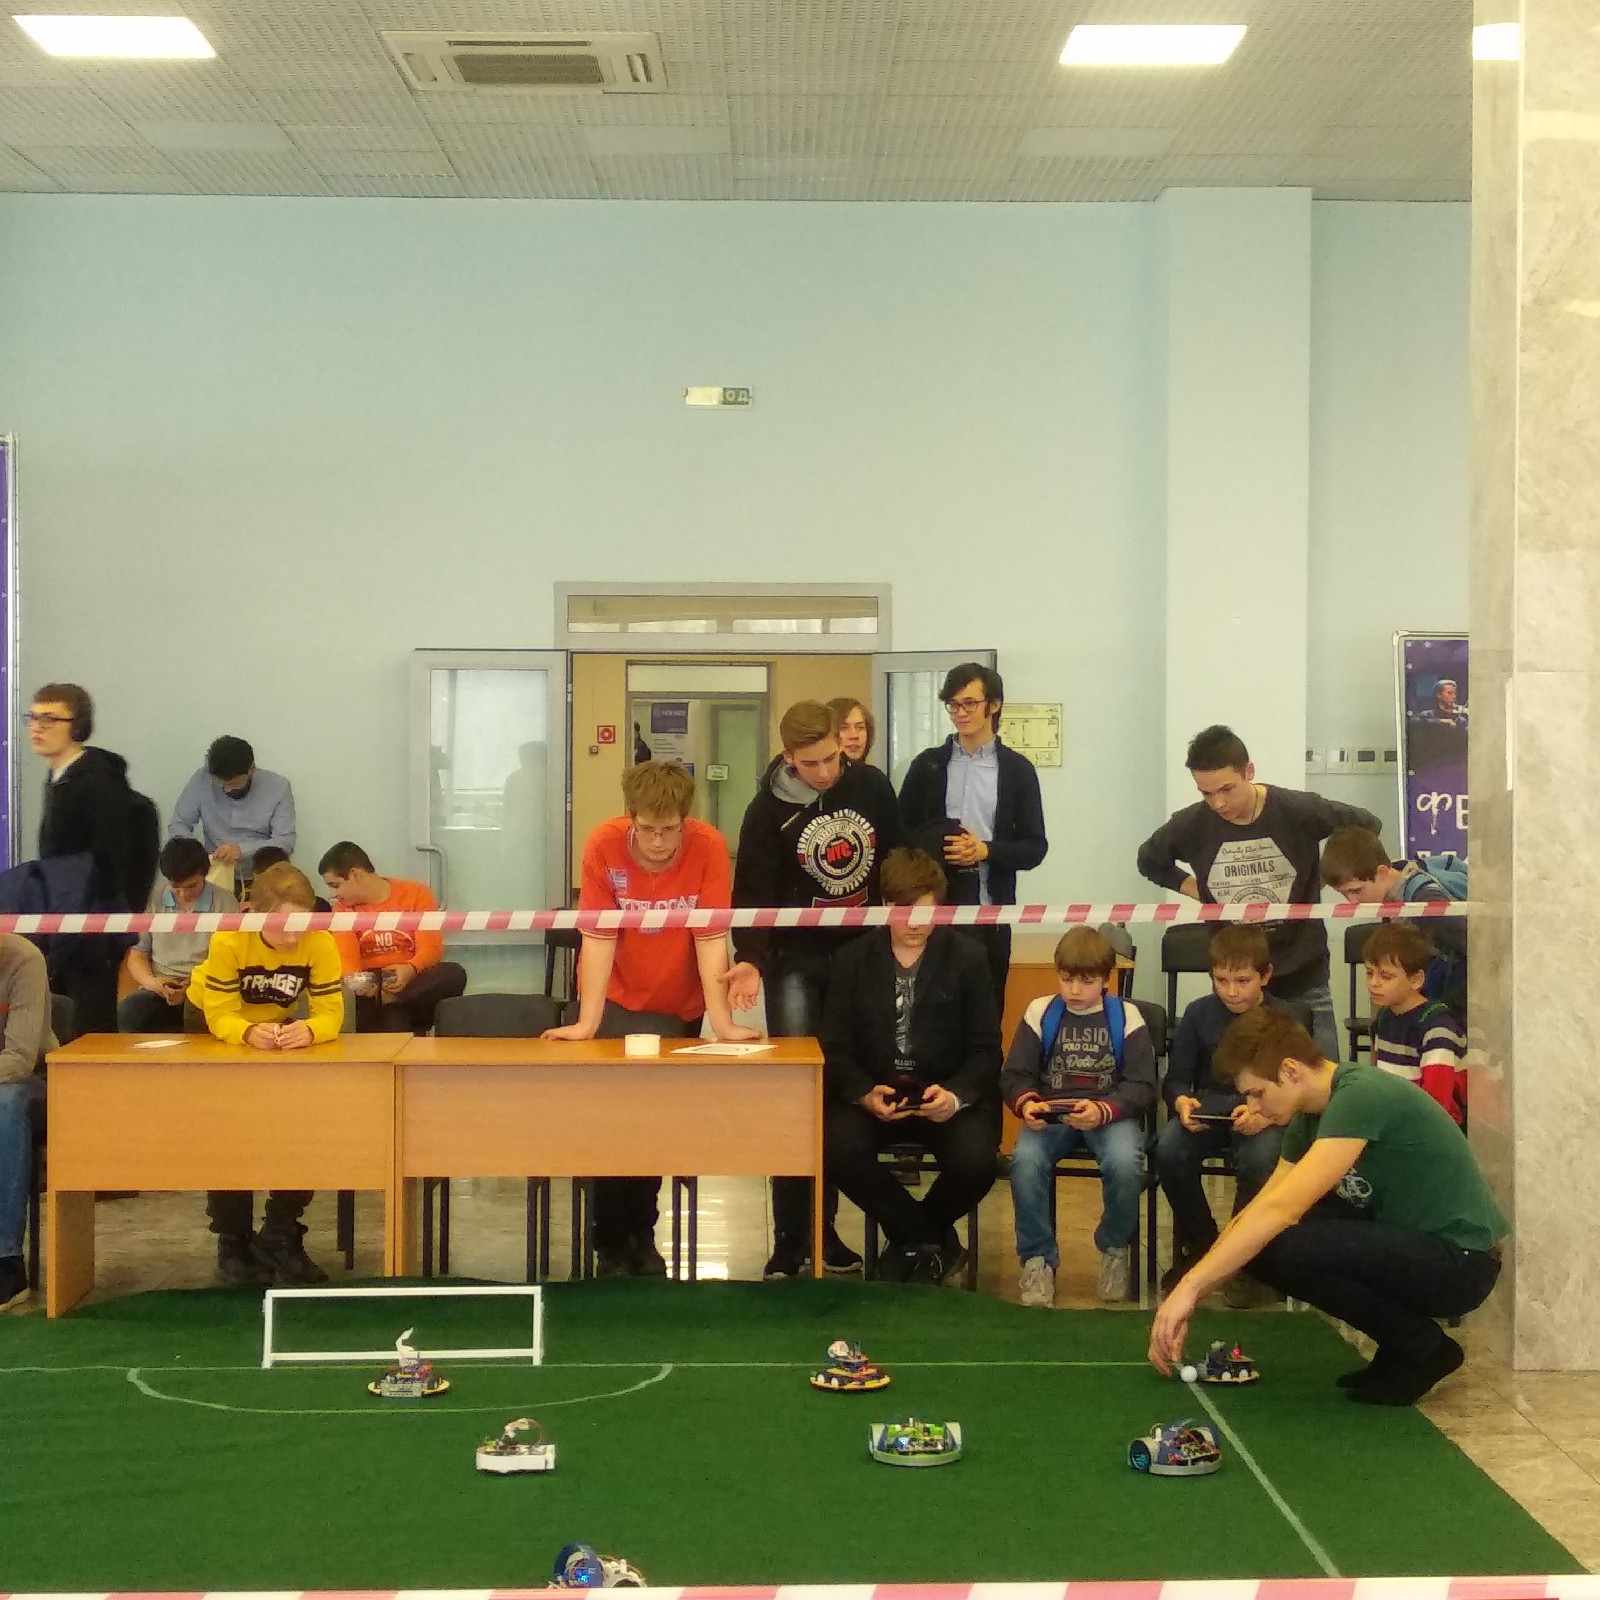
With our robot, we went to the robotic football competition, which was organized and held at the Moscow Institute of Physics and Technology, Dolgoprudny, 04/14/2019. We managed to reach the 1 \ 4 finals, but did not advance further.

The process itself was interesting to us, but here I will describe the conclusions that were made by looking at the robot in the field:
Comments and suggestions will be very happy. Under previous articles, comments are sometimes more interesting than the article itself. Thank you , Sasha and Dana for the work .
The previous instruction was divided into two parts: software and physical. There were not so many changes in both directions, so this time everything is in one copy. I will briefly remind you why the described part is needed, but for a complete understanding it is better to go over the first two parts.
Physical part
Based on all the same principles described in the first article:
- sandwich from Arduino Uno and Motor Shield.
- two motors connected to the motor shield.
And here are the changes:
- the shock part appeared, oddly enough, responsible for hitting the ball.
- the case is now completely mine, printed on a 3D printer.
Body
A form is a circle in which both the board and two wheels fit. Extension for the part where the impact force will stand.

When designing this, pay attention to:
- High sides. Robots collide during the game, the sides protect not only your wires, but also your rivals from your wires.
- Center of gravity and stability. The center of gravity is of course where the board is. The wheels are located near it, so they will not slip. Plus, a battery is placed on top of the board.
- To prevent the robot from pecking its nose or back, we put balls going in the kit from the amperes here and there (if they are not there, you can replace it with any other sliding design).
- Rigidity of a design. The platform must not sag under the weight of circuit boards and motors. Do not stint, either use hard materials (plywood), or reinforce the plastic structure with racks

And now the main nonsense
Balls added for lack of “pecking” raised the platform so that the wheels did not reach the floor. To avoid this, we either use larger diameter wheels or shorten the supporting structures. In general, we calculate this in advance!
Shock part. She does not hit. Beats, but not cool enough. In our first model, there was a servo machine, to which a part similar to a snowplow bucket was connected. By changing the position of the servo (from 0 to 30 degrees), you can simulate a blow. But the servos turned out to be slow, so the blow goes to the deuce.
There are two ways out: add a jerk on impact or replace servos with solenoids. The first option - you can increase the momentum by applying speed to the wheels during a stroke. In practice, this is as follows: the user presses the hit button, the robot starts from the spot (slightly) and at the same time make a strike.
The second option - the solenoids push the shock part, and here everything depends on the power (speed) of the shock, which in turn depends on the characteristics of the solenoid.

Software part
By a good tradition, which is already one article, we will divide this section into two parts. First an Android app, then an Arduino sketch.
Android
Let me remind you, the application was written by me from scratch. Over the past six months, I understood a little more in this matter, so I will describe what
First, let's go to simplification. Now the communication protocol is as follows: “opening character” + “value” + “closing character” (To understand how I get these values and what I’m talking about, see the full analysis of the application here ). This works for both speed and angle. Since there is only one type of strike, he does not need such wisdom, so the team consists of one “/” character (about the hit team through the paragraph).
   private void sendCommand(String speed, String angle) {
            String speedCommand = "#" + speed + "#"; //добавляем начальный и конечный символ
            String angleCommand = "@" + angle + "@";
            try {
                outputStream.write(speedCommand.getBytes()); //отсылаем обе команды
                outputStream.write(angleCommand.getBytes());
            } catch(Exception e) {
                e.printStackTrace();
            }
        }
A typical command would look like this: # 125 # @ 180 @, where 125 is speed and 180 is angle. Of course, this can be simplified yet, but one of the tasks was to maintain lightness and readability, so that later it could be easily explained, including to children.
A new sendHit () command has appeared, which is triggered when the “Hit” button is clicked. She sends one "/" sign. Since ordinary bluetooth 2.0+ does not suffer from data received at the same time, that is, it knows how to queue them and not lose, we do not need to control this. If you are going to work with Bluetooth Low Energy 4.0+ (well, all of a sudden), there already the queue will need to be organized manually, otherwise the data will be lost.
...
  bHit = findViewById(R.id.b_high_hit); //находим кнопку удара
  bHit.setOnClickListener(new View.OnClickListener() {
            @Override
            public void onClick(View view) {
                threadCommand.sendHit(); //при нажатии вызываем отправку команды "удар"
            }
        });
...
private void sendHit() {
            try {
                outputStream.write("/".getBytes()); //отправляем один символ
            }catch (Exception e) {
                e.printStackTrace();
            }
        }
}
Arduino
So the protocol for sending commands has changed, the reception algorithm has also changed. He simplified. One if tracking kick was added as well. A complete analysis of the sketch is here .
bt.read () reads one character. If it is equal to "#", then the speed symbols begin. We read them until the closing character "#" appears. The for loop cannot be used here, because the speed length is not known in advance (it can be a single-digit, two-digit or three-digit number). The resulting value is written to the variable.
The same thing happens with a turn. After both speed and angle are read, we pass everything to the function turn (int speed, int angle).
void loop() {
  if(BTSerial.available() > 0) {//если есть присланные символы
     char a = BTSerial.read(); //считываем первый символ
    if(a == '#') { //начинается скорость
      sp="";
      char b = BTSerial.read();
      while( b != '#') {
        //пока не закрывающий символ, плюсуем символы в переменную
        sp+=b;
        b = BTSerial.read();
      }
    } else if (a == '@') {//начинается угол
      val = "";
      char b = BTSerial.read();
      while(b != '@') { //пока не закрывающий символ
      val+=b; //прибавляем символ к переменной
      b = BTSerial.read();
    }
    turn(val.toInt(), sp.toInt()); //скорость и угол считаны, запускаем действие
    } else if (a == '/')  { //оп, нужно сделать удар
      Serial.println(a);
      servo.write(30); //делаем удар
      delay(150);
      servo.write(0); //возращаем в исходную позицию
    }
    lastTakeInformation = millis();
  } else {
     if(millis() - lastTakeInformation > 150) {
      //если команды не приходили больше 150мс
     //останавливаем робота
     lastTakeInformation = 0;
     analogWrite(speedRight, 0);
     analogWrite(speedLeft, 0);
     }
  }
  delay(5);
}
The turn () function determines which direction to move (forward, backward) and where to turn (right, left, straight). The restriction if (speed> 0 && speed <70) is necessary so that the robot does not slow down if bytes are lost. Faced this when I increased the transmission speed (played with delays of 100-300ms between teams) - sometimes the speed value did not reach and turned into 0, 40 (although, for example, 240 was actually sent). Crutch, but it works.
It can be called "protection against uncontrolled factors."
void turn(int angle, int speed) {
  if(speed >= 0 && speed < 70) return;
  if(speed > 0) {
     digitalWrite(dirLeft, HIGH);
     digitalWrite(dirRight, HIGH);
  } else if (sp < 0) {
      digitalWrite(dirLeft, LOW);
      digitalWrite(dirRight, LOW);
  }
  if(angle > 149) {
        analogWrite(speedLeft, speed);
        analogWrite(speedRight, speed - 65); //поворот вправо
  } else if (angle < 31) {
        analogWrite(speedLeft, speed - 65); //поворот влево
        analogWrite(speedRight, speed);
  } else {
      analogWrite(speedLeft, speed);
      analogWrite(speedRight, speed);
  }
}
Competitions at MIPT instead of a total
With our robot, we went to the robotic football competition, which was organized and held at the Moscow Institute of Physics and Technology, Dolgoprudny, 04/14/2019. We managed to reach the 1 \ 4 finals, but did not advance further.

The process itself was interesting to us, but here I will describe the conclusions that were made by looking at the robot in the field:
- need more powerful. Four wheels or more powerful engines and other wheels are desirable. Although, of course, it was the four-wheel models that looked more advantageous
- management is not high. It is necessary to transfer the robot to a tank turn (turn at one point due to wheels spinning in opposite directions), otherwise the turn radius is too large. And in general, the option with four arrows, rather than a circle with a proportional speed, is preferable for football . The described option is better suited for racing where you drive continuously, and here you need clarity (I turned 10 degrees around my axis, aimed at the ball and pressed the button forward. But then, when I already grabbed the ball, I would like to flexibly maneuver, but here you need proportional speed ... you need to somehow combine this thing).
Comments and suggestions will be very happy. Under previous articles, comments are sometimes more interesting than the article itself. Thank you , Sasha and Dana for the work .
