React Training Course Part 27: Course Project
- Transfer
- Tutorial
In this part of the translation of the React training course, you are asked to create a meme generator.
→ Part 1: course overview, reasons for the popularity of React, ReactDOM and JSX
→ Part 2: functional components
→ Part 3: component files, project structure
→ Part 4: parent and child components
→ Part 5: start of work on a TODO application, basics of styling
→ Part 6: about some features of the course, JSX and JavaScript
→ Part 7: built-in styles
→ Part 8: continued work on the TODO application, familiarity with the properties of components
→ Part 9: properties of components
→

Part 10: workshop on working with component properties and stylization
→ Part 11: dynamic markup generation and map arrays method
→ Part 12: workshop, third stage of work on a TODO application
→ Part 13: class-based components
→ Part 14: workshop on class-based components, state of the components
→ Part 15: workshops on working with the state of components
→ Part 16: the fourth stage of work on a TODO application, event handling
→ Part 17: fifth stage of work on a TODO application, modification of the state of components
→ Part 18 : sha that phase of work on TODO-application
→Part 19: component life cycle methods
→ Part 20: first lesson on conditional rendering
→ Part 21: second lesson and workshop on conditional rendering
→ Part 22: seventh stage of work on a TODO application, downloading data from external sources
→ Part 23: first lesson on working with forms
→ Part 24: second lesson on working with forms
→ Part 25: workshop on working with forms
→ Part 26: application architecture, the Container / Component pattern
→ Part 27: course project
→ Original.
So we got to the course project. Let's create an application that will generate memes. Let's start with the standard create-react-app project created using this command:
Here you can find information about the features of its use.
In the course of work on this project, you will be asked to implement some of its parts yourself, and then read the explanations about them. In the standard project, there is already template code located, in particular, in
In this project, you are invited to use the following styles:
These styles can be included in an existing file in the project
So, assuming that the files
Here's what should happen in
Here we import
Here's what the file might look like
Here is now presented the simplest functional component.
At this stage, the project looks like the one shown below.

Application in the browser
Now create two new components, in two files whose names correspond to the names of the components:
Considering what functions are assigned to these components, think about what they should be.
Here is the contents of the file
Since this component will only be used to display the application header, we designed it as a functional component.
Here is the file code
Here, taking into account the tasks that are supposed to be solved by means of the component
After creating these files, we import them into
Check the appearance of the application.

Application in the browser
Now let's work on the component
Here's how the look of the app will change.

Application in the browser
The application title is designed in accordance with the
We will continue to deal with the component
This is what the code will be
Now the appearance of the application will not be affected.
We will use calls to the API, which returns an array of objects containing links to images, based on which memes can be created. At this stage of work on the project, you are invited to implement the
Here, to make it clearer, a fragment of the JSON data returned when accessing this API:
Solving the problem posed above, it is necessary to take into account the fact that we are talking about the data that the component needs at the very beginning of the application.
Therefore, to load them, we will resort to the component life cycle method
Here's what the component code looks like
This is what gets to the console after successfully loading the data.
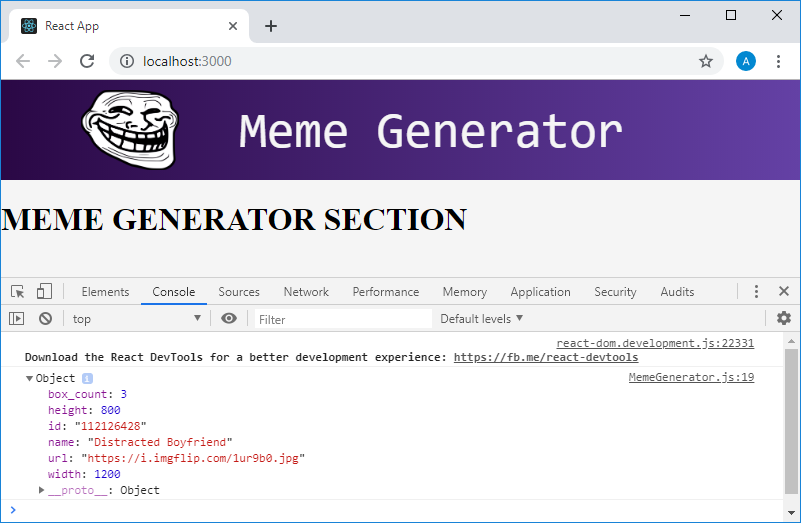
Application in the browser, output to the console of the first element of the loaded array
Note that the image is described using many properties. We will use only the property
At the beginning of the course, we talked about how this application will look.
Meme generator
In particular, its interface has a couple of fields for entering text, which will be displayed in the upper and lower parts of the image. Now you are invited to take, based on the updated component code shown below
By the way, pay attention to the fact that in order to include a comment in the code returned by the method
Here is what you should get at this stage of work on the application:
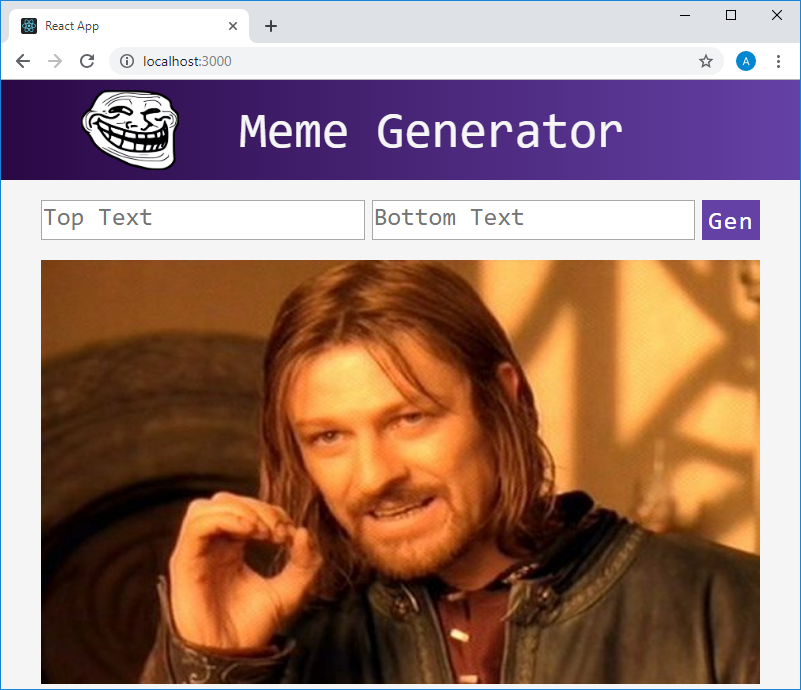
Now the application page will look like the one shown below.

Application in the browser
So far only fields with the text of prompts are displayed, entering data into them does not lead to changes in the interface. In order to check the correct operation of the mechanisms implemented here, you can use the command
Now we’ll work on the part of the application that is responsible for displaying the image-meme. Recall that now we have an array containing information about images that are planned to be used as the basis of memes. The application should, at the click of a button
Here is the updated component code
Part 10: workshop on working with component properties and stylization
→ Part 11: dynamic markup generation and map arrays method
→ Part 12: workshop, third stage of work on a TODO application
→ Part 13: class-based components
→ Part 14: workshop on class-based components, state of the components
→ Part 15: workshops on working with the state of components
→ Part 16: the fourth stage of work on a TODO application, event handling
→ Part 17: fifth stage of work on a TODO application, modification of the state of components
→ Part 18 : sha that phase of work on TODO-application
→Part 19: component life cycle methods
→ Part 20: first lesson on conditional rendering
→ Part 21: second lesson and workshop on conditional rendering
→ Part 22: seventh stage of work on a TODO application, downloading data from external sources
→ Part 23: first lesson on working with forms
→ Part 24: second lesson on working with forms
→ Part 25: workshop on working with forms
→ Part 26: application architecture, the Container / Component pattern
→ Part 27: course project
Lesson 45. Course project. Meme generator
→ Original.
So we got to the course project. Let's create an application that will generate memes. Let's start with the standard create-react-app project created using this command:
npx create-react-app meme-generatorHere you can find information about the features of its use.
In the course of work on this project, you will be asked to implement some of its parts yourself, and then read the explanations about them. In the standard project, there is already template code located, in particular, in
index.jsand files App.js. You can completely remove this code and try to write it yourself in order to test yourself in the implementation of the standard mechanisms of React-applications. In this project, you are invited to use the following styles:
* {
    box-sizing: border-box;
}
body {
    margin: 0;
    background-color: whitesmoke;
}
header {
    height: 100px;
    display: flex;
    align-items: center;
    background: #6441A5;  /* fallback for old browsers */
    background: -webkit-linear-gradient(to right, #2a0845, #6441A5);  /* Chrome 10-25, Safari 5.1-6 */
    background: linear-gradient(to right, #2a0845, #6441A5); /* W3C, IE 10+/ Edge, Firefox 16+, Chrome 26+, Opera 12+, Safari 7+ */
}
header > img {
    height: 80%;
    margin-left: 10%;
}
header > p {
    font-family: VT323, monospace;
    color: whitesmoke;
    font-size: 50px;
    margin-left: 60px;
}
.meme {
    position: relative;
    width: 90%;
    margin: auto;
}
.meme > img {
    width: 100%;
}
.meme > h2 {
    position: absolute;
    width: 80%;
    text-align: center;
    left: 50%;
    transform: translateX(-50%);
    margin: 15px 0;
    padding: 0 5px;
    font-family: impact, sans-serif;
    font-size: 2em;
    text-transform: uppercase;
    color: white;
    letter-spacing: 1px;
    text-shadow:
        2px 2px 0 #000,
        -2px -2px 0 #000,
        2px -2px 0 #000,
        -2px 2px 0 #000,
        0 2px 0 #000,
        2px 0 0 #000,
        0 -2px 0 #000,
        -2px 0 0 #000,
        2px 2px 5px #000;
}
.meme > .bottom {
    bottom: 0;
}
.meme > .top {
    top: 0;
}
.meme-form {
    width: 90%;
    margin: 20px auto;
    display: flex;
    justify-content: space-between;
}
.meme-form > input {
    width: 45%;
    height: 40px;
}
.meme-form > button {
    border: none;
    font-family: VT323, monospace;
    font-size: 25px;
    letter-spacing: 1.5px;
    color: white;
    background: #6441A5;
}
.meme-form > input::-webkit-input-placeholder { /* Chrome/Opera/Safari */
  font-family: VT323, monospace;
  font-size: 25px;
  text-align: cen
}
.meme-form > input::-moz-placeholder { /* Firefox 19+ */
  font-family: VT323, monospace;
  font-size: 25px;
  text-align: cen
}
.meme-form > input:-ms-input-placeholder { /* IE 10+ */
  font-family: VT323, monospace;
  font-size: 25px;
  text-align: cen
}
.meme-form > input:-moz-placeholder { /* Firefox 18- */
  font-family: VT323, monospace;
  font-size: 25px;
  text-align: cen
}
These styles can be included in an existing file in the project
index.cssand included in the file index.js. So, assuming that the files
index.jsand App.jsis now empty, you will, as a first task, it is proposed to write your own code index.jsto create a simple component in App.jsand bring it in index.js. Here's what should happen in
index.js:import React from "react"
import ReactDOM from "react-dom"
import './index.css'
import App from "./App"
ReactDOM.render(, document.getElementById("root")) Here we import
Reactand ReactDOM, import styles from index.cssand components App. After that, using the method ReactDOM.render(), we print what the component forms Appinto a page element index.htmlwith identifier root( Here's what the file might look like
App.js:import React from "react"
function App() {
return (
Hello world!
)
}
export default AppHere is now presented the simplest functional component.
At this stage, the project looks like the one shown below.
Application in the browser
Now create two new components, in two files whose names correspond to the names of the components:
- The component
Headerthat will be used to display the application header. - The component
MemeGeneratorin which the main tasks assigned to the application will be solved. Namely, calls to the API will be performed here. Application data will be stored here.
Considering what functions are assigned to these components, think about what they should be.
Here is the contents of the file
Header.js:import React from "react"
function Header() {
return (
HEADER
)
}
export default HeaderSince this component will only be used to display the application header, we designed it as a functional component.
Here is the file code
MemeGenerator.js:import React, {Component} from "react"
class MemeGenerator extends Component {
constructor() {
super()
this.state ={}
}
render() {
return (
MEME GENERATOR SECTION
)
}
}
export default MemeGeneratorHere, taking into account the tasks that are supposed to be solved by means of the component
MemeGenerator, we will use a component based on the class. There is a constructor here in which we initialize the state with an empty object. After creating these files, we import them into
App.jsand return the Appmarkup from the functional component , which uses instances of these components, not forgetting that if the functional component returns several elements, they need to be wrapped in something. In our case, this is a tagApp.js:import React from "react"
import Header from "./Header"
import MemeGenerator from "./MemeGenerator"
function App() {
return (
)
}
export default AppCheck the appearance of the application.
Application in the browser
Now let's work on the component
Header. Here we will use the semantic element HTML5Header.jswill look like this:import React from "react"
function Header() {
return (
![]()
Meme Generator
)
}
export default HeaderHere's how the look of the app will change.
Application in the browser
The application title is designed in accordance with the
index.jsstyles previously connected . Work on the component Headeris now complete. We will continue to deal with the component
MemeGenerator. Now you are invited to independently initialize the state of this component by writing the following data to it:- Text displayed at the top of the meme (property
topText). - The text displayed at the bottom of the meme (property
bottomText). - Random image (property
randomImageto be initialized with the link http://i.imgflip.com/1bij.jpg ).
This is what the code will be
MemeGenerator.jsafter initializing the state:import React, {Component} from "react"
class MemeGenerator extends Component {
constructor() {
super()
this.state = {
topText: "",
bottomText: "",
randomImg: "http://i.imgflip.com/1bij.jpg"
}
}
render() {
return (
MEME GENERATOR SECTION
)
}
}
export default MemeGeneratorNow the appearance of the application will not be affected.
We will use calls to the API, which returns an array of objects containing links to images, based on which memes can be created. At this stage of work on the project, you are invited to implement the
MemeGeneratorfollowing functionality in the component :- Call the API https://api.imgflip.com/get_memes/ .
- Save the data available in the response as an array
response.data.memesin the new state property (allMemeImgs).
Here, to make it clearer, a fragment of the JSON data returned when accessing this API:
{
   "success":true,
   "data":{
      "memes":[
         {
            "id":"112126428",
            "name":"Distracted Boyfriend",
            "url":"https:\/\/i.imgflip.com\/1ur9b0.jpg",
            "width":1200,
            "height":800,
            "box_count":3
         },
         {
            "id":"87743020",
            "name":"Two Buttons",
            "url":"https:\/\/i.imgflip.com\/1g8my4.jpg",
            "width":600,
            "height":908,
            "box_count":2
         },
         {
            "id":"129242436",
            "name":"Change My Mind",
            "url":"https:\/\/i.imgflip.com\/24y43o.jpg",
            "width":482,
            "height":361,
            "box_count":2
         },
         ….
   ]
   }
}
Solving the problem posed above, it is necessary to take into account the fact that we are talking about the data that the component needs at the very beginning of the application.
Therefore, to load them, we will resort to the component life cycle method
componentDidMount(). Here we, using the standard method fetch(), will call the API. It returns a promise. After loading the data, the response object will be available to us, from it we extract the array memesand put it in a new state property allMemeImgsinitialized by an empty array. Since this data is not yet used to form something that is displayed on the screen, we will print the first element of the array to the console to check the correct operation of the data loading mechanism. Here's what the component code looks like
MemeGeneratorat this stage of work:import React, {Component} from "react"
class MemeGenerator extends Component {
constructor() {
super()
this.state = {
topText: "",
bottomText: "",
randomImg: "http://i.imgflip.com/1bij.jpg",
allMemeImgs: []
}
}
componentDidMount() {
fetch("https://api.imgflip.com/get_memes")
.then(response => response.json())
.then(response => {
const {memes} = response.data
console.log(memes[0])
this.setState({ allMemeImgs: memes })
})
}
render() {
return (
MEME GENERATOR SECTION
)
}
}
export default MemeGeneratorThis is what gets to the console after successfully loading the data.
Application in the browser, output to the console of the first element of the loaded array
Note that the image is described using many properties. We will use only the property
urlthat gives access to the link to download the image. At the beginning of the course, we talked about how this application will look.
Meme generator
In particular, its interface has a couple of fields for entering text, which will be displayed in the upper and lower parts of the image. Now you are invited to take, based on the updated component code shown below
MemeGenerator, which differs from the above code for this component in that a form blank is added here, to create a couple of text fields yourself, topTextand bottomText. Keep in mind that these must be managed components. Add the necessary attributes to them. Create an event handler for onChangethese fields in which you need to update the corresponding state properties as you enter text in them.import React, {Component} from "react"
class MemeGenerator extends Component {
constructor() {
super()
this.state = {
topText: "",
bottomText: "",
randomImg: "http://i.imgflip.com/1bij.jpg",
allMemeImgs: []
}
}
componentDidMount() {
fetch("https://api.imgflip.com/get_memes")
.then(response => response.json())
.then(response => {
const {memes} = response.data
this.setState({ allMemeImgs: memes })
})
}
render() {
return (
)
}
}
export default MemeGeneratorBy the way, pay attention to the fact that in order to include a comment in the code returned by the method
render(), we enclosed it in curly brackets in order to indicate to the system that it should perceive this fragment as JavaScript code. Here is what you should get at this stage of work on the application:
import React, {Component} from "react"
class MemeGenerator extends Component {
constructor() {
super()
this.state = {
topText: "",
bottomText: "",
randomImg: "http://i.imgflip.com/1bij.jpg",
allMemeImgs: []
}
this.handleChange = this.handleChange.bind(this)
}
componentDidMount() {
fetch("https://api.imgflip.com/get_memes")
.then(response => response.json())
.then(response => {
const {memes} = response.data
this.setState({ allMemeImgs: memes })
})
}
handleChange(event) {
const {name, value} = event.target
this.setState({ [name]: value })
}
render() {
return (
)
}
}
export default MemeGeneratorNow the application page will look like the one shown below.
Application in the browser
So far only fields with the text of prompts are displayed, entering data into them does not lead to changes in the interface. In order to check the correct operation of the mechanisms implemented here, you can use the command
console.log(). Now we’ll work on the part of the application that is responsible for displaying the image-meme. Recall that now we have an array containing information about images that are planned to be used as the basis of memes. The application should, at the click of a button
Gen, randomly select an image from this array and form a meme. Here is the updated component code
MemeGenerator. Here, in the method render(), below the form description code, there is an element![]()
import React, {Component} from "react"
class MemeGenerator extends Component {
constructor() {
super()
this.state = {
topText: "",
bottomText: "",
randomImg: "http://i.imgflip.com/1bij.jpg",
allMemeImgs: []
}
this.handleChange = this.handleChange.bind(this)
}
componentDidMount() {
fetch("https://api.imgflip.com/get_memes")
.then(response => response.json())
.then(response => {
const {memes} = response.data
this.setState({ allMemeImgs: memes })
})
}
handleChange(event) {
const {name, value} = event.target
this.setState({ [name]: value })
}
render() {
return (

{this.state.topText}
{this.state.bottomText}
)
}
}
export default MemeGenerator
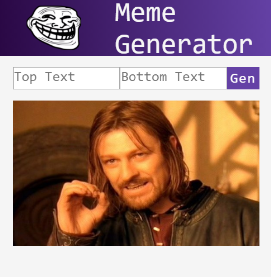
Here's what the app looks like now.
Application in the browser
Note that the image that initialized the state is displayed here. We do not yet use images that are stored in the state property allMemeImgs. Let's try to enter something into the text fields.

The application in the browser
As you can see, the subsystems of the application responsible for working with text function as expected. Now it remains only to make sure that by clicking on the button Genfrom the array with the image data, a random image would be selected and loaded into the element ![]()
In order to equip the application with this feature - perform the following task. Create a method that fires when a button is clicked Gen. This method should select one of the images, information about which is stored in the state property allMemeImgs, and then perform actions that allow you to display this image in the element ![]()
allMemeImgsAn array of objects describing the images is stored, and the fact that each object from this array has a property url.
Here is the code that provides a solution to this problem:
import React, {Component} from "react"
class MemeGenerator extends Component {
constructor() {
super()
this.state = {
topText: "",
bottomText: "",
randomImg: "http://i.imgflip.com/1bij.jpg",
allMemeImgs: []
}
this.handleChange = this.handleChange.bind(this)
this.handleSubmit = this.handleSubmit.bind(this)
}
componentDidMount() {
fetch("https://api.imgflip.com/get_memes")
.then(response => response.json())
.then(response => {
const {memes} = response.data
this.setState({ allMemeImgs: memes })
})
}
handleChange(event) {
const {name, value} = event.target
this.setState({ [name]: value })
}
handleSubmit(event) {
event.preventDefault()
const randNum = Math.floor(Math.random() * this.state.allMemeImgs.length)
const randMemeImg = this.state.allMemeImgs[randNum].url
this.setState({ randomImg: randMemeImg })
}
render() {
return (
{this.state.topText}
{this.state.bottomText}
)
}
}
export default MemeGenerator
A button Gencan be assigned a handler for the event that occurs when you click on it, as is done when working with any other buttons. However, given the fact that this button is used to submit the form, it is better to use the onSubmitform event handler . In this handler,, handleSubmit()we call the method of the event arriving in it event.preventDefault()in order to cancel the standard form submission procedure, during which the page is reloaded. Next, we get a random number in the range from 0 to the value corresponding to the index of the last element of the array allMemeImgsand use this number to refer to the element with the corresponding index. Turning to the element that is the object, we get the property of this object urland write it to the state propertyrandomImg. After that, the component is re-rendered and the appearance of the page changes.

Application page in browser
Course project completed.
Summary
In this lesson, you created an application that uses what you learned while mastering React. Next time we’ll talk about developing modern React applications and discuss project ideas, implementing which you can practice working with React.
Dear readers! Have you encountered any difficulties while completing this course project?

import React, {Component} from "react"
class MemeGenerator extends Component {
constructor() {
super()
this.state = {
topText: "",
bottomText: "",
randomImg: "http://i.imgflip.com/1bij.jpg",
allMemeImgs: []
}
this.handleChange = this.handleChange.bind(this)
}
componentDidMount() {
fetch("https://api.imgflip.com/get_memes")
.then(response => response.json())
.then(response => {
const {memes} = response.data
this.setState({ allMemeImgs: memes })
})
}
handleChange(event) {
const {name, value} = event.target
this.setState({ [name]: value })
}
render() {
return (
{this.state.topText}
{this.state.bottomText}
)
}
}
export default MemeGenerator
Here's what the app looks like now.
Application in the browser
Note that the image that initialized the state is displayed here. We do not yet use images that are stored in the state property allMemeImgs. Let's try to enter something into the text fields.
The application in the browser
As you can see, the subsystems of the application responsible for working with text function as expected. Now it remains only to make sure that by clicking on the button Genfrom the array with the image data, a random image would be selected and loaded into the element ![]()
In order to equip the application with this feature - perform the following task. Create a method that fires when a button is clicked Gen. This method should select one of the images, information about which is stored in the state property allMemeImgs, and then perform actions that allow you to display this image in the element ![]()
allMemeImgsAn array of objects describing the images is stored, and the fact that each object from this array has a property url.
Here is the code that provides a solution to this problem:
import React, {Component} from "react"
class MemeGenerator extends Component {
constructor() {
super()
this.state = {
topText: "",
bottomText: "",
randomImg: "http://i.imgflip.com/1bij.jpg",
allMemeImgs: []
}
this.handleChange = this.handleChange.bind(this)
this.handleSubmit = this.handleSubmit.bind(this)
}
componentDidMount() {
fetch("https://api.imgflip.com/get_memes")
.then(response => response.json())
.then(response => {
const {memes} = response.data
this.setState({ allMemeImgs: memes })
})
}
handleChange(event) {
const {name, value} = event.target
this.setState({ [name]: value })
}
handleSubmit(event) {
event.preventDefault()
const randNum = Math.floor(Math.random() * this.state.allMemeImgs.length)
const randMemeImg = this.state.allMemeImgs[randNum].url
this.setState({ randomImg: randMemeImg })
}
render() {
return (
{this.state.topText}
{this.state.bottomText}
)
}
}
export default MemeGenerator
A button Gencan be assigned a handler for the event that occurs when you click on it, as is done when working with any other buttons. However, given the fact that this button is used to submit the form, it is better to use the onSubmitform event handler . In this handler,, handleSubmit()we call the method of the event arriving in it event.preventDefault()in order to cancel the standard form submission procedure, during which the page is reloaded. Next, we get a random number in the range from 0 to the value corresponding to the index of the last element of the array allMemeImgsand use this number to refer to the element with the corresponding index. Turning to the element that is the object, we get the property of this object urland write it to the state propertyrandomImg. After that, the component is re-rendered and the appearance of the page changes.
Application page in browser
Course project completed.
import React, {Component} from "react"
class MemeGenerator extends Component {
constructor() {
super()
this.state = {
topText: "",
bottomText: "",
randomImg: "http://i.imgflip.com/1bij.jpg",
allMemeImgs: []
}
this.handleChange = this.handleChange.bind(this)
}
componentDidMount() {
fetch("https://api.imgflip.com/get_memes")
.then(response => response.json())
.then(response => {
const {memes} = response.data
this.setState({ allMemeImgs: memes })
})
}
handleChange(event) {
const {name, value} = event.target
this.setState({ [name]: value })
}
render() {
return (
{this.state.topText}
{this.state.bottomText}
)
}
}
export default MemeGeneratorimport React, {Component} from "react"
class MemeGenerator extends Component {
constructor() {
super()
this.state = {
topText: "",
bottomText: "",
randomImg: "http://i.imgflip.com/1bij.jpg",
allMemeImgs: []
}
this.handleChange = this.handleChange.bind(this)
this.handleSubmit = this.handleSubmit.bind(this)
}
componentDidMount() {
fetch("https://api.imgflip.com/get_memes")
.then(response => response.json())
.then(response => {
const {memes} = response.data
this.setState({ allMemeImgs: memes })
})
}
handleChange(event) {
const {name, value} = event.target
this.setState({ [name]: value })
}
handleSubmit(event) {
event.preventDefault()
const randNum = Math.floor(Math.random() * this.state.allMemeImgs.length)
const randMemeImg = this.state.allMemeImgs[randNum].url
this.setState({ randomImg: randMemeImg })
}
render() {
return (
{this.state.topText}
{this.state.bottomText}
)
}
}
export default MemeGeneratorSummary
In this lesson, you created an application that uses what you learned while mastering React. Next time we’ll talk about developing modern React applications and discuss project ideas, implementing which you can practice working with React.
Dear readers! Have you encountered any difficulties while completing this course project?