React Tutorial, Part 22: Seventh Stage of Working on a TODO Application, Downloading Data from External Sources
- Transfer
- Tutorial
In today's part of the translation of the React tutorial, we will finish work on the Todo application and talk about how to use data from internal components and the standard JavaScript capabilities to load data from external sources.
→ Part 1: course overview, reasons for the popularity of React, ReactDOM and JSX
→ Part 2: functional components
→ Part 3: component files, project structure
→ Part 4: parent and child components
→ Part 5: start of work on a TODO application, basics of styling
→ Part 6: about some features of the course, JSX and JavaScript
→ Part 7: inline styles
→

Part 8: continued work on the TODO application, familiarity with component properties
→ Part 9: component properties
→ Part 10: workshop on working with component properties and styling
→ Part 11: dynamic markup formation and map arrays method
→ Part 12: workshop, third stage towards TODO-application
→ Part 13: components based on classes
→ Part 14: workshop on the components, based on classes state components
→ Part 15: workshops to work with components state
→ Part 16: fourth stage towards TODO-attached I eat, event handling
→Part 17: the fifth stage of work on the TODO application, modifying the state of the components
→ Part 18: the sixth stage of work on the TODO application
→ Part 19: the life cycle methods of the components
→ Part 20: the first lesson in conditional rendering
→ Part 21: the second lesson and workshop on conditional rendering
→ Part 22: the seventh stage of work on the TODO application, downloading data from external sources
→ Part 23: the first lesson on working with forms
→ Part 24: the second lesson on working with forms
→ Part 25: a workshop on working with forms
→ Part 26: application architecture, p Container / Component
→Part 27: course project
→ Original
Now the Todo application looks like the following figure.
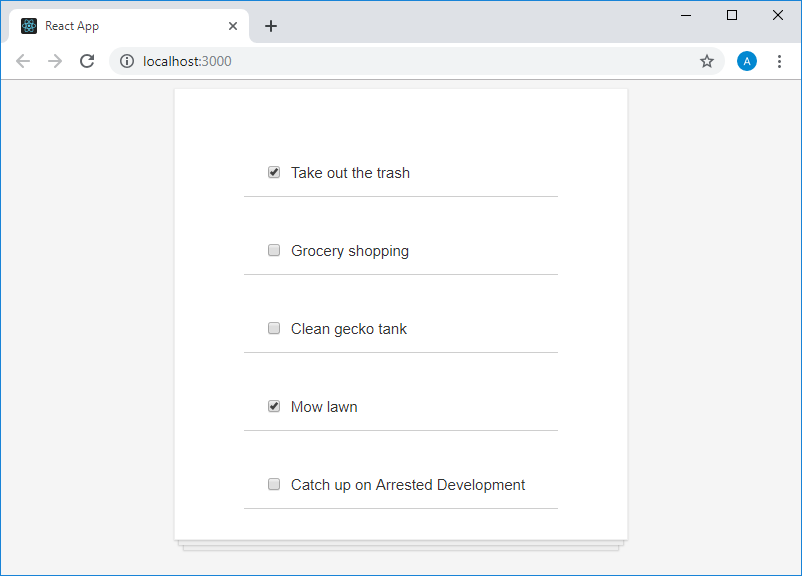
Application page in browser.
Component code
Your task is to style the list items according to their state. The appearance of completed cases should be different from incomplete. When formatting list items representing completed tasks, their text can be grayed out, it can be crossed out, italicized, or other modifications can be made.
The problem presented here can be solved in various ways. We will use the built-in style, which we will describe as a constant
Here's how the look of the application page changes.
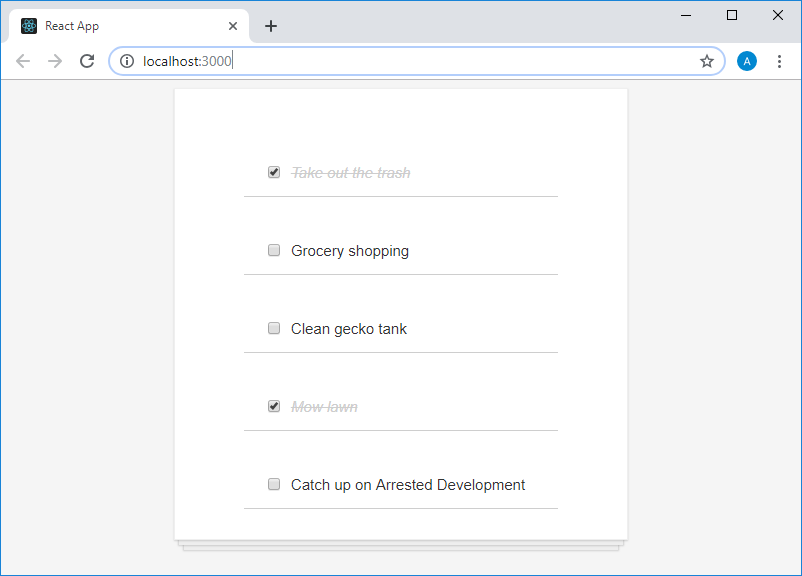
Changed application page in the browser.
At the same time, the styles are applied when setting and unchecking the flags indicating the status of the items in the to-do list.
This concludes the work on the Todo application.
→ Original
In a lesson on component life cycle methods, we talked about a method
Let's start our today's experiments with a new project created using the create-react-app tools, the file of
We will describe the
The output to the console line
In this lesson, we will use several auxiliary tools that will be useful to us when loading data into the component.
The first one is the built-in JavaScript feature. We are talking about the API Fetch , which is a convenient interface for obtaining resources, based on promises , which allows you to perform HTTP requests, through which the data is loaded.
The second tool we will use is the Star Wars API. This project is good because it can be used in front-end applications without any special difficulties (in particular, we are talking about the CORS configuration features).
In the method,
Here we download data about a certain hero of the film, referring to the API, after that we convert what came from the server into JSON format, and then print this data to the console. What got into the console is shown in the following figure.
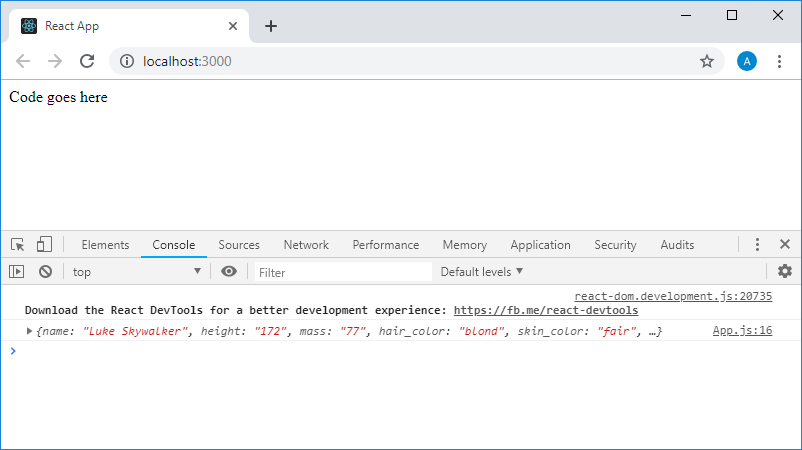
Data downloaded from the Star Wars API is displayed in the console.
As you can see, an object with data about Luke Skywalker got into the console. Now, after we have the data, we need to think about how to display them on the application page. In order to solve this problem, you should first take into account the fact that data downloaded from outside, if it is not saved anywhere, will not be possible to display on the application page in a browser. The place that serves to store such data is the state of the component. Add a new property
We are going to store in this property an object with a description of the character, data about which is downloaded from an external source. They exist in the form of an object, therefore, when we initialize the states, we make the property
After that, in that place of the method code
In order to verify the correct operation of the mechanisms that now exist in the code, we will derive
And here is how the application page will look in the browser.
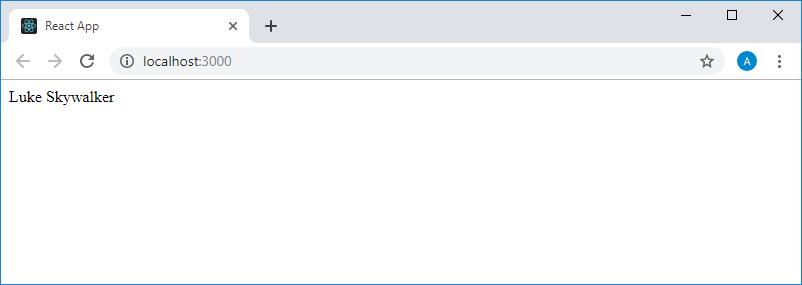
Application page in a browser
Output to a page of text
Our application uses a simple request, in response to which the application receives a small amount of data that is quickly processed and displayed on the page. It takes very little time to complete all these actions. Therefore, the data is displayed on the screen so quickly that we get the impression that the component, immediately after displaying it on the screen, already contains it. But if the remote data source were accessed using a very slow communication line, or the API from which the data is loaded slowly responded to requests, it could take a long time before the application could display this data on the screen . All this time, the screen would remain blank. If this happens in real-world applications, it’s confusing for their users, who may decide that such applications do not work correctly. In order to anticipate a similar situation, it is necessary, during the loading and processing of data, to show the user a corresponding message. This does not apply to our topic today, but it is here that it will be appropriate to discuss it.
In real applications, to alert the user that he needs to wait for a certain action, such as downloading data, they use something like a loading indicator. In our case, we, until the moment the data is uploaded and ready for output to the page, we will just show the text
Add a new property to the state, indicating whether data is being loaded at some point in time. Call it
Further, in the method
This code, however, does not work correctly. Namely, this is what the application page now looks like.
The application page in the browser
It is assumed that the inscription
As a matter of fact, the problem here is that, before starting to load the data, we set
Now, when loading data, an inscription appears briefly
In this lesson, you completed work on a Todo application and learned how to use
Dear readers! How do you load data from external sources into React applications?

Part 8: continued work on the TODO application, familiarity with component properties
→ Part 9: component properties
→ Part 10: workshop on working with component properties and styling
→ Part 11: dynamic markup formation and map arrays method
→ Part 12: workshop, third stage towards TODO-application
→ Part 13: components based on classes
→ Part 14: workshop on the components, based on classes state components
→ Part 15: workshops to work with components state
→ Part 16: fourth stage towards TODO-attached I eat, event handling
→Part 17: the fifth stage of work on the TODO application, modifying the state of the components
→ Part 18: the sixth stage of work on the TODO application
→ Part 19: the life cycle methods of the components
→ Part 20: the first lesson in conditional rendering
→ Part 21: the second lesson and workshop on conditional rendering
→ Part 22: the seventh stage of work on the TODO application, downloading data from external sources
→ Part 23: the first lesson on working with forms
→ Part 24: the second lesson on working with forms
→ Part 25: a workshop on working with forms
→ Part 26: application architecture, p Container / Component
→Part 27: course project
Lesson 39. Workshop. TODO application. Stage number 7
→ Original
▍Job
Now the Todo application looks like the following figure.
Application page in browser.
Component code
TodoItemlooks like this:import React from "react"
function TodoItem(props) {
return (
props.handleChange(props.item.id)}
/>
{props.item.text}
)
}
export default TodoItemYour task is to style the list items according to their state. The appearance of completed cases should be different from incomplete. When formatting list items representing completed tasks, their text can be grayed out, it can be crossed out, italicized, or other modifications can be made.
▍Solution
The problem presented here can be solved in various ways. We will use the built-in style, which we will describe as a constant
completedStylein the code of the functional component TodoItem. Here we set the text properties fontStyle, colorand textDecoration. After that, using the conditional rendering technique, we will assign this style to the elementin the event that the case deduced by him is marked as completed. We will determine this, focusing on the property passed to the component instance, which is available in it as props.item.completed.
The converted component code will look like this:
import React from "react"
function TodoItem(props) {
    const completedStyle = {
        fontStyle: "italic",
        color: "#cdcdcd",
        textDecoration: "line-through"
    }
    return (

             props.handleChange(props.item.id)}
            />
            {props.item.text}

    )
}
export default TodoItem
Here's how the look of the application page changes.
Changed application page in the browser.
At the same time, the styles are applied when setting and unchecking the flags indicating the status of the items in the to-do list.
This concludes the work on the Todo application.
Lesson 40. Downloading Data from External Sources
→ Original
In a lesson on component life cycle methods, we talked about a method
componentDidMount(). Try to remember how it works. This method allows you to interfere with the operation of the component by executing some code immediately after the component has been added to the DOM tree. When we talked about component life cycle methods, I mentioned that the method is componentDidMount()most often used to load data from some external sources. This data is used by the component to realize its purpose. Let's start our today's experiments with a new project created using the create-react-app tools, the file of
App.jswhich contains the following code:import React, {Component} from "react"
class App extends Component {
constructor() {
super()
this.state = {}
}
render() {
return (
Code goes here
)
}
}
export default AppWe will describe the
Appmethod in the code of the component based on the class componentDidMount()and check the operability of the resulting construct by displaying something from the method in the console.import React, {Component} from "react"
class App extends Component {
constructor() {
super()
this.state = {}
}
componentDidMount() {
console.log("Hi!")
}
render() {
return (
Code goes here
)
}
}
export default AppThe output to the console line
Hi!proves the functionality of the code, so we can continue to work. As already mentioned, this method usually loads the data necessary for the component to work. In this lesson, we will use several auxiliary tools that will be useful to us when loading data into the component.
The first one is the built-in JavaScript feature. We are talking about the API Fetch , which is a convenient interface for obtaining resources, based on promises , which allows you to perform HTTP requests, through which the data is loaded.
The second tool we will use is the Star Wars API. This project is good because it can be used in front-end applications without any special difficulties (in particular, we are talking about the CORS configuration features).
In the method,
componentDidMount()we are going to use the function fetch(), passing it the address for downloading data, converting this data to the type we need, and, in order to check the correct operation of the system, display this data in the console. We transform the method code to the following form:componentDidMount() {
fetch("https://swapi.co/api/people/1")
.then(response => response.json())
.then(data => console.log(data))
}Here we download data about a certain hero of the film, referring to the API, after that we convert what came from the server into JSON format, and then print this data to the console. What got into the console is shown in the following figure.
Data downloaded from the Star Wars API is displayed in the console.
As you can see, an object with data about Luke Skywalker got into the console. Now, after we have the data, we need to think about how to display them on the application page. In order to solve this problem, you should first take into account the fact that data downloaded from outside, if it is not saved anywhere, will not be possible to display on the application page in a browser. The place that serves to store such data is the state of the component. Add a new property
character, represented by an empty object, to the component state :this.state = {
character: {}
}We are going to store in this property an object with a description of the character, data about which is downloaded from an external source. They exist in the form of an object, therefore, when we initialize the states, we make the property
characteran empty object. After that, in that place of the method code
componentDidMount()where we receive the data, we will write them to the state using the method setState(). Moreover, in this case, what was stored in the state before that does not interest us, therefore, we can simply pass to this method an object containing a new representation of the state. As a result, we come to this method code componentDidMount():componentDidMount() {
fetch("https://swapi.co/api/people/1")
.then(response => response.json())
.then(data => {
this.setState({
character: data
})
})
}In order to verify the correct operation of the mechanisms that now exist in the code, we will derive
render()something in the method that must be present in the state after the loaded data is written to it. Now the file code App.jswill look like this:import React, {Component} from "react"
class App extends Component {
constructor() {
super()
this.state = {
    character: {}
}
}
componentDidMount() {
    fetch("https://swapi.co/api/people/1")
        .then(response => response.json())
        .then(data => {
            this.setState({
                character: data
            })
        })
}
render() {
return (
{this.state.character.name}
)
}
}
export default AppAnd here is how the application page will look in the browser.
Application page in a browser
Output to a page of text
Luke Skywalkerdemonstrates the correct operation of data loading mechanisms.Our application uses a simple request, in response to which the application receives a small amount of data that is quickly processed and displayed on the page. It takes very little time to complete all these actions. Therefore, the data is displayed on the screen so quickly that we get the impression that the component, immediately after displaying it on the screen, already contains it. But if the remote data source were accessed using a very slow communication line, or the API from which the data is loaded slowly responded to requests, it could take a long time before the application could display this data on the screen . All this time, the screen would remain blank. If this happens in real-world applications, it’s confusing for their users, who may decide that such applications do not work correctly. In order to anticipate a similar situation, it is necessary, during the loading and processing of data, to show the user a corresponding message. This does not apply to our topic today, but it is here that it will be appropriate to discuss it.
In real applications, to alert the user that he needs to wait for a certain action, such as downloading data, they use something like a loading indicator. In our case, we, until the moment the data is uploaded and ready for output to the page, we will just show the text
loading.... By doing this, we will be able to assess the possibilities that data storage in the application state gives us. Add a new property to the state, indicating whether data is being loaded at some point in time. Call it
loadingand initialize it with a value false. After that, right before we load data using fetch(), we will write to this property true. Further, in the method
render(), relying on the state propertyloading, configure the text displayed on the page. This is how the code will look App.jsafter these conversions.import React, {Component} from "react"
class App extends Component {
constructor() {
super()
this.state = {
loading: false,
character: {}
}
}
componentDidMount() {
this.setState({loading: true})
fetch("https://swapi.co/api/people/1")
.then(response => response.json())
.then(data => {
this.setState({
character: data
})
})
}
render() {
const text = this.state.loading ? "loading..." : this.state.character.name
return (
{text}
)
}
}
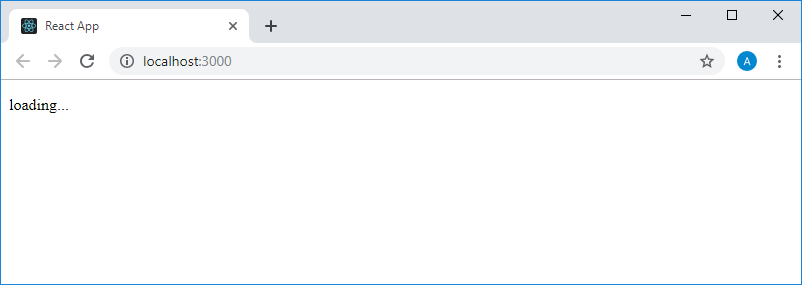
export default AppThis code, however, does not work correctly. Namely, this is what the application page now looks like.
The application page in the browser
It is assumed that the inscription
loading...should be displayed on it only when loading data from an external source, but it seems that it is now displayed on the page constantly. Before reading further, try and find and correct errors in the code. As a matter of fact, the problem here is that, before starting to load the data, we set
loadingto true, and after the download was completed, we did not write to loadingfalse. As a result, text is always displayed on the page loading.... It is not difficult to fix this error. It is enough, in the same place where we write the loaded data to the state, set loadingto a value false. As a result, the code will App.jstake the following form:import React, {Component} from "react"
class App extends Component {
constructor() {
super()
this.state = {
loading: false,
character: {}
}
}
componentDidMount() {
this.setState({loading: true})
fetch("https://swapi.co/api/people/1")
.then(response => response.json())
.then(data => {
this.setState({
loading: false,
character: data
})
})
}
render() {
const text = this.state.loading ? "loading..." : this.state.character.name
return (
{text}
)
}
}
export default AppNow, when loading data, an inscription appears briefly
loading..., and after that the character’s name is displayed on the page.Summary
In this lesson, you completed work on a Todo application and learned how to use
componentDidMount()data from the component life cycle and the standard Fetch API to load data from external sources, process it, and display it on pages. In addition, here we talked about the implementation of a mechanism for notifying the user about the application performing operations, which can take a lot of time. Next time we’ll talk about forms. Dear readers! How do you load data from external sources into React applications?