Configuring data transfer from the device to AWS IoT Core
- Tutorial
I present to you the translation of a part of the article: The non-primitive approach of amazon - how AWS IoT meets IoT challenges
AWS IoT Core is perhaps the most significant service among the basic Amazon services dedicated to IoT. It allows you to easily and securely connect physical devices to the cloud, scale them securely, and provides full interoperability between IoT devices with their peripheral software and the AWS IoT cloud services mentioned above.
To get started with AWS IoT, let's organize a test connection of a test device containing a microcontroller, as well as the following sensors HDC1080 - (temperature, humidity), BME280 - (pressure), MH-Z19 - (CO2), CCS811 - (eCO2, tVOC) in AWS IoT Core for test data transfer.
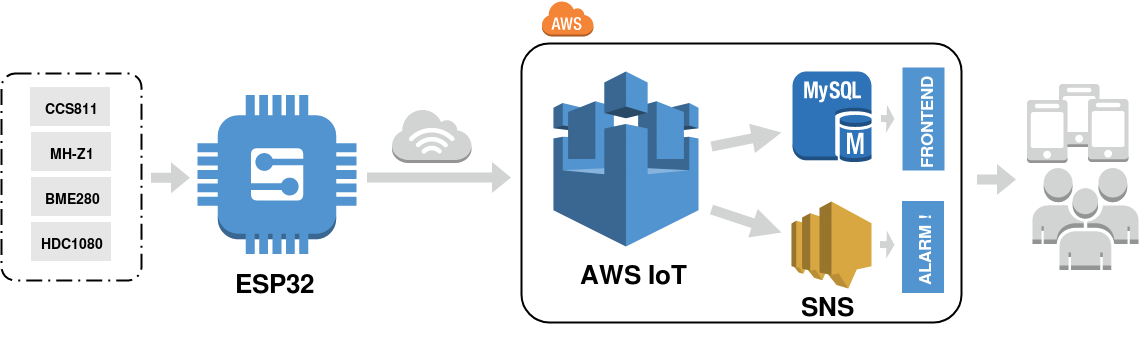
A secure device connection is essential in our case. One of the most popular methods for ensuring secure data transfer is the use of end-to-end encryption via TLS 1.2. protocol. Only a few microcontroller-based solutions can comply with TLS 1.2. due to lack of resources. This time we use ESP32, since the microcontroller is one of the most affordable solutions.
First, we need to create an AWS user, and our ESP32 microcontroller must be connected to the Internet.
After logging in, open the IoT AWS console at aws.amazon.com/iot . On the welcome page, select “Start”.
If you are using the IoT AWS console for the first time, you will see the “Welcome to the IoT AWS console” page. In the left navigation pane, select Manage to expand the options, and then select Things.
On the page that says “You still have nothing”, select “Register item”. (If you have already created the item, select Create.)

An object is a device whose state or data is stored in the AWS cloud. This saved status or data is called device shadow. The Device Shadow service maintains a shadow for each device connected to AWS IoT.
Enter a name for the item and then click “Next”.

After that we have to create certificates for a secure connection.

Then we have to upload the certificates, click Finish and get the authorized item.


Then we have to go to “security” and choose “policy”.

On the New Policy page, in the Name field, enter a name for the policy.
In the “Action” field, enter “iot”: *. In the resource ARN field, enter *.
Check the box “Allow”. This allows your Raspberry Pi to post messages to AWS IoT.
iot: * - subscription and publication policy using this certificate
* - all clients can publish / subscribe to this thing using this certificate


In the left navigation pane, in the “Security” section, select “Certificates”.
In the field for the certificate you created, select ... to open the drop-down menu, and then select “Attach policy”.


In the field for the certificate you created, select ... to open the drop-down menu, and then select “Attach the item”.

The last step is to activate the certificate:
In the field for the certificate you created, select ... to open the drop-down menu, and then select “Activate”.

We assume that our microcontroller ESP32, already configured to work with IoT AWS. He knows the Rest API Endpoint broker, the port and the protocol, and all the necessary certificates are available.
Now we need to test the ability to transfer data between ESP32 and the AWS IoT cloud. Go to “Management”, select our test-ESP32 item, in the left menu, go to “Interact” and copy the address of the topic under the “Update to this thing shadow” line.

After that, subscribe to the selected topic and wait for the data.


In a few seconds, we will see the data successfully received by the MQTT broker.

Finally, we can collect, analyze and visualize our data using AWS IoT, as well as using our own solutions and architecture.
AWS IoT Core is perhaps the most significant service among the basic Amazon services dedicated to IoT. It allows you to easily and securely connect physical devices to the cloud, scale them securely, and provides full interoperability between IoT devices with their peripheral software and the AWS IoT cloud services mentioned above.
To get started with AWS IoT, let's organize a test connection of a test device containing a microcontroller, as well as the following sensors HDC1080 - (temperature, humidity), BME280 - (pressure), MH-Z19 - (CO2), CCS811 - (eCO2, tVOC) in AWS IoT Core for test data transfer.
A secure device connection is essential in our case. One of the most popular methods for ensuring secure data transfer is the use of end-to-end encryption via TLS 1.2. protocol. Only a few microcontroller-based solutions can comply with TLS 1.2. due to lack of resources. This time we use ESP32, since the microcontroller is one of the most affordable solutions.
First, we need to create an AWS user, and our ESP32 microcontroller must be connected to the Internet.
After logging in, open the IoT AWS console at aws.amazon.com/iot . On the welcome page, select “Start”.
If you are using the IoT AWS console for the first time, you will see the “Welcome to the IoT AWS console” page. In the left navigation pane, select Manage to expand the options, and then select Things.
On the page that says “You still have nothing”, select “Register item”. (If you have already created the item, select Create.)
An object is a device whose state or data is stored in the AWS cloud. This saved status or data is called device shadow. The Device Shadow service maintains a shadow for each device connected to AWS IoT.
Enter a name for the item and then click “Next”.
After that we have to create certificates for a secure connection.
Then we have to upload the certificates, click Finish and get the authorized item.
Then we have to go to “security” and choose “policy”.
On the New Policy page, in the Name field, enter a name for the policy.
In the “Action” field, enter “iot”: *. In the resource ARN field, enter *.
Check the box “Allow”. This allows your Raspberry Pi to post messages to AWS IoT.
iot: * - subscription and publication policy using this certificate
* - all clients can publish / subscribe to this thing using this certificate
In the left navigation pane, in the “Security” section, select “Certificates”.
In the field for the certificate you created, select ... to open the drop-down menu, and then select “Attach policy”.
In the field for the certificate you created, select ... to open the drop-down menu, and then select “Attach the item”.
The last step is to activate the certificate:
In the field for the certificate you created, select ... to open the drop-down menu, and then select “Activate”.
We assume that our microcontroller ESP32, already configured to work with IoT AWS. He knows the Rest API Endpoint broker, the port and the protocol, and all the necessary certificates are available.
Now we need to test the ability to transfer data between ESP32 and the AWS IoT cloud. Go to “Management”, select our test-ESP32 item, in the left menu, go to “Interact” and copy the address of the topic under the “Update to this thing shadow” line.
After that, subscribe to the selected topic and wait for the data.
In a few seconds, we will see the data successfully received by the MQTT broker.
Finally, we can collect, analyze and visualize our data using AWS IoT, as well as using our own solutions and architecture.