 January 18, 2016 at 23:54
Practical Use of ROS on the Raspberry Pi - Part 2
Good afternoon, dear readers of Habr! This is the second article in a series of articles about the practical use of ROS on the Raspberry Pi. In the first article of the series, I described installing the necessary ROS components and setting up the working environment for work.
In the second part of the series, we will begin to practical use of the ROS features on the Raspberry Pi platform. Specifically, in this article I am going to talk about using the Raspberry Pi Camera Board on the Raspberry Pi in conjunction with ROS to solve computer vision problems. Who is interested, please, under cat.
For work, we will need such a Raspberry Pi Camera Board
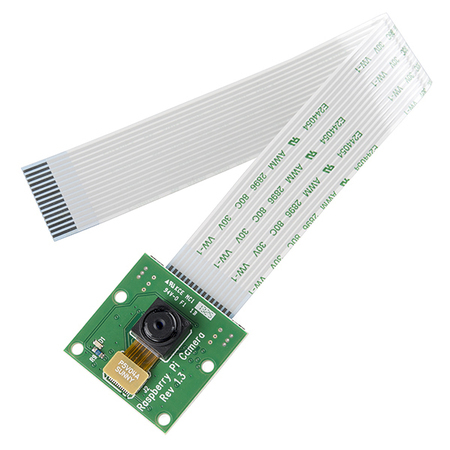
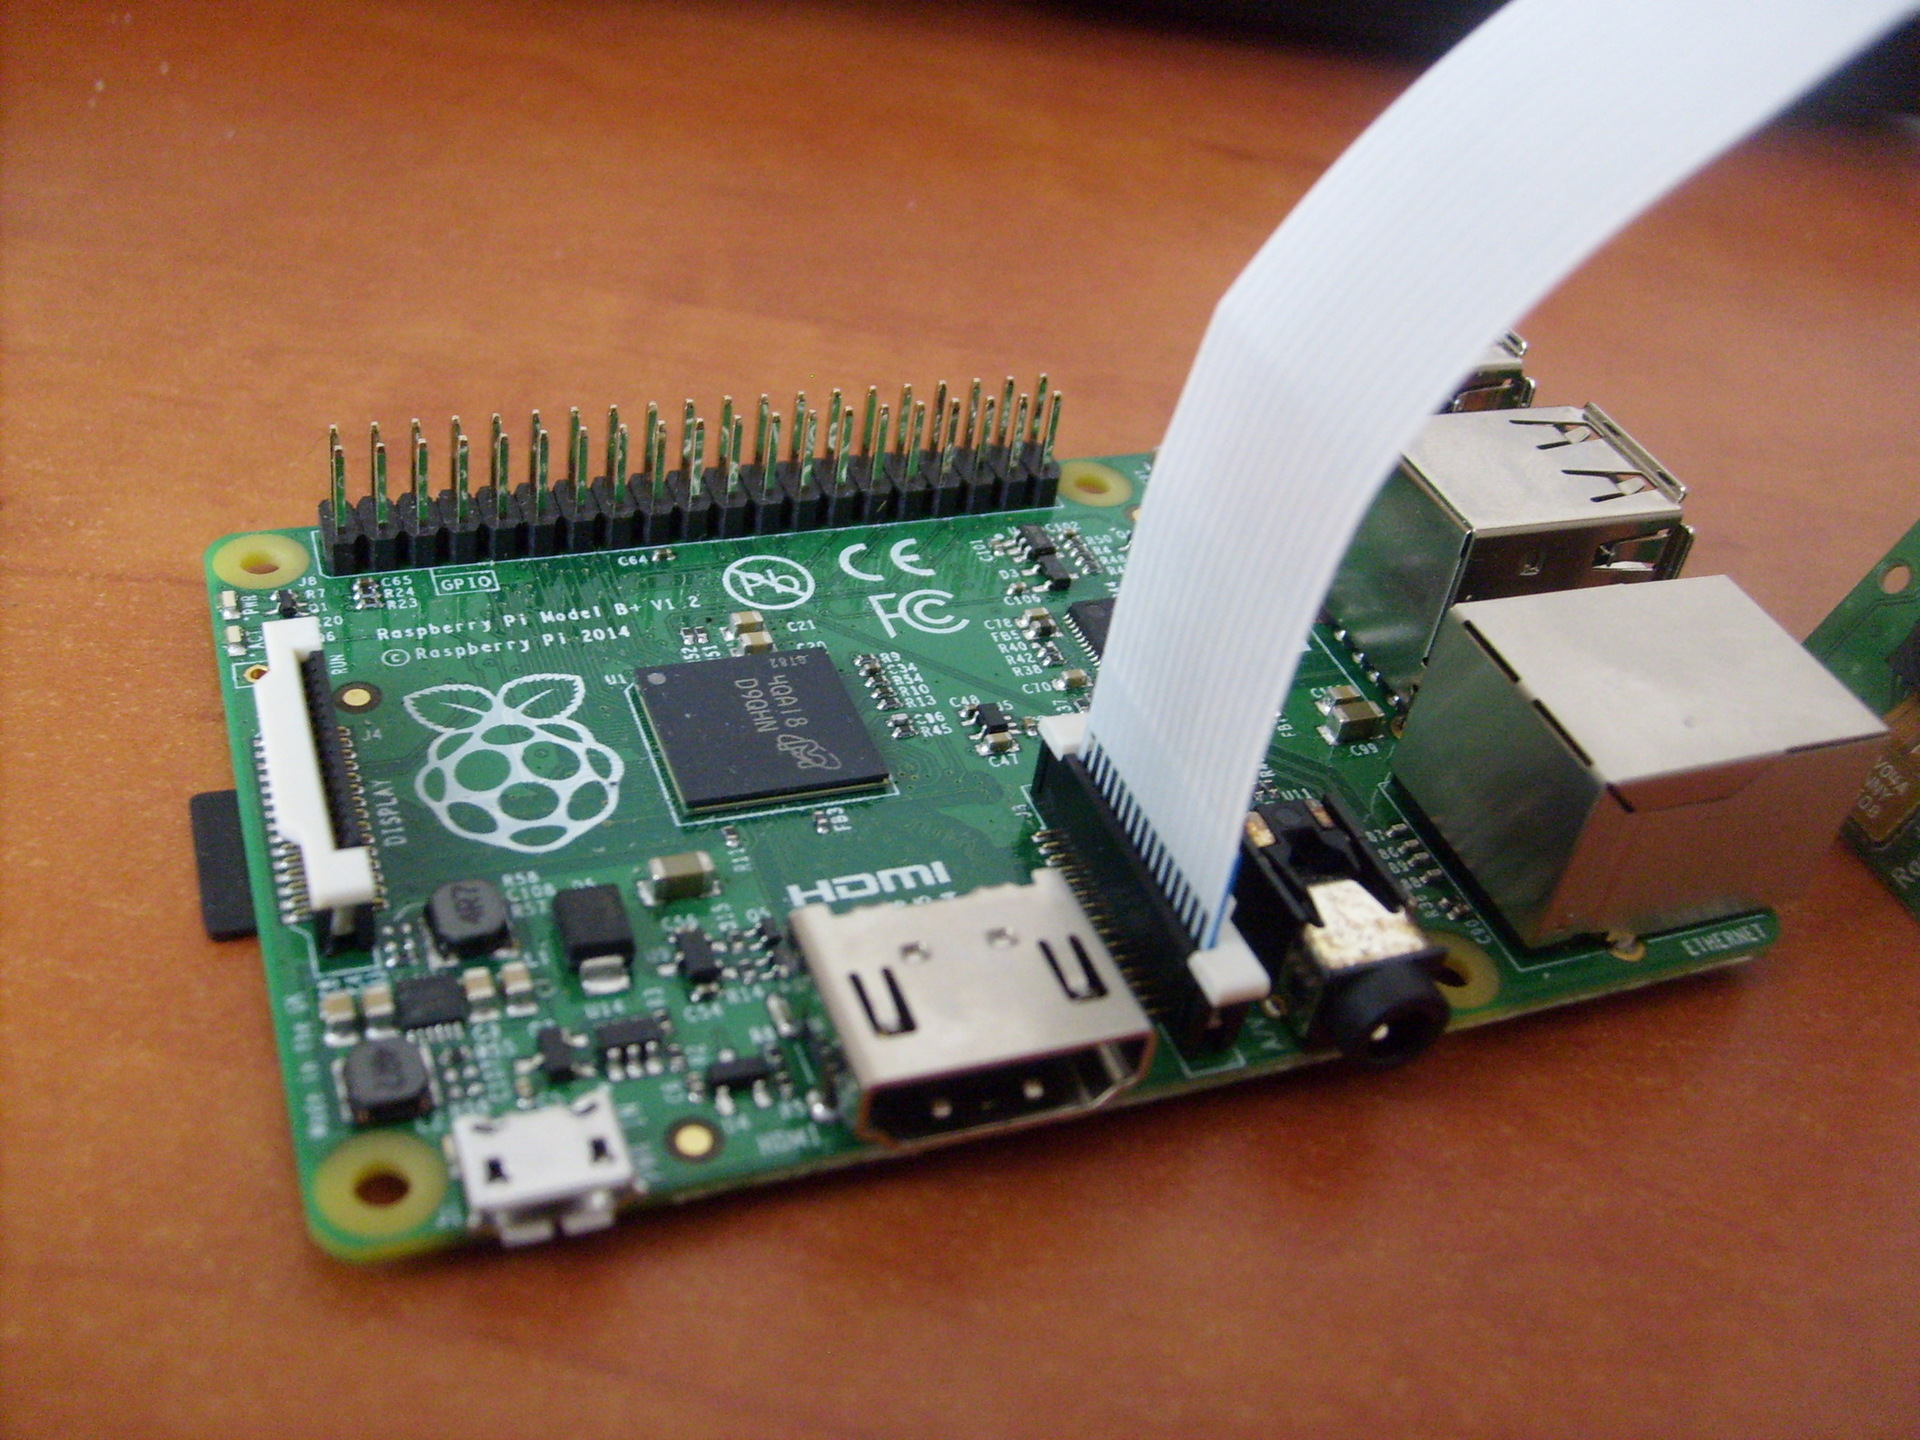
camera : This camera connects directly to the GPU via a CSi connector on the board, which allows you to record and encode the image from the camera without using processor time. A ZIF cable is used to connect the camera. The cable connector on the board is located between the Ethernet and HDMI ports:
So, let's start the installation of the necessary libraries. First, install OpenCV:
To use the Raspberry Pi Camera, we will need the raspicam library. Download the archive from here .
Next, install the library:
You need to enable camera support in Raspbian through the raspi-config program:
Select option 5 - Enable camera, save the selection and reboot the system.
For convenience, create a new catkin workshop for our packages:
Create a new ROS package:
The catkin_create_pkg command specification is as follows: catkin_create_pkg[depend1] [depend2],
where you can specify under dependencies any number of dependencies - libraries that the package will use.
This command creates the framework of the ROS project: an empty src directory for node scripts and CMakeLists.txt and package.xml configuration files.
I found a simple script that receives frames from the camera and publishes them using the “publisher” (publisher), and adapted it for ROS Indigo. You can download it from here .
To use it, you need to install the Raspberry Pi UV4L camera driver:
Add the following line to the /etc/apt/sources.list file
update the packages and install:
To download the driver, at each system boot, we also install an optional package:
Let's move on to editing the package. Paste the lines from here into your CMakeLists.txt file .
The most important lines in the CMakeLists.txt file:
Thus, we add a link to the uv4l driver needed to compile the package.
At the end of the file, we set special lines for our node:
The add_executable line creates a binary to run and target_link_lbraries links additional libraries for the capture binary.
Paste the missing lines from here into the package.xml file so that it looks like this:
The first lines set the basic parameters of the node - name, version, description, information about the author. The build_depend lines determine the library dependencies needed to compile the package, and the run_depend lines determine the dependencies needed to run the code in the package.
Create a capturer.cpp file inside the src folder and paste the lines from here . Here in the main () method, the node is initialized and started in a loop:
The whole logic of the script is that we get the picture from the camera using OpenCV, wrap it in a message for ROS in the fillImage method and publish it to the topic. Here the image_transport package is used to create a “publisher” picture.
Launch the uv4l driver by running the command:
what will create MJPEG streaming.
Compile our ROS node:
Check the value of the ROS_PACKAGE_PATH variable:
The value of the ROS_PACKAGE_PATH variable should include the path to our workspace. Add our workshop space to the path:
Now running the echo $ ROS_PACKAGE_PATH command again, we should see a similar output:
where / home // catkin_ws / src is the way to our workspace. This means that ROS can “see” our nodes created in catkin_ws and we can run them through rosrun.
Run our ROS node:
Run the graphical program rqt_image_view to display the video stream from the topic:
Select the image_raw topic in the rqt_image_view window.

When starting the node, the error “Gtk-WARNING **: cannot open display: -1” may occur when working via ssh or “GdkGLExt-WARNING **: Window system doesn't support OpenGL.” When starting in VNC Remote Desktop mode. The solution is to connect to the Raspberry Pi via SSH with X11 forwarding:
You can find out how often posts are posted to the topic using the rostopic command:
This command calculates the frequency of receiving messages per topic every second and displays it in the console.
For model B +, I had a conclusion like this:
As you can see, the frequency of posting is 8 Hz.
I also checked the frequency of publishing images from the camera on the RPi 2 model. Here the results were many times better:
Messages are already published at a frequency of 30 Hz, which is a pretty good increase in speed compared to the B + model.
Now we will write a small ROS package for using computer vision on a robot with the Raspberry Pi, which will perform a recognition algorithm (in our case, visual orientation using the line following method) and publish the value of the required robot offset to the topic. On the other hand, the robot motion control node will subscribe to this topic and send motion control commands to the Arduino.
Now let's add a “publisher” to the capturer.cpp script, which will publish the shift value. First, enable the definition of the message type for the shift value - std_msgs / Int16.
rosserial takes special msg message files and generates source code for them. The following template is used: The source code for standard rosserial messages is stored in the package_name folder inside the ros_lib directory. Next, we initialize the message for this type:
Create a “publisher”:
and inside the UsbCamNode constructor we give it a definition:
Here we set the type of messages and the name of the topic for publication.
Next, we add the logic for calculating the line shift value using OpenCV and publishing it to the line_shift topic in the take_and_send_image () method before the #ifdef OUTPUT_ENABLED line:
I do not have a ready-made algorithm for following the line, so the reader is free to write his own logic here.
In fact, the data in the message is stored in the data field. The structure of the message can be viewed using the command:
Now run the node:
We use the rostopic echo command to output data published to the topic line_shift:
Now add a “subscriber” in the robot control node. Enable the definition of the message type:
Then we add a callback function that is executed when a message is received from the topic.
The callback function must be of type void and take a const reference of the message type as an argument.
For simplicity, I log a message about the direction of the line offset. Here you can add your own robot motion logic for your scenario.
Create a subscriber to messages from the topic line_shift.
Here we set the name of the topic and a link to the callback function.
Next come the standard sketch methods for rosserial_arduino:
The only difference is that we add nh.subscribe (sub) to create the actual “subscription” of the node to the topic.
The robot control sketch can be downloaded from here .
Little trick! In ROS, there are special launch files that allow you to launch nodes as separate processes automatically with certain parameters. launch files are created in xml format and their syntax allows you to run many nodes at once. However, the launch file does not guarantee that the nodes will be launched in the exact order specified.
You can create a launch file for easier launch of the rosserial_python server.
Let's write launch file with the following content:
Compile and run it:
We can visualize the values published in the line_shift theme using the rqt_plot utility, as is done in the article :
Now you can take full advantage of the Raspberry Pi Camera and the OpenCV library in your scenarios for visual orientation of the robot, object recognition, tracking, and many others. Unleash your imagination!
Next time we’ll talk about controlling the robot in teleoperation mode by pressing keys on the keyboard.
PS. The network has useful cheat sheets - ROS Cheatsheet. For the ROS Indigo version, this can be downloaded from here .
In the second part of the series, we will begin to practical use of the ROS features on the Raspberry Pi platform. Specifically, in this article I am going to talk about using the Raspberry Pi Camera Board on the Raspberry Pi in conjunction with ROS to solve computer vision problems. Who is interested, please, under cat.
Camera RPi Camera Board
For work, we will need such a Raspberry Pi Camera Board
camera : This camera connects directly to the GPU via a CSi connector on the board, which allows you to record and encode the image from the camera without using processor time. A ZIF cable is used to connect the camera. The cable connector on the board is located between the Ethernet and HDMI ports:
Library Installation
So, let's start the installation of the necessary libraries. First, install OpenCV:
$ sudo apt-get install libopencv-dev
To use the Raspberry Pi Camera, we will need the raspicam library. Download the archive from here .
Next, install the library:
$ tar xvzf raspicamxx.tgz
$ cd raspicamxx
$ mkdir build
$ cd build
$ cmake ..
$ make
$ sudo make install
$ sudo ldconfig
You need to enable camera support in Raspbian through the raspi-config program:
$ sudo raspi-config
Select option 5 - Enable camera, save the selection and reboot the system.
Getting started with ROS
For convenience, create a new catkin workshop for our packages:
$ mkdir -p ~/driverobot_ws/src
$ cd ~/driverobot_ws/src
$ catkin_init_workspace
$ cd ~/driverobot_ws
$ catkin_make
Create a new ROS package:
$ cd src/
$ catkin_create_pkg raspi_cam_ros image_transport cv_bridge roscpp std_msgs sensor_msgs compressed_image_transport opencv2
The catkin_create_pkg command specification is as follows: catkin_create_pkg
where you can specify under dependencies any number of dependencies - libraries that the package will use.
This command creates the framework of the ROS project: an empty src directory for node scripts and CMakeLists.txt and package.xml configuration files.
I found a simple script that receives frames from the camera and publishes them using the “publisher” (publisher), and adapted it for ROS Indigo. You can download it from here .
To use it, you need to install the Raspberry Pi UV4L camera driver:
$ curl http://www.linux-projects.org/listing/uv4l_repo/lrkey.asc | sudo apt-key add -
Add the following line to the /etc/apt/sources.list file
deb http://www.linux-projects.org/listing/uv4l_repo/raspbian/ wheezy main
update the packages and install:
$ sudo apt-get update
$ sudo apt-get install uv4l uv4l-raspicam
To download the driver, at each system boot, we also install an optional package:
$ sudo apt-get install uv4l-raspicam-extras
Let's move on to editing the package. Paste the lines from here into your CMakeLists.txt file .
The most important lines in the CMakeLists.txt file:
link_directories(/usr/lib/uv4l/uv4lext/armv6l/)
…
target_link_libraries(capture ${catkin_LIBRARIES} uv4lext)
Thus, we add a link to the uv4l driver needed to compile the package.
At the end of the file, we set special lines for our node:
add_executable(capture src/capturer.cpp)
target_link_libraries(capture ${catkin_LIBRARIES} uv4lext)
The add_executable line creates a binary to run and target_link_lbraries links additional libraries for the capture binary.
Paste the missing lines from here into the package.xml file so that it looks like this:
raspi_cam_ros 0.0.0 The raspi_cam_ros package pi TODO catkin cv_bridge image_transport roscpp std_msgs sensor_msgs opencv2 compressed_image_transport cv_bridge image_transport roscpp std_msgs sensor_msgs opencv2 compressed_image_transport The first lines set the basic parameters of the node - name, version, description, information about the author. The build_depend lines determine the library dependencies needed to compile the package, and the run_depend lines determine the dependencies needed to run the code in the package.
Create a capturer.cpp file inside the src folder and paste the lines from here . Here in the main () method, the node is initialized and started in a loop:
ros::init(argc, argv,"raspi_cam_ros");
ros::NodeHandle n;
UsbCamNode a(n);
a.spin();
The whole logic of the script is that we get the picture from the camera using OpenCV, wrap it in a message for ROS in the fillImage method and publish it to the topic. Here the image_transport package is used to create a “publisher” picture.
Launch the uv4l driver by running the command:
$ uv4l --driver raspicam --auto-video_nr --width 640 --height 480 --nopreview
what will create MJPEG streaming.
Compile our ROS node:
$ roscore
$ cd ~/driverobot_ws
$ catkin_make
Check the value of the ROS_PACKAGE_PATH variable:
echo $ROS_PACKAGE_PATH
/opt/ros/indigo/share:/opt/ros/indigo/stacks
The value of the ROS_PACKAGE_PATH variable should include the path to our workspace. Add our workshop space to the path:
$ source devel/setup.bash
Now running the echo $ ROS_PACKAGE_PATH command again, we should see a similar output:
/home/youruser/catkin_ws/src:/opt/ros/indigo/share:/opt/ros/indigo/stacks
where / home /
Run our ROS node:
$ rosrun raspi_cam_ros capture
Run the graphical program rqt_image_view to display the video stream from the topic:
$ rosrun rqt_image_view rqt_image_view
Select the image_raw topic in the rqt_image_view window.
When starting the node, the error “Gtk-WARNING **: cannot open display: -1” may occur when working via ssh or “GdkGLExt-WARNING **: Window system doesn't support OpenGL.” When starting in VNC Remote Desktop mode. The solution is to connect to the Raspberry Pi via SSH with X11 forwarding:
$ ssh -X pi@You can find out how often posts are posted to the topic using the rostopic command:
rostopic hz image_raw
This command calculates the frequency of receiving messages per topic every second and displays it in the console.
For model B +, I had a conclusion like this:
average rate: 7.905
              min: 0.075s max: 0.249s std dev: 0.02756s
As you can see, the frequency of posting is 8 Hz.
I also checked the frequency of publishing images from the camera on the RPi 2 model. Here the results were many times better:
average rate: 30.005
              min: 0.024s max: 0.043s std dev: 0.00272s
Messages are already published at a frequency of 30 Hz, which is a pretty good increase in speed compared to the B + model.
Visual-based robot control with OpenCV and ROS
Now we will write a small ROS package for using computer vision on a robot with the Raspberry Pi, which will perform a recognition algorithm (in our case, visual orientation using the line following method) and publish the value of the required robot offset to the topic. On the other hand, the robot motion control node will subscribe to this topic and send motion control commands to the Arduino.
Now let's add a “publisher” to the capturer.cpp script, which will publish the shift value. First, enable the definition of the message type for the shift value - std_msgs / Int16.
#include rosserial takes special msg message files and generates source code for them. The following template is used: The source code for standard rosserial messages is stored in the package_name folder inside the ros_lib directory. Next, we initialize the message for this type:
package_name/msg/Foo.msg → package_name::Foo
std_msgs::Int16 shift_msg;
Create a “publisher”:
ros::Publisher shift_pub;
and inside the UsbCamNode constructor we give it a definition:
shift_pub = nh.advertise(“line_shift”, 1);
Here we set the type of messages and the name of the topic for publication.
Next, we add the logic for calculating the line shift value using OpenCV and publishing it to the line_shift topic in the take_and_send_image () method before the #ifdef OUTPUT_ENABLED line:
// Some logic for the calculation of offest
shift_msg.data = offset;
shift_pub.publish(shift_msg);
I do not have a ready-made algorithm for following the line, so the reader is free to write his own logic here.
In fact, the data in the message is stored in the data field. The structure of the message can be viewed using the command:
$ rosmsg show std_msgs/Int16
Now run the node:
$ rosrun raspi_cam_ros capturer
We use the rostopic echo command to output data published to the topic line_shift:
$ rostopic echo line_shift
Now add a “subscriber” in the robot control node. Enable the definition of the message type:
#include Then we add a callback function that is executed when a message is received from the topic.
void messageCb(const std_msgs::UInt16& message)
{
  int shift_val = int(message.data);
  char* log_msg;
  if(shift_val < 0) log_msg = "Left";
  else if(shift_val > 0 ) log_msg = "Right";
  else log_msg = "Forward";
  nh.loginfo(log_msg);
}
The callback function must be of type void and take a const reference of the message type as an argument.
For simplicity, I log a message about the direction of the line offset. Here you can add your own robot motion logic for your scenario.
Create a subscriber to messages from the topic line_shift.
ros::Subscriber sub("line_shift", &messageCb);
Here we set the name of the topic and a link to the callback function.
Next come the standard sketch methods for rosserial_arduino:
void setup()
{
  nh.initNode();
  nh.subscribe(sub);
  Serial.begin(57600);
}
void loop()
{
  nh.spinOnce();
  delay(100);
}
The only difference is that we add nh.subscribe (sub) to create the actual “subscription” of the node to the topic.
The robot control sketch can be downloaded from here .
Little trick! In ROS, there are special launch files that allow you to launch nodes as separate processes automatically with certain parameters. launch files are created in xml format and their syntax allows you to run many nodes at once. However, the launch file does not guarantee that the nodes will be launched in the exact order specified.
You can create a launch file for easier launch of the rosserial_python server.
$ cd /src
$ catkin_create_pkg rosserial_controller
$ cd src/rosserial_controller
$ vim rosserial_controller.launch
Let's write launch file with the following content:
Compile and run it:
$ cd ~/
$ catkin_make
$ source devel/setup.bash
$ roslaunch rosserial_controller rosserial_controller.launch
We can visualize the values published in the line_shift theme using the rqt_plot utility, as is done in the article :
$ rqt_plot line_shift
Now you can take full advantage of the Raspberry Pi Camera and the OpenCV library in your scenarios for visual orientation of the robot, object recognition, tracking, and many others. Unleash your imagination!
Next time we’ll talk about controlling the robot in teleoperation mode by pressing keys on the keyboard.
PS. The network has useful cheat sheets - ROS Cheatsheet. For the ROS Indigo version, this can be downloaded from here .









