Laurent Modules and Smart Home (Part 3). Processing
Here at last we got to the third part of our series on modules Laurent (Laurent) company KernelChip and their integration into the home automation system. You can read the first two articles here and here . They talked about the integration of Laurent modules with MajorDoMo , Arduino and Arduino Mega Server systems . Today we’ll talk about how to learn how to manage these modules directly from the screen of your computer and how to use these modules to ... teach your children programming in Processing .
This time we will not talk much directly about the Smart House; we talked enough about it in the two previous articles. This time we will allow ourselves to relax a bit and just work out programming for our own pleasure.
So, before us lies the “Laurent” module and we would like to manage it from our computer. How to do it? There are many ways and we will choose one of them, namely, the programming language Processing. Why Processing? Because it is a simple and at the same time powerful programming language, especially in terms of the visual presentation of information. The best sketches on it simply amaze the imagination and among simple programs there are also very, very nice ones. All in all, it is a great programming language for experimenting and learning.
It is also important for us that Processing has built-in support for network functions and programming interaction with Laurent modules will not require special efforts from us.
To start the experiments, Processing should already be installed on your computer . If you have not yet installed this programming environment, then you need to download the distribution kit and install it on your computer. We will assume that you have already done this and are able to write and run the simplest sketches on Processing.

First of all, we need to connect a library with support for network functions. This is done in one line:
Then let's introduce test commands for managing Laurent modules. Let it be the commands for turning the relay on and off already familiar to you from previous articles. And do not forget the password entry command, without it, the module will not respond to our commands.
We also need service symbols and an object that will represent the Laurent module in our program and with which we will send commands to this module.
Now a function that will directly send control commands to the modules:
First, the function sends a password, which is stored in the pass variable (if you changed the default password, then you need to change the password in this variable as well), then it waits 10 milliseconds and sends a command. Service bytes are needed to complete the sent string.
Now the standard setup () function. This function is present in all sketches on Processing and is intended for initialization and setting of initial parameters.
Here we set the size of the program window, white background color and create the myClient object for our Laurent module. You probably already understood that “192.168.2.19” is the IP address of the module (you must change it to the real address of your module), and 2424 is the standard port of all Laurent modules and you do not need to change it.
And finally, the main draw () function, which will ensure the work of the sketch. This is an endless cycle in which we will organize the functionality we need. Let’s, for example, try turning the lamp on and off, connected to the second relay of the Laurent module every three seconds.
Instead, rele2on will be replaced with the command "$ KE, REL, 2.1", and instead of rele2off, "$ KE, REL, 2.0".
Simple, right? We send a command and wait three seconds and so on in a cycle. The functionality is simple, but no one bothers you, armed with the information from this article, to create an arbitrarily more complex module control algorithm. And do not forget that the modules can not only turn on and off the light, but also much more, so the task is yours, you now have a tool for managing modules from the sketches on Processing.
Here is the full sketch.
And finally, we got to teaching children programming. This process, as you yourself understand, is not easy and the Processing programming language is often used for this purpose, as one of the simplest and most obvious.
The creators of the language have already taken care and simplified the writing of programs as much as possible. The work with graphics is especially easy and affordable. From the first minutes of training, your children can not only display graphics on the screen, but even draw simple cartoons when the drawn figures move around the screen and respond to mouse movements and clicks. In general, it is hard to imagine a better language for teaching children programming.
We will try to make the learning process even more interesting and exciting. How? We will give children the opportunity to control not only the colored shapes on the screen, but also real objects in the real world right from their first program on Processing.
How to do this in practice? We take as a basis the sketch we have already written and add a few lines of code. Let's, for example, create a magical figure, when you touch it with a mouse, an event in the real world will happen, for example, the light or fan will turn on or music or something else will start playing, for which you have enough imagination. This will have a much greater effect on the child than simple manipulations with abstract objects.
So, we will create a shape and for this we will set its coordinates and size and introduce a logical variable that will contain the state of the object (now in the real world).
Now the important point. It is difficult for a child to master programming and it is difficult for him to operate with such constructions as
Therefore, we need to simplify the syntax of the language as much as possible and for this we will introduce a “children's” wrapper for the function that turns the relay on and off.
Agree, on () or off () is already much better than sendCommand (rele2on, myClient). And it’s much easier for a child to create a program from such constructions. And no one bothers you to show imagination and come up with some other simple and understandable name for your child.
Now the code for the main draw () function.
At the initial stage of training, other language constructions can be wrapped in this way, and the child will make programs from very simple blocks. As a homework assignment, you can consider how to get rid of such designs as
or
and replace them with simple and understandable for the child.
The light came on not only in the virtual world on the computer screen, but also in a real room. And on the module there are three more relays that are waiting for your creative ideas. If nothing comes to mind - ask your child - he probably has ideas on this. Here you have the beginning of the "training in programming and robotics", so relevant today.
Here is the full sketch.
Well, the third part of the cycle on integrating Laurent modules into home automation systems has come to an end. In this article we did not talk directly about home automation, but no one bothers you from applying the knowledge you have gained in building a Smart Home. Perhaps you will create a Smart Home management interface specifically on Processing. Why not? Processing has everything to solve this problem and now it even knows how to manage Laurent modules.
After reading all the articles in the series, you can control Laurent modules from four popular systems:
And, having such extensive information and examples of use, it will not be difficult for you to add support for these modules to other systems with which you work.
But what about a smart home?
This time we will not talk much directly about the Smart House; we talked enough about it in the two previous articles. This time we will allow ourselves to relax a bit and just work out programming for our own pleasure.
So, before us lies the “Laurent” module and we would like to manage it from our computer. How to do it? There are many ways and we will choose one of them, namely, the programming language Processing. Why Processing? Because it is a simple and at the same time powerful programming language, especially in terms of the visual presentation of information. The best sketches on it simply amaze the imagination and among simple programs there are also very, very nice ones. All in all, it is a great programming language for experimenting and learning.
It is also important for us that Processing has built-in support for network functions and programming interaction with Laurent modules will not require special efforts from us.
Writing a sketch
To start the experiments, Processing should already be installed on your computer . If you have not yet installed this programming environment, then you need to download the distribution kit and install it on your computer. We will assume that you have already done this and are able to write and run the simplest sketches on Processing.
First of all, we need to connect a library with support for network functions. This is done in one line:
import processing.net.*;
Then let's introduce test commands for managing Laurent modules. Let it be the commands for turning the relay on and off already familiar to you from previous articles. And do not forget the password entry command, without it, the module will not respond to our commands.
String pass = "$KE,PSW,SET,Laurent";
String rele2on = "$KE,REL,2,1";
String rele2off = "$KE,REL,2,0";
We also need service symbols and an object that will represent the Laurent module in our program and with which we will send commands to this module.
byte CRbyte = 13;
byte LFbyte = 10;
Client myClient;
Now a function that will directly send control commands to the modules:
voidsendCommand(String command, Client cl){
  cl.write(pass);
  cl.write(CRbyte);
  cl.write(LFbyte);
  delay(10);
  cl.write(command);
  cl.write(CRbyte);
  cl.write(LFbyte);
}
First, the function sends a password, which is stored in the pass variable (if you changed the default password, then you need to change the password in this variable as well), then it waits 10 milliseconds and sends a command. Service bytes are needed to complete the sent string.
Now the standard setup () function. This function is present in all sketches on Processing and is intended for initialization and setting of initial parameters.
voidsetup(){
  size(300, 300);
  background(255);
  myClient = new Client(this, "192.168.2.19", 2424);
}
Here we set the size of the program window, white background color and create the myClient object for our Laurent module. You probably already understood that “192.168.2.19” is the IP address of the module (you must change it to the real address of your module), and 2424 is the standard port of all Laurent modules and you do not need to change it.
And finally, the main draw () function, which will ensure the work of the sketch. This is an endless cycle in which we will organize the functionality we need. Let’s, for example, try turning the lamp on and off, connected to the second relay of the Laurent module every three seconds.
voiddraw(){
  sendCommand(rele2on, myClient);
  delay(3000);
  sendCommand(rele2off, myClient);
  delay(3000);
}
Instead, rele2on will be replaced with the command "$ KE, REL, 2.1", and instead of rele2off, "$ KE, REL, 2.0".
Simple, right? We send a command and wait three seconds and so on in a cycle. The functionality is simple, but no one bothers you, armed with the information from this article, to create an arbitrarily more complex module control algorithm. And do not forget that the modules can not only turn on and off the light, but also much more, so the task is yours, you now have a tool for managing modules from the sketches on Processing.
Here is the full sketch.
Full sketch code
import processing.net.*;
byte CRbyte = 13; // HEX 0x0D
byte LFbyte = 10; // HEX 0x0A
// Commands
String pass = "$KE,PSW,SET,Laurent";
String rele2on = "$KE,REL,2,1";
String rele2off = "$KE,REL,2,0";
// Client
Client myClient;
void sendCommand(String command, Client cl) {
cl.write(pass);
cl.write(CRbyte);
cl.write(LFbyte);
delay(10);
cl.write(command);
cl.write(CRbyte);
cl.write(LFbyte);
}
void setup() {
size(300, 300);
background(255);
myClient = new Client(this, «192.168.2.19», 2424);
}
void draw() {
sendCommand(rele2on, myClient);
delay(3000);
sendCommand(rele2off, myClient);
delay(3000);
}
Teaching children to program
And finally, we got to teaching children programming. This process, as you yourself understand, is not easy and the Processing programming language is often used for this purpose, as one of the simplest and most obvious.
The creators of the language have already taken care and simplified the writing of programs as much as possible. The work with graphics is especially easy and affordable. From the first minutes of training, your children can not only display graphics on the screen, but even draw simple cartoons when the drawn figures move around the screen and respond to mouse movements and clicks. In general, it is hard to imagine a better language for teaching children programming.
We will try to make the learning process even more interesting and exciting. How? We will give children the opportunity to control not only the colored shapes on the screen, but also real objects in the real world right from their first program on Processing.
How to do this in practice? We take as a basis the sketch we have already written and add a few lines of code. Let's, for example, create a magical figure, when you touch it with a mouse, an event in the real world will happen, for example, the light or fan will turn on or music or something else will start playing, for which you have enough imagination. This will have a much greater effect on the child than simple manipulations with abstract objects.
So, we will create a shape and for this we will set its coordinates and size and introduce a logical variable that will contain the state of the object (now in the real world).
int x1 = 100;
int y1 = 100;
int dx = 100;
int dy = 100;
boolean state = false;
Now the important point. It is difficult for a child to master programming and it is difficult for him to operate with such constructions as
sendCommand(rele2on, myClient);
Therefore, we need to simplify the syntax of the language as much as possible and for this we will introduce a “children's” wrapper for the function that turns the relay on and off.
voidon(){
  sendCommand(rele2on, myClient);
}
voidoff(){
  sendCommand(rele2off, myClient);
}
Agree, on () or off () is already much better than sendCommand (rele2on, myClient). And it’s much easier for a child to create a program from such constructions. And no one bothers you to show imagination and come up with some other simple and understandable name for your child.
Now the code for the main draw () function.
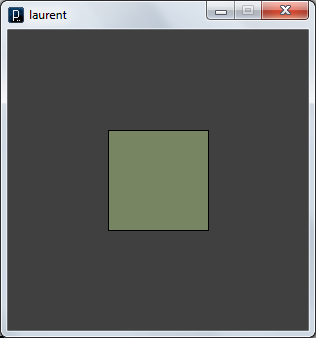
voiddraw(){
background(64);
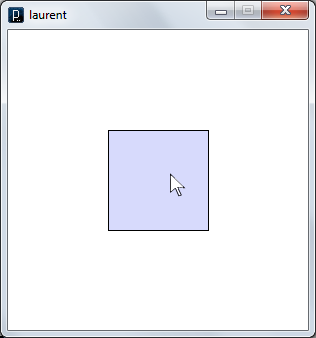
if ((mouseX > x1 && mouseX < x1 + dx) &&
(mouseY > y1 && mouseY < y1 + dy)) {
fill(152,161,247, 100);
background(255);
if (!state) {
on();
}
state = true;
} else {
fill(204,240,152, 100);
if (state) {
off();
}
state = false;
}
rect(x1, y1, dx, dy);
}
At the initial stage of training, other language constructions can be wrapped in this way, and the child will make programs from very simple blocks. As a homework assignment, you can consider how to get rid of such designs as
if ((mouseX > x1 && mouseX < x1 + dx) &&
      (mouseY > y1 && mouseY < y1 + dy)) {
or
fill(152,161,247, 100);
and replace them with simple and understandable for the child.
The light came on not only in the virtual world on the computer screen, but also in a real room. And on the module there are three more relays that are waiting for your creative ideas. If nothing comes to mind - ask your child - he probably has ideas on this. Here you have the beginning of the "training in programming and robotics", so relevant today.
Here is the full sketch.
Full sketch code
import processing.net.*;
int x1 = 100;
int y1 = 100;
int dx = 100;
int dy = 100;
boolean state = false;
byte CRbyte = 13; // HEX 0x0D
byte LFbyte = 10; // HEX 0x0A
// Commands
String pass = "$KE,PSW,SET,Laurent";
String rele2on = "$KE,REL,2,1";
String rele2off = "$KE,REL,2,0";
// Client
Client myClient;
void sendCommand(String command, Client cl) {
cl.write(pass);
cl.write(CRbyte);
cl.write(LFbyte);
delay(10);
cl.write(command);
cl.write(CRbyte);
cl.write(LFbyte);
}
void on() {
sendCommand(rele2on, myClient);
}
void off() {
sendCommand(rele2off, myClient);
}
void setup() {
size(300, 300);
background(255);
myClient = new Client(this, «192.168.2.19», 2424);
}
void draw() {
background(64);
if ((mouseX > x1 && mouseX < x1 + dx) &&
(mouseY > y1 && mouseY < y1 + dy)) {
fill(152,161,247, 100);
background(255);
if (!state) {on();}
state = true;
} else {
fill(204,240,152, 100);
if (state) {off();}
state = false;
}
rect(x1, y1, dx, dy);
}
Conclusion
Well, the third part of the cycle on integrating Laurent modules into home automation systems has come to an end. In this article we did not talk directly about home automation, but no one bothers you from applying the knowledge you have gained in building a Smart Home. Perhaps you will create a Smart Home management interface specifically on Processing. Why not? Processing has everything to solve this problem and now it even knows how to manage Laurent modules.
After reading all the articles in the series, you can control Laurent modules from four popular systems:
- MajorDoMo Home Automation System
- Arduino Hobby & Construction Platform
- Multifunctional Arduino Mega Server System
- Processing Environment
And, having such extensive information and examples of use, it will not be difficult for you to add support for these modules to other systems with which you work.