Using Cylon.js with the Intel Edison Board and Intel IoT Developer Kit
- Transfer
- Tutorial
Intel Edison is an amazing new single board computer. With a dual-core processor, I / O ports and other external interfaces, the Intel Edison board has great potential for Physical computing (Physical computing - a combination of hardware and software in the device that allows it to receive analog information from the outside world and respond to it) . That's why we added full support for Intel Edison to Cylon.js , our JavaScript framework for applications developed for robots and the Internet of Things (IoT).
This article will tell beginners where to start and how to access a complete set of all the features. We will show you how to use Cylon.js for almost all devices that are part of the Intel IoT Developer Kit. Note, we said "almost for everyone", we did not consider the relay, because it may be unsafe. And the use of devices powered by AC voltage with the Intel Edison board is generally the topic of a separate article.
Intel Edison board, to which almost everything in the kit is connected:
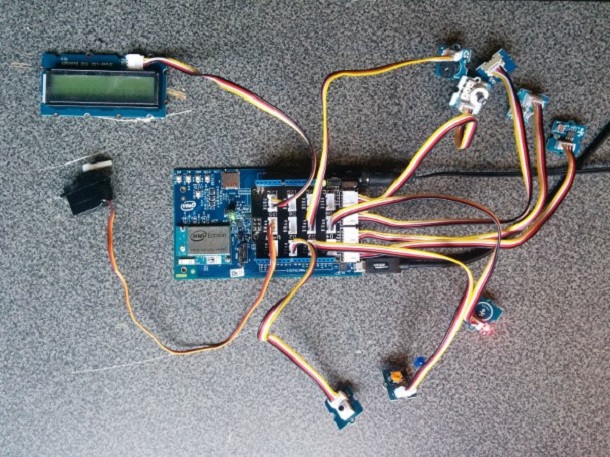
Using Cylon.js we will connect all the devices from the set to create one integrated solution - a smart front door. The door system will include lighting, squeaker, LCD screen, sound and light sensors and its own API. This will be a complete IoT solution, albeit a small one.
Use an external power supply that provides enough current to power all devices connected to the Intel Edison board at the same time. Any power supply is suitable, with a voltage of 7-15 V and a current of 1 A.
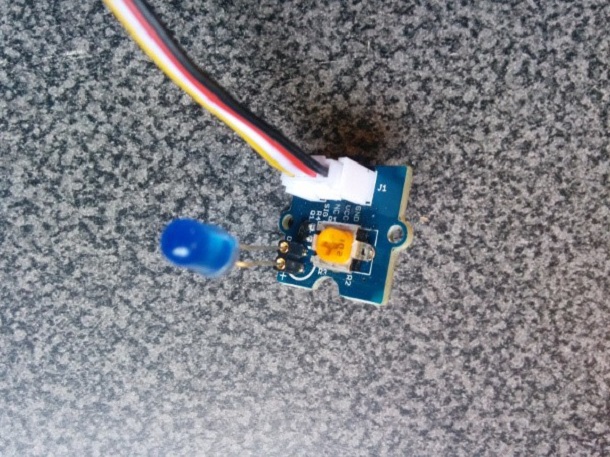
We use an LED. We'll start by turning on the lights using the LEDs from the kit. Turning on the LED is something like the “Hello, World” program for IoT, which serves as a good start. We are going to use a connector board for the LED. You will need to select one of the color LEDs and connect it to the small Grove board. Remember that the long leg of the LED is “+” (anode), and it must be connected to the “+” on the Grove board.
Also, the code is available at the link . Copy or enter this code into the “main.js” file in the Intel® XDK IoT Edition editing window, save it and upload it to the board.
Run the program and you should see a blinking LED.
Add a button. Now we will add a button, and the user will be able to turn the LED on and off. The code shows how Cylon.js can respond to an action from the real world. If you have ever used jQuery, then you know the main idiom of events such as “MouseOver”. Cylon.js makes extensive use of events that correspond to actions from hardware devices. In our case, the button driver supports two events, “push” and “release” (“press” and “release”). We will connect these events with the LED in such a way that it will turn on and off when the button is pressed or released.
Also, the code is available at the link . Copy or enter this code into the “main.js” file in the Intel® XDK IoT Edition window, replace all the previous code, save and upload it to the board.
Run the program and blink the LED by pressing the button.
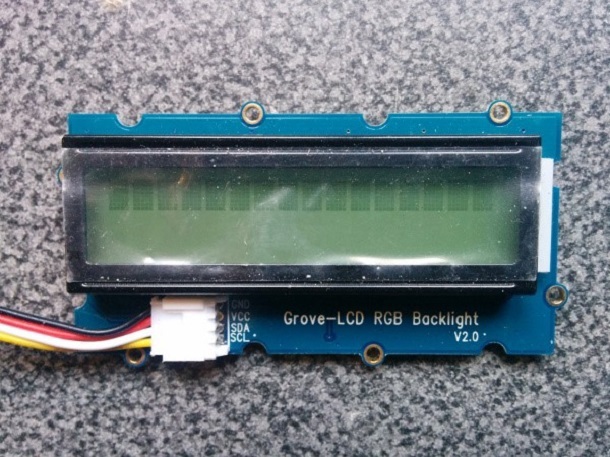
Add LCD screen. Now we are going to connect a display that will allow us to see what is happening on the board while we add new functionality to our systems. This is an LCD with RGB background illumination. It will allow us to simultaneously display text and change the background color.
The LCD screen from the kit is a device connected via the I2C serial bus. The I2C interface is the standard for many types of high-level sensors and devices. We need to connect it to the “i2c” connector on the Grove shield.
First we add the code for the LCD screen. Then we will add code to display a message when our program starts. In conclusion, we will add the code for the button.on (“release”) and (“push”) event to update the screen with the current lighting state.
Also, the code is available at the link . Copy or enter this code into the “main.js” file in the Intel® XDK IoT Edition window, replace all the previous code, save and upload it to the board.
Run the program, press the button and look at the messages on the LCD screen.
We are going to add the Cylon.js HTTP API, which will allow us to see the web user interface and control the system using REST. The Cylon.js API has a modular structure and is implemented as several plug-ins. Therefore, you can connect its various parts depending on your needs. We now have the plug-ins http, socketio, and mqtt. Soon we will add more.
The HTTP API plugin also includes Robeaux ( http://robeaux.io ), which is a simple, one-page React-based web application. This application shows the control panel with the current state of your robot and makes it possible to change its parameters.
In the various Cylon.js API plugins, there is a single way to determine which robot or device you want to work with. This method of specifying the path as in the file system is described in the form of specifications and is called the Common Protocol for Programming Physical Input / Output or in short “cppp.io”.
For example, in our current Doorbot project, the path to the LED will be “/ api / robots / doorbot / devices / led”. Using the template "/ api / robots // devices /»We will be able to use the Cylon.js API to allow other programs to control our device or send commands to our robot.
Also, the code is available at the link . Copy or enter this code into the “main.js” file in the Intel® XDK IoT Edition window, replace all the previous code, save and upload it to the board.
Launch the program and go to the browser on the IP address of your board, specifying port 3000 (this is the default port for Robeaux). You should see the following page:
Click “doorbot”. You should see a list of devices. Click the “button” device. Information on this button will be displayed.
In the “Device Events” block, enter “push” in the input field, then click the “Listen” button. Now press the real connected button. Thanks to server-side events, you should see the event appear on the web page. This is a great way to verify that your device is connected correctly.
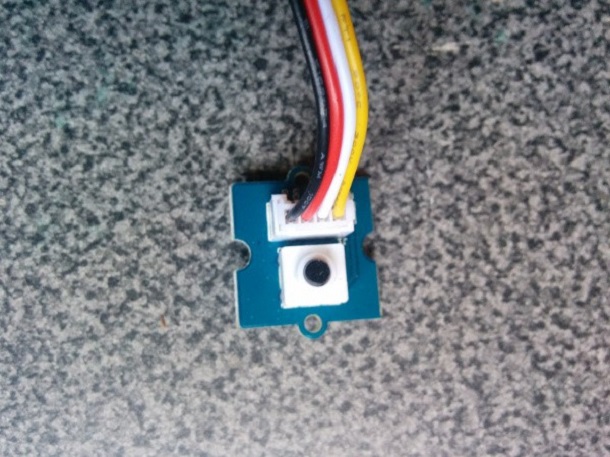
Add a touch sensor and a tweeter. Now we will add the squeaker and give the visitor the opportunity to call it. From the point of view of Cylon.js, a touch sensor is just a kind of button. And the tweeter acts like an LED, that is, it can only be turned on and off.
Touching a touch sensor triggers the touch.on (“push”) event. We turn on the squeaker and show the message on the LCD screen.
Connect the touch sensor and tweeter.
Also, the code is available at the link . Copy or enter this code into the “main.js” file in the Intel® XDK IoT Edition window, replace all the previous code, save and upload it to the board.
Run the program, touch the touch sensor and listen to the squeaker giving a signal.
Add a rotation sensor (potentiometer) and a servomotor. Now we will add the ability to rotate the servomotor by controlling it with a potentiometer. Something similar can be used to open the lock or rotate the surveillance camera. But for the sake of simplicity, we're just going to use a couple more parts from the kit.
A potentiometer is a type of variable resistor. Based on how you turn it, it produces more or less voltage, like a volume control knob. In fact, most volume controls are potentiometers.
Servomotors are a special type of motor that can rotate forward and backward in a certain range, usually 180 degrees. Often they are used in radio-controlled models of aircraft or ships to control the steering angle. They can also be used to open the lock on the door, move the camera, etc.
Connect the servomotor and potentiometer:
Also, the code is available at the link . Copy or enter this code into the “main.js” file in the Intel® XDK IoT Edition window, replace all the previous code, save and upload it to the board.
Run the program, turn the knob and look at the servomotor.
Add a temperature sensor. But not only visitors will be interested in our smart door. We also want to be able to detect heat from fire and react accordingly, for example, including an audible alarm. In the event of a fire, you would not want to open the door if fire is burning on its other side.
The temperature sensor uses the UMP library, which is built into Cylon.js. UPM is an Intel library that supports many different sensors. One of them is just our “Grove - Temperature Sensor” temperature sensor.
Connect the temperature sensor.
Also, the code is available at the link . Copy or enter this code into the “main.js” file in the Intel® XDK IoT Edition window, replace all the previous code, save and upload it to the board.
Run the code and check the temperature on the screen.
Add a sound sensor. If anyone or anything approaches the front door, our smart door will be able to detect noise using the sound sensor and turn on the light. We will deter the intruder, and invited guests will be able to easily find the doorbell.
The sound sensor from the kit is a regular analog device. Like a potentiometer, it gives a value from 0 to 1023. In this case, the sound volume determined by the sensor corresponds to the voltage at its output.
Connect the sound sensor.
Also, the code is available at the link . Copy or enter this code into the “main.js” file in the Intel® XDK IoT Edition window, replace all the previous code, save and upload it to the board.
Run the program, make a noise and see that the LED turns on.
Add a light sensor. As in the case of the sound sensor, if someone comes to the front door at night, we can determine the presence of light and turn on the lighting on our own. Once again, we will deter the intruder, and invited guests will be able to easily find the doorbell.
The light sensor from the kit is another analog device, so its code is similar to the sound sensor code.
Connect the light sensor.
Also, the code is available at the link . Copy or enter this code into the “main.js” file in the Intel® XDK IoT Edition window, replace all the previous code, save and upload it to the board.
Run the program, light the sensor and see that the LED turns on.
In this article, we showed how to use Cylon.js with an Intel Edison board and connect all parts from the Intel® IoT Developer Kit, except the relay. We also created a complete, miniature version of the smart door system.
Intel Edison is a very powerful device with a very small size. And we just looked at the top of its capabilities. Thanks to Cylon.js, it’s very easy to use these features to create next-generation smart devices. What do you think of yourself?
For more information on working with the Intel IoT Developer Kit, see the article IoT Ingredients for Fast Food: Intel Edison + Intel XDK + JavaScript + Grove Kit
This article will tell beginners where to start and how to access a complete set of all the features. We will show you how to use Cylon.js for almost all devices that are part of the Intel IoT Developer Kit. Note, we said "almost for everyone", we did not consider the relay, because it may be unsafe. And the use of devices powered by AC voltage with the Intel Edison board is generally the topic of a separate article.
Intel Edison board, to which almost everything in the kit is connected:
Using Cylon.js we will connect all the devices from the set to create one integrated solution - a smart front door. The door system will include lighting, squeaker, LCD screen, sound and light sensors and its own API. This will be a complete IoT solution, albeit a small one.
Use an external power supply that provides enough current to power all devices connected to the Intel Edison board at the same time. Any power supply is suitable, with a voltage of 7-15 V and a current of 1 A.
Part 1. Light
We use an LED. We'll start by turning on the lights using the LEDs from the kit. Turning on the LED is something like the “Hello, World” program for IoT, which serves as a good start. We are going to use a connector board for the LED. You will need to select one of the color LEDs and connect it to the small Grove board. Remember that the long leg of the LED is “+” (anode), and it must be connected to the “+” on the Grove board.
Source Code main.js
 "use strict";
var cylon = require("cylon");
cylon.robot({
  name: "doorbot",
  connections: {
    edison: { adaptor: "intel-iot" }
  },
  devices: {
    led: { driver: "led", pin: 3, connection: "edison" }
  },
  work: function() {
    var that = this;
    setInterval(function() {
      that.led.toggle()
    }, 1000);
  }
}).start();
Also, the code is available at the link . Copy or enter this code into the “main.js” file in the Intel® XDK IoT Edition editing window, save it and upload it to the board.
Run the program and you should see a blinking LED.
Part 2. Light switch
Add a button. Now we will add a button, and the user will be able to turn the LED on and off. The code shows how Cylon.js can respond to an action from the real world. If you have ever used jQuery, then you know the main idiom of events such as “MouseOver”. Cylon.js makes extensive use of events that correspond to actions from hardware devices. In our case, the button driver supports two events, “push” and “release” (“press” and “release”). We will connect these events with the LED in such a way that it will turn on and off when the button is pressed or released.
Source Code main.js
"use strict";
var cylon = require("cylon");
cylon.robot({
  name: "doorbot",
  connections: {
    edison: { adaptor: "intel-iot" }
  },
  devices: {
    // digital sensors
    button: { driver: "button",        pin: 2, connection: "edison" },
    led:    { driver: "led",           pin: 3, connection: "edison" },
  },
  setup: function() {
    this.led.turnOff();
  },
  work: function() {
    var that = this;
    that.setup();
    that.button.on('push', function() {
      that.led.turnOn();
    });
    that.button.on('release', function() {
      that.led.turnOff();
    });
  }
}).start();
Also, the code is available at the link . Copy or enter this code into the “main.js” file in the Intel® XDK IoT Edition window, replace all the previous code, save and upload it to the board.
Run the program and blink the LED by pressing the button.
Part 3. Display
Add LCD screen. Now we are going to connect a display that will allow us to see what is happening on the board while we add new functionality to our systems. This is an LCD with RGB background illumination. It will allow us to simultaneously display text and change the background color.
The LCD screen from the kit is a device connected via the I2C serial bus. The I2C interface is the standard for many types of high-level sensors and devices. We need to connect it to the “i2c” connector on the Grove shield.
First we add the code for the LCD screen. Then we will add code to display a message when our program starts. In conclusion, we will add the code for the button.on (“release”) and (“push”) event to update the screen with the current lighting state.
Source Code main.js
"use strict";
var cylon = require("cylon");
cylon.robot({
  name: "doorbot",
  connections: {
    edison: { adaptor: "intel-iot" }
  },
  devices: {
    // digital sensors
    button: { driver: "button",        pin: 2, connection: "edison" },
    led:    { driver: "led",           pin: 3, connection: "edison" },
    // i2c devices
    screen: { driver: "upm-jhd1313m1", connection: "edison" }
  },
  writeMessage: function(message, color) {
    var that = this;
    var str = message.toString();
    while (str.length < 16) {
      str = str + " ";
    }
    console.log(message);
    that.screen.setCursor(0,0);
    that.screen.write(str);
    switch(color)
    {
      case "red":
        that.screen.setColor(255, 0, 0);
        break;
      case "green":
        that.screen.setColor(0, 255, 0);
        break;
      case "blue":
        that.screen.setColor(0, 0, 255);
        break;
      default:
        that.screen.setColor(255, 255, 255);
        break;
    }
  },
  reset: function() {
    this.writeMessage("Doorbot ready");
    this.led.turnOff();
  },
  work: function() {
    var that = this;
    that.reset();
    that.button.on('push', function() {
      that.led.turnOn();
      that.writeMessage("Lights On", "blue");
    });
    that.button.on('release', function() {
      that.reset();
    });
  }
}).start();
Also, the code is available at the link . Copy or enter this code into the “main.js” file in the Intel® XDK IoT Edition window, replace all the previous code, save and upload it to the board.
Run the program, press the button and look at the messages on the LCD screen.
Part 4 - Web API
We are going to add the Cylon.js HTTP API, which will allow us to see the web user interface and control the system using REST. The Cylon.js API has a modular structure and is implemented as several plug-ins. Therefore, you can connect its various parts depending on your needs. We now have the plug-ins http, socketio, and mqtt. Soon we will add more.
The HTTP API plugin also includes Robeaux ( http://robeaux.io ), which is a simple, one-page React-based web application. This application shows the control panel with the current state of your robot and makes it possible to change its parameters.
In the various Cylon.js API plugins, there is a single way to determine which robot or device you want to work with. This method of specifying the path as in the file system is described in the form of specifications and is called the Common Protocol for Programming Physical Input / Output or in short “cppp.io”.
For example, in our current Doorbot project, the path to the LED will be “/ api / robots / doorbot / devices / led”. Using the template "/ api / robots /
Source Code main.js
"use strict";
var cylon = require("cylon");
cylon.api({
  host: "0.0.0.0",
  port: "3000",
  ssl: false
});
cylon.robot({
  name: "doorbot",
  connections: {
    edison: { adaptor: "intel-iot" }
  },
  devices: {
    // digital sensors
    button: { driver: "button",        pin: 2, connection: "edison" },
    led:    { driver: "led",           pin: 3, connection: "edison" },
    // i2c devices
    screen: { driver: "upm-jhd1313m1", connection: "edison" }
  },
  writeMessage: function(message, color) {
    var that = this;
    var str = message.toString();
    while (str.length < 16) {
      str = str + " ";
    }
    console.log(message);
    that.screen.setCursor(0,0);
    that.screen.write(str);
    switch(color)
    {
      case "red":
        that.screen.setColor(255, 0, 0);
        break;
      case "green":
        that.screen.setColor(0, 255, 0);
        break;
      case "blue":
        that.screen.setColor(0, 0, 255);
        break;
      default:
        that.screen.setColor(255, 255, 255);
        break;
    }
  },
  reset: function() {
    this.writeMessage("Doorbot ready");
    this.led.turnOff();
  },
  work: function() {
    var that = this;
    that.reset();
    that.button.on('push', function() {
      that.led.turnOn();
      that.writeMessage("Lights On", "blue");
    });
    that.button.on('release', function() {
      that.reset();
    });
  }
}).start();
Also, the code is available at the link . Copy or enter this code into the “main.js” file in the Intel® XDK IoT Edition window, replace all the previous code, save and upload it to the board.
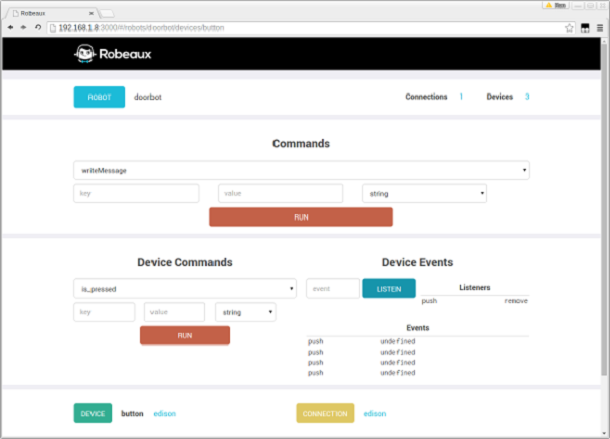
Launch the program and go to the browser on the IP address of your board, specifying port 3000 (this is the default port for Robeaux). You should see the following page:
Click “doorbot”. You should see a list of devices. Click the “button” device. Information on this button will be displayed.
In the “Device Events” block, enter “push” in the input field, then click the “Listen” button. Now press the real connected button. Thanks to server-side events, you should see the event appear on the web page. This is a great way to verify that your device is connected correctly.
Part 5. The doorbell
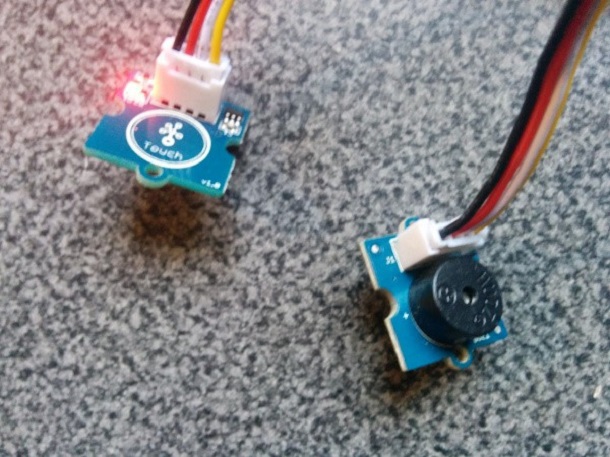
Add a touch sensor and a tweeter. Now we will add the squeaker and give the visitor the opportunity to call it. From the point of view of Cylon.js, a touch sensor is just a kind of button. And the tweeter acts like an LED, that is, it can only be turned on and off.
Touching a touch sensor triggers the touch.on (“push”) event. We turn on the squeaker and show the message on the LCD screen.
Connect the touch sensor and tweeter.
Source Code main.js
"use strict";
var cylon = require("cylon");
cylon.api({
  host: "0.0.0.0",
  port: "3000",
  ssl: false
});
cylon.robot({
  name: "doorbot",
  connections: {
    edison: { adaptor: "intel-iot" }
  },
  devices: {
    // digital sensors
    button: { driver: "button",        pin: 2, connection: "edison" },
    led:    { driver: "led",           pin: 3, connection: "edison" },
    buzzer: { driver: "direct-pin",    pin: 7, connection: "edison" },
    touch:  { driver: "button",        pin: 8, connection: "edison" },
    // i2c devices
    screen: { driver: "upm-jhd1313m1", connection: "edison" }
  },
  doorbell: function() {
    var that = this;
    that.buzzer.digitalWrite(1);
    that.writeMessage("Doorbell pressed", "green");
    setTimeout(function() {
      that.reset();
    }, 1000);
  },
  writeMessage: function(message, color) {
    var that = this;
    var str = message.toString();
    while (str.length < 16) {
      str = str + " ";
    }
    console.log(message);
    that.screen.setCursor(0,0);
    that.screen.write(str);
    switch(color)
    {
      case "red":
        that.screen.setColor(255, 0, 0);
        break;
      case "green":
        that.screen.setColor(0, 255, 0);
        break;
      case "blue":
        that.screen.setColor(0, 0, 255);
        break;
      default:
        that.screen.setColor(255, 255, 255);
        break;
    }
  },
  reset: function() {
    this.writeMessage("Doorbot ready");
    this.led.turnOff();
    this.buzzer.digitalWrite(0);
  },
  work: function() {
    var that = this;
    that.reset();
    that.button.on('push', function() {
      that.led.turnOn();
      that.writeMessage("Lights On", "blue");
    });
    that.button.on('release', function() {
      that.reset();
    });
    that.touch.on('push', function() {
      that.doorbell();
    });
  }
}).start();
Also, the code is available at the link . Copy or enter this code into the “main.js” file in the Intel® XDK IoT Edition window, replace all the previous code, save and upload it to the board.
Run the program, touch the touch sensor and listen to the squeaker giving a signal.
Part 6. Door opener
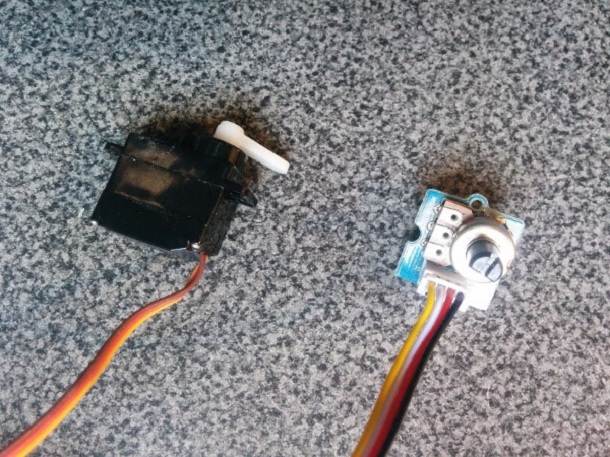
Add a rotation sensor (potentiometer) and a servomotor. Now we will add the ability to rotate the servomotor by controlling it with a potentiometer. Something similar can be used to open the lock or rotate the surveillance camera. But for the sake of simplicity, we're just going to use a couple more parts from the kit.
A potentiometer is a type of variable resistor. Based on how you turn it, it produces more or less voltage, like a volume control knob. In fact, most volume controls are potentiometers.
Servomotors are a special type of motor that can rotate forward and backward in a certain range, usually 180 degrees. Often they are used in radio-controlled models of aircraft or ships to control the steering angle. They can also be used to open the lock on the door, move the camera, etc.
Connect the servomotor and potentiometer:
Source Code main.js
"use strict";
var cylon = require("cylon");
cylon.api({
  host: "0.0.0.0",
  port: "3000",
  ssl: false
});
cylon.robot({
  name: "doorbot",
  connections: {
    edison: { adaptor: "intel-iot" }
  },
  devices: {
    // digital sensors
    button: { driver: "button",        pin: 2, connection: "edison" },
    led:    { driver: "led",           pin: 3, connection: "edison" },
    servo:  { driver: "servo",         pin: 5, connection: "edison" },
    buzzer: { driver: "direct-pin",    pin: 7, connection: "edison" },
    touch:  { driver: "button",        pin: 8, connection: "edison" },
    // analog sensors
    dial:   { driver: "analogSensor",  pin: 0, connection: "edison" },
    // i2c devices
    screen: { driver: "upm-jhd1313m1", connection: "edison" }
  },
  turnLock: function(val) {
    var that = this;
    var currentAngle = that.servo.currentAngle();
    var angle = val.fromScale(0, 1023).toScale(0,180) | 0;
    if (angle <= currentAngle - 3 || angle >= currentAngle + 3) {
      console.log("turning lock:", angle);
      that.servo.angle(angle);
    }
  },
  doorbell: function() {
    var that = this;
    that.buzzer.digitalWrite(1);
    that.writeMessage("Doorbell pressed", "green");
    setTimeout(function() {
      that.reset();
    }, 1000);
  },
  writeMessage: function(message, color) {
    var that = this;
    var str = message.toString();
    while (str.length < 16) {
      str = str + " ";
    }
    console.log(message);
    that.screen.setCursor(0,0);
    that.screen.write(str);
    switch(color)
    {
      case "red":
        that.screen.setColor(255, 0, 0);
        break;
      case "green":
        that.screen.setColor(0, 255, 0);
        break;
      case "blue":
        that.screen.setColor(0, 0, 255);
        break;
      default:
        that.screen.setColor(255, 255, 255);
        break;
    }
  },
  reset: function() {
    this.writeMessage("Doorbot ready");
    this.led.turnOff();
    this.buzzer.digitalWrite(0);
  },
  work: function() {
    var that = this;
    that.reset();
    that.button.on('push', function() {
      that.led.turnOn();
      that.writeMessage("Lights On", "blue");
    });
    that.button.on('release', function() {
      that.reset();
    });
    that.dial.on('analogRead', function(val) {
      that.turnLock(val);
    });
    that.touch.on('push', function() {
      that.doorbell();
    });
  }
}).start();
Also, the code is available at the link . Copy or enter this code into the “main.js” file in the Intel® XDK IoT Edition window, replace all the previous code, save and upload it to the board.
Run the program, turn the knob and look at the servomotor.
Part 7. Fire alarm
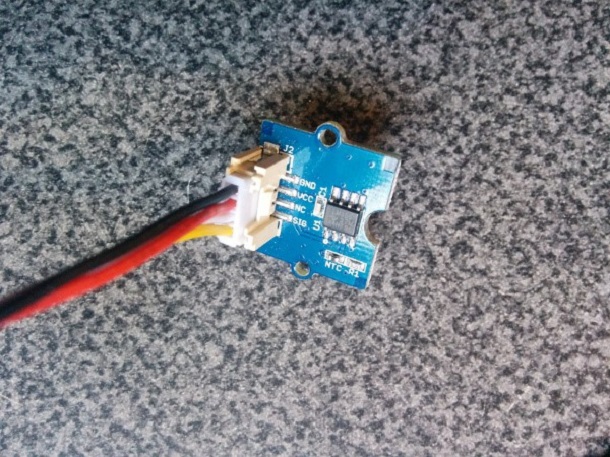
Add a temperature sensor. But not only visitors will be interested in our smart door. We also want to be able to detect heat from fire and react accordingly, for example, including an audible alarm. In the event of a fire, you would not want to open the door if fire is burning on its other side.
The temperature sensor uses the UMP library, which is built into Cylon.js. UPM is an Intel library that supports many different sensors. One of them is just our “Grove - Temperature Sensor” temperature sensor.
Connect the temperature sensor.
Source Code main.js
"use strict";
var cylon = require("cylon");
cylon.api({
  host: "0.0.0.0",
  port: "3000",
  ssl: false
});
cylon.robot({
  name: "doorbot",
  connections: {
    edison: { adaptor: "intel-iot" }
  },
  devices: {
    // digital sensors
    button: { driver: "button",        pin: 2, connection: "edison" },
    led:    { driver: "led",           pin: 3, connection: "edison" },
    servo:  { driver: "servo",         pin: 5, connection: "edison" },
    buzzer: { driver: "direct-pin",    pin: 7, connection: "edison" },
    touch:  { driver: "button",        pin: 8, connection: "edison" },
    // analog sensors
    dial:   { driver: "analogSensor",  pin: 0, connection: "edison" },
    temp:   { driver: "upm-grovetemp", pin: 1, connection: "edison" },
    // i2c devices
    screen: { driver: "upm-jhd1313m1", connection: "edison" }
  },
  fireAlarm: function() {
    var that = this;
    var deg = that.temp.value();
    console.log("current temp:", deg);
    if (deg >= 30) {
      that.writeMessage("Fire alarm!", "red");
      that.buzzer.digitalWrite(1);
      setTimeout(function() {
        that.buzzer.digitalWrite(0);
      }, 200);
    }
  },
  turnLock: function(val) {
    var that = this;
    var currentAngle = that.servo.currentAngle();
    var angle = val.fromScale(0, 1023).toScale(0,180) | 0;
    if (angle <= currentAngle - 3 || angle >= currentAngle + 3) {
      console.log("turning lock:", angle);
      that.servo.angle(angle);
    }
  },
  doorbell: function() {
    var that = this;
    that.buzzer.digitalWrite(1);
    that.writeMessage("Doorbell pressed", "green");
    setTimeout(function() {
      that.reset();
    }, 1000);
  },
  writeMessage: function(message, color) {
    var that = this;
    var str = message.toString();
    while (str.length < 16) {
      str = str + " ";
    }
    console.log(message);
    that.screen.setCursor(0,0);
    that.screen.write(str);
    switch(color)
    {
      case "red":
        that.screen.setColor(255, 0, 0);
        break;
      case "green":
        that.screen.setColor(0, 255, 0);
        break;
      case "blue":
        that.screen.setColor(0, 0, 255);
        break;
      default:
        that.screen.setColor(255, 255, 255);
        break;
    }
  },
  reset: function() {
    this.writeMessage("Doorbot ready");
    this.led.turnOff();
    this.buzzer.digitalWrite(0);
  },
  work: function() {
    var that = this;
    that.reset();
    that.button.on('push', function() {
      that.led.turnOn();
      that.writeMessage("Lights On", "blue");
    });
    that.button.on('release', function() {
      that.reset();
    });
    that.dial.on('analogRead', function(val) {
      that.turnLock(val);
    });
    that.touch.on('push', function() {
      that.doorbell();
    });
    setInterval(function() {
      that.fireAlarm();
    }, 1000);
  }
}).start();
Also, the code is available at the link . Copy or enter this code into the “main.js” file in the Intel® XDK IoT Edition window, replace all the previous code, save and upload it to the board.
Run the code and check the temperature on the screen.
Part 8. Security alarm
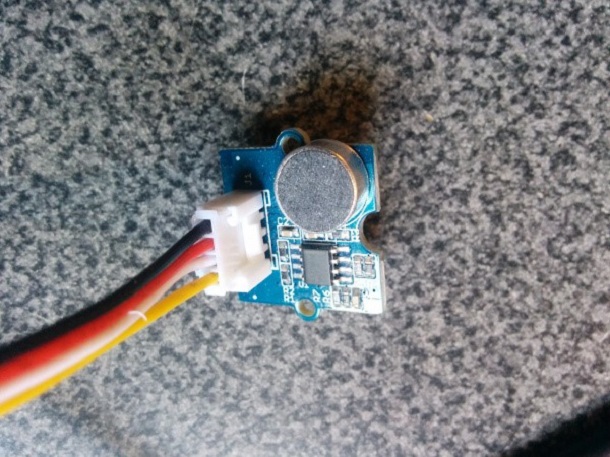
Add a sound sensor. If anyone or anything approaches the front door, our smart door will be able to detect noise using the sound sensor and turn on the light. We will deter the intruder, and invited guests will be able to easily find the doorbell.
The sound sensor from the kit is a regular analog device. Like a potentiometer, it gives a value from 0 to 1023. In this case, the sound volume determined by the sensor corresponds to the voltage at its output.
Connect the sound sensor.
Source Code main.js
"use strict";
var cylon = require("cylon");
cylon.api({
  host: "0.0.0.0",
  port: "3000",
  ssl: false
});
cylon.robot({
  name: "doorbot",
  connections: {
    edison: { adaptor: "intel-iot" }
  },
  devices: {
    // digital sensors
    button: { driver: "button",        pin: 2, connection: "edison" },
    led:    { driver: "led",           pin: 3, connection: "edison" },
    servo:  { driver: "servo",         pin: 5, connection: "edison" },
    buzzer: { driver: "direct-pin",    pin: 7, connection: "edison" },
    touch:  { driver: "button",        pin: 8, connection: "edison" },
    // analog sensors
    dial:   { driver: "analogSensor",  pin: 0, connection: "edison" },
    temp:   { driver: "upm-grovetemp", pin: 1, connection: "edison" },
    sound:  { driver: "analogSensor",  pin: 2, connection: "edison" },
    // i2c devices
    screen: { driver: "upm-jhd1313m1", connection: "edison" }
  },
  fireAlarm: function() {
    var that = this;
    var deg = that.temp.value();
    console.log("current temp:", deg);
    if (deg >= 30) {
      that.writeMessage("Fire alarm!", "red");
      that.buzzer.digitalWrite(1);
      setTimeout(function() {
        that.buzzer.digitalWrite(0);
      }, 200);
    }
  },
  detectSound: function(val) {
    var that = this;
    if (val >= 450) {
      console.log("Sound detected:", val)
      that.writeMessage("Sound detected", "blue");
      that.led.turnOn();
      setTimeout(function() {
        that.reset();
      }, 500);
    }
  },
  turnLock: function(val) {
    var that = this;
    var currentAngle = that.servo.currentAngle();
    var angle = val.fromScale(0, 1023).toScale(0,180) | 0;
    if (angle <= currentAngle - 3 || angle >= currentAngle + 3) {
      console.log("turning lock:", angle);
      that.servo.angle(angle);
    }
  },
  doorbell: function() {
    var that = this;
    that.buzzer.digitalWrite(1);
    that.writeMessage("Doorbell pressed", "green");
    setTimeout(function() {
      that.reset();
    }, 1000);
  },
  writeMessage: function(message, color) {
    var that = this;
    var str = message.toString();
    while (str.length < 16) {
      str = str + " ";
    }
    console.log(message);
    that.screen.setCursor(0,0);
    that.screen.write(str);
    switch(color)
    {
      case "red":
        that.screen.setColor(255, 0, 0);
        break;
      case "green":
        that.screen.setColor(0, 255, 0);
        break;
      case "blue":
        that.screen.setColor(0, 0, 255);
        break;
      default:
        that.screen.setColor(255, 255, 255);
        break;
    }
  },
  reset: function() {
    this.writeMessage("Doorbot ready");
    this.led.turnOff();
    this.buzzer.digitalWrite(0);
  },
  work: function() {
    var that = this;
    that.reset();
    that.button.on('push', function() {
      that.led.turnOn();
      that.writeMessage("Lights On", "blue");
    });
    that.button.on('release', function() {
      that.reset();
    });
    that.dial.on('analogRead', function(val) {
      that.turnLock(val);
    });
    that.sound.on('analogRead', function(val) {
      that.detectSound(val);
    });
    that.touch.on('push', function() {
      that.doorbell();
    });
    setInterval(function() {
      that.fireAlarm();
    }, 1000);
  }
}).start();
Also, the code is available at the link . Copy or enter this code into the “main.js” file in the Intel® XDK IoT Edition window, replace all the previous code, save and upload it to the board.
Run the program, make a noise and see that the LED turns on.
Part 9. Security alarm (continued)
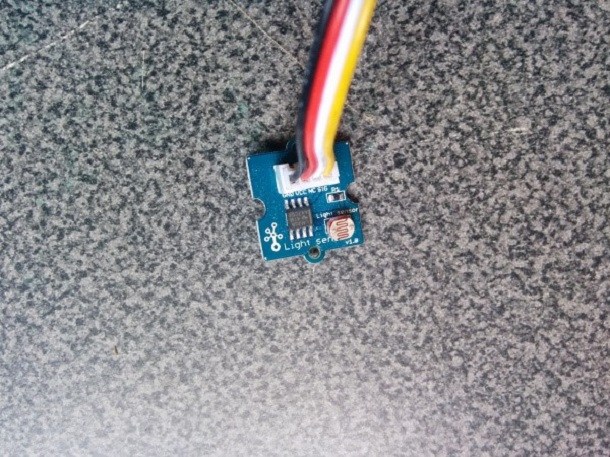
Add a light sensor. As in the case of the sound sensor, if someone comes to the front door at night, we can determine the presence of light and turn on the lighting on our own. Once again, we will deter the intruder, and invited guests will be able to easily find the doorbell.
The light sensor from the kit is another analog device, so its code is similar to the sound sensor code.
Connect the light sensor.
Source Code main.js
"use strict";
var cylon = require("cylon");
cylon.api({
  host: "0.0.0.0",
  port: "3000",
  ssl: false
});
cylon.robot({
  name: "doorbot",
  connections: {
    edison: { adaptor: "intel-iot" }
  },
  devices: {
    // digital sensors
    button: { driver: "button",        pin: 2, connection: "edison" },
    led:    { driver: "led",           pin: 3, connection: "edison" },
    servo:  { driver: "servo",         pin: 5, connection: "edison" },
    buzzer: { driver: "direct-pin",    pin: 7, connection: "edison" },
    touch:  { driver: "button",        pin: 8, connection: "edison" },
    // analog sensors
    dial:   { driver: "analogSensor",  pin: 0, connection: "edison" },
    temp:   { driver: "upm-grovetemp", pin: 1, connection: "edison" },
    sound:  { driver: "analogSensor",  pin: 2, connection: "edison" },
    light:  { driver: "analogSensor",  pin: 3, connection: "edison" },
    // i2c devices
    screen: { driver: "upm-jhd1313m1", connection: "edison" }
  },
  fireAlarm: function() {
    var that = this;
    var deg = that.temp.value();
    console.log("current temp:", deg);
    if (deg >= 30) {
      that.writeMessage("Fire alarm!", "red");
      that.buzzer.digitalWrite(1);
      setTimeout(function() {
        that.buzzer.digitalWrite(0);
      }, 200);
    }
  },
  detectSound: function(val) {
    var that = this;
    if (val >= 450) {
      console.log("Sound detected:", val)
      that.writeMessage("Sound detected", "blue");
      that.led.turnOn();
      setTimeout(function() {
        that.reset();
      }, 500);
    }
  },
  detectLight: function(val) {
    var that = this;
    var date = new Date();
    var currentHour = date.getHours();
    if (currentHour > 19 && currentHour < 8 && val >= 450) {
      console.log("Light detected:", val)
      that.writeMessage("Light detected", "blue");
      that.led.turnOn();
      setTimeout(function() {
        that.reset();
      }, 500);
    }
  },
  turnLock: function(val) {
    var that = this;
    var currentAngle = that.servo.currentAngle();
    var angle = val.fromScale(0, 1023).toScale(0,180) | 0;
    if (angle <= currentAngle - 3 || angle >= currentAngle + 3) {
      console.log("turning lock:", angle);
      that.servo.angle(angle);
    }
  },
  doorbell: function() {
    var that = this;
    that.buzzer.digitalWrite(1);
    that.writeMessage("Doorbell pressed", "green");
    setTimeout(function() {
      that.reset();
    }, 1000);
  },
  writeMessage: function(message, color) {
    var that = this;
    var str = message.toString();
    while (str.length < 16) {
      str = str + " ";
    }
    console.log(message);
    that.screen.setCursor(0,0);
    that.screen.write(str);
    switch(color)
    {
      case "red":
        that.screen.setColor(255, 0, 0);
        break;
      case "green":
        that.screen.setColor(0, 255, 0);
        break;
      case "blue":
        that.screen.setColor(0, 0, 255);
        break;
      default:
        that.screen.setColor(255, 255, 255);
        break;
    }
  },
  reset: function() {
    this.writeMessage("Doorbot ready");
    this.led.turnOff();
    this.buzzer.digitalWrite(0);
  },
  work: function() {
    var that = this;
    that.reset();
    that.button.on('push', function() {
      that.led.turnOn();
      that.writeMessage("Lights On", "blue");
    });
    that.button.on('release', function() {
      that.reset();
    });
    that.dial.on('analogRead', function(val) {
      that.turnLock(val);
    });
    that.sound.on('analogRead', function(val) {
      that.detectSound(val);
    });
    that.light.on('analogRead', function(val) {
      that.detectLight(val);
    });
    that.touch.on('push', function() {
      that.doorbell();
    });
    setInterval(function() {
      that.fireAlarm();
    }, 1000);
  }
}).start();
Also, the code is available at the link . Copy or enter this code into the “main.js” file in the Intel® XDK IoT Edition window, replace all the previous code, save and upload it to the board.
Run the program, light the sensor and see that the LED turns on.
Conclusion
In this article, we showed how to use Cylon.js with an Intel Edison board and connect all parts from the Intel® IoT Developer Kit, except the relay. We also created a complete, miniature version of the smart door system.
Intel Edison is a very powerful device with a very small size. And we just looked at the top of its capabilities. Thanks to Cylon.js, it’s very easy to use these features to create next-generation smart devices. What do you think of yourself?
For more information on working with the Intel IoT Developer Kit, see the article IoT Ingredients for Fast Food: Intel Edison + Intel XDK + JavaScript + Grove Kit