How to install a smart home Home Assistant
- Tutorial
This article is written to remind you that the smart home is much closer than we thought.
→ View demo
What is a smart home can be read on Wikipedia here and here .
Let's take it in order:
1. Central core A
smart home needs a central controller (hub, server, etc.). This is the link between all the elements of a smart home and the user. There are distributed systems without a central controller, but you still need one information collector that will show the user all the latest news from each PC device
-excellent option if you need a large load on the server, because even older laptops will have enough performance (only if you don’t watch 4K video or use 10 cameras with HEVC encoding). Of the minuses, in 95% of cases, active cooling and to connect a conventional relay, you always have to use additional crutches.
Specialized Controllers- A great option if you need reliability and fault tolerance. The probability of failure of the industrial controller (with the right hands) approaches the probability of the appearance of a zombie apocalypse. But there is a minus, either those who have already automated several pipelines or the person in the brain of which is not neurons but relay circuits can program and configure. And most often their interface is, to put it mildly, ascetic. Unfortunately, I'm not so smart, so this option is definitely not for me.
And here we come to the most modern option - these are cheap single-board computers based on ARM architecture. Now their choice is simply huge, but the most popular founder of Raspberri pi. From the advantages of low power consumption, there are user-friendly conclusions and satisfactory performance for running simple programs.
There are many more exotic options for automating your hearth, for example, an alarm bed at the World Exhibition in 1851 (inventor Theophile Carter). Or your favorite perversion is arduino with shields (forgive my forgiveness for a frivolous meme)

2. External sensors, controllers, controls.
This topic is so vast that it is not possible to describe all the diversity in this article, so let us leave it for future articles. In short, there are:
- DIY solutions and arduino-like solutions
- Chinese solutions (Sonoff example)
- Expensive beautiful solutions (nest example)
3. Software
We will also bring this discussion into a separate topic. Today we will consider only one of the many open platforms. Reviews will still be. I’ll immediately answer the questions of why it is:
a) A huge number of supported services,
b) Easy and free to install,
c) Nice interface.
4. Third-party services
Help connect various existing solutions and automate actions on smartphones and PCs. Typical IFTTT example .
What if I can’t program or I have money?
Separately, there are solutions of modern ecosystems from Samsung , Xiaomi , Amazon , Apple , Googleetc. I agree that sometimes their decisions look much more beautiful, but the average salary of a Russian person is about $ 500, which does not allow you to feel the whole gamut of tastes.
So let's go!
Recommended for purchase:
1. Raspberry Pi 3 (older ones will probably work) 35 $
2. MicroSD 16GB not lower than grade 10 (the faster the better) with an adapter for your computer 7 $
3. MicroUSB charger 5V and more than 2A $ 0 (came up from the old phone)
4. Your precious time. Priceless.
5. Optional monitor with HDMI
Let's install:
1. Download a convenient program for recording on a USB flash drive. I recommend the portable version
2. Go to the siteand download the latest version of Hassbian
3. Unzip the main image to any folder.
4. Open Etcher
5. Choose our main image
6. Choose our flash drive for recording
7. Press the start button
8. ???
9. Profit
After recording, remove the USB flash drive and insert it into the peepberry pe.
MANDATORY NECESSARY TO INSTALL INTERNET CORD IN MALINA
When power is applied, the red light should light up and the green light will start to flash randomly. We are waiting with a mug of tea for 10 minutes.
After that, we need to find the web interface of our smart home system. There are several ways to do this:
1) Look through hdmi our command line and find there an IP of the form 192.168.1.x (or any other)
2) look at the settings of the router which DHCP server assigned the address to the new device
3) Use a network scanner (for example, Advanced IP Scanner Portable )
After that, open a browser (not a program for downloading browsers, namely a browser)
And enter our IP +: 8123 (at me it is 192.168.1.101:8123 )
And voila! Our system has booted!

Everything is well described on the official website (but in English), so if I ’m interested, I can write a few examples of how to do this in real life.
I recorded all the steps on the video, so do not be shy and go to the video.
Dear readers, write in the comments what else I really want to see?
Thanks for attention!
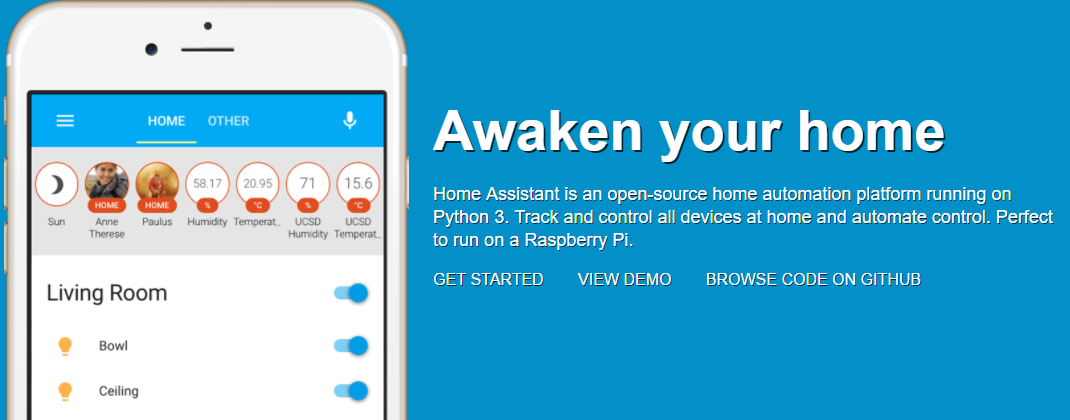
Home Assistant is an open-source automation platform that runs on Python 3. Allows you to track and control all the devices in the house and automate actions. It can work ideally on a single-board Raspberry PI computer.
→ View demo
What is a smart home can be read on Wikipedia here and here .
Let's take it in order:
1. Central core A
smart home needs a central controller (hub, server, etc.). This is the link between all the elements of a smart home and the user. There are distributed systems without a central controller, but you still need one information collector that will show the user all the latest news from each PC device
-excellent option if you need a large load on the server, because even older laptops will have enough performance (only if you don’t watch 4K video or use 10 cameras with HEVC encoding). Of the minuses, in 95% of cases, active cooling and to connect a conventional relay, you always have to use additional crutches.
Specialized Controllers- A great option if you need reliability and fault tolerance. The probability of failure of the industrial controller (with the right hands) approaches the probability of the appearance of a zombie apocalypse. But there is a minus, either those who have already automated several pipelines or the person in the brain of which is not neurons but relay circuits can program and configure. And most often their interface is, to put it mildly, ascetic. Unfortunately, I'm not so smart, so this option is definitely not for me.
And here we come to the most modern option - these are cheap single-board computers based on ARM architecture. Now their choice is simply huge, but the most popular founder of Raspberri pi. From the advantages of low power consumption, there are user-friendly conclusions and satisfactory performance for running simple programs.
There are many more exotic options for automating your hearth, for example, an alarm bed at the World Exhibition in 1851 (inventor Theophile Carter). Or your favorite perversion is arduino with shields (forgive my forgiveness for a frivolous meme)
2. External sensors, controllers, controls.
This topic is so vast that it is not possible to describe all the diversity in this article, so let us leave it for future articles. In short, there are:
- DIY solutions and arduino-like solutions
- Chinese solutions (Sonoff example)
- Expensive beautiful solutions (nest example)
3. Software
We will also bring this discussion into a separate topic. Today we will consider only one of the many open platforms. Reviews will still be. I’ll immediately answer the questions of why it is:
a) A huge number of supported services,
b) Easy and free to install,
c) Nice interface.
4. Third-party services
Help connect various existing solutions and automate actions on smartphones and PCs. Typical IFTTT example .
What if I can’t program or I have money?
Separately, there are solutions of modern ecosystems from Samsung , Xiaomi , Amazon , Apple , Googleetc. I agree that sometimes their decisions look much more beautiful, but the average salary of a Russian person is about $ 500, which does not allow you to feel the whole gamut of tastes.
So let's go!
Recommended for purchase:
1. Raspberry Pi 3 (older ones will probably work) 35 $
2. MicroSD 16GB not lower than grade 10 (the faster the better) with an adapter for your computer 7 $
3. MicroUSB charger 5V and more than 2A $ 0 (came up from the old phone)
4. Your precious time. Priceless.
5. Optional monitor with HDMI
Let's install:
1. Download a convenient program for recording on a USB flash drive. I recommend the portable version
2. Go to the siteand download the latest version of Hassbian
3. Unzip the main image to any folder.
4. Open Etcher
5. Choose our main image
6. Choose our flash drive for recording
7. Press the start button
8. ???
9. Profit
After recording, remove the USB flash drive and insert it into the peepberry pe.
MANDATORY NECESSARY TO INSTALL INTERNET CORD IN MALINA
When power is applied, the red light should light up and the green light will start to flash randomly. We are waiting with a mug of tea for 10 minutes.
After that, we need to find the web interface of our smart home system. There are several ways to do this:
1) Look through hdmi our command line and find there an IP of the form 192.168.1.x (or any other)
2) look at the settings of the router which DHCP server assigned the address to the new device
3) Use a network scanner (for example, Advanced IP Scanner Portable )
After that, open a browser (not a program for downloading browsers, namely a browser)
And enter our IP +: 8123 (at me it is 192.168.1.101:8123 )
And voila! Our system has booted!
Everything is well described on the official website (but in English), so if I ’m interested, I can write a few examples of how to do this in real life.
I recorded all the steps on the video, so do not be shy and go to the video.
Dear readers, write in the comments what else I really want to see?
Thanks for attention!