From installing AWX to launching your first playbook - setting up Ansible centralized management
- Tutorial

The number of servers in our infrastructure has already exceeded 800, although a year ago there were about 500 of them . To work with this, everyone is actively using solutions from Red Hat. About FreeIPA - for organizing and managing access for Linux-servers - we already wrote , now I want to touch on the topic of configuration management. For these purposes, we use Ansible, and more recently, AWX was added to it - a solution presented six months ago for centralized management of playbooks, their launch schedules, inventory management, credentials for accessing servers, as well as callbacks for requesting configurations with server side.
Due to a number of things, we were not able to immediately integrate it to work with our main War Robots project, but there were plenty of fields for checking AWX. Firstly, the company is developing new projects that need dev / stage environments and, of course, production environments in the future. And recently, a project for internal analytics was added to this, which required a completely new cluster.
So, let's begin!
AWX was introduced in September 2017 - this is a free open source project, distributed under the Apache-2.0 license and is an upstream for the commercial project Ansible Tower . In general, this is the same principle as other Red Hat projects: Red Hat Cloud Forms - ManageIQ; RHEV - Ovirt; Red Hat Identify Managment - FreeIPA and so on.
This article is a guide - from installing AWX to launching the first playbook. But first, let's list the main features of AWX:
- Integration with version control systems (git / mercurial / subversion).
- Tracking the status of the playbooks in real time.
- Schedule setting for automatic launch of playbooks.
- Running multiple playbooks in a single workflow.
- Remote execution of commands without playbooks (Ansible ad hoc).
- Support for callbacks, allowing new servers to request configurations for their part.
- Inventory management for the ensemble, including the ability to integrate with AWS / Azure / OpenStack platforms, etc., as well as support for native scripts for generating Dynamic Inventory.
- Flexible system of access rights differentiation. Integration with LDAP / SAML / Active Directory, etc.
- Native notification support for Email / Slack / PagerDuty / HipChat / MatterMost / IRC.
- Integration with external log aggregation systems: Logstash / Splunk / Loggly / Sumologic.
Installation
Currently, several installation options are supported:
- Kubernetes.
- Openshift.
- Docker / Docker Compose.
All of them are described in the documentation on GitHub , and for example, consider the option with pure Docker, since this is the fastest option that does not require additional configuration of OpenShift / Kubernetes.
We will install everything on Centos 7. The installation of Docker is also described in the official documentation , so we will not touch it in the article.
Next we need to install ansible and the docker-py module. This can be done from pip:
pip install ansible
pip install docker-py
Clone the AWX repository:
git clone https://github.com/ansible/awx.git
cd awx/installer
Edit the inventory file. First of all, I recommend correcting the variable postgres_data_dir. By default, it is equal to / tmp / pgdocker, but if you leave it like this, after a while you can lose the postgresql database that AWX uses.
If you want to use an external database, specify the variables:
pg_hostname
pg_username
pg_password
pg_database
pg_port
After that, run:
ansible-playbook -i inventory install.ymlThis command will start the playbook, which will load the desired docker-images and launch the containers directly with AWX and additional components: Postgres, MemCached, RabbitMQ.
After completing the playbook, we should see the following containers:
docker ps
CONTAINER ID        IMAGE                     COMMAND                  CREATED             STATUS              PORTS                                NAMES
b1bd94f83420        ansible/awx_task:latest   "/tini -- /bin/sh ..."   6 days ago          Up 6 days           8052/tcp                             awx_task
abf30fd81335        ansible/awx_web:latest    "/tini -- /bin/sh ..."   6 days ago          Up 6 days           0.0.0.0:80->8052/tcp                 awx_web
b13ee3c7cbb7        memcached:alpine          "docker-entrypoint..."   2 months ago        Up 6 days           11211/tcp                            memcached
3c4cac5a4ce5        rabbitmq:3                "docker-entrypoint..."   2 months ago        Up 6 days           4369/tcp, 5671-5672/tcp, 25672/tcp   rabbitmq
b717c6019e02        postgres:9.6              "docker-entrypoint..."   2 months ago        Up 6 days           5432/tcp                             postgres
Follow the AWX installation process as follows:
docker logs -f awx_taskAWX will be available at the server address on port 80 (if you have not changed the port in the inventory file).
Default username and password:
Admin:passwordUsage and Examples
Now we’ll go directly to AWX, but first we’ll take a look at how everything is organized.
First of all, we are interested in the Projects section. Projects in AWX terminology means a set of playbooks that are located locally on the AWX server or in the repository.
Let's create our first Project:
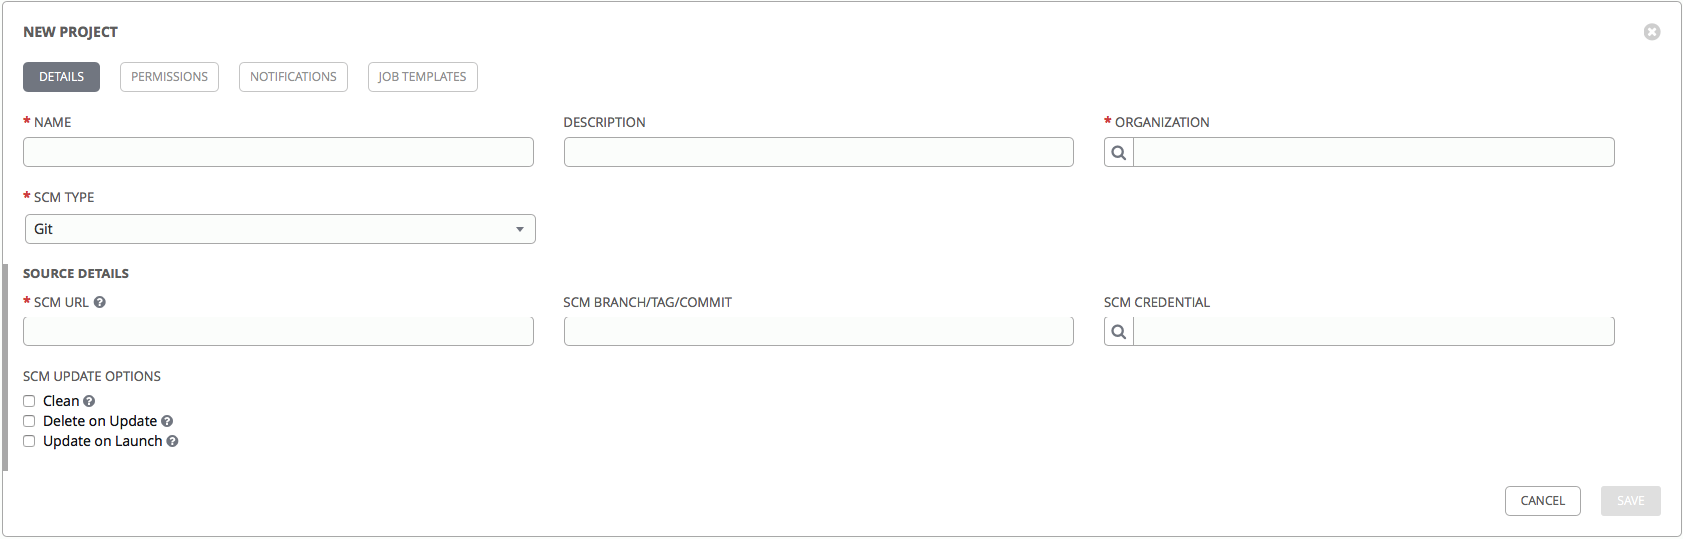
- Name: the name of the project, let it be firstproject.
- Organization: in AWX, this is an entity that is used to control access. Organization may include inventories, users, user groups, playbooks. Choose Default.
- SCM TYPE: type of repository, it can be either a local directory or one of the version control systems to choose from: git, mercurial, subversion.
- SCM Url: url for the repository.
- SCM branch / tag / commit: optionally, you can specify the required branch / tag / commit.
- In the SCM credentials field, you can select the details that will be used to access the repository.
You can also tick off the checkboxes:
- Clean: delete all local changes before updating.
- Delete on Update: when updating Project, delete the local copy and reload the new copy of the repository.
- Update on Launch: every time you start a playbook from this Project, update the local copy of the repository to the current version. It can be used in conjunction with Delete on Update, but this can lead to a longer playbook execution, since each time you will need to wait for the end of synchronization with the repository.
Choose Clean and Update on Launch. Click Save and after that the creation of our first Project has been completed.
Let's go to the Projects section and for our Project, click on the Start an scm update button. We will wait until the first download of our repository is completed (you can monitor the status of the update in the Jobs section).
Let's look at the playbook that is in our repository. There are a lot of articles on Habré that talk about Ansible and the structure of its playbooks / roles, so we won’t describe this point in detail (here are a few articles for example: 1 , 2 , 3 ).
firstproject/
├── ansible.cfg
├── group_vars/
├── host_vars/
├── roles/
│   └── requirements.yml
└── run.yml
AWX treats .yml files located in the root of the firstproject directory as playbooks.
The contents of the run.yml file:
---
  - name: Test Role
    hosts:
      - all
    gather_facts: true
    roles:
      - roleawx
That is, we simply run roleawx, after collecting the facts. Hosts we specify all, since you can specify the hosts and group host in AWX itself.
The interesting point is the contents of the roles / requirements.yml file:
- src: git@gitlab.example.com:ansible-roles/roleawx.git
  scm: git
When synchronizing Project, AWX will install all the roles in the roles directory in accordance with the requirements.yml file. In this case, it will install the roleawx role from the git repository.
Create a role using the command:
ansible-galaxy init roleawxThe structure of the role will be as follows:
roleawx/
├── README.md
├── defaults
│   └── main.yml
├── files
├── handlers
│   └── main.yml
├── meta
│   └── main.yml
├── tasks
│   └── main.yml
├── templates
├── tests
│   ├── inventory
│   └── test.yml
└── vars
    └── main.yml
The contents of the tasks / main.yml file:
---
# tasks file for roleawx
  - name: Test Message
    debug:
      msg: "AWX and Ansible"
To get started, simply display the message “AWX and Ansible”.
Please note that in order for AWX to automatically install the roles specified in the requirements.yml file, the meta / main.yml file must be correctly generated in the role itself (if you created a template for the role using ansible-galaxy init, then with meta / main .yml is fine and AWX will be able to load this role).
So, we have a repository with a playbook, we have a repository with a role. And also we have several virtual machines with addresses 192.168.10.233, 192.168.10.234 and 192.168.10.239.
Before starting our playbook, we need to make sure that Ansible can get from our AWX server to our hosts (in our case, via SSH). We can specify passwords directly in the variables inside the playbook, but this is not interesting. AWX can manage the details of access to the servers and we will use it.
We’ll go to the Credentials tab and click the Add button:
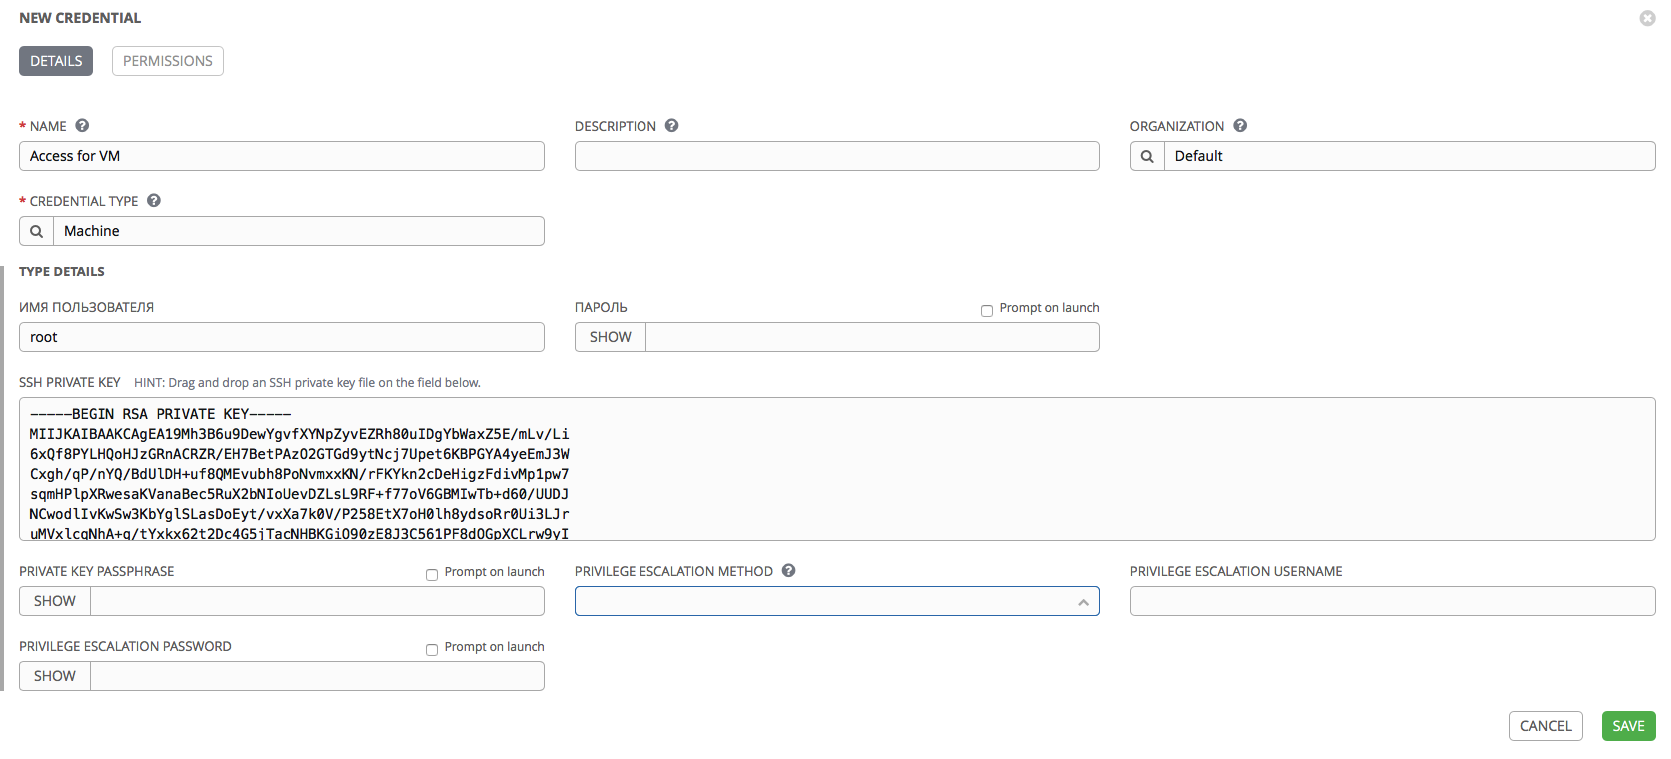
- Name: we’ll indicate the name for our details.
- Credential Type: here you can select the type of details. We are interested in Machine to use them to access our servers. In addition, AWX offers many different types of access details that can be used to integrate with various services, such as scm (git, svn, mercurial), Red Hat Insight, AWS, Azure, Red Hat Satellite, RHEV, Vmware, OpenStack. You can also create your own types of credentials.
- Username: choose root.
- Password: leave blank, as we will use key access.
- PRIVATE KEY PASSPHRASE: password for the key, if the key is created with a password. In our case, the key is without a password, so we leave the field blank.
- PRIVILEGE ESCALATION METHOD: privilege escalation method. For example: sudo, su, pfexec, etc.
- PRIVILEGE ESCALATION USERNAME: the user under which Ansible should receive privileges.
- PRIVILEGE ESCALATION PASSWORD: password for privilege escalation.
Leave the fields related to privilege escalation empty, as we will log in as root.
Please note: a number of fields have a Prompt on launch checkbox. When this checkbox is activated, the corresponding field will be offered to be filled in manually each time the playbook is started, with which these details are associated. Thus, you can not save the password inside AWX, but request it every time you start the playbook.
So, we have created Project and details for access to servers. Now we need Inventory.
Go to the Inventory section, click the Add button. The choice will be offered to create:
- Inventory: regular Inventory.
- Smart Inventory: allows you to generate inventory based on existing hosts, based on any parameters, for example, on the type of operating system.
Create a regular Inventory:
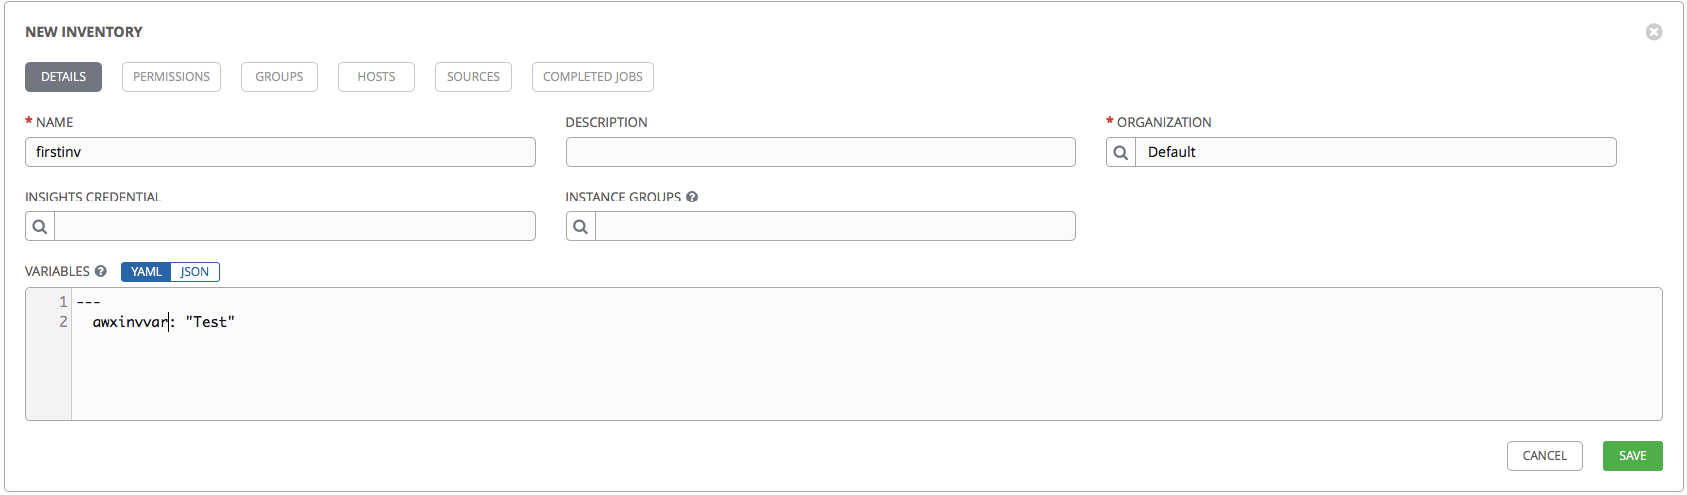
- In the Name field, specify the name.
- Select the Default Organization.
- In the Variables field, you can specify the variables that will later be available from the playbook.
We are trying to indicate:
---
  awxinvvar: "Test"
The remaining tabs are inactive until we save our Inventory.
Save and return to the Inventory section. Our Inventory has appeared on the list. Let's go into it: after creating the upper tabs have become active.
- Permissions: This controls which users or user groups have access to Inventory.
- Groups: a list of host groups.
- Hosts: a list of hosts.
- Sources: list of sources for Inventory. You can unload inventories from AWS / Azure / OpenStack / RHEV and a number of services, you can specify the inventory file that is inside our Project, or you can specify your own script that Dynamic Inventory generates as a source.
- Completed Jobs: a list of running playbooks associated with hosts from the current Inventory.
We fill our Inventory with our hands, as we have few hosts. Go to the Hosts tab and create several hosts:
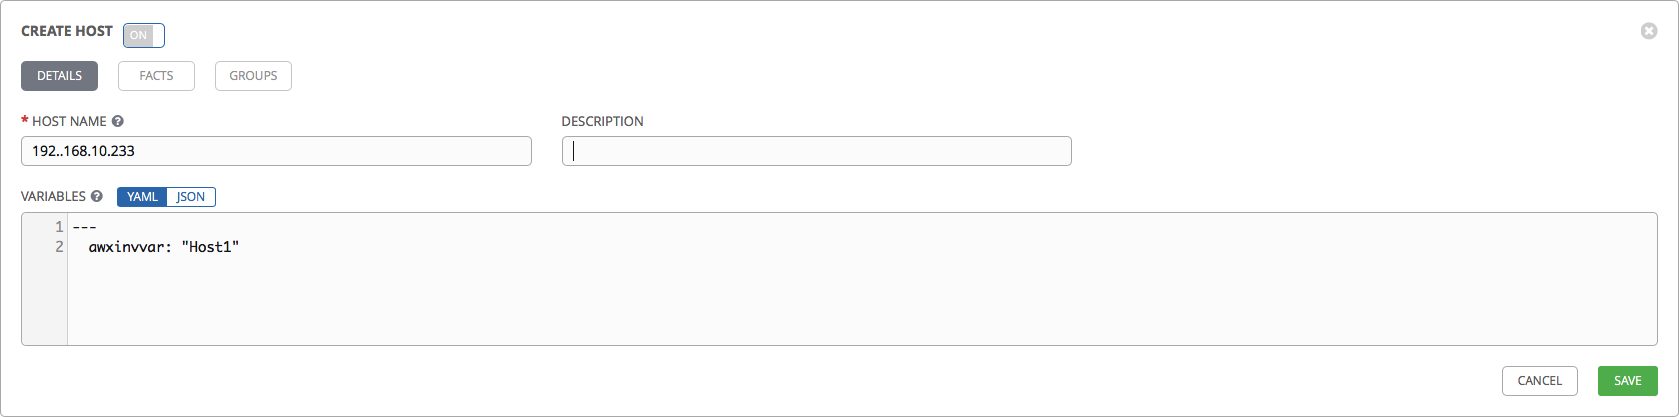
- In the Host Name field, you can specify the IP address of the server or its DNS name.
- In the Variables field, try to override the awxinvvar variable for one of our hosts:
---
  awxinvvar: "Host1"
After creating the hosts, go to the Groups tab and create groups for our hosts:
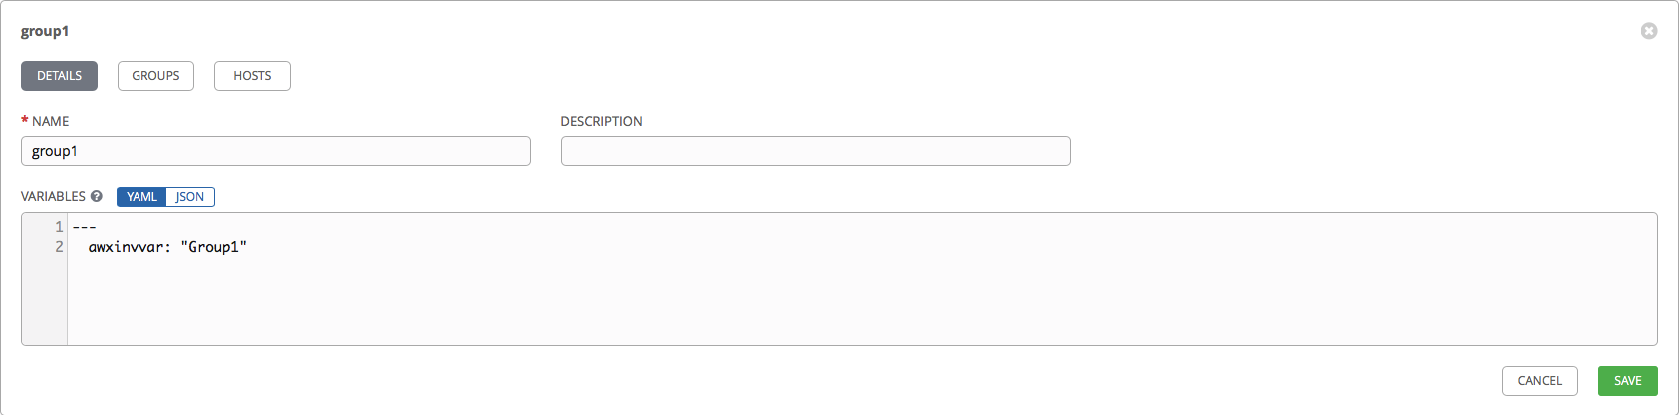
In the same way, specify the group name and redefine the awxinvvar variable for one of the groups.
We return to the Hosts tab, select one of the hosts from the list, go to the Groups tab for this host and click Associate Group:
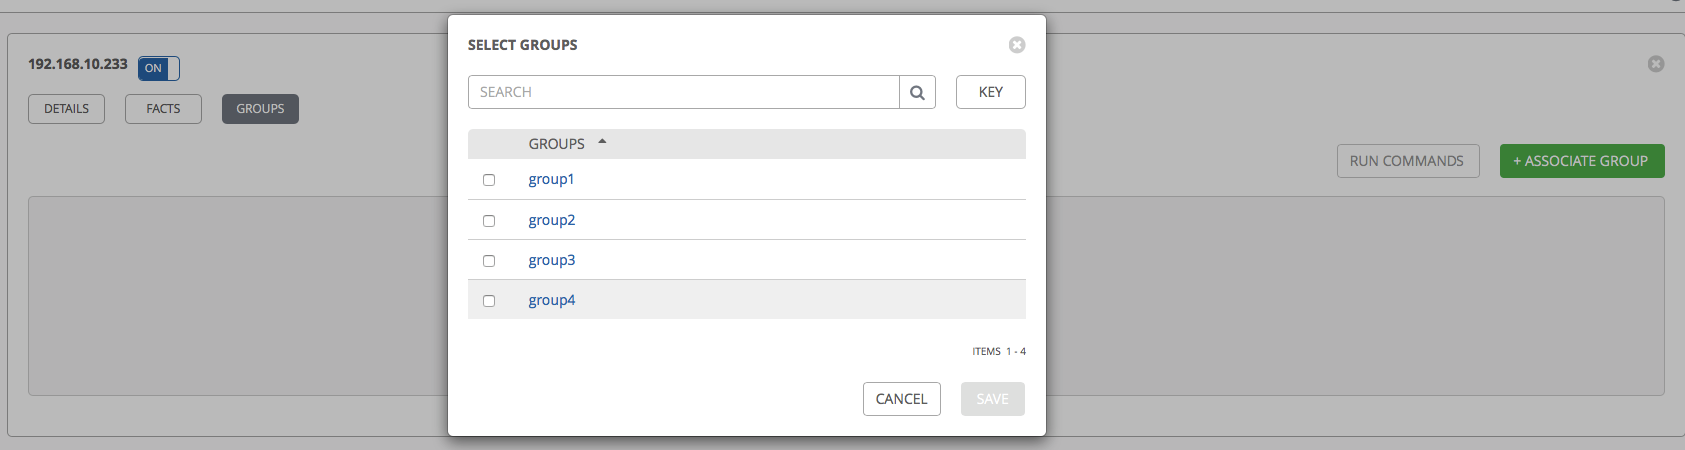
On the Hosts tab, you can now see which groups each of the hosts consists of:

By the way, the Run button is also available on the Hosts and Groups tabs command. This is an analogue of the ad-hoc commands in Ansible, which allow you to perform actions on remote hosts without a playbook.
Let's try. We will choose our hosts from the list, select the key for access via SSH that we created earlier and try to execute the date command using the shell module:
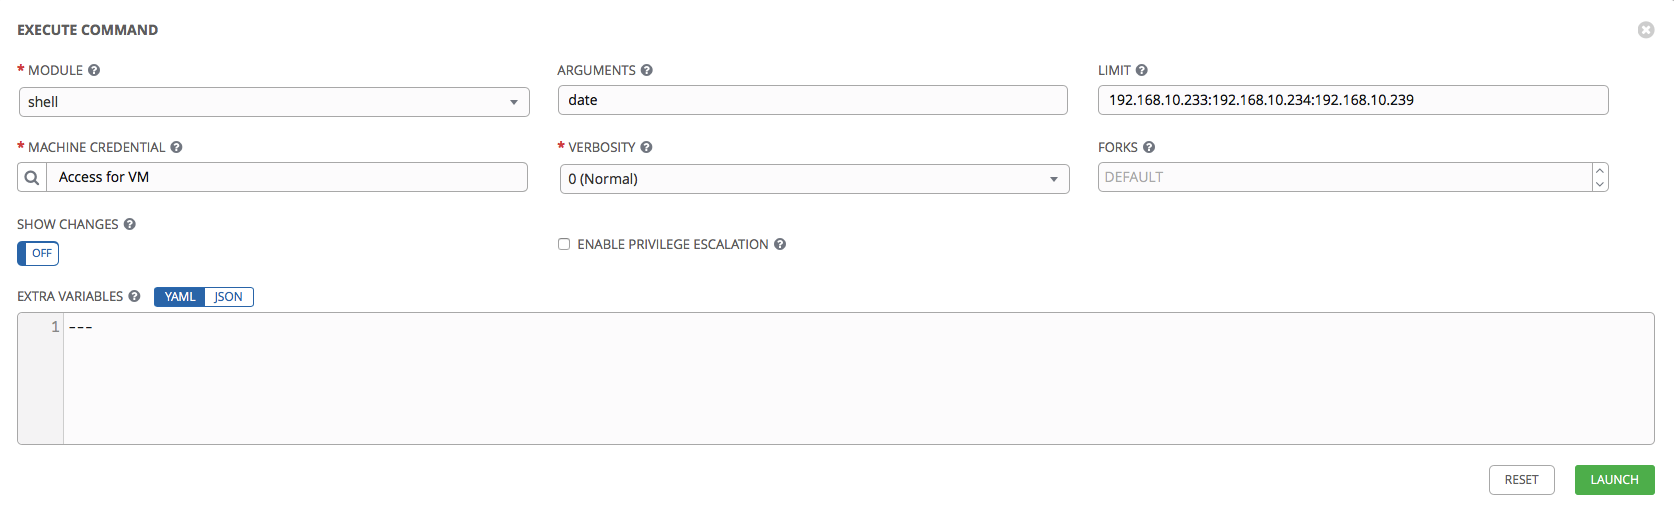
Click Launch. We should be thrown to a page on which we can monitor progress in real time. Also, all launches of playbooks / ad-hoc commands are visible in the Jobs section.
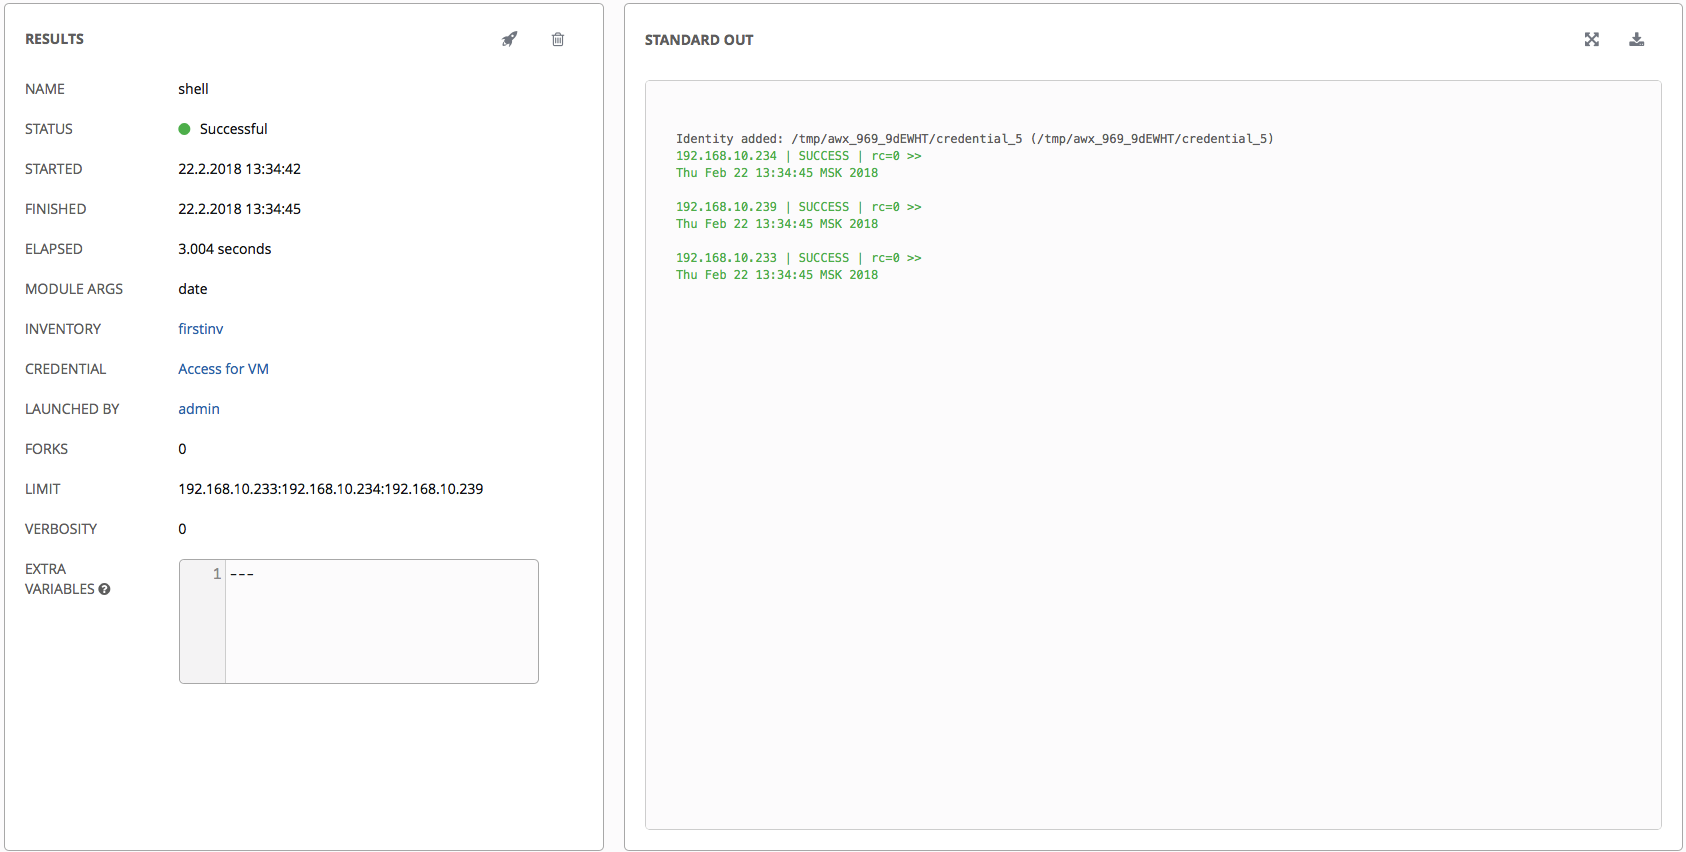
Our ad-hoc team completed successfully.
Let's now try to launch our playbook. Go to the Templates section, click the Add button, select Job Template.
In terminology, the AWX Template is a set of parameters that are used to launch a playbook. In a minimal form, you must specify the name of the template, select project, select playbook, select inventory.
The template creation looks like this:
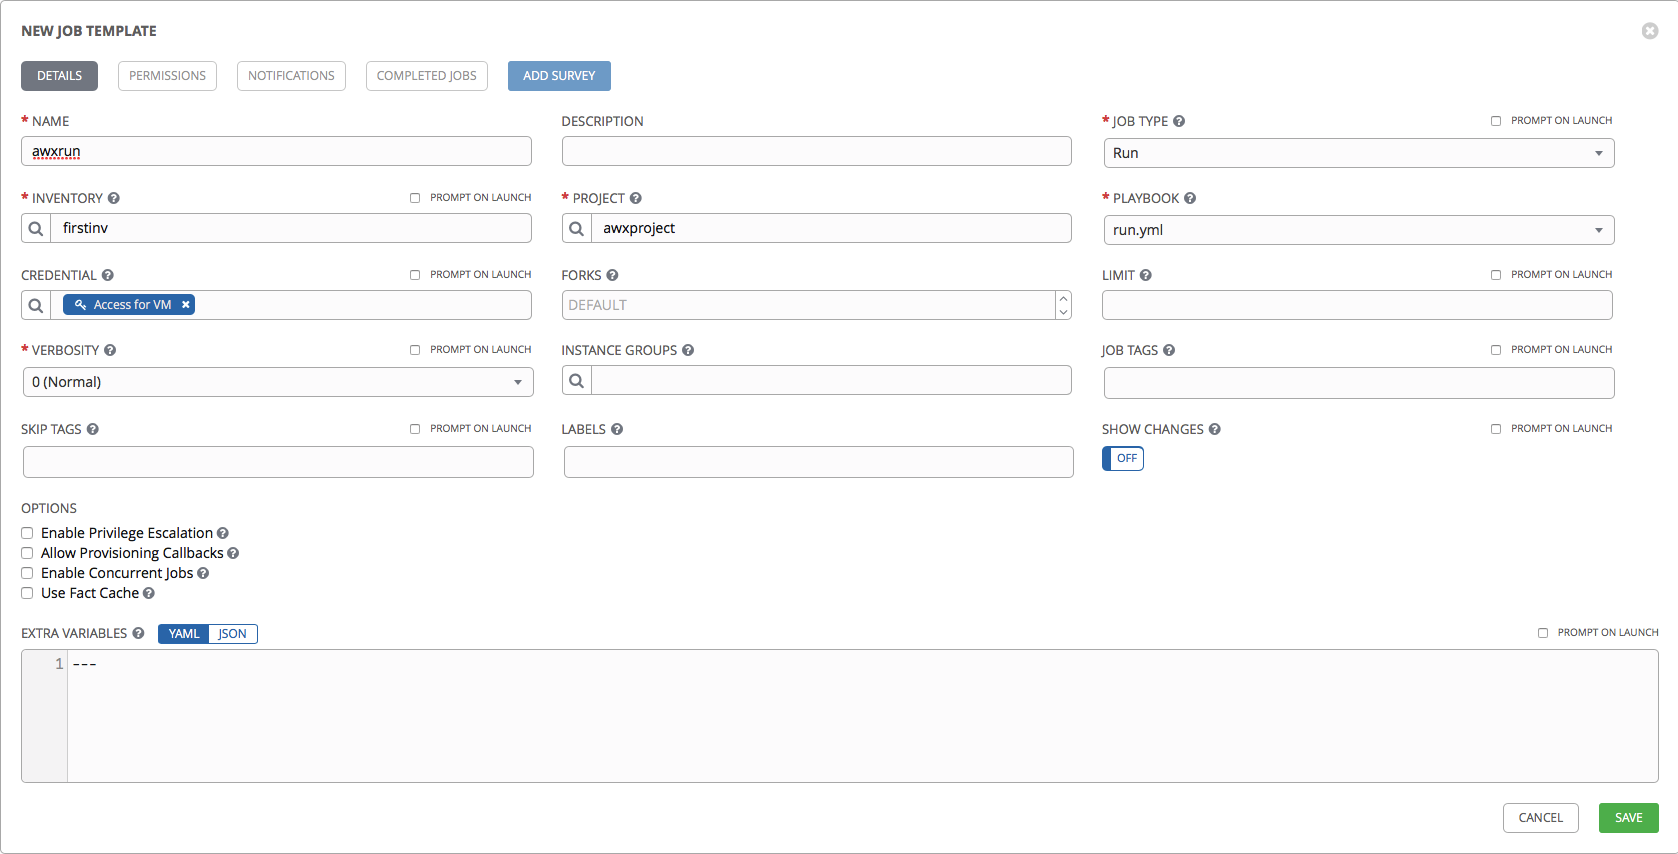
- Name and Description: the name and description of the template.
- Job Type: Run or Check. That is, starting a playbook or just checking a playbook (dry-run) without making changes.
- Inventory: Inventory with which the playbook will be launched.
- Project and Playbook: designed to select Project with playbooks and a specific playbook from Project.
- Limit: a list of hosts and groups on which the playbook will be launched.
- Verbosity: how much detail Ansible will output the result of the execution (analogue of the -v -vv -vvv switches).
- Job tags: list of tags - tasks that should be started. If not specified, all tasks described in the roles will be performed.
- Skip tags: list of tags - tasks that will not be performed.
- Labels: labels that will be associated with this template. Can be used for filtering in AWX itself.
- Show diff: show changes made by Ansible (analogue of the --diff key).
We save the project, return to the Templates section, and launch our playbook (button in the form of a rocket):
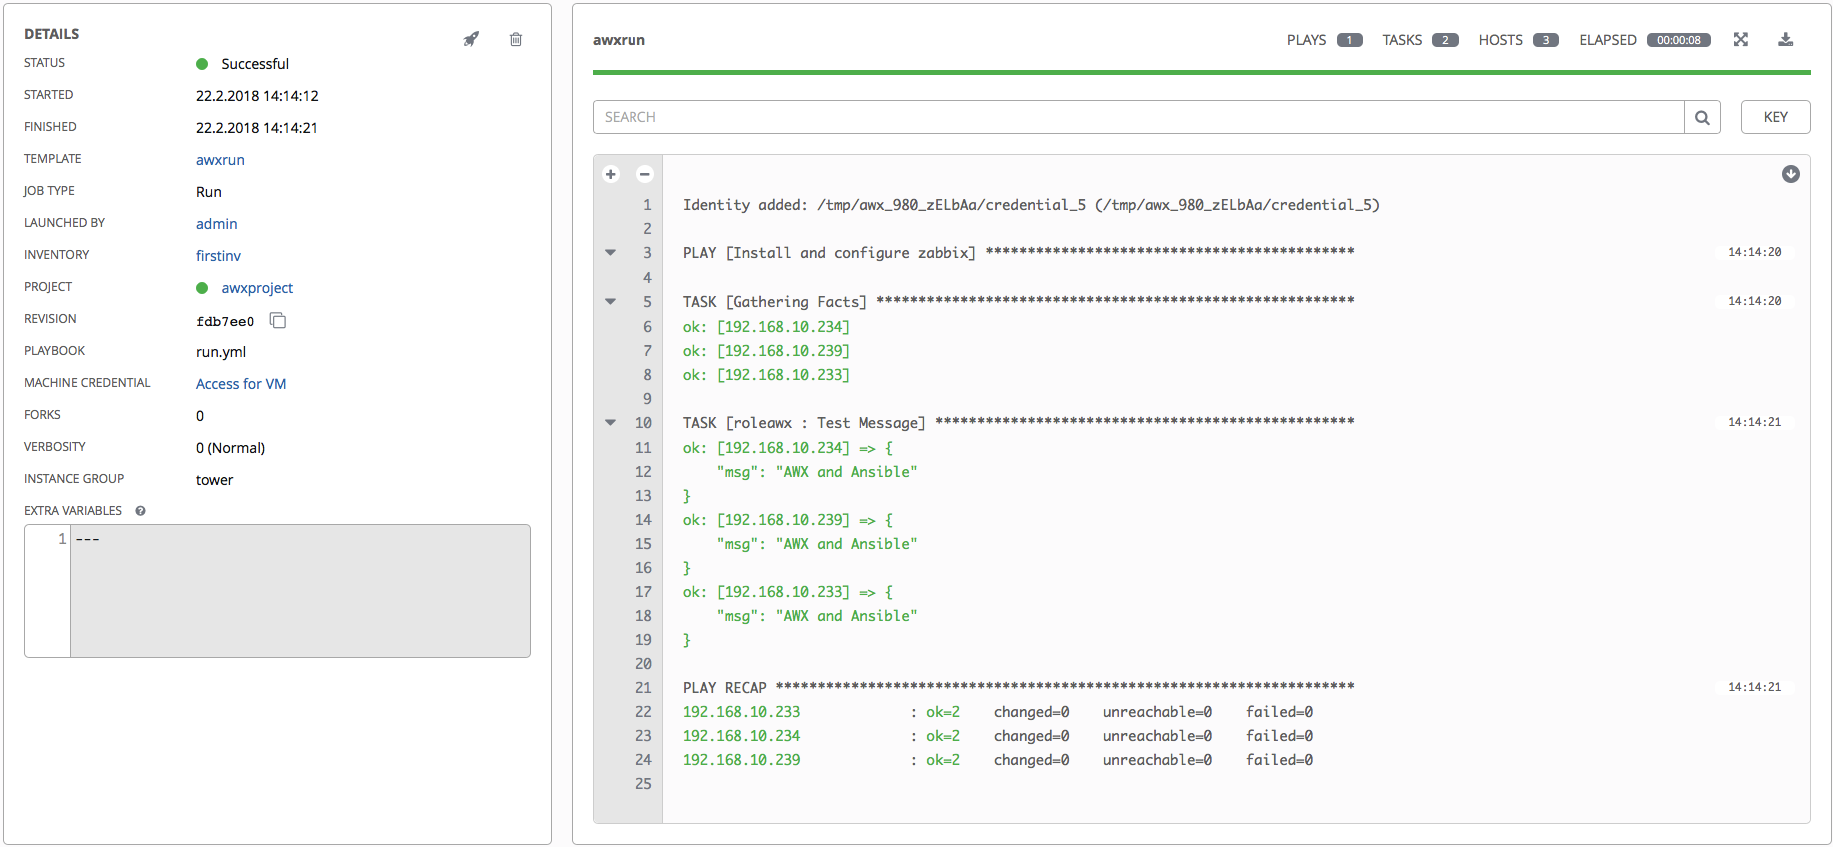
Hurray, our playbook started, loaded the necessary roles and successfully completed it. By the way, on the same page you can download the result of the playbook. It is also possible to search for the output of the playbook.
Remember we added the awxinvvar variable in several places? Let's try to bring her in and see what happens.
Add the following to our role in the tasks / main.yml file:
  - name: Print var
    debug:
      msg: "{{ awxinvvar }}"
And run our template again.
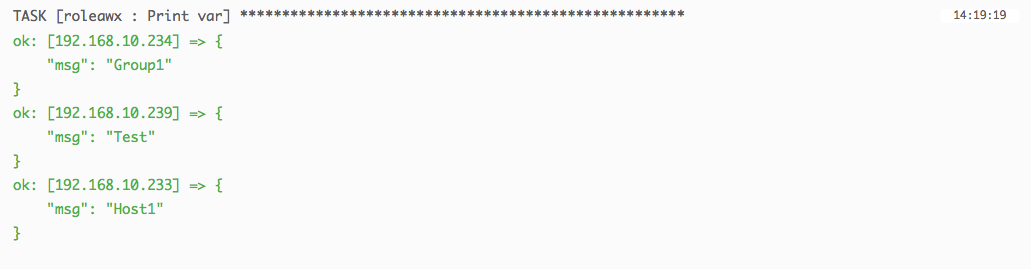
The playbook sees our variable, which we defined in Inventory and correctly redefines it in accordance with the priority of the use of variables .
Variables, by the way, can also be stored in the repository in the host_vars group_vars directories, if you prefer. True, in this case they will not be displayed in Inventory in AWX itself.
Instead of a conclusion
We have been using AWX for several months now and so far we are happy with everything. Of course, since this is a new project, we periodically encounter various kinds of problems (mainly minor bugs in the interface), but they are not critical and do not interfere with work.
Note: New releases are often released now and there may be problems updating. Make backups!
This guide is written to familiarize yourself with the basic functions of AWX, and if it is interesting, we will write about additional useful functionality, such as integration with sources for Dynamic Inventory, Callbacks, etc.
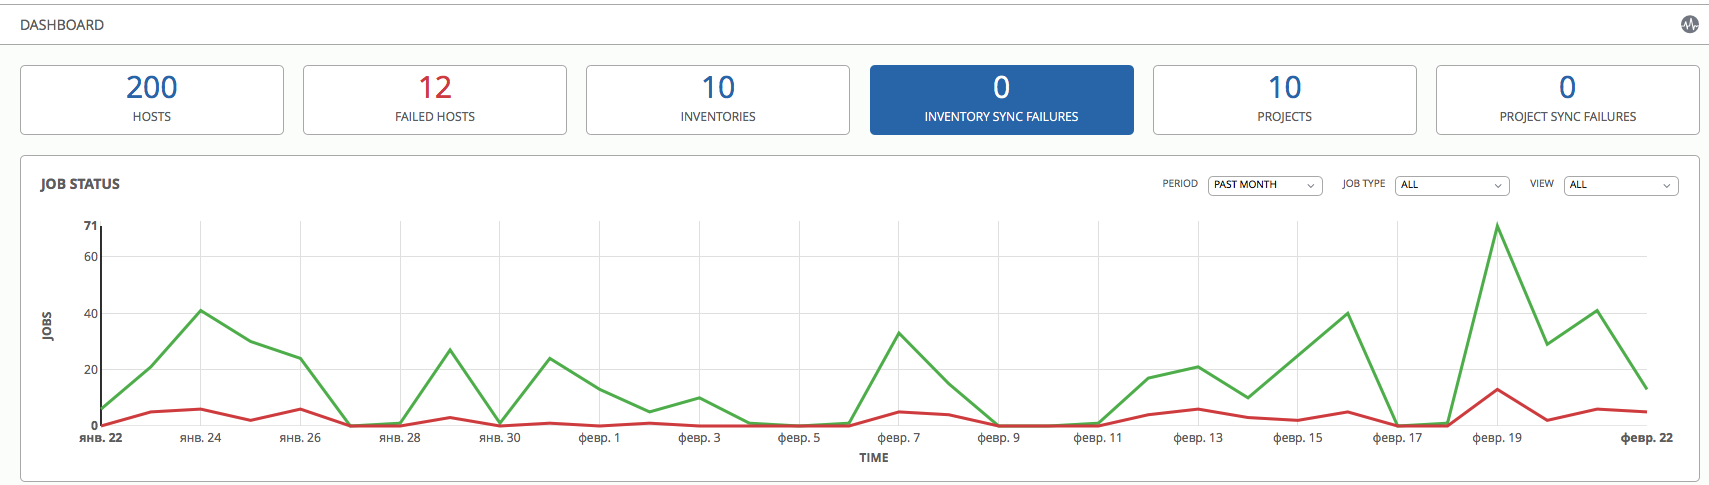
PS Here, by the way, looks like our AWX dashboard, which we use for part of the infrastructure: