Dragon Bones: 2D character creation and skeletal, mesh animation
- Tutorial
Good afternoon, reader! In this article, we’ll look at the development process of a typical character in our debut game Kidarian Adventures. I will demonstrate my usual structure of work, however, I will focus on creating animations in Dragon Bones, I will provide explanations and self-written video tutorials.

So, let's begin.
Ongoing task: Redesigning a morally obsolete model of a standard flying monster six months ago. The bat did not have time for our skill and became irrelevant within the framework of our chosen graphic style.

The model we are going to remake.
At a minimum, our task is initially slightly simplified: we don’t need to look for a concept for the character, but, nevertheless, the work will be carried out practically from scratch.
Among people producing graphic content, nothing is taken from scratch. I never believed those people who are sitting on a chair shouting: “Oh inspiration!”, And masterpieces begin to be painted.
And there are the simplest explanations for this: “Damn it, my mouse is so stupid because I don’t even know what bats look like! Without references, I just drew a balloon with wings! ”
So, we open Google and begin to be “inspired” by real bats, the structure of their bodies and faces. Let's analyze the structure using an example:
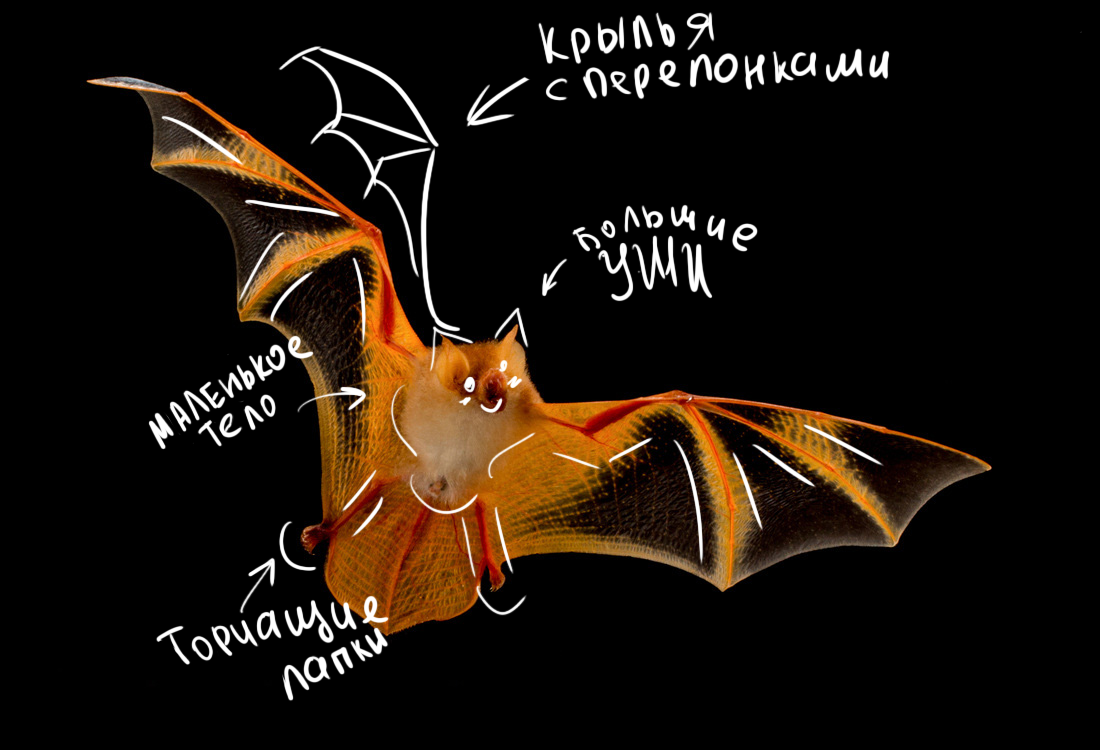
Determined with general forms and proportions. I begin to notice the features of the structure and fastening of the wings. The wings are a frame with stretched membranes. There are small legs and large ears. And if everything is clear with the body (although in the previous version I managed to draw the wings upside down), then with the face of the bats everything is much more complicated, and often they look well ... not very.

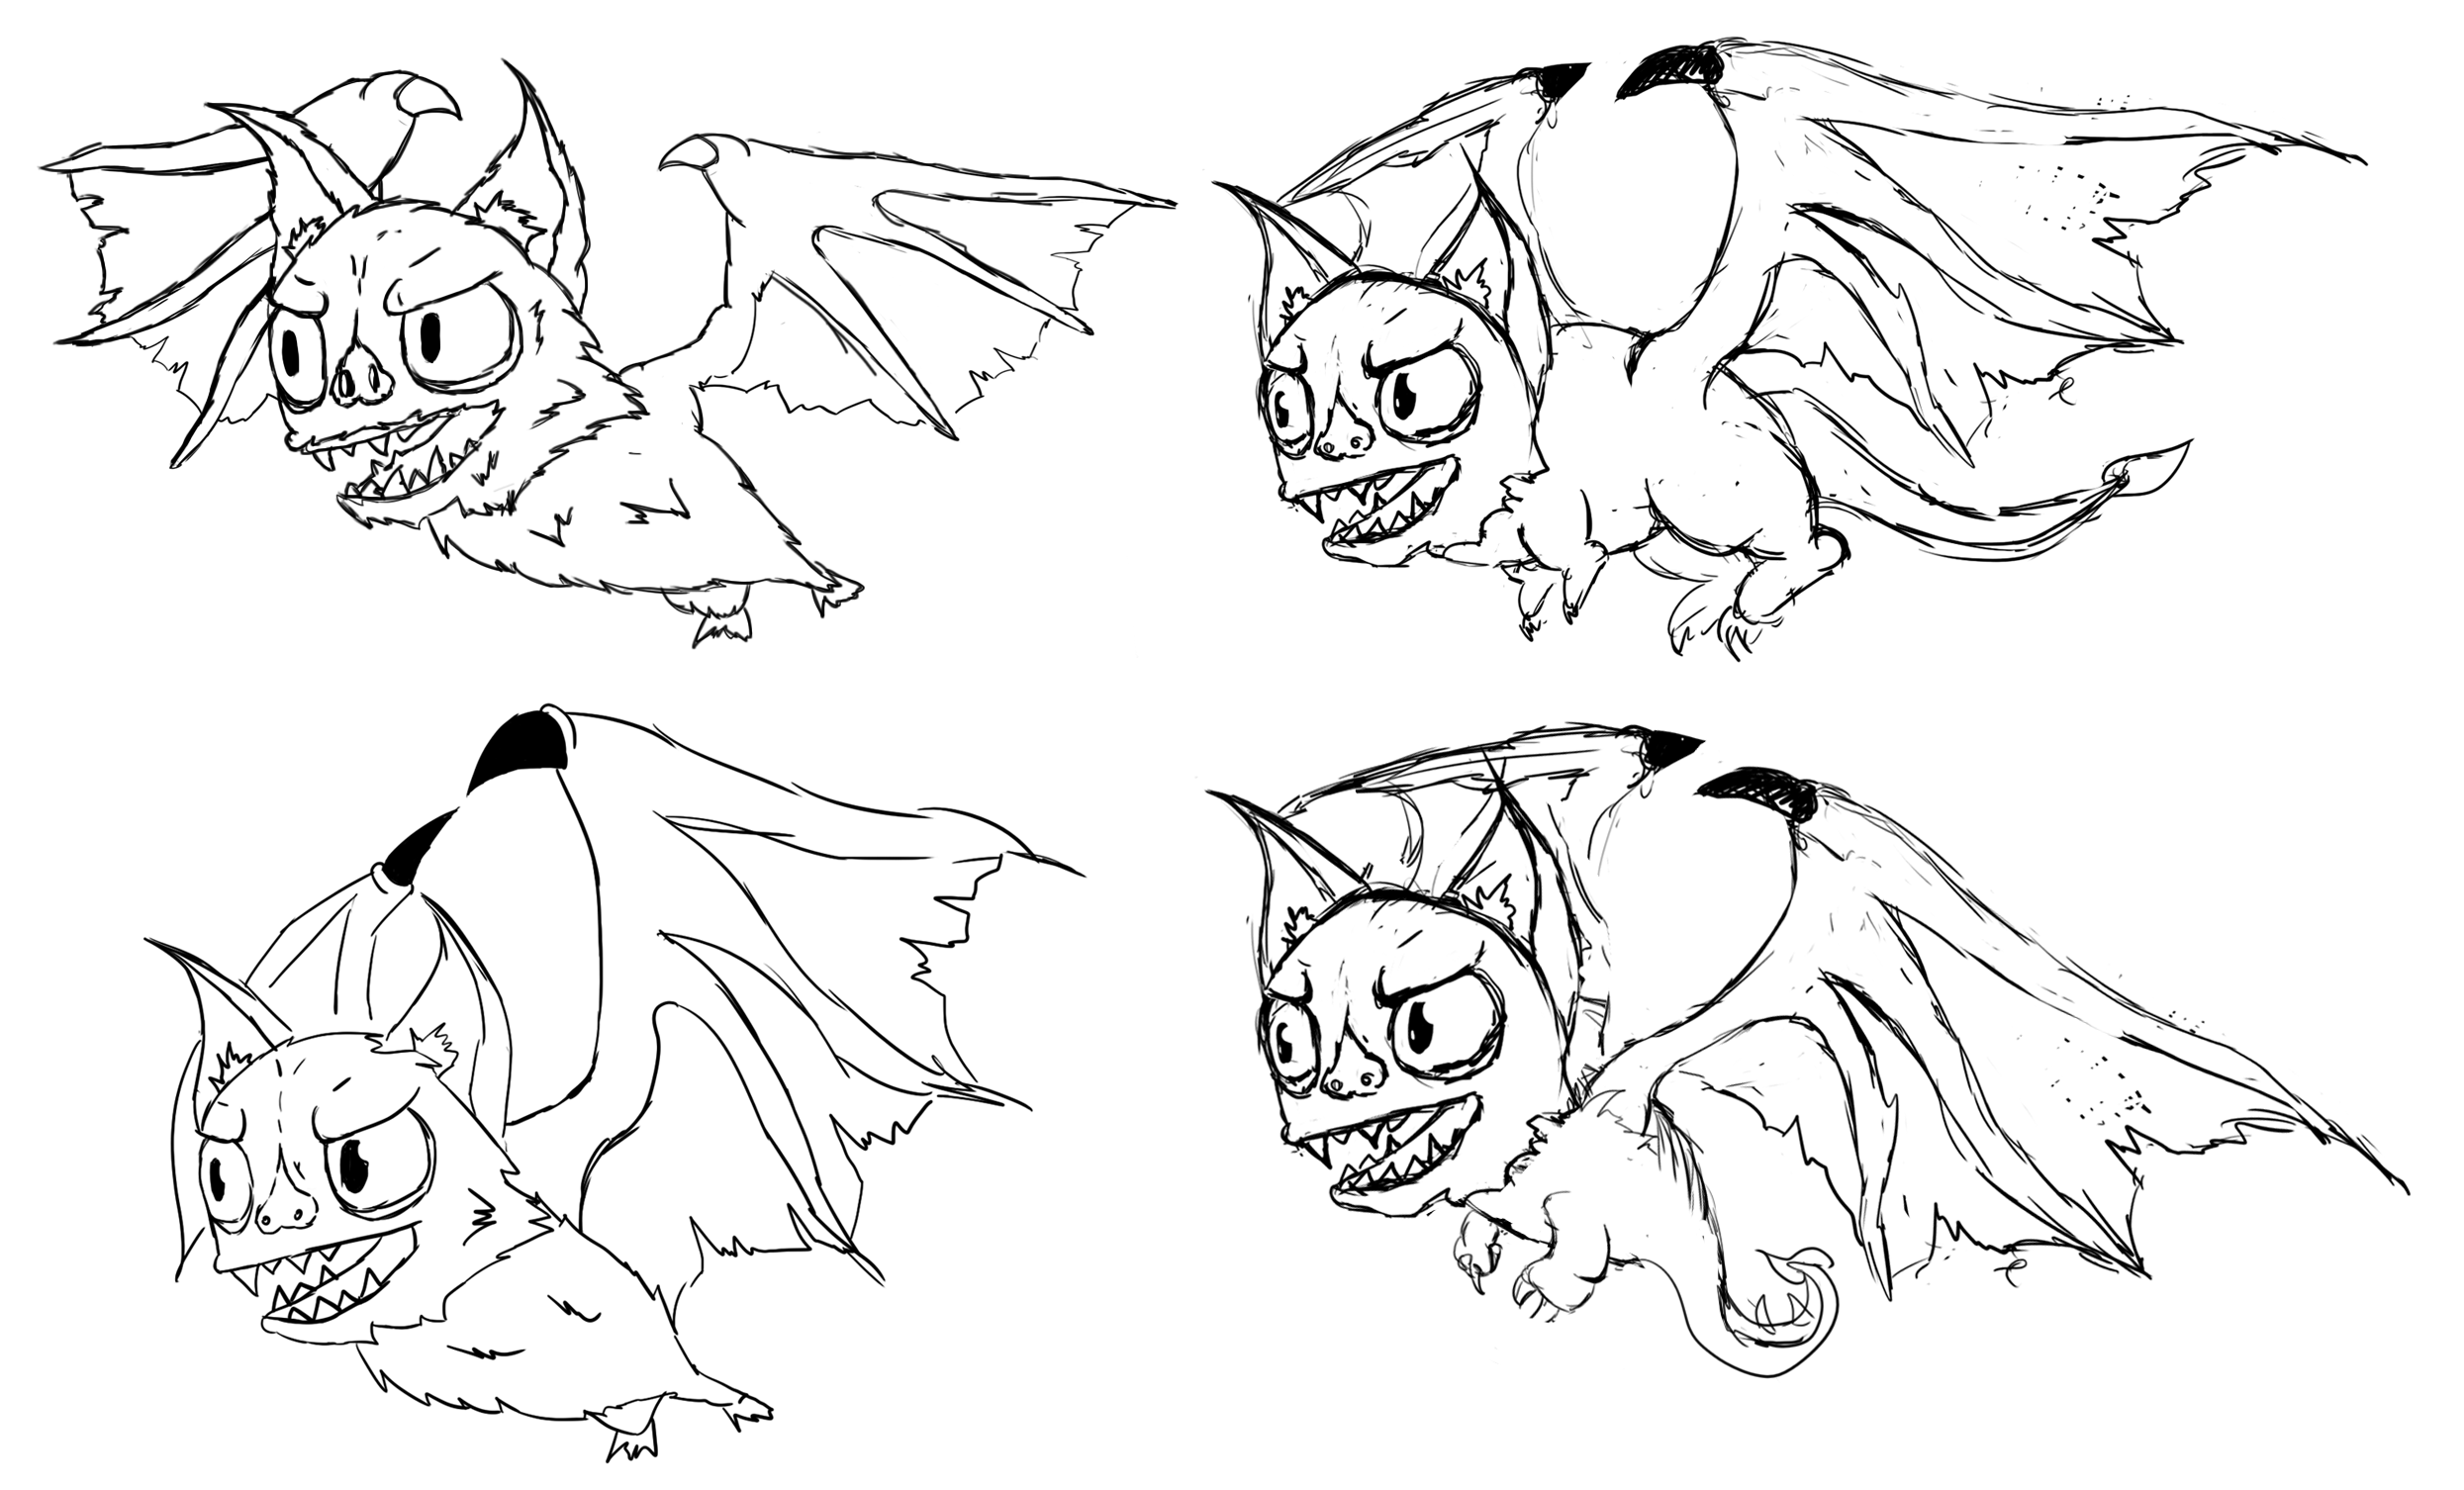
Once you have determined the correct anatomy, you can begin to visualize. I tried to use different forms of the body, giving them a slightly more grotesque appearance, like flying devils or large animals. As a result, I came to the conclusion to use the original plan with a small body, paws on the back and large wings.
Several working options

Short excerpt from the process
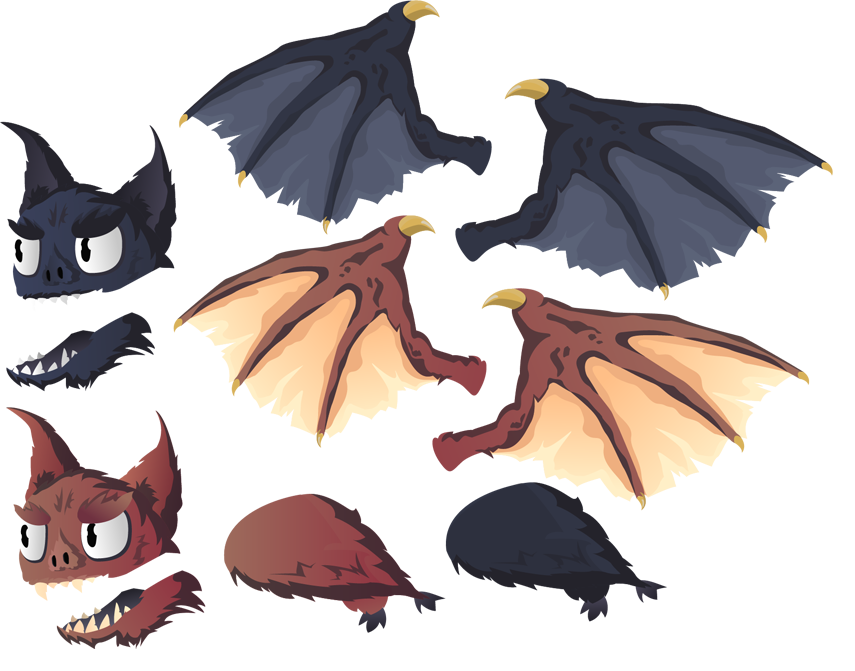
After sketching and approving the final result, I go to Adobe Illustrator. Images are drawn in a vector - this allows you to always easily set the desired size without loss of quality. It is worth noting that as a result I upload a bitmap image in .png format. As additional materials for different game levels, the bat will have two color schemes for different levels.

We will animate in Dragon Bones. This is a free Chinese analogue of Spine, which provides a clear interface and features of skeletal and mesh-animation. Dragon bones is free and can be downloaded from . site.
Unfortunately, now the community of this software is not very wide, and even in English there are not many tutorials, basically all the information is in Chinese.
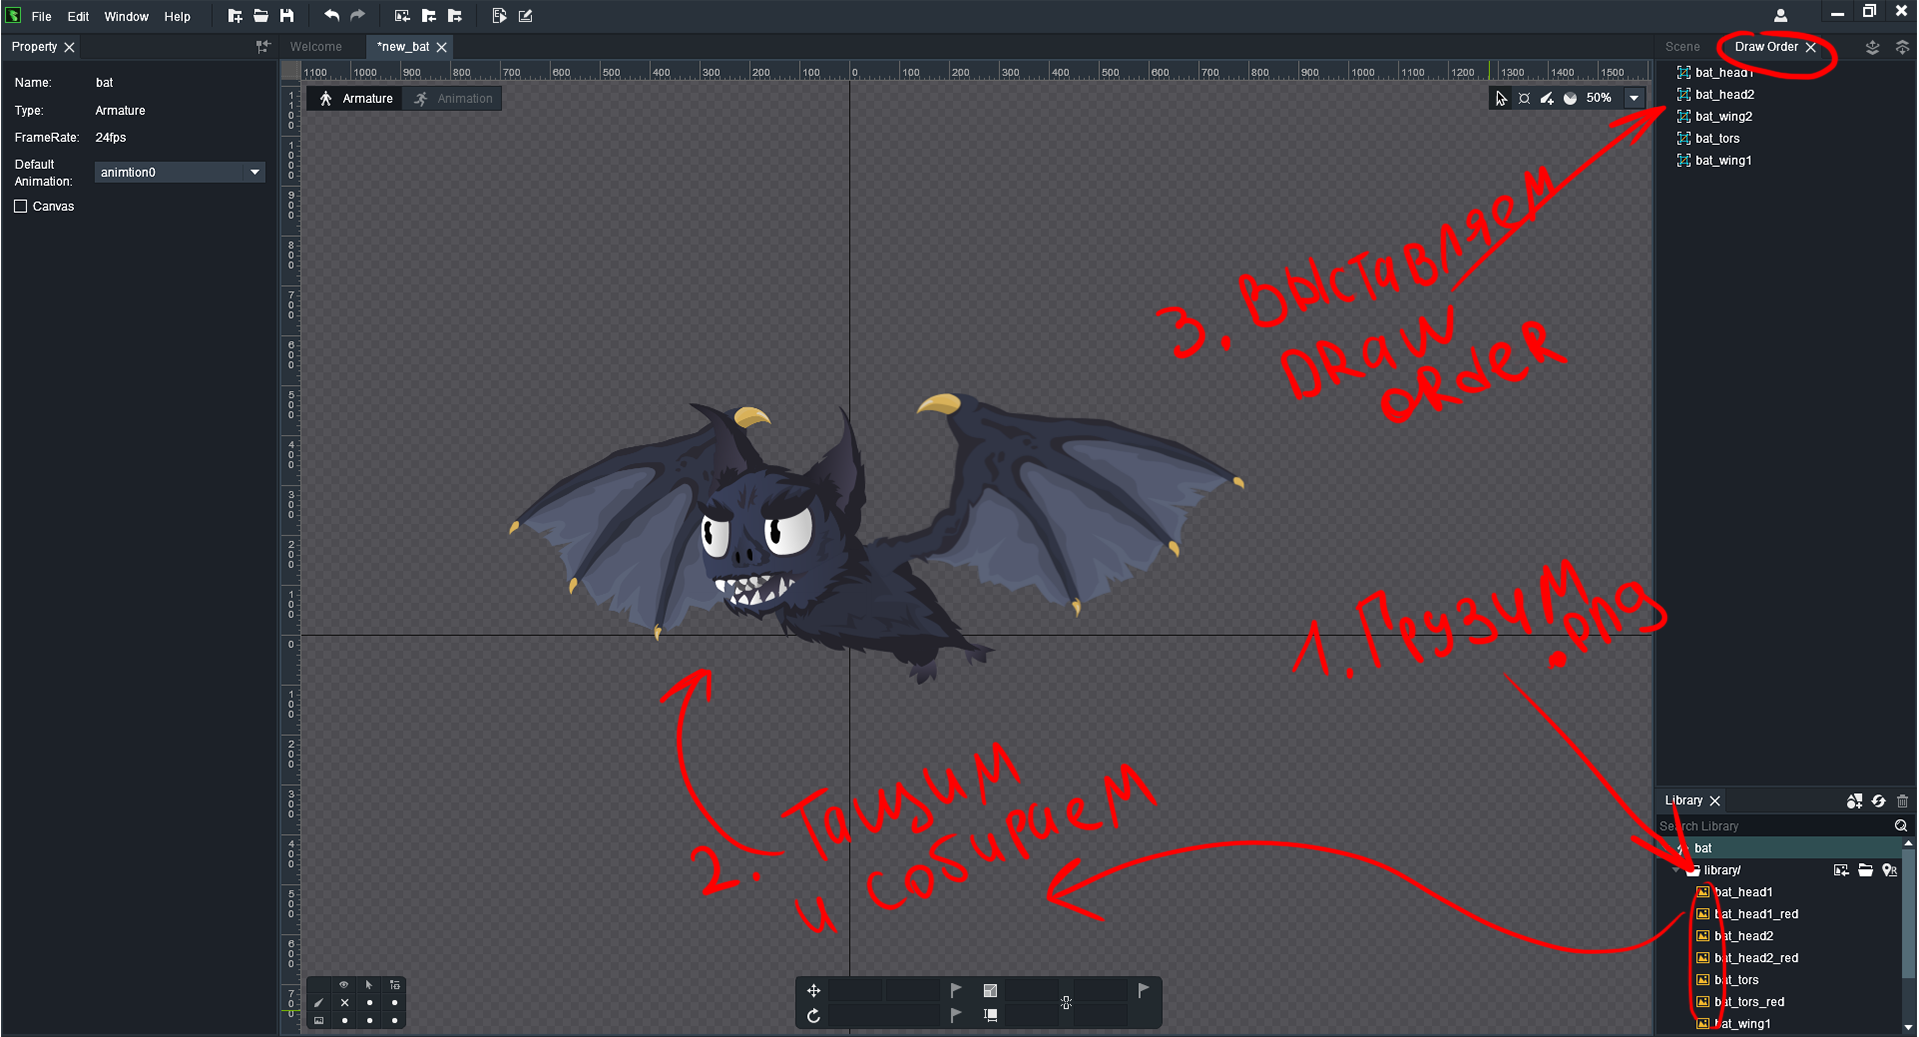
The first step to take is to cut the model so that each moving part is separate. We save pictures in .png format and without background.
After that, load the finished .png into DragonBones, assemble it according to the idea. You must also set some parameters. Draw order is a layer-by-layer display based on the principle of layers in Photoshop. The higher the object is in the hierarchy, the higher it is above the other layers. (Approx. The first in the hierarchy is the farthest)
Character assembly
A brief summary of what is happening in the video above
Next, you need to convert the objects to mesh, so that you can change their shape the way we need. To do this, select the object on the stage, put a checkmark in front of the mesh on the left, then click on Edit mesh and begin to draw the mesh so that the image is not distorted and cropped anywhere. We pay special attention to stiffeners, such as bones in the wing, which will bend.

UPD For better optimization in game engines, it is recommended to make a minimum of polygons in the model. As part of the game and the bat, the number of polygons does not greatly affect performance, so I can allow more
We perform this operation with all parts that will morph. These are mainly wings and head. For the body, just a checkmark mesh will suffice, a mesh is not required, since the object will be static.
When everything is ready, you can lay the bones. To do this, use the bone tool in the upper right of the screen. The initial point is always present on the screen - root.
This is the base bone to which the whole composition is attached by default; it is the first parent bone. Snapping to the parent bones is indicated by arrows.

Bone Mesh
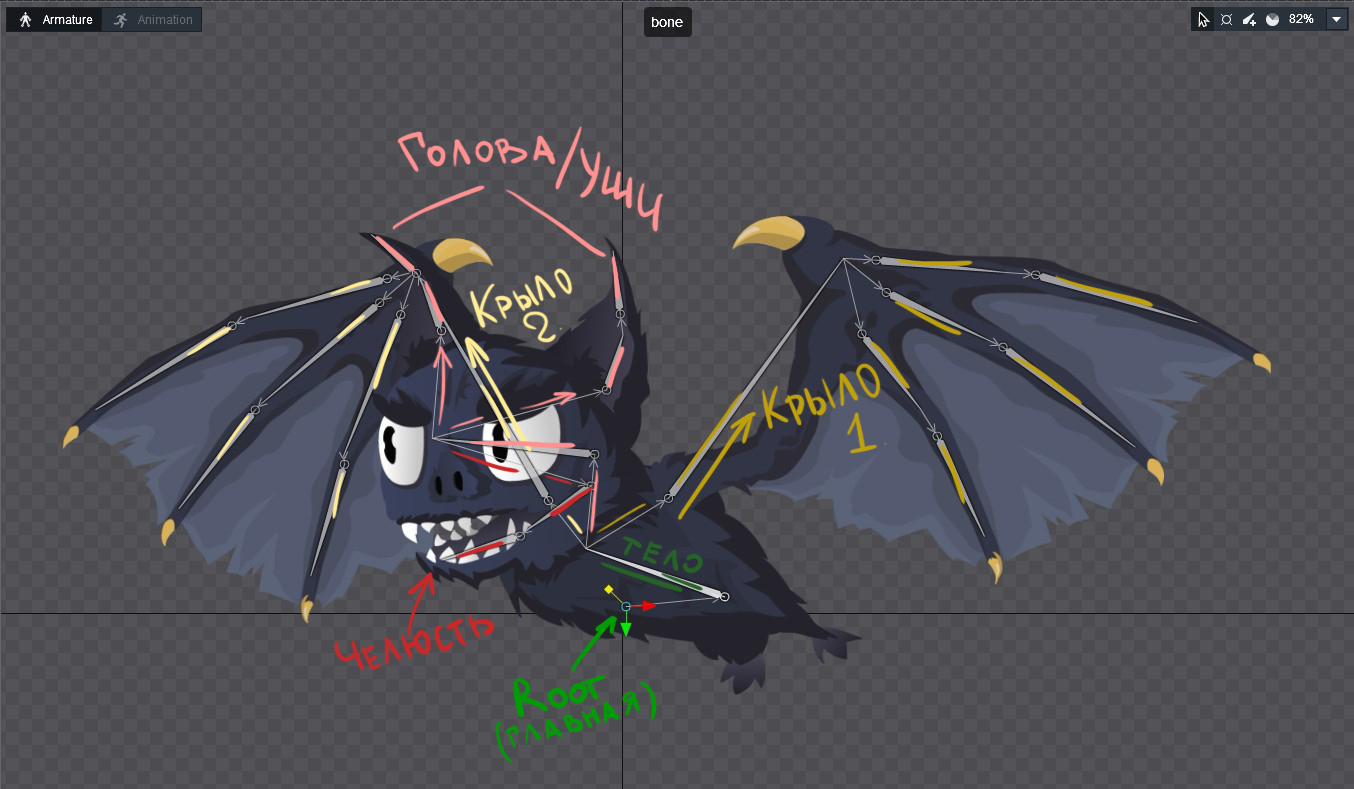
Deciphering Parent Bones
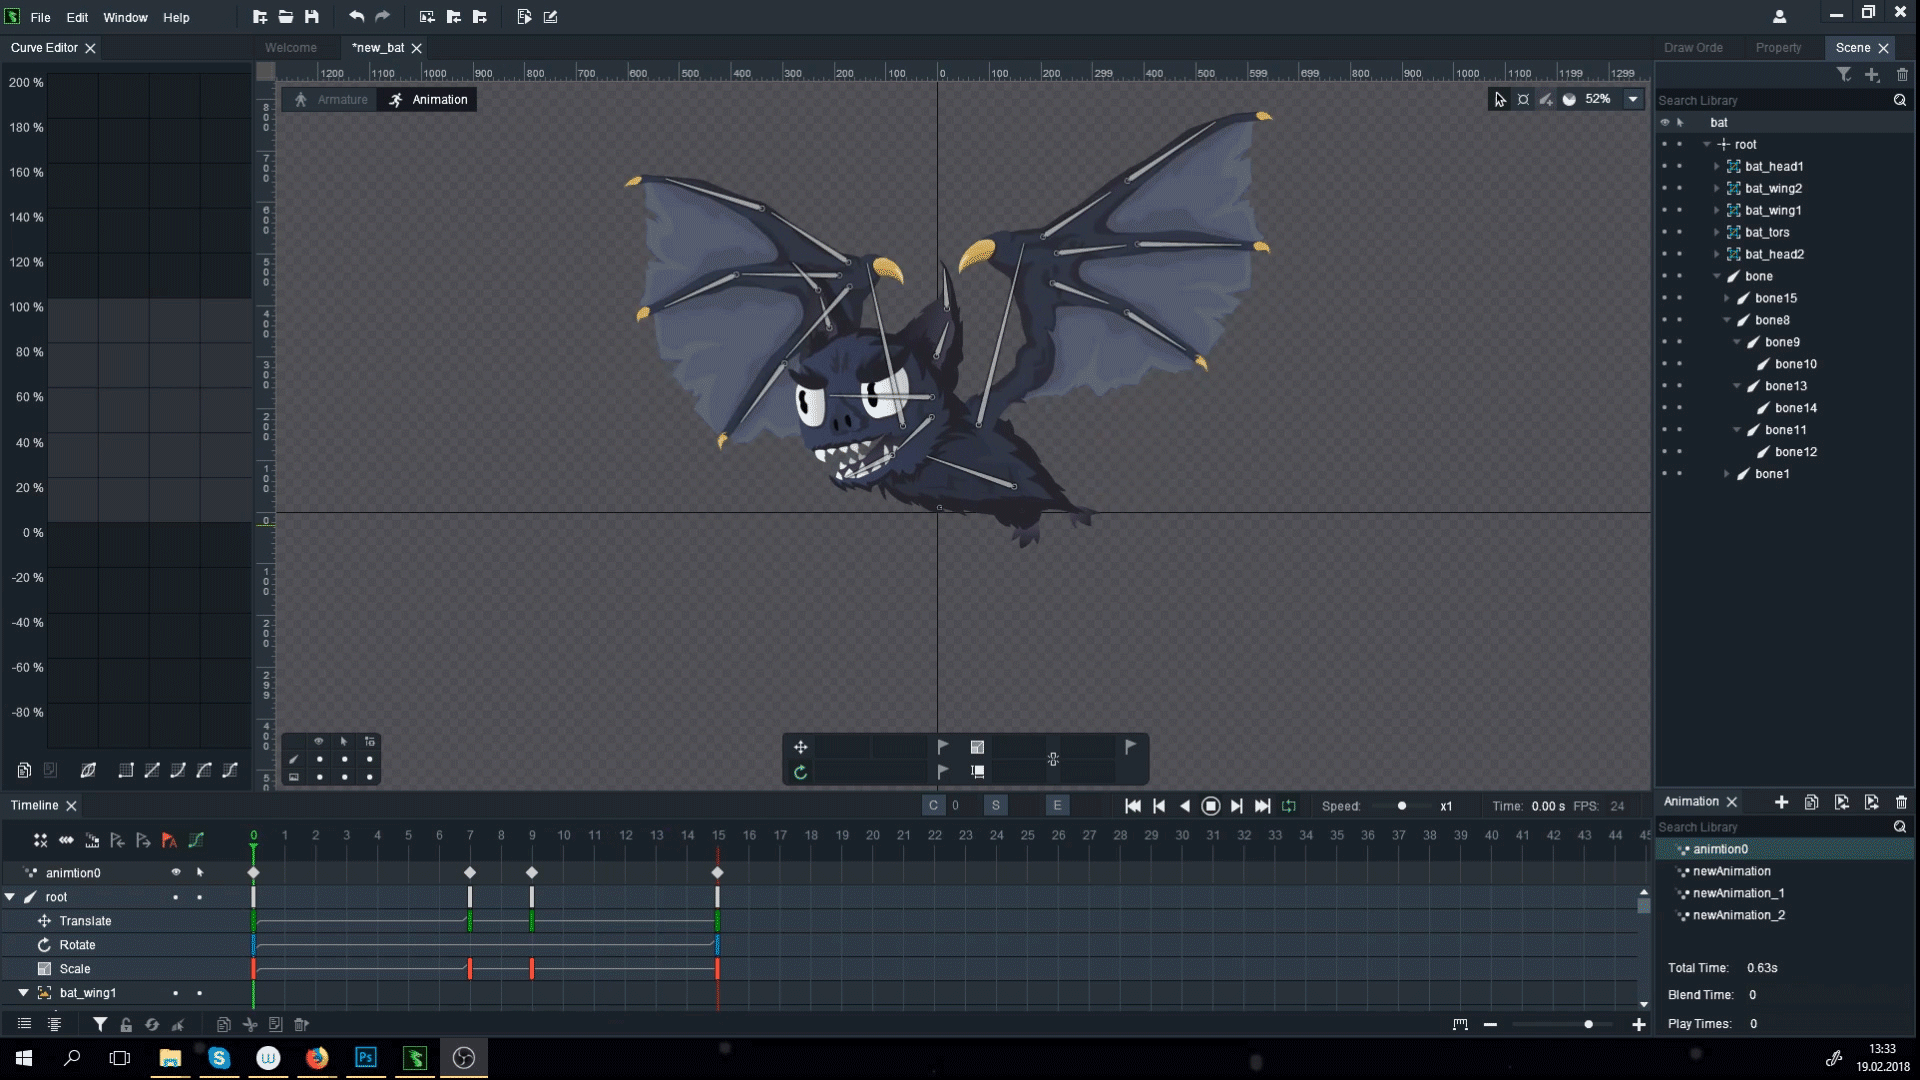
After laying the bones, you need to bind them to the mesh, for this, click the Add bones to bind button, select all the bones that belong to the sprite and right-click, either on an empty part of the screen or on Auto Generate Weight. The bones will automatically snap to the sprite, they will be set to Weight. The value of Weight, or popularly “weight”, answers how the bone affects the sprite. This is important in cases where several bones are attached to the same sprite at the same time. Adjustment occurs with the help of sliders that define the “zone of responsibility” of each bone.

This operation is carried out with all bones and sprites, we adjust the weight value for incorrect bending of the sprite. When all the bones are attached and adjusted, you can proceed directly to animating the object. For this, I recorded a short video.
Building key frames on the example of a wing
Such an animation mesh system is suitable for all moving parts of our bat. I finish the same for the second wing, slightly add amplitudes for the ears and torso.
TIPS: Some points that may clarify the work, and what I showed:
1. Key frames are created automatically if you did some action with the bone. (Provided that the corresponding flag is clicked)
2. With one of the latest versions, separate timelines for variables such as Move, Rotate and Scale appeared in Dragon bones. To force a key point on one of them, click on the checkbox.

3. In order to change the skins for the character, you need to add sprites to the appropriate subfolders (displays). First you need to turn them into mesh, draw a grid and snap the bones, as they did with the main sprites, so that with the same animation, everything would display correctly. To add a sprite, simply drag and drop drag'n'drop into the appropriate section.

4. In Dragon Bones there are curves that slightly change the proportions of the animation, the delay and the emphasis on some key frames. It is difficult to explain in words how they work, but very clearly it immediately becomes clear what a magical tool it is. IMPORTANT: For each keyframe, you can hang your own curve, and it will be valid until the next rule for curvature.

What did we get as a result?
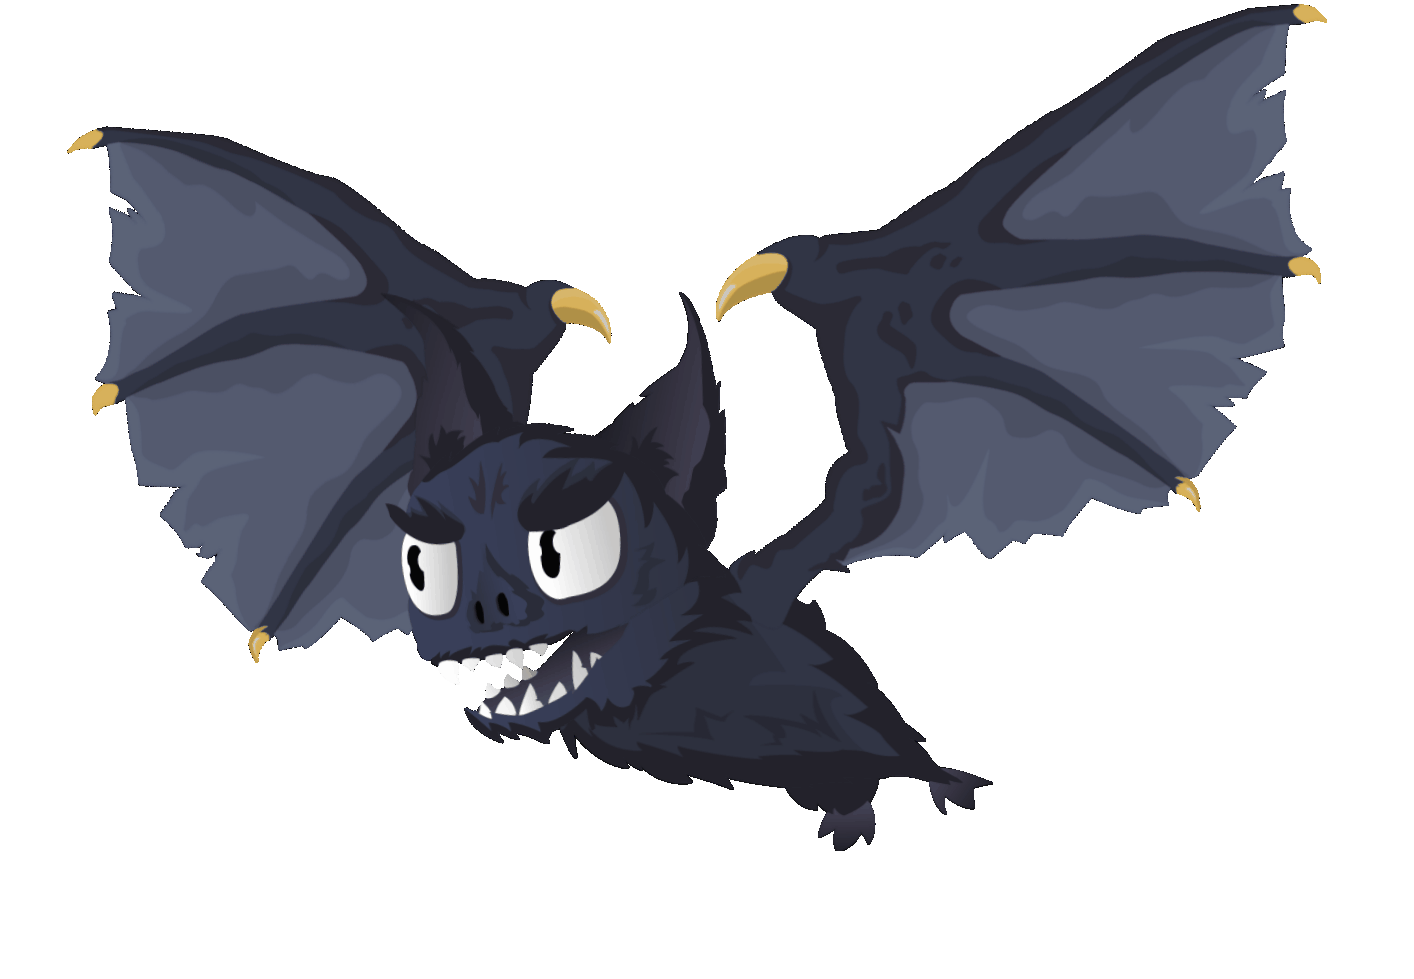
The result was a simple animation in two colors.

We can unload the obtained result in various formats that any game engine eats.
Thanks for attention!
So, let's begin.
Ongoing task: Redesigning a morally obsolete model of a standard flying monster six months ago. The bat did not have time for our skill and became irrelevant within the framework of our chosen graphic style.
The model we are going to remake.
At a minimum, our task is initially slightly simplified: we don’t need to look for a concept for the character, but, nevertheless, the work will be carried out practically from scratch.
Stage 1: Working with references
Among people producing graphic content, nothing is taken from scratch. I never believed those people who are sitting on a chair shouting: “Oh inspiration!”, And masterpieces begin to be painted.
And there are the simplest explanations for this: “Damn it, my mouse is so stupid because I don’t even know what bats look like! Without references, I just drew a balloon with wings! ”
So, we open Google and begin to be “inspired” by real bats, the structure of their bodies and faces. Let's analyze the structure using an example:
Determined with general forms and proportions. I begin to notice the features of the structure and fastening of the wings. The wings are a frame with stretched membranes. There are small legs and large ears. And if everything is clear with the body (although in the previous version I managed to draw the wings upside down), then with the face of the bats everything is much more complicated, and often they look well ... not very.
Stage 2: Outline
Once you have determined the correct anatomy, you can begin to visualize. I tried to use different forms of the body, giving them a slightly more grotesque appearance, like flying devils or large animals. As a result, I came to the conclusion to use the original plan with a small body, paws on the back and large wings.
Several working options
Short excerpt from the process
Stage 2: Rendering / Vectorization
After sketching and approving the final result, I go to Adobe Illustrator. Images are drawn in a vector - this allows you to always easily set the desired size without loss of quality. It is worth noting that as a result I upload a bitmap image in .png format. As additional materials for different game levels, the bat will have two color schemes for different levels.
Stage 3. Animation
We will animate in Dragon Bones. This is a free Chinese analogue of Spine, which provides a clear interface and features of skeletal and mesh-animation. Dragon bones is free and can be downloaded from . site.
Unfortunately, now the community of this software is not very wide, and even in English there are not many tutorials, basically all the information is in Chinese.
The first step to take is to cut the model so that each moving part is separate. We save pictures in .png format and without background.
After that, load the finished .png into DragonBones, assemble it according to the idea. You must also set some parameters. Draw order is a layer-by-layer display based on the principle of layers in Photoshop. The higher the object is in the hierarchy, the higher it is above the other layers. (Approx. The first in the hierarchy is the farthest)
Character assembly
A brief summary of what is happening in the video above
Next, you need to convert the objects to mesh, so that you can change their shape the way we need. To do this, select the object on the stage, put a checkmark in front of the mesh on the left, then click on Edit mesh and begin to draw the mesh so that the image is not distorted and cropped anywhere. We pay special attention to stiffeners, such as bones in the wing, which will bend.
UPD For better optimization in game engines, it is recommended to make a minimum of polygons in the model. As part of the game and the bat, the number of polygons does not greatly affect performance, so I can allow more
We perform this operation with all parts that will morph. These are mainly wings and head. For the body, just a checkmark mesh will suffice, a mesh is not required, since the object will be static.
When everything is ready, you can lay the bones. To do this, use the bone tool in the upper right of the screen. The initial point is always present on the screen - root.
This is the base bone to which the whole composition is attached by default; it is the first parent bone. Snapping to the parent bones is indicated by arrows.
Bone Mesh
Deciphering Parent Bones
After laying the bones, you need to bind them to the mesh, for this, click the Add bones to bind button, select all the bones that belong to the sprite and right-click, either on an empty part of the screen or on Auto Generate Weight. The bones will automatically snap to the sprite, they will be set to Weight. The value of Weight, or popularly “weight”, answers how the bone affects the sprite. This is important in cases where several bones are attached to the same sprite at the same time. Adjustment occurs with the help of sliders that define the “zone of responsibility” of each bone.
This operation is carried out with all bones and sprites, we adjust the weight value for incorrect bending of the sprite. When all the bones are attached and adjusted, you can proceed directly to animating the object. For this, I recorded a short video.
Building key frames on the example of a wing
Such an animation mesh system is suitable for all moving parts of our bat. I finish the same for the second wing, slightly add amplitudes for the ears and torso.
TIPS: Some points that may clarify the work, and what I showed:
1. Key frames are created automatically if you did some action with the bone. (Provided that the corresponding flag is clicked)
2. With one of the latest versions, separate timelines for variables such as Move, Rotate and Scale appeared in Dragon bones. To force a key point on one of them, click on the checkbox.
3. In order to change the skins for the character, you need to add sprites to the appropriate subfolders (displays). First you need to turn them into mesh, draw a grid and snap the bones, as they did with the main sprites, so that with the same animation, everything would display correctly. To add a sprite, simply drag and drop drag'n'drop into the appropriate section.
4. In Dragon Bones there are curves that slightly change the proportions of the animation, the delay and the emphasis on some key frames. It is difficult to explain in words how they work, but very clearly it immediately becomes clear what a magical tool it is. IMPORTANT: For each keyframe, you can hang your own curve, and it will be valid until the next rule for curvature.
What did we get as a result?
The result was a simple animation in two colors.
We can unload the obtained result in various formats that any game engine eats.
Thanks for attention!