February 11, 2018 at 21:41
And Spring will come to the street of JavaFX too
- From the sandbox
- Tutorial
Good time of day, Habrovsk!
I hope among you there will be the same lovers to make molds like me.
The fact is that I have always been committed to friendly interfaces. I was frustrated by applications that are not very user-oriented, this is especially true in corporate development. And often client applications written in Java are black windows, and they are skeptical about GUI applications.
Previously, on Swing or AWT, everything was very sad, and probably even before JavaFX 8, writing anonymous classes turned into spaghetti code. But with the advent of lambda expressions, everything changed, the code became simpler, clearer, more beautiful. Using JavaFX in your projects was a pleasure.
So I had an idea to connect the best tool for Java Spring Framework and a convenient tool for creating a JavaFX GUI in our time, this will allow us to use all the Spring features in a client desktop application. Having collected all the information voeidno that I was looking for on the vastness of the network, I decided to share it. First of all, I want to note that the article is intended more for beginners, so some of the details for many may be too banal and simple, but I do not want to omit them, so as not to lose the integrity of the article.

I look forward to constructive criticism of my decisions.
Who cares, please, under the cat.
Let's try to write a small application. Suppose there is such a primitive task: you need to write an application that will load product data from the database into a table on the form, and when you click on each row of the table, open an additional window with more detailed data about the product. We will use the service to populate the database. I generated fake data for a table with products and successfully populated the database with them.
It turns out the following.
The main form consists of the following components:
1. Button with the text “Download”
2. TableView with fields “ID”, “Name”, “Quantity”, “Price”
Functional
Stack Used:
JavaFX 8
Spring JDBC
SQLite 3
IntelliJ IDEA Community Edition 2017
Create a new project in IDEA using the Maven archetype. The initial structure that we see is quite standard for a maven project:
We set the necessary Language Level for the module and the project and change the Target bytecode version for our module in the settings Build, Execution, Deployment -> Compiler -> Java Compiler. Depending on the version of your JDK.
Now you need to turn what happened into a JavaFX application. The structure of the project that I want to get is given below, it does not claim to be ideal.
Create the org.name package (or just use the same value as in groupId) in the java directory. The application entry point, controllers, custom elements and utilities for the interface will be located in the app package. Everything else concerns directly the entities used in the application in the model package. In resources, I create a view directory and store * .fxml in the fxml folder, * .css in the style folder and the image in the image folder.
In the main FXML template, we set the application appearance template. It will include a productTable template , which sets the appearance of the table. MainController is our main controller and so far it will be with one method of processing the click of the download button. ProductTableController table controller.Extend Launcher from Application and load our main.fxml in the usual way in the start method. We leave the ProductDao class for later. And here is the Product write by the concept of JavaBean.
Go to the contents of the files:
We start to make sure that everything works.
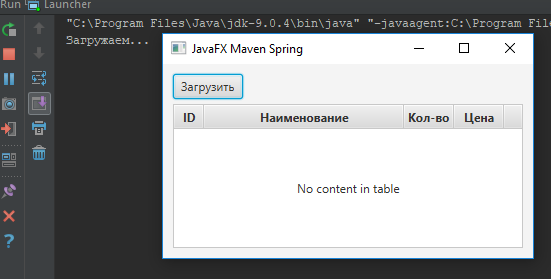
We are trying to build a JAR using the maven package . Adding the following configuration to our pom.xml (I have Java 9 in the project, but this does not mean that I use all its features, I just choose the latest tools for new projects):
and maven-jar-plugin:
We try to run the resulting jar nickname if you have properly configured environment variables:
Or using run.bat with the following content:
Personally, I use different JDKs on my PC, so I launch applications this way.

By the way, to hide the terminal, we call not java , but javaw, just for the current case we needed to check the text output when the button was clicked.
Now it's time for Spring, namely, create an application-context.xml in resources and write a slightly modified scene loader. Immediately, I note that the idea of Spring loader for JavaFX is not mine, I have already seen this on the open spaces of the network. But I rethought it a little.
We edit for starters our pom.xml . Add Spring Version
and dependencies spring-context, spring-jdbc and sqlite-jdbc.
Create the config.properties configuration file . It contains the following data:
We add application-context.xml to the resources with the following content, if you are even a little familiar with spring, then I think you will not have problems understanding what is written below.
We will write an abstract controller Controller that extends the ApplicationContextAware interface so that we can get context from any controller.
Now we implement the SpringStageLoader scene loader . It will be more like a utility class in which you can implement the loading of various scenes and windows, so I immediately turned out to be so voluminous.
Rewrite the start method in the Launcher class a bit . And also we add context initialization and its release.
Do not forget to inherit the MainController class from Controller and add the Component annotation to all controllers , this will add them to the context via component-scan and get any controllers from the context, like bins, or inject them. Otherwise, we get an exception
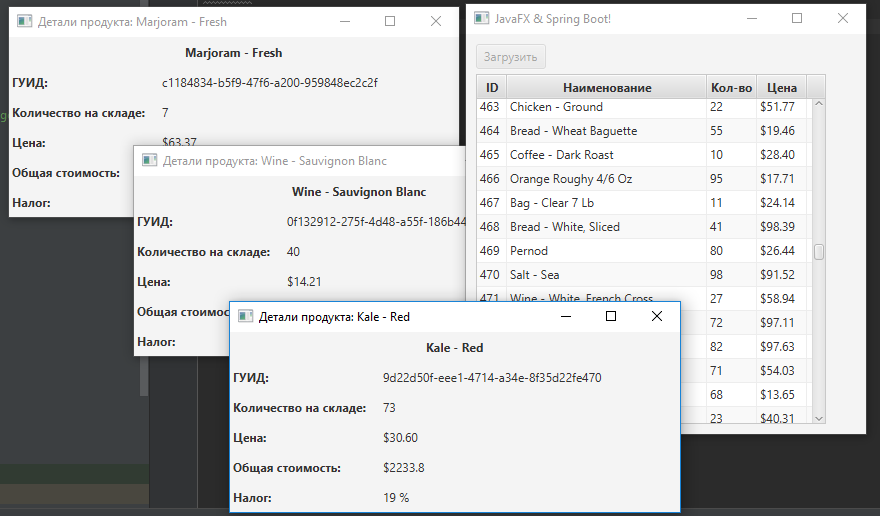
We start and see that the text of the window title has become such that we have registered in the property:

But the loading of data has not yet been redesigned, as well as the display of detailed information about the product.
We implement the ProductDao class
Now it remains to add a couple of lines in the main controller, so that when you click on the button, we have the data loaded into the table
and realize the opening of a new window with product details. To do this, use the productDetails template and the ProductDetailsModalStage scene .
In SpringStageLoader, add another method:
and add a few lines to the ProductTableController initialization method :
We start and see the result:
And here is another interesting topic. Suppose your context is initialized for a long time, in this case, the user will not understand whether the application is launching or not. Therefore, for clarity, it is necessary to add a splash screen during initialization of the context.
We will write the scene with the screensaver in the usual way through FXMLLoader . Because the context will be initialized just at that time. The initialization of a heavy context is simulated by calling Thread.sleep (10000);
Template with a picture:
Modified Launcher to download a screen saver application
We assemble, run and get what we wanted:
The last step remained. This is to build a JAR, but with Spring. To do this, add another maven-shade-plugin plugin to pom :
In such a simple way, you can make friends with Spring and JavaFX. Final project structure:
Sources on GitHub . There is a PRODUCTS.sql file for the table in the database.
I hope among you there will be the same lovers to make molds like me.
The fact is that I have always been committed to friendly interfaces. I was frustrated by applications that are not very user-oriented, this is especially true in corporate development. And often client applications written in Java are black windows, and they are skeptical about GUI applications.
Previously, on Swing or AWT, everything was very sad, and probably even before JavaFX 8, writing anonymous classes turned into spaghetti code. But with the advent of lambda expressions, everything changed, the code became simpler, clearer, more beautiful. Using JavaFX in your projects was a pleasure.
So I had an idea to connect the best tool for Java Spring Framework and a convenient tool for creating a JavaFX GUI in our time, this will allow us to use all the Spring features in a client desktop application. Having collected all the information voeidno that I was looking for on the vastness of the network, I decided to share it. First of all, I want to note that the article is intended more for beginners, so some of the details for many may be too banal and simple, but I do not want to omit them, so as not to lose the integrity of the article.
I look forward to constructive criticism of my decisions.
Who cares, please, under the cat.
Let's try to write a small application. Suppose there is such a primitive task: you need to write an application that will load product data from the database into a table on the form, and when you click on each row of the table, open an additional window with more detailed data about the product. We will use the service to populate the database. I generated fake data for a table with products and successfully populated the database with them.
It turns out the following.
The main form consists of the following components:
1. Button with the text “Download”
2. TableView with fields “ID”, “Name”, “Quantity”, “Price”
Functional
- When the application starts in the context, a bean DataSource will be created and a connection to the database will occur. Connection data is in the configuration file. It is necessary to derive 4 fields from the Products table.
- When you click on the "Download" button, the TableView will be filled with data from the table.
- By double-clicking on the table row, an additional window opens with all the Products fields.
Stack Used:
JavaFX 8
Spring JDBC
SQLite 3
IntelliJ IDEA Community Edition 2017
Creating a JavaFX Project
Create a new project in IDEA using the Maven archetype. The initial structure that we see is quite standard for a maven project:
SpringFXExample
├──.idea
├──src
│  ├──main
│  │  ├──java
│  │  └──resources
│  └──test
├──────pom.xml
└──────SpringFXExample.iml
External Libraries
We set the necessary Language Level for the module and the project and change the Target bytecode version for our module in the settings Build, Execution, Deployment -> Compiler -> Java Compiler. Depending on the version of your JDK.
Now you need to turn what happened into a JavaFX application. The structure of the project that I want to get is given below, it does not claim to be ideal.
SpringFXExample
├──.idea
├──src
│  ├──main
│  │  ├──java
│  │  │  └──org.name
│  │  │     ├──app
│  │  │     │  ├──controller
│  │  │     │  │  ├──MainController.java
│  │  │     │  │  └──ProductTableController.java
│  │  │     │  └──Launcher.java
│  │  │     └──model
│  │  │        ├──dao
│  │  │        │  └─ProductDao.java
│  │  │        └──Product.java
│  │  └──resources
│  │     └──view
│  │        ├──fxml
│  │        │  ├──main.fxml
│  │        │  └──productTable.fxml
│  │        ├──style
│  │        └──image
│  └──test
├──────pom.xml
└──────SpringFXExample.iml
External Libraries
Create the org.name package (or just use the same value as in groupId) in the java directory. The application entry point, controllers, custom elements and utilities for the interface will be located in the app package. Everything else concerns directly the entities used in the application in the model package. In resources, I create a view directory and store * .fxml in the fxml folder, * .css in the style folder and the image in the image folder.
In the main FXML template, we set the application appearance template. It will include a productTable template , which sets the appearance of the table. MainController is our main controller and so far it will be with one method of processing the click of the download button. ProductTableController table controller.Extend Launcher from Application and load our main.fxml in the usual way in the start method. We leave the ProductDao class for later. And here is the Product write by the concept of JavaBean.
Go to the contents of the files:
main.fxml
productTable.fxml
MainController.java
package org.name.app.controller;
import javafx.fxml.FXML;
import javafx.scene.control.Button;
public class MainController {
	@FXML private Button load;
	/**
	* Обработка нажатия кнопки загрузки товаров
	*/
	@FXML
	public void onClickLoad() {
		System.out.println("Загружаем...");
		// TODO: Реализовать получение данный из БД с помощью DAO класса
		// TODO: и передать полученный данные в таблицу для отображения
	}
}
ProductTableController.java
package org.name.app.controller;
import javafx.collections.FXCollections;
import javafx.fxml.FXML;
import javafx.scene.control.TableColumn;
import javafx.scene.control.TableView;
import javafx.scene.control.cell.PropertyValueFactory;
import org.name.model.Product;
import java.util.List;
public class ProductTableController {
	@FXML private TableColumn id;
	@FXML private TableColumn name;
	@FXML private TableColumn quantity;
	@FXML private TableColumn price;
	@FXML private TableView productTable;
	/**
	* Устанавливаем value factory для полей таблицы
	*/
	public void initialize() {
		id.setCellValueFactory(new PropertyValueFactory<>("id"));
		name.setCellValueFactory(new PropertyValueFactory<>("name"));
		quantity.setCellValueFactory(new PropertyValueFactory<>("quantity"));
		price.setCellValueFactory(new PropertyValueFactory<>("price"));
	}
	/**
	* Заполняем таблицу данными из БД
	* @param products список продуктов
	*/
	public void fillTable(List products) {
		productTable.setItems(FXCollections.observableArrayList(products));
	}
}
Launcher.java
package org.name.app;
import javafx.application.Application;
import javafx.fxml.FXMLLoader;
import javafx.scene.Parent;
import javafx.scene.Scene;
import javafx.stage.Stage;
public class Launcher extends Application {
	public static void main(String[] args) {
		launch(args);
	}
	public void start(Stage stage) throws Exception {
		Parent root = FXMLLoader.load(getClass()
		.getResource("/view/fxml/main.fxml"));
		stage.setTitle("JavaFX Maven Spring");
		stage.setScene(new Scene(root));
		stage.show();
	}
}
Product.java
package org.name.model;
public class Product {
    private int id;
    private String name;
    private int quantity;
    private String price;
    private String guid;
    private int tax;
    public Product() {
    }
    public int getId() {
        return id;
    }
    public void setId(int id) {
        this.id = id;
    }
    public String getName() {
        return name;
    }
    public void setName(String name) {
        this.name = name;
    }
    public int getQuantity() {
        return quantity;
    }
    public void setQuantity(int quantity) {
        this.quantity = quantity;
    }
    public String getPrice() {
        return price;
    }
    public void setPrice(String price) {
        this.price = price;
    }
    public String getGuid() {
        return guid;
    }
    public void setGuid(String guid) {
        this.guid = guid;
    }
    public int getTax() {
        return tax;
    }
    public void setTax(int tax) {
        this.tax = tax;
    }
}
We start to make sure that everything works.
First build
We are trying to build a JAR using the maven package . Adding the following configuration to our pom.xml (I have Java 9 in the project, but this does not mean that I use all its features, I just choose the latest tools for new projects):
9 9 and maven-jar-plugin:
org.apache.maven.plugins maven-jar-plugin 3.0.2 true lib/ org.name.app.Launcher pom.xml
4.0.0 org.name SpringFXExample 1.0 9 9 org.apache.maven.plugins maven-jar-plugin 3.0.2 true lib/ org.name.app.Launcher We try to run the resulting jar nickname if you have properly configured environment variables:
start java -jar target\SpringFXExample-1.0.jar
Or using run.bat with the following content:
set JAVA_HOME=PATH_TO_JDK\bin
set JAVA_CMD=%JAVA_HOME%\java
start %JAVA_CMD% -jar target\SpringFXExample-1.0.jar
Personally, I use different JDKs on my PC, so I launch applications this way.
By the way, to hide the terminal, we call not java , but javaw, just for the current case we needed to check the text output when the button was clicked.
Add Spring
Now it's time for Spring, namely, create an application-context.xml in resources and write a slightly modified scene loader. Immediately, I note that the idea of Spring loader for JavaFX is not mine, I have already seen this on the open spaces of the network. But I rethought it a little.
We edit for starters our pom.xml . Add Spring Version
9 9 5.0.3.RELEASE and dependencies spring-context, spring-jdbc and sqlite-jdbc.
org.springframework spring-context ${spring.version} org.springframework spring-jdbc ${spring.version} org.xerial sqlite-jdbc 3.7.2 pom.xml
4.0.0 org.name SpringFXExample 1.0 9 9 5.0.3.RELEASE org.apache.maven.plugins maven-jar-plugin 3.0.2 true lib/ org.name.app.Launcher org.springframework spring-context ${spring.version} org.springframework spring-jdbc ${spring.version} org.xerial sqlite-jdbc 3.7.2 Create the config.properties configuration file . It contains the following data:
# The title of the main scene
title = JavaFX & Spring Boot!
# DB connection configuration
db.url = jdbc: sqlite: PATH_TO_DB / test_db
db.user = user
db.password = password
db.driver = org.sqlite.JDBC
We add application-context.xml to the resources with the following content, if you are even a little familiar with spring, then I think you will not have problems understanding what is written below.
application-context.xml
We will write an abstract controller Controller that extends the ApplicationContextAware interface so that we can get context from any controller.
Controller.java
package org.name.app.controller;
import org.springframework.beans.BeansException;
import org.springframework.context.ApplicationContext;
import org.springframework.context.ApplicationContextAware;
public abstract class Controller implements ApplicationContextAware {
    private ApplicationContext context;
    public ApplicationContext getContext() {
        return context;
    }
    @Override
    public void setApplicationContext(ApplicationContext context) throws BeansException {
        this.context = context;
    }
}
Now we implement the SpringStageLoader scene loader . It will be more like a utility class in which you can implement the loading of various scenes and windows, so I immediately turned out to be so voluminous.
SpringStageLoader.java
package org.name.app;
import javafx.application.Platform;
import javafx.fxml.FXMLLoader;
import javafx.scene.Parent;
import javafx.scene.Scene;
import javafx.stage.Stage;
import org.springframework.beans.BeansException;
import org.springframework.beans.factory.annotation.Value;
import org.springframework.context.ApplicationContext;
import org.springframework.context.ApplicationContextAware;
import org.springframework.stereotype.Component;
import java.io.IOException;
@Component
public class SpringStageLoader implements ApplicationContextAware {
	private static ApplicationContext staticContext;
	//инъекция заголовка главного окна
	@Value("${title}")
	private String appTitle;
	private static String staticTitle;
	private static final String FXML_DIR = "/view/fxml/";
	private static final String MAIN_STAGE = "main";
	/**
	* Загрузка корневого узла и его дочерних элементов из fxml шаблона
	* @param fxmlName наименование *.fxml файла в ресурсах
	* @return объект типа Parent
	* @throws IOException бросает исключение ввода-вывода
	*/
	private static Parent load(String fxmlName) throws IOException {
		FXMLLoader loader = new FXMLLoader();
		// setLocation необходим для корректной загрузки включенных шаблонов, таких как productTable.fxml,
		// без этого получим исключение javafx.fxml.LoadException: Base location is undefined.
		loader.setLocation(SpringStageLoader.class.getResource(FXML_DIR + fxmlName + ".fxml"));
		// setLocation необходим для корректной того чтобы loader видел наши кастомные котнролы
		loader.setClassLoader(SpringStageLoader.class.getClassLoader());
		loader.setControllerFactory(staticContext::getBean);
		return loader.load(SpringStageLoader.class.getResourceAsStream(FXML_DIR + fxmlName + ".fxml"));
	}
	/**
	* Реализуем загрузку главной сцены. На закрытие сцены стоит обработчик, которых выходит из приложения
	* @return главную сцену
	* @throws IOException бросает исключение ввода-вывода
	*/
	public static Stage loadMain() throws IOException {
		Stage stage = new Stage();
		stage.setScene(new Scene(load(MAIN_STAGE)));
		stage.setOnHidden(event -> Platform.exit());
		stage.setTitle(staticTitle);
		return stage;
	}
	/**
	* Передаем данные в статические поля в реализации метода интерфейса ApplicationContextAware,
	т.к. методы их использующие тоже статические
	*/
	@Override
	public void setApplicationContext(ApplicationContext context) throws BeansException {
		SpringStageLoader.staticContext = context;
		SpringStageLoader.staticTitle = appTitle;
	}
}
Rewrite the start method in the Launcher class a bit . And also we add context initialization and its release.
Launcher.java
package org.name.app;
import javafx.application.Application;
import javafx.stage.Stage;
import org.springframework.context.support.ClassPathXmlApplicationContext;
import java.io.IOException;
public class Launcher extends Application {
    private static ClassPathXmlApplicationContext context;
    public static void main(String[] args) {
        launch(args);
    }
    /**
     * Инициализируем контекст
     */
    @Override
    public void init() {
        context = new ClassPathXmlApplicationContext("application-context.xml");
    }
    @Override
    public void start(Stage stage) throws IOException {
        SpringStageLoader.loadMain().show();
    }
    /**
     * Освобождаем контекст
     */
    @Override
    public void stop() throws IOException {
        context.close();
    }
}
Do not forget to inherit the MainController class from Controller and add the Component annotation to all controllers , this will add them to the context via component-scan and get any controllers from the context, like bins, or inject them. Otherwise, we get an exception
org.springframework.beans.factory.NoSuchBeanDefinitionException: No qualifying bean of type 'org.name.app.controller.MainController' available
We start and see that the text of the window title has become such that we have registered in the property:
But the loading of data has not yet been redesigned, as well as the display of detailed information about the product.
We implement the ProductDao class
ProductDao.java
package org.name.model.dao;
import org.name.model.Product;
import org.springframework.beans.factory.annotation.Autowired;
import org.springframework.jdbc.core.BeanPropertyRowMapper;
import org.springframework.jdbc.core.JdbcTemplate;
import org.springframework.stereotype.Component;
import javax.sql.DataSource;
import java.util.List;
@Component
public class ProductDao {
    private JdbcTemplate template;
	/**
	* Инжектим dataSource и создаем объект JdbcTemplate
	*/
    @Autowired
    public ProductDao(DataSource dataSource) {
        this.template = new JdbcTemplate(dataSource);
    }
	/**
	* Получаем весь список продуктов из таблицы. Т.к. класс Product построен на концепции JavaBean
	* мы можем воспользоваться классом BeanPropertyRowMapper.
	*/
    public List getAllProducts(){
        String sql = "SELECT * FROM product";
        return template.query(sql, new BeanPropertyRowMapper<>(Product.class));
    }
}
Now it remains to add a couple of lines in the main controller, so that when you click on the button, we have the data loaded into the table
MainController.java
package org.name.app.controller;
import javafx.fxml.FXML;
import javafx.scene.control.Button;
import org.name.model.dao.ProductDao;
import org.springframework.beans.factory.annotation.Autowired;
import org.springframework.stereotype.Component;
@Component
public class MainController extends Controller {
    @FXML private Button load;
    private ProductTableController tableController;
    private ProductDao productDao;
    @Autowired
    public MainController(ProductTableController tableController,
                          ProductDao productDao) {
        this.tableController = tableController;
        this.productDao = productDao;
    }
    /**
     * Обработка нажатия кнопки загрузки товаров
     */
    @FXML
    public void onClickLoad() {
        tableController.fillTable(productDao.getAllProducts());
        load.setDisable(true);
    }
}
and realize the opening of a new window with product details. To do this, use the productDetails template and the ProductDetailsModalStage scene .
productDetails.fxml
ProductDetailsModalStage.java
package org.name.app.controller;
import javafx.scene.Scene;
import javafx.scene.control.Label;
import javafx.stage.Modality;
import javafx.stage.Stage;
import org.name.app.SpringStageLoader;
import org.name.model.Product;
import java.io.IOException;
public class ProductDetailsModalStage extends Stage {
    private Label name;
    private Label guid;
    private Label quantity;
    private Label price;
    private Label costOfAll;
    private Label tax;
    public ProductDetailsModalStage() {
        this.initModality(Modality.WINDOW_MODAL);
        this.centerOnScreen();
        try {
            Scene scene = SpringStageLoader.loadScene("productDetails");
            this.setScene(scene);
            name = (Label) scene.lookup("#name");
            guid = (Label) scene.lookup("#guid");
            quantity = (Label) scene.lookup("#quantity");
            price = (Label) scene.lookup("#price");
            costOfAll = (Label) scene.lookup("#costOfAll");
            tax = (Label) scene.lookup("#tax");
        } catch (IOException e) {
            e.printStackTrace();
        }
    }
    public void showDetails(Product product) {
        name.setText(product.getName());
        guid.setText(product.getGuid());
        quantity.setText(String.valueOf(product.getQuantity()));
        price.setText(product.getPrice());
        costOfAll.setText("$" + getCostOfAll(product));
        tax.setText(String.valueOf(product.getTax()) + " %");
        setTitle("Детали продукта: " + product.getName());
        show();
    }
    private String getCostOfAll(Product product) {
        int quantity = product.getQuantity();
        double priceOfOne = Double.parseDouble(product
                .getPrice()
                .replace("$", ""));
        return String.valueOf(quantity * priceOfOne);
    }
}
In SpringStageLoader, add another method:
public static Scene loadScene(String fxmlName) throws IOException {
	return new Scene(load(fxmlName));
}
and add a few lines to the ProductTableController initialization method :
productTable.setRowFactory(rf -> {
	TableRow row = new TableRow<>();
	row.setOnMouseClicked(event -> {
		if (event.getClickCount() == 2 && (!row.isEmpty())) {
			ProductDetailsModalStage stage = new ProductDetailsModalStage();
			stage.showDetails(row.getItem());
		}
	});
	return row;
});
We start and see the result:
The problem of long initialization of the context
And here is another interesting topic. Suppose your context is initialized for a long time, in this case, the user will not understand whether the application is launching or not. Therefore, for clarity, it is necessary to add a splash screen during initialization of the context.
We will write the scene with the screensaver in the usual way through FXMLLoader . Because the context will be initialized just at that time. The initialization of a heavy context is simulated by calling Thread.sleep (10000);
Template with a picture:
splash.fxml
![]()
Modified Launcher to download a screen saver application
Launcher.java
package org.name.app;
import javafx.application.Application;
import javafx.application.Platform;
import javafx.fxml.FXMLLoader;
import javafx.scene.Parent;
import javafx.scene.Scene;
import javafx.scene.paint.Color;
import javafx.stage.Stage;
import javafx.stage.StageStyle;
import org.springframework.context.support.ClassPathXmlApplicationContext;
import java.io.IOException;
public class Launcher extends Application {
    private static ClassPathXmlApplicationContext context;
    private Stage splashScreen;
    public static void main(String[] args) {
        launch(args);
    }
    /**
     * Контекст инициализируется не в UI потоке. Поэтому в методе init() UI поток вызывается через Platform.runLater()
     * @throws Exception
     */
    @Override
    public void init() throws Exception {
        Platform.runLater(this::showSplash);
        Thread.sleep(10000);
        context = new ClassPathXmlApplicationContext("application-context.xml");
        Platform.runLater(this::closeSplash);
    }
    @Override
    public void start(Stage stage) throws IOException {
        SpringStageLoader.loadMain().show();
    }
    /**
     * Освобождаем контекст
     */
    @Override
    public void stop() {
        context.close();
    }
    /**
     * Загружаем заставку обычным способом. Выставляем везде прозрачность
     */
    private void showSplash() {
        try {
            splashScreen = new Stage(StageStyle.TRANSPARENT);
            splashScreen.setTitle("Splash");
            Parent root = FXMLLoader.load(getClass().getResource("/view/fxml/splash.fxml"));
            Scene scene = new Scene(root, Color.TRANSPARENT);
            splashScreen.setScene(scene);
            splashScreen.show();
        } catch (IOException e) {
            e.printStackTrace();
        }
    }
    /**
     * Закрывает сцену с заставкой
     */
    private void closeSplash() {
        splashScreen.close();
    }
}
We assemble, run and get what we wanted:
Launch App GIF
Final assembly jar
The last step remained. This is to build a JAR, but with Spring. To do this, add another maven-shade-plugin plugin to pom :
pom.xml - final version
4.0.0 org.name SpringFXExample 1.0 9 9 5.0.3.RELEASE org.apache.maven.plugins maven-jar-plugin 3.0.2 true lib/ org.name.app.Launcher org.apache.maven.plugins maven-shade-plugin 3.1.0 shade META-INF/spring.handlers META-INF/spring.schemas org.springframework spring-context ${spring.version} org.springframework spring-jdbc ${spring.version} org.xerial sqlite-jdbc 3.7.2 In such a simple way, you can make friends with Spring and JavaFX. Final project structure:
SpringFXExample
├──.idea
├──src
│  ├──main
│  │  ├──java
│  │  │  └──org.name
│  │  │     ├──app
│  │  │     │  ├──controller
│  │  │     │  │  ├──Controller.java
│  │  │     │  │  ├──MainController.java
│  │  │     │  │  ├──ProductTableController.java
│  │  │     │  │  └──ProductDetailsModalStage.java
│  │  │     │  ├──Launcher.java
│  │  │     │  └──SpringStageLoader.java
│  │  │     └──model
│  │  │        ├──dao
│  │  │        │  └─ProductDao.java
│  │  │        └──Product.java
│  │  └──resources
│  │     ├──view
│  │     │  ├──fxml
│  │     │  │  ├──main.fxml
│  │     │  │  ├──productDetails.fxml
│  │     │  │  ├──productTable.fxml
│  │     │  │  └──splash.fxml
│  │     │  ├──style
│  │     │  └──image
│  │     │     └──splash.png
│  │     └──application-context.xml
│  └──test
├──────config.properties.xml
├──────pom.xml
├──────SpringFXExample.iml
└──────test-db.xml
External Libraries
Sources on GitHub . There is a PRODUCTS.sql file for the table in the database.