February 8, 2018 at 07:21
AWS and Bitbucket Pipelines serverless CI / CD application
This article talks about deploying a Django application in the AWS cloud using Bitbucket Pipelines. For those who are interested in this topic, welcome to cat.
Go to the mines!
The project is a typical Django application. The only difference is that application settings will be pulled through environment variables. The project repository is on a bitbucket. To create a similar one, set requirements from the list:
As you can see, a typical set of dependencies for building a REST API and connecting PostgreSQL. Next, we go through the steps to create a typical Django application. Add to the project settings settings for connecting to the database and placing statics on S3.
Zappa is a framework that simplifies the deployment of a wsgi application based on the Gateway and Lambda APIs. Under the hood, there is a Cloudformation template generator and an Lambda event adapter into a wsgi request, which allows you to use the classic application operation scheme. Add finishing touches for tests as a final touch.
and add configuration files for tox, pylint and pytest
Represents a JSON or YAML file with a set of variables. In my version, it is stored on a bucket hidden in the settings of Pipelines S3 and is copied every time an artifact is created.
I will give an example:
Everything related to the project settings is specified in environment_variables. See the zappa documentation for more details.
I send those who do not know what it is to my other articles. Here I will try to consider in detail the pipeline configuration. For CI / CD, I use the following shell script:
The script runs in a typical container for bitbucket pipeline (image: python: 3.6.1) on Debian. Pipeline allows you to use any container with DockerHub, but the adaptation of the script will remain on your conscience.
The pipeline configuration itself is as follows:
image points to a container, production deployment is done by tags, the brunch master is deployed to dev1 environment. Those who wish can independently add a test run for the remaining brunches. Everything is simple.
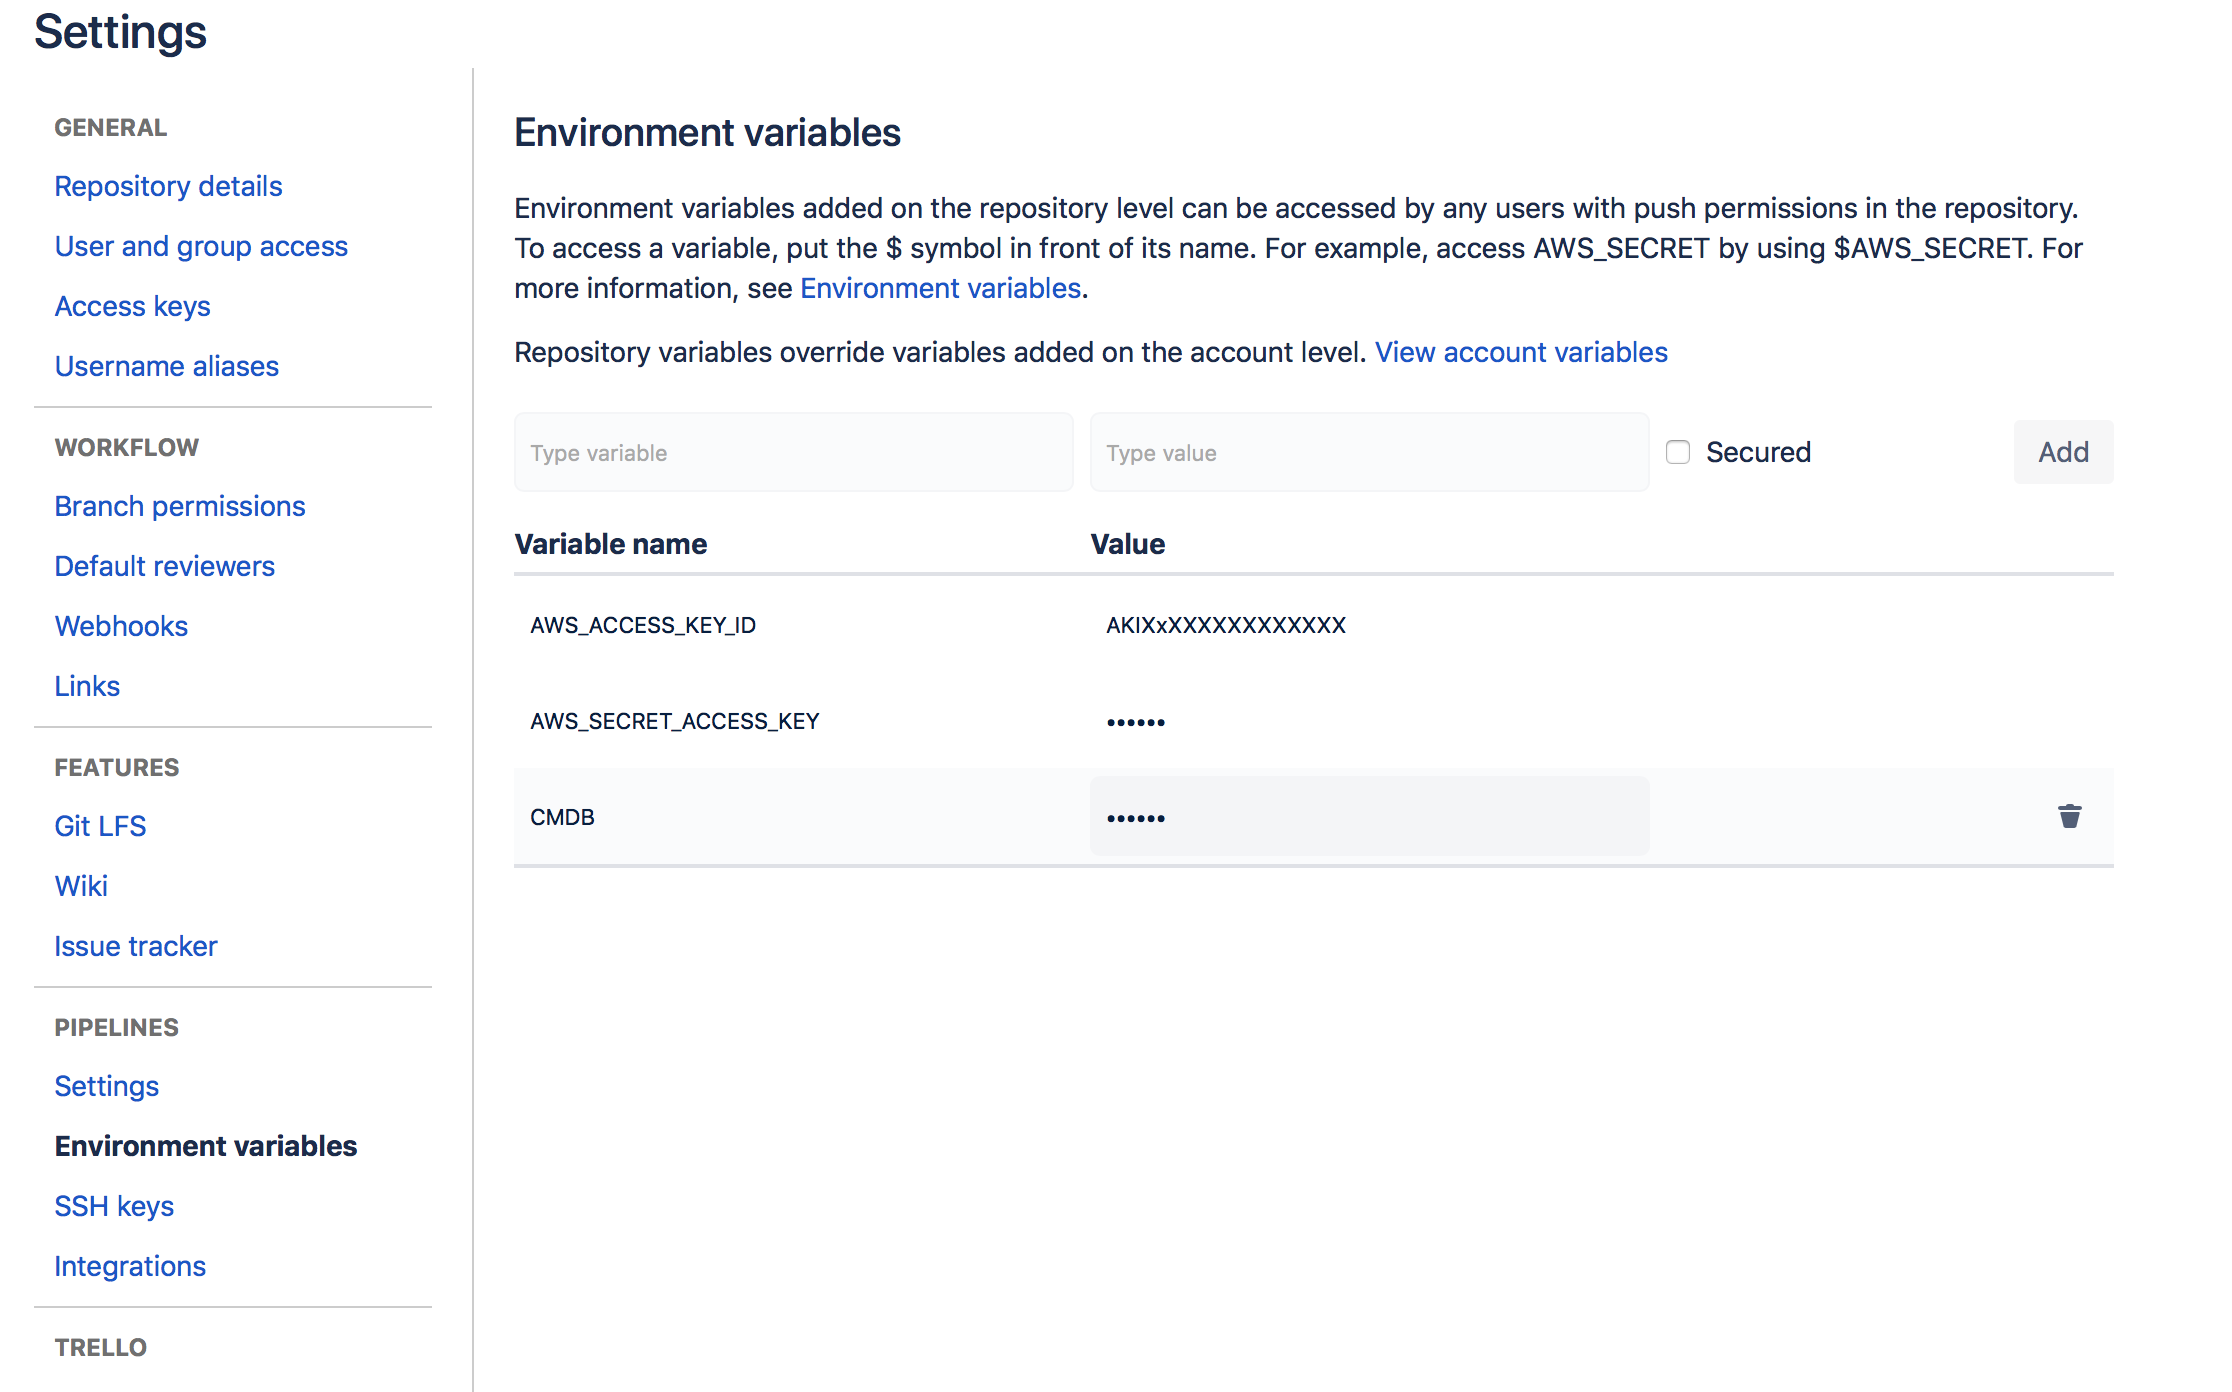
After adding the configuration files, it remains only to configure the bitpack itself. Turn on pipelines and set environment variables:
That's it, now you can push into the wizard, cut tags and ... in general, give the repository to the developers, they know what to do with it.
The topic of secrets encryption and using Cloudfront, as well as the settings of RDS, ACM, IAM, Route53, remained behind the scenes, but this is beyond the scope of the article. Those interested can find all this in the AWS documentation.
Once again a link to the repository
Go to the mines!
Create an application wireframe
The project is a typical Django application. The only difference is that application settings will be pulled through environment variables. The project repository is on a bitbucket. To create a similar one, set requirements from the list:
zappa==0.45.1
django-rest-swagger==2.1.2
djangorestframework==3.7.3
django-filter==1.1.0
Django==2.0
psycopg2==2.7.3.2
django-storages==1.6.5
As you can see, a typical set of dependencies for building a REST API and connecting PostgreSQL. Next, we go through the steps to create a typical Django application. Add to the project settings settings for connecting to the database and placing statics on S3.
STATICFILES_STORAGE = 'storages.backends.s3boto3.S3Boto3Storage'
DEFAULT_FILE_STORAGE = 'storages.backends.s3boto3.S3Boto3Storage'
#####################################
# ENV VARIABLES
#####################################
RDS_DB_NAME = os.environ.get('RDS_DB_NAME')
RDS_USERNAME = os.environ.get('RDS_USERNAME')
RDS_PASSWORD = os.environ.get('RDS_PASSWORD')
RDS_HOSTNAME = os.environ.get('RDS_HOSTNAME')
RDS_PORT = os.environ.get('RDS_PORT')
S3_BUCKET = os.environ.get('S3_BUCKET')
#####################################
#####################################
# THIS SETTINGS CAN'T BE OVERRIDED  #
#####################################
# Database
# https://docs.djangoproject.com/en/2.0/ref/settings/#databases
DATABASES = {
    'default': {
        'ENGINE': 'django.db.backends.postgresql_psycopg2',
        'NAME': RDS_DB_NAME,
        'USER': RDS_USERNAME,
        'PASSWORD': RDS_PASSWORD,
        'HOST': RDS_HOSTNAME,
        'PORT': RDS_PORT,
    }
}
AWS_STORAGE_BUCKET_NAME = S3_BUCKET
AWS_S3_CUSTOM_DOMAIN = '%s.s3.amazonaws.com' % AWS_STORAGE_BUCKET_NAME
STATIC_ROOT = 'static'
STATIC_URL = "https://%s/" % AWS_S3_CUSTOM_DOMAIN
Zappa is a framework that simplifies the deployment of a wsgi application based on the Gateway and Lambda APIs. Under the hood, there is a Cloudformation template generator and an Lambda event adapter into a wsgi request, which allows you to use the classic application operation scheme. Add finishing touches for tests as a final touch.
pytest==3.3.1
pylint==1.8.1
tox==2.9.1
pytest-django==3.1.2
docstringtest==0.3.0
and add configuration files for tox, pylint and pytest
Zappa configuration
Represents a JSON or YAML file with a set of variables. In my version, it is stored on a bucket hidden in the settings of Pipelines S3 and is copied every time an artifact is created.
I will give an example:
{
  "dev1": {
    "environment_variables": {
      "RDS_DB_NAME": "dbname",
      "RDS_USERNAME": "user",
      "RDS_PASSWORD": "pass",
      "RDS_HOSTNAME": "host",
      "RDS_PORT": "5432",
      "S3_BUCKET": "s3-bucket"
    },
    "aws_region": "us-east-1",
    "django_settings": "sample.settings",
    "project_name": "serverless",
    "runtime": "python3.6",
    "s3_bucket": "app-bucket",
    "domain":"example.com",
    "certificate_arn":""
  }
}
Everything related to the project settings is specified in environment_variables. See the zappa documentation for more details.
Bitbucket Pipelines Configuration
I send those who do not know what it is to my other articles. Here I will try to consider in detail the pipeline configuration. For CI / CD, I use the following shell script:
#!/bin/bash
setup () {
    echo  ------- SETUP -------
    apt-get update # required to install zip
    apt-get install -y zip
    pip install virtualenv
    virtualenv --python=python3 env
    source env/bin/activate
    pip install -r requirements.txt
    return $?
}
tests() {
    echo ------- TESTS -------
    pip install -r requirements-test.txt # for tests
    tox
    return $?
}
deploy() {
    echo ------- DEPLOY -------
    echo $1
    pip install awscli
    aws s3 cp s3://$CMDB/zappa_settings.json .
    zappa update $1 || zappa deploy $1
    zappa certify $1 --yes
    zappa manage $1 "migrate --noinput"
    zappa manage $1 "collectstatic --noinput"
    return $?
}
setup && test && deploy $1
The script runs in a typical container for bitbucket pipeline (image: python: 3.6.1) on Debian. Pipeline allows you to use any container with DockerHub, but the adaptation of the script will remain on your conscience.
The pipeline configuration itself is as follows:
image: python:3.6.1
pipelines:
  tags:
    release-*:
      - step:
          caches:
            - pip
          script:
            - ./ci.sh prod1
  branches:
    master:
      - step:
          caches:
            - pip
          script:
            - ./ci.sh dev1
image points to a container, production deployment is done by tags, the brunch master is deployed to dev1 environment. Those who wish can independently add a test run for the remaining brunches. Everything is simple.
After adding the configuration files, it remains only to configure the bitpack itself. Turn on pipelines and set environment variables:
That's it, now you can push into the wizard, cut tags and ... in general, give the repository to the developers, they know what to do with it.
The topic of secrets encryption and using Cloudfront, as well as the settings of RDS, ACM, IAM, Route53, remained behind the scenes, but this is beyond the scope of the article. Those interested can find all this in the AWS documentation.
Once again a link to the repository