Google Pay Integration
- Tutorial
Hello, Habr!
My name is Igor, I am an Android developer in the Trinity Digital team. Today I want to talk about a cool tool - Google Pay API . so
, if you can make purchases in your application, and at the same time you are not using In-app Billing (not Google Play is responsible for the processing), then most likely you have “Card payment” among payment options. This means that each time you have to send the user to enter card data either on beautifully designed screens with a card, or on the website of your payment service provider (hereinafter - payment processor). Already calculated how many actions the user will have to perform in order to pay for the coveted order? Yeah, now imagine that he can perform the same target action in just two tapas. We also introduced and thought, why not give users such an opportunity? The main conditions for success - the seller must be registered with Google and payment processor must cooperate with Google.
The list of Russian banks that cooperate with Android Pay:
AK Bars Bank
Alfa Bank
BINBANK
Promsvyazbank
VTB24
Bank Opening
MTS Bank
Raiffeisen Bank
Rocketbank
Rosselkhozbank
Bank Russian Standard
Sberbank
Tinkoff Bank
Point
Yandex Money
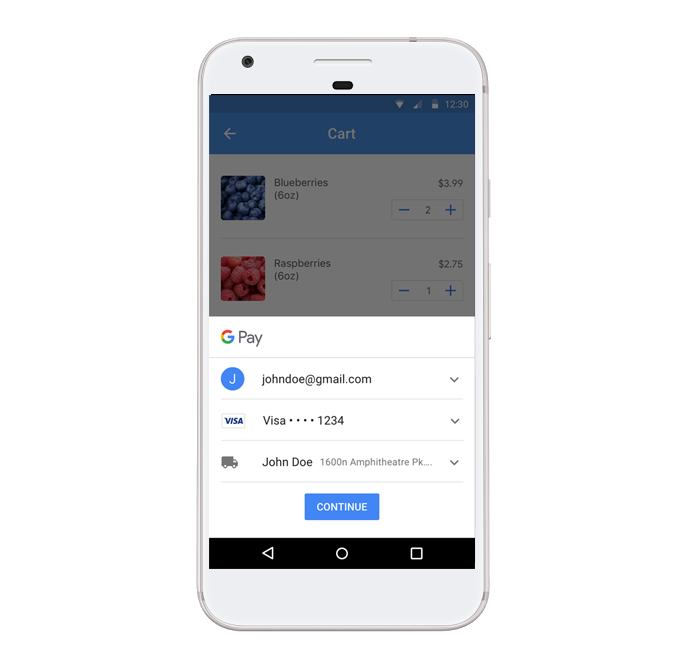
How it will look for the user : it will appear on the screen for choosing payment types in your application, clicks on the “Pay via Google” button, selects the desired card or leaves the one that is specified by default, presses the confirmation button. Done!
Remember that the Google Pay API allows users to select any card linked to either a Google account or added to Google Pay.
Now we will pass directly to integration .
Consider the steps:
The first thing worth mentioning is to warn designers about guidelines . Briefly on the points:
Compliance with these items will allow you to quickly go through all the checks and get into the white list.
For payment through Google to work, Google Play Services version no lower than 11.4 must be installed on the user's phone. But do not worry, there is a special method that will tell you whether it is possible to make a payment or whether to hide the button.
First, add the necessary dependencies to the build.gradle of the application level. Before implementation check the relevance of the versions!
Next up is updating AndroidManifest:
Now just a little remains:
That's all, in paymentData you will have a token that should be given to your server. Further logic depends on your payment processor.
Nothing complicated, just check that the WalletConstants.ENVIRONMENT_TEST constant is set , and go through the whole flow. Money will not be written off from the card, a test token will be given to you, so the payment processor should reject the payment.
Congratulations! You are ready to submit your debug build for manual verification to Google.
A few tips:
Send the build to [email protected] and wait for a response.
You were told that everything is fine and you can release the application. First of all, you will be asked to activate the application at the address (from the seller’s account (merchant)).
You may then be asked to send PCI Compliance. These documents confirm that your payment processor complies with card security standards. Ask him and send in support.
Once you have completed these two points, they will tell you that you can change WalletConstants.ENVIRONMENT_TEST to WalletConstants.ENVIRONMENT_PRODUCTION . You may also need to change TOKENIZATION_PUBLIC_KEY if you used the key from the test environment of your payment processor.
That's all, now test the real payment and you can release the release to the market!
Thank you and good luck!
My name is Igor, I am an Android developer in the Trinity Digital team. Today I want to talk about a cool tool - Google Pay API . so
, if you can make purchases in your application, and at the same time you are not using In-app Billing (not Google Play is responsible for the processing), then most likely you have “Card payment” among payment options. This means that each time you have to send the user to enter card data either on beautifully designed screens with a card, or on the website of your payment service provider (hereinafter - payment processor). Already calculated how many actions the user will have to perform in order to pay for the coveted order? Yeah, now imagine that he can perform the same target action in just two tapas. We also introduced and thought, why not give users such an opportunity? The main conditions for success - the seller must be registered with Google and payment processor must cooperate with Google.
The list of Russian banks that cooperate with Android Pay:
AK Bars Bank
Alfa Bank
BINBANK
Promsvyazbank
VTB24
Bank Opening
MTS Bank
Raiffeisen Bank
Rocketbank
Rosselkhozbank
Bank Russian Standard
Sberbank
Tinkoff Bank
Point
Yandex Money
How it will look for the user : it will appear on the screen for choosing payment types in your application, clicks on the “Pay via Google” button, selects the desired card or leaves the one that is specified by default, presses the confirmation button. Done!
Remember that the Google Pay API allows users to select any card linked to either a Google account or added to Google Pay.
Now we will pass directly to integration .
Consider the steps:
- Layout
- The code
- Testing
- Manual Verification
- Release date
1. Layout
The first thing worth mentioning is to warn designers about guidelines . Briefly on the points:
- on the screens BEFORE OR on the screen where the button “Pay via Google” will be located, the purchase price should be indicated;
- give users the opportunity to change the order data, choose the type of payment [, change the address];
- never show the details for payment in full (any numbers, dates, and so on);
- once again - “Pay via Google” - this is exactly the inscription that should be on your button if you are making an application with support for the Russian language;
- Google recommends using standard buttons. If you want to use a dark theme or a button in general with your design, then you should write in those. support at [email protected] . But even on the custom button there should be a Google logo and an inscription ... yes, I hope you understand :);
- There are no restrictions on the width, the minimum button height is 40dp. If you do it higher / wider, then remember that the text should be centered.
Compliance with these items will allow you to quickly go through all the checks and get into the white list.
2. Code
For payment through Google to work, Google Play Services version no lower than 11.4 must be installed on the user's phone. But do not worry, there is a special method that will tell you whether it is possible to make a payment or whether to hide the button.
First, add the necessary dependencies to the build.gradle of the application level. Before implementation check the relevance of the versions!
dependencies {
    compile 'com.google.android.gms:play-services-wallet:11.4.0'
    compile 'com.android.support:support-v4:24.1.1'
    compile 'com.android.support:appcompat-v7:24.1.1'
}
Next up is updating AndroidManifest:
...
Now just a little remains:
- Create a PaymentsClient in your Activity or in Fragment. In order not to clutter up these classes, you can put all the code into GooglePaymentUtils methods, for example. Then:
class MainActivity : AppCompatActivity() {
    private lateinit var googlePaymentsClient: PaymentsClient
    ...
    override fun onCreate(savedInstanceState: Bundle?) {
        super.onCreate(savedInstanceState)
        ...
        googlePaymentsClient = GooglePaymentUtils.createGoogleApiClientForPay(context)
    }
    ...
}
object GooglePaymentUtils { fun createGoogleApiClientForPay(context: Context): PaymentsClient = Wallet.getPaymentsClient(context, Wallet.WalletOptions.Builder() .setEnvironment(WalletConstants.ENVIRONMENT_TEST) .setTheme(WalletConstants.THEME_LIGHT) .build()) }
Pay attention to the constants:
WalletConstants.ENVIRONMENT_TEST - until Google allows access to the combat environment, you must use it in order to independently test flow payments. Do not be alarmed when you see a warning on the Google Pay dialog that the application is not recognized.
WalletConstants.THEME_LIGHT - a light topic of dialogue, there is also a dark one. - Well, we have a client, now we are ready to make a request whether it is possible to use payment and show a button at all.
object GooglePaymentUtils {
    fun checkIsReadyGooglePay(paymentsClient: PaymentsClient,
                              callback: (res: Boolean) -> Unit) {
        val isReadyRequest = IsReadyToPayRequest.newBuilder()
                  .addAllowedPaymentMethod(WalletConstants.PAYMENT_METHOD_CARD)
                  .addAllowedPaymentMethod(WalletConstants.PAYMENT_METHOD_TOKENIZED_CARD)
                  .build()
       val task = paymentsClient.isReadyToPay(isReadyRequest)
       task.addOnCompleteListener {
            try {
                if (it.getResult(ApiException::class.java))
                // можем показать кнопку оплаты, все хорошо
                    callback.invoke(true)
                else
                // должны спрятать кнопку оплаты
                    callback.invoke(false)
            } catch (e: ApiException) {
                e.printStackTrace()
                callback.invoke(false)
            }
        }
    }
}
PAYMENT_METHOD_CARD , PAYMENT_METHOD_TOKENIZED_CARD - they say that we want to see cards from the user's Google account and cards tied to Android Pay. - If we can show the button, then we need to put a click handler on it
btnPaymentByGoogle.setOnClickListener {
    val request = GooglePaymentUtils.createPaymentDataRequest(price)
    AutoResolveHelper.resolveTask(googlePaymentsClient.loadPaymentData(request),
                                                   context,
                                                   REQUEST_CODE)
}
Here, remember that price is a line. And most importantly, even if you call AutoResolveHelper.resolveTask from a fragment, the result will still come into activity (more on that later) [at the time of writing, it works that way, AutoResolveHelper is not able to return the result to the fragment].fun createPaymentDataRequest(price: String): PaymentDataRequest { val transaction = createTransaction(price) val request = generatePaymentRequest(transaction) return request } fun createTransaction(price: String): TransactionInfo = TransactionInfo.newBuilder() .setTotalPriceStatus(WalletConstants.TOTAL_PRICE_STATUS_FINAL) .setTotalPrice(price) .setCurrencyCode(CURRENCY_CODE) .build() private fun generatePaymentRequest(transactionInfo: TransactionInfo): PaymentDataRequest { val tokenParams = PaymentMethodTokenizationParameters .newBuilder() .setPaymentMethodTokenizationType (WalletConstants.PAYMENT_METHOD_TOKENIZATION_TYPE_DIRECT) .addParameter("publicKey", TOKENIZATION_PUBLIC_KEY) build() return PaymentDataRequest.newBuilder() .setPhoneNumberRequired(false) .setEmailRequired(true) .setShippingAddressRequired(true) .setTransactionInfo(transactionInfo) .addAllowedPaymentMethods(SUPPORTED_METHODS) .setCardRequirements(CardRequirements.newBuilder() .addAllowedCardNetworks(SUPPORTED_NETWORKS) .setAllowPrepaidCards(true) .setBillingAddressRequired(true) .setBillingAddressFormat(WalletConstants.BILLING_ADDRESS_FORMAT_FULL) .build()) .setPaymentMethodTokenizationParameters(tokenParams) .setUiRequired(true) .build() }
Here CURRENCY_CODE = “RUB”.
WalletConstants.TOTAL_PRICE_STATUS_FINAL - we say that the purchase price is final and will not change anymore.
There are also options:
WalletConstants.TOTAL_PRICE_STATUS_ESTIMATED - the cost is approximate, and may change, for example, after specifying the address.
WalletConstants.TOTAL_PRICE_STATUS_NOT_CURRENTLY_KNOWN - we still don’t know how much.
I can’t say how the last two constants behave in practice, because I didn’t check ¯ \ _ (ツ) _ / ¯.
Let's dwell on PaymentMethodTokenizationParameters and its setPaymentMethodTokenizationType method:- PAYMENT_METHOD_TOKENIZATION_TYPE_PAYMENT_GATEWAY
is only used if your payment processor is listed:
Adyen
Braintree
PaySafe
Stripe
Vantiv
WorldPay
Then.addParameter("publicKey", TOKENIZATION_PUBLIC_KEY)
you should write instead.addParameter("gateway", "yourGateway").addParameter("gatewayMerchantId", "yourMerchantIdGivenFromYourGateway") - Otherwise, the above type PAYMENT_METHOD_TOKENIZATION_TYPE_DIRECT is used .
To do this, you need to request a public key from the payment service provider and transfer it to.addParameter("publicKey", TOKENIZATION_PUBLIC_KEY)
Now it remains to create a request.
.setPhoneNumberRequired - whether the user should enter a number.
.setEmailRequired - whether the user should enter an email
.setShippingAddressRequired - whether the user should select a country. Here you can limit the number of countries for which this transaction will be executed.
.addAllowedPaymentMethods - we have it WalletConstants.PAYMENT_METHOD_CARD - cards from google account, WalletConstants.PAYMENT_METHOD_TOKENIZED_CARD - cards added to Google Pay.
In CardRequirements, we indicate that cards of Visa, Mastercard and other systems should work (MIR, for example)val SUPPORTED_NETWORKS = arrayListOf(WalletConstants.CARD_NETWORK_OTHER, WalletConstants.CARD_NETWORK_VISA, WalletConstants.CARD_NETWORK_MASTERCARD) - PAYMENT_METHOD_TOKENIZATION_TYPE_PAYMENT_GATEWAY
- That's all, we created a request, sent it through the client and we are waiting for the result through AutoResolveHelper.
As you remember, the result will come in activity .override fun onActivityResult(requestCode: Int, resultCode: Int, data: Intent?) { super.onActivityResult(requestCode, resultCode, data) when (requestCode) { LOAD_PAYMENT_DATA_REQUEST_CODE -> { when (resultCode) { Activity.RESULT_OK -> { if (data == null) return val paymentData = PaymentData.getFromIntent(data) } Activity.RESULT_CANCELED -> { // Пользователь нажал назад, // когда был показан диалог google pay // если показывали загрузку или что-то еще, // можете отменить здесь } AutoResolveHelper.RESULT_ERROR -> { if (data == null) return // Гугл сам покажет диалог ошибки. // Можете вывести логи и спрятать загрузку, // если показывали val status = AutoResolveHelper.getStatusFromIntent(data) Log.e("GOOGLE PAY", "Load payment data has failed with status: $status") } else -> { } } } else -> { } } }
That's all, in paymentData you will have a token that should be given to your server. Further logic depends on your payment processor.
3. Testing
Nothing complicated, just check that the WalletConstants.ENVIRONMENT_TEST constant is set , and go through the whole flow. Money will not be written off from the card, a test token will be given to you, so the payment processor should reject the payment.
4. Sending for manual inspection
Congratulations! You are ready to submit your debug build for manual verification to Google.
A few tips:
- If your application supports only Russian, then prepare screenshots with instructions on where to click.
- If there is any specificity in the order process, then describe in detail.
- Create a test account specifically for Google and send directly with the build.
Send the build to [email protected] and wait for a response.
5. Release
You were told that everything is fine and you can release the application. First of all, you will be asked to activate the application at the address (from the seller’s account (merchant)).
You may then be asked to send PCI Compliance. These documents confirm that your payment processor complies with card security standards. Ask him and send in support.
Once you have completed these two points, they will tell you that you can change WalletConstants.ENVIRONMENT_TEST to WalletConstants.ENVIRONMENT_PRODUCTION . You may also need to change TOKENIZATION_PUBLIC_KEY if you used the key from the test environment of your payment processor.
That's all, now test the real payment and you can release the release to the market!
Thank you and good luck!