January 23, 2018 at 11:57
TypeScript real-time applications: developing chat using WebSocket, Node, and Angular
- Transfer
I recently created a simple chat using only TypeScript. The main goal of this project was to write an application demonstrating the use of this language on both the client and the server. The client part of the chat is based on the latest version of Angular. The server is based on Node.js. The interaction between them is organized using the WebSocket protocol.
In this article you will learn how to create the chat in question from scratch. Here, by the way, looks like working with him.
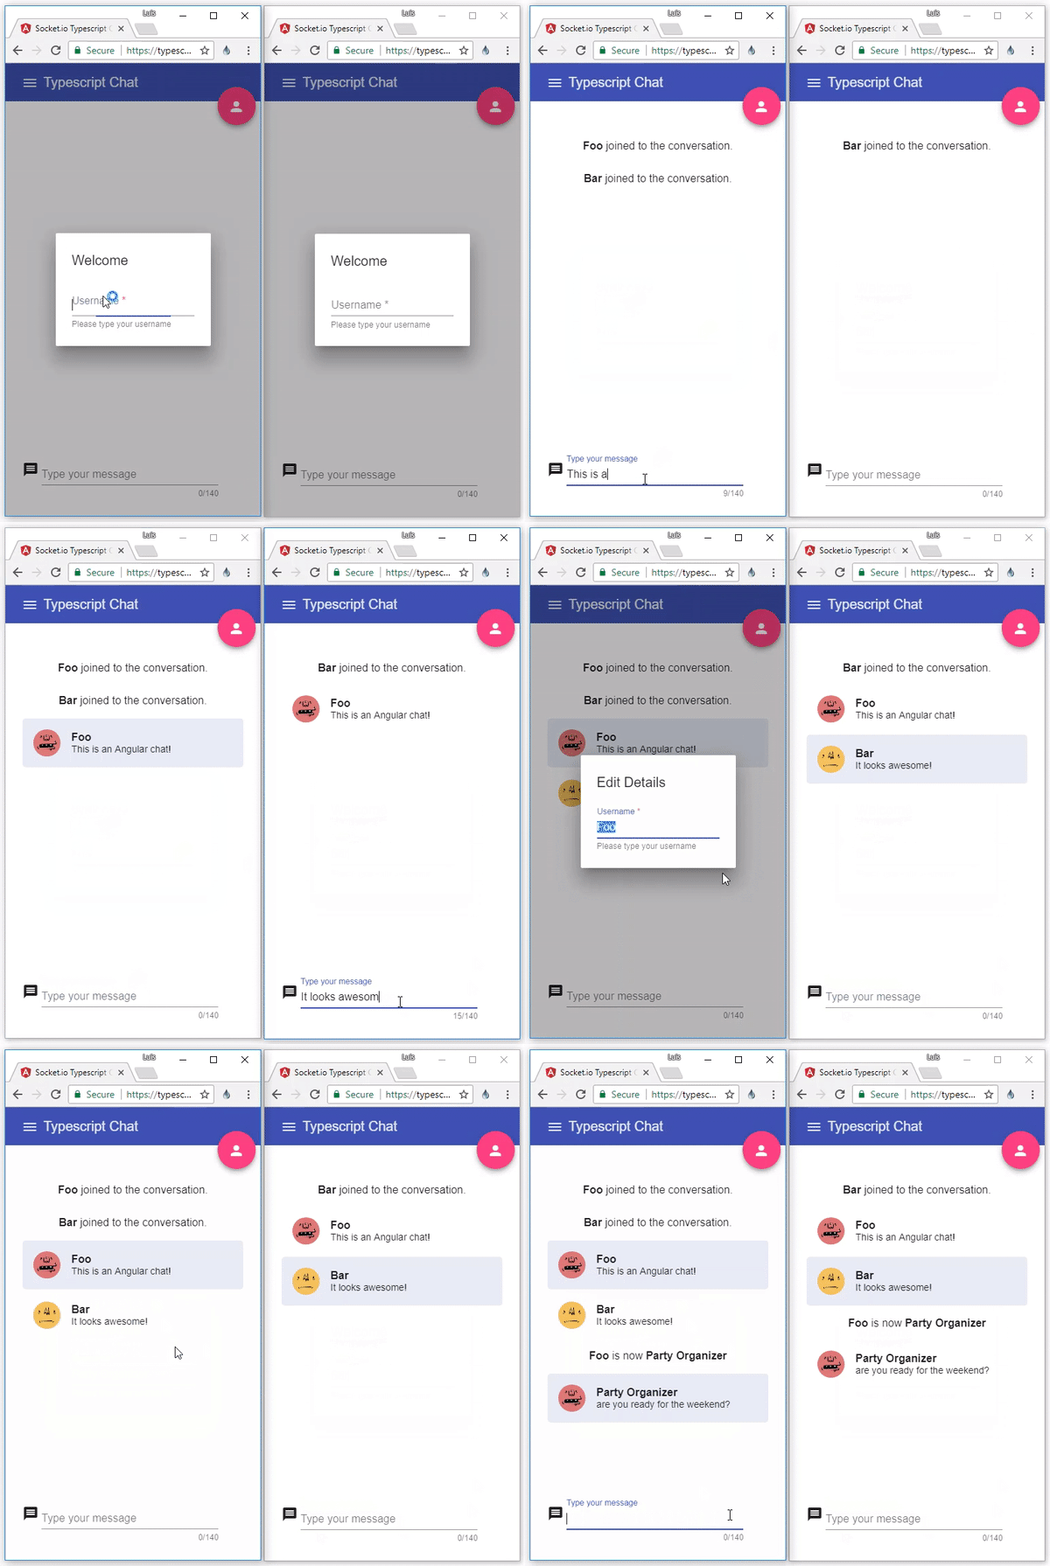
TypeScript Chat
According to this definition from Wikipedia, a real-time application allows interested entities to receive information immediately after it has been published, without the need for a periodic survey of the source of information. Thus, this kind of application should give users the feeling that certain actions occur instantly, without delay.
WebSocket is a protocol that allows you to organize a bi-directional data channel. In our case, this means that the browser and the web server can communicate in real time, sending messages to each other when there is an open connection between them.
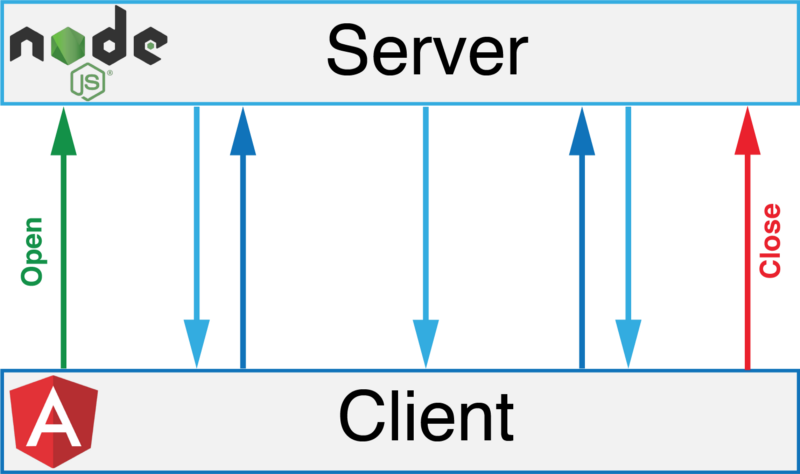
WebSocket Communication
We will place the code related to the client and server parts of the application in separate folders. The structure of the finished application is shown below. We will consider the details below when we talk about the key files of our project.
Since the WebSocket protocol is a specification , several practical implementations can be found . Here you can useJavaScript , TypeScript, or any other programming language.
In this case, we will use the Socket.IO library . This is one of the fastest and most reliable libraries that implements real-time data exchange capabilities.
TypeScript offers the programmer great features , the development team keeps the language up to date. In addition, the use of typing can reduce the number of errors in the code, compared to using regular JS. For me, these reasons are quite enough for using TS on the server.
Create a file
In addition, you will need to establish some development dependencies in order to integrate into the project
Create a file
Using the capabilities of static typing, we will create a small data model:
Take a look at the directory structure
The main files in the directory
Here is the file code
Here is the file
The code above gives the following classes and the relationships between them:
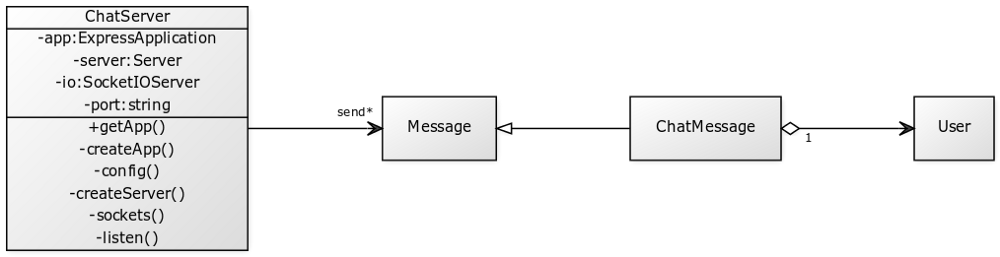
Server Class Diagram
In order to get the JavaScript files needed by the V8 engine on which Node.js is based, add the task
As you can see, the output of the build process (JS files) will be located in the directory
Now, in order to start the server, you need to use the following command:
Create a folder for the client using the Angular CLI :
Install the project dependencies. Here you can execute the command
To take advantage of the Angular Material component set in a project created using the Angular CLI, take a look at the latest manual on material.angular.io and act on it.
In accordance with the recommendations on the structure of Angular projects, we will create modules
You can do this from the command line:
In order to evaluate the relationship between these modules, analyze the files
Now you need to connect the modules to our client application
Before creating chat components, create a new module:
Now add the component to this module:
In order to use web sockets and our own models, create another folder
The result should be the following structure:
Since our Angular application supports RxJS, you can use observable objects to work with Socket.IO events. Therefore, the file
Now we are ready to respond to messages from the server, so let's look at the file
As soon as it is
Functions
From this material, you learned how to use a TypeScript to write a real-time application - a chat in which TS is used both on the client and on the server, and in which technologies such as WebSockets, Node.js and Angular are involved. The source code of the project can be found here . And here is a working chat (open a couple of tabs with this page in your browser in order to experience it).
Dear readers! Do you use TypeScript to develop server applications?

In this article you will learn how to create the chat in question from scratch. Here, by the way, looks like working with him.
TypeScript Chat
About real-time applications
According to this definition from Wikipedia, a real-time application allows interested entities to receive information immediately after it has been published, without the need for a periodic survey of the source of information. Thus, this kind of application should give users the feeling that certain actions occur instantly, without delay.
WebSocket Protocol
WebSocket is a protocol that allows you to organize a bi-directional data channel. In our case, this means that the browser and the web server can communicate in real time, sending messages to each other when there is an open connection between them.
WebSocket Communication
Application structure
We will place the code related to the client and server parts of the application in separate folders. The structure of the finished application is shown below. We will consider the details below when we talk about the key files of our project.
server/
|- src/
|- package.json
|- tsconfig.json
|- gulpfile.js
client/
|- src/
|- package.json
|- tsconfig.json
|- .angular-cli.json
Choosing a WebSocket Implementation
Since the WebSocket protocol is a specification , several practical implementations can be found . Here you can use
In this case, we will use the Socket.IO library . This is one of the fastest and most reliable libraries that implements real-time data exchange capabilities.
Why use TypeScript on a server?
TypeScript offers the programmer great features , the development team keeps the language up to date. In addition, the use of typing can reduce the number of errors in the code, compared to using regular JS. For me, these reasons are quite enough for using TS on the server.
Server Application Initialization
Create a file
package.jsonand install the following dependencies:npm install --save express socket.io @types/express @types/socket.ioIn addition, you will need to establish some development dependencies in order to integrate into the project
gulpand typescript, all this will be useful to us during the creation and assembly of the finished project:npm install --save-dev typescript gulp gulp-typescriptTypeScript Compiler Setup
Create a file
tsconfig.jsonand put the following into it:{
"files": [
"src/*.ts",
"src/model/*.ts"
],
"compilerOptions": {
"target": "es5"
}
}Data Model Description
Using the capabilities of static typing, we will create a small data model:
export class User {
    constructor(private name: string) {}
}
export class Message {
    constructor(private from: User, private content: string) {}
}
export class ChatMessage extends Message{
    constructor(from: User, content: string) {
        super(from, content);
    }
}
Take a look at the directory structure
server/src:server/
|- src/
|- model/
|- message.model.ts
|- user.model.ts
|- index.ts
|- server.ts
|- package.json
|- tsconfig.json
|- gulpfile.jsChat server implementation
The main files in the directory
serverare index.tsand chat-server.ts. The first allows you to create and export the application ChatServer, while the second contains the express and Socket.IO configurations : Here is the file code
index.js:import { ChatServer } from './chat-server';
let app = new ChatServer().getApp();
export { app };Here is the file
chat-server.ts:import { createServer, Server } from 'http';
import * as express from 'express';
import * as socketIo from 'socket.io';
import { Message } from './model';
export class ChatServer {
public static readonly PORT:number = 8080;
private app: express.Application;
private server: Server;
private io: SocketIO.Server;
private port: string | number;
constructor() {
this.createApp();
this.config();
this.createServer();
this.sockets();
this.listen();
}
private createApp(): void {
this.app = express();
}
private createServer(): void {
this.server = createServer(this.app);
}
private config(): void {
this.port = process.env.PORT || ChatServer.PORT;
}
private sockets(): void {
this.io = socketIo(this.server);
}
private listen(): void {
this.server.listen(this.port, () => {
console.log('Running server on port %s', this.port);
});
this.io.on('connect', (socket: any) => {
console.log('Connected client on port %s.', this.port);
socket.on('message', (m: Message) => {
console.log('[server](message): %s', JSON.stringify(m));
this.io.emit('message', m);
});
socket.on('disconnect', () => {
console.log('Client disconnected');
});
});
}
public getApp(): express.Application {
return this.app;
}
}Server Classes
The code above gives the following classes and the relationships between them:
Server Class Diagram
Build and start the server
In order to get the JavaScript files needed by the V8 engine on which Node.js is based, add the task
buildto the file gulpfile.js:var gulp = require("gulp");
var ts = require("gulp-typescript");
var tsProject = ts.createProject("tsconfig.json");
gulp.task("build", function () {
return tsProject.src()
.pipe(tsProject())
.js.pipe(gulp.dest("./dist"));
});As you can see, the output of the build process (JS files) will be located in the directory
dist. In order to complete the assembly, you will need the following command:gulp buildNow, in order to start the server, you need to use the following command:
node dist/index.jsChat client development
Create a folder for the client using the Angular CLI :
ng new typescript-chat-client --routing --prefix tcc --skip-installInstall the project dependencies. Here you can execute the command
npm install, but I prefer to use Yarn in this step :cd typescript-chat-client
yarn installAdding an Angular Material Component Set to a Project
To take advantage of the Angular Material component set in a project created using the Angular CLI, take a look at the latest manual on material.angular.io and act on it.
In accordance with the recommendations on the structure of Angular projects, we will create modules
sharedand material:client/
|- src/
|- app/
|- chat/
|- shared/
|- material/
|- material.module.ts
|- shared.module.ts
|-app.module.tsYou can do this from the command line:
ng generate module shared --module app
ng generate module shared/material --module shared
In order to evaluate the relationship between these modules, analyze the files
app.module.tsand shared.module.ts.Connect express and Socket.IO
Now you need to connect the modules to our client application
expressand socket.io:npm install express socket.io --saveChat Modules and Components
Before creating chat components, create a new module:
ng generate module chat --module appNow add the component to this module:
ng generate component chat --module chatIn order to use web sockets and our own models, create another folder
shared. This time inside the directory chat:ng generate service chat/shared/services/socket --module chat
ng generate class chat/shared/model/user
ng generate class chat/shared/model/messageThe result should be the following structure:
client/
|- src/
   |- app/
      |- chat/
         |- shared/
           |- model/
              |- user.ts
              |- message.ts
           |- services/
              |- socket.service.ts
      |- shared/
      |-app.module.ts
Observed objects and web sockets
Since our Angular application supports RxJS, you can use observable objects to work with Socket.IO events. Therefore, the file
socket.services.tswill look like this:import { Injectable } from '@angular/core';
import { Observable } from 'rxjs/Observable';
import { Observer } from 'rxjs/Observer';
import { Message } from '../model/message';
import { Event } from '../model/event';
import * as socketIo from 'socket.io-client';
const SERVER_URL = 'http://localhost:8080';
@Injectable()
export class SocketService {
private socket;
public initSocket(): void {
this.socket = socketIo(SERVER_URL);
}
public send(message: Message): void {
this.socket.emit('message', message);
}
public onMessage(): Observable {
return new Observable(observer => {
this.socket.on('message', (data: Message) => observer.next(data));
});
}
public onEvent(event: Event): Observable {
return new Observable(observer => {
this.socket.on(event, () => observer.next());
});
}
} Now we are ready to respond to messages from the server, so let's look at the file
chat.component.ts(here the code regarding Material and user interface events is omitted):import { Component, OnInit } from '@angular/core';
import { Action } from './shared/model/action';
import { Event } from './shared/model/event';
import { Message } from './shared/model/message';
import { User } from './shared/model/user';
import { SocketService } from './shared/services/socket.service';
@Component({
selector: 'tcc-chat',
templateUrl: './chat.component.html',
styleUrls: ['./chat.component.css']
})
export class ChatComponent implements OnInit {
action = Action;
user: User;
messages: Message[] = [];
messageContent: string;
ioConnection: any;
constructor(private socketService: SocketService) { }
ngOnInit(): void {
this.initIoConnection();
}
private initIoConnection(): void {
this.socketService.initSocket();
this.ioConnection = this.socketService.onMessage()
.subscribe((message: Message) => {
this.messages.push(message);
});
this.socketService.onEvent(Event.CONNECT)
.subscribe(() => {
console.log('connected');
});
this.socketService.onEvent(Event.DISCONNECT)
.subscribe(() => {
console.log('disconnected');
});
}
public sendMessage(message: string): void {
if (!message) {
return;
}
this.socketService.send({
from: this.user,
content: message
});
this.messageContent = null;
}
public sendNotification(params: any, action: Action): void {
let message: Message;
if (action === Action.JOINED) {
message = {
from: this.user,
action: action
}
} else if (action === Action.RENAME) {
message = {
action: action,
content: {
username: this.user.name,
previousUsername: params.previousUsername
}
};
}
this.socketService.send(message);
}
}As soon as it is
ChatComponentinitialized, the component subscribes to monitored objects SocketServicein order to receive connection-related events or incoming messages. Functions
sendMessageand sendNotificationwill send, respectively, messages and notifications through the same service. Notifications are used to notify the system that a new user has joined the chat and to rename the chat participants.Summary
From this material, you learned how to use a TypeScript to write a real-time application - a chat in which TS is used both on the client and on the server, and in which technologies such as WebSockets, Node.js and Angular are involved. The source code of the project can be found here . And here is a working chat (open a couple of tabs with this page in your browser in order to experience it).
Dear readers! Do you use TypeScript to develop server applications?