Docker-compose: the perfect working environment
- Tutorial
- Recovery mode

Hello!
Recently, I am increasingly thinking about the optimality of the workflow and would like to share my research on this issue.
In this post we’ll talk about docker-compose , which in my opinion is a panacea for organizing and optimizing the developer’s workflow.
I will describe everything almost on my fingers, so if you have never heard of docker before (which is strange), you have never worked with it and want to figure it out, then I ask for a cat.
Foreword
In the article, I deliberately simplify some points, do not go into details and touch upon many issues superficially.
I do this with a full understanding of my actions, and I believe that there is no need to climb under the hood if everything works.
Those who think otherwise - this is your full right, but just do not need to impose your point of view.
Thank!
Docker
Technology that allows you to easily (in every sense) deploy the necessary working environment.
You can learn more from the links at the end of the article, but it’s better not to switch to it now, so as not to clog your brain.
Docker-compose
A package manager (similar to composer and npm, only docker has containers), which allows you to describe the necessary structure in one file (config).
You can also learn more from the links at the end of the article.
Docker hub
Container repository (similar to packagist and npm).
Important note : carefully read the description of the image, 70-80% of stupid questions are described there, do not waste time on Google.
Installation
I will not rewrite the docker documentation, so just throw the links:
Installing ordinary software (software), no problems should arise.
If you do arise, then you can’t read on, probably you accidentally stumbled upon this article and the development as a whole ...
If you installed docker under Windows, you need to work through the special Docker Quickstart Terminal console . After installation, the appropriate shortcut should appear on the desktop.
Project structure
First, let's determine the structure of the projects:
- project 1
- project 2
- project N
- src
- container 1
- container 2
- container N
- docker-compose.yml
Each project must have docker-compose.yml and the src directory.
Also, for each container there should be its own directory (matching the name of the container), where all the information necessary for the container to work (configs, data, ...) will be stored.
CMD / Terminal
To work with docker and compose, we will use only a few commands:
- docker ps - view all containers ( more ),
- docker-compose up --build - build the project. The build parameter is used to force compose to recreate containers. ( more ).
Description of other teams can be found on the official website .
Let's get down to business.
apache
https://hub.docker.com/_/httpd/
Let's start with the most popular server - Apache.
Create a project directory:
- project
- src
- docker-compose.yml
The config will look like this:
version: '3'
services:
  apache:
    image: httpd:2.4
    ports:
      - 80:80
    volumes:
      - ./src:/usr/local/apache2/htdocs
What's going on here:
image: httpd:2.4- indicate which image we need and its version (a list of available versions and modifications can be found in the corresponding docker-hub).ports: 80:80- forward ports between docker and our machine, i.e. all requests that will go to port 80 of our machine will be broadcast to port docker 80.volumes: ./src:/usr/local/apache2/htdocs- link the directory on our machine, from the working directory of apache, i.e. all files located in the src directory will be available for apache, as if they are in the htdocs directory (the reverse also works, everything created in docker is "copied" to the local machine).
Create the src / index.html file in the working directory with the contents:
Hi, I'amApacheWe launch our project:
docker-compose up --buildWe go to the browser at the PC address and observe the greeting of our server.
To destroy the containers of our project, it is enough to execute Ctrl + C in the console.
If the docker works through VirtualBox, then you need to go over the IP virtualka. In any case, if you work through the Docker Quickstart Terminal, then the address will be displayed when the console starts.
Work in the background
If you need to run docker and continue to work in the console, then you can run the project in the background:
docker-compose up --build -dAfter starting, the console will be available for work.
To destroy a container in this situation, you need to stop it and delete it, but first, you need to find out its ID:
docker psIn my case, I got the following conclusion:
CONTAINER ID        IMAGE       ...
988e27da7bdf        httpd:2.4   ...
Now stop and delete our container:
docker stop 988e27da7bdf
docker rm 988e27da7bdf
Or you can act rudely and immediately delete:
docker rm -f 988e27da7bdfnginx
https://hub.docker.com/_/nginx/
The nginx config is built on the same scheme as apache: image, ports, working directory. The file looks like this:
version: '3'
services:
  nginx:
    image: nginx:1.13
    ports:
      - 80:80
    volumes:
      - ./src:/usr/share/nginx/html
Create the src / index.html file in the working directory with the contents:
Hi, I'amNginxWe go into the browser, and we see the greeting of the next server.
php + apache
If we talk about a bunch of PHP and Apache, then there is already a ready-made image for it, so we will talk more about linking containers. And now just a config:
version: '3'
services:
  web:
    image: php:7.2-apache
    ports:
      - 80:80
    volumes:
      - ./src:/var/www/html
Create the src / index.php file in the working directory with the contents:
<?php
phpinfo();
We check its operation in the browser.
php + nginx
https://hub.docker.com/_/nginx/
https://hub.docker.com/_/php/
In this bundle, php will be in fpm format. Schematically, it looks like this:
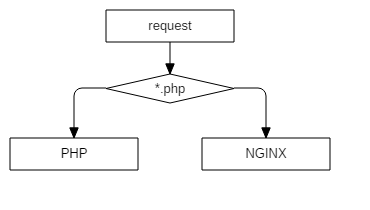
Accordingly, we will need to rewrite the server config.
To do this, in addition to the working directory, you will also need to link the server configuration file:
version: '3'
services:
  nginx:
    image: nginx:1.13
    ports:
      - 80:80
    volumes:
      - ./src:/usr/share/nginx/html
      - ./nginx/nginx.conf:/etc/nginx/nginx.conf
    depends_on:
      - php
  php:
    image: php:7.2-fpm
    volumes:
      - ./src:/usr/share/nginx/html
What changed:
volumes: ./nginx/nginx.conf:/etc/nginx/nginx.conf- link the nginx config file;depends_on: php- indicate the dependence of nginx on php, i.e. in fact, this is a guarantee that the php container will start earlier than nginx.
If we do not specify depends_on , then we can catch a similar error:
nginx_1  | 2018/01/0508:56:42 [emerg] 1#1: host notfoundin upstream "php" in /etc/nginx/nginx.conf:23
nginx_1  | nginx: [emerg] host notfoundin upstream "php" in /etc/nginx/nginx.conf:23
We create the file /nginx/nginx.conf in the directory of our project. The config itself looks like this:
worker_processes1;
events {
    worker_connections1024;
}
http {
    include       mime.types;
    default_type  application/octet-stream;
    sendfileon;
    keepalive_timeout65;
    server {
        root   /usr/share/nginx/html;
        listen80;
        server_name  localhost;
        location / {
            index  index.html index.htm;
        }
        location~ \.php$ {
            fastcgi_pass   php:9000;
            fastcgi_index  index.php;
            include fastcgi_params;
            fastcgi_param SCRIPT_FILENAME $document_root$fastcgi_script_name;
            fastcgi_param PATH_INFO $fastcgi_path_info;
        }
    }
}
Everything is standard, as long as the root directive matches docker-compose.yml.
Looking at the config, please pay attention to the fastcgi_pass directive , namely the value php:9000.
Usually, when a local server is being configured localhost:9000, BUT because Since php is located in another container, we should contact it (docker itself will "substitute" the IP address of the container, in fact, all the magic is hidden in the simple addition of the hosts file).
To make this possible, we need to add the links directive to our docker-compose (although in fact it is not necessary, more details ).
After all the actions, the directory of our project looks like this:
- project
- src
- index.php
- nginx
- nginx.conf
- docker-compose.yml
- src
We launch, check, rejoice!
php + apache + nginx
https://hub.docker.com/_/nginx/
https://hub.docker.com/_/php/
https://hub.docker.com/_/httpd/
Probably the most popular bundle for web projects. Schematically, it looks like this:

A couple of comments:
- php is used as php-fpm because it is faster and more fashionable;
- apache is used because htaccess is also popular.
In order to configure everything, we will also need to link the apache config, and thus docker-compose will look like this:
version: '3'
services:
  apache:
    image: httpd:2.4
    volumes:
      - ./src:/var/www/html
      - ./httpd/httpd.conf:/usr/local/apache2/conf/httpd.conf
    depends_on:
      - php
  nginx:
    image: nginx:1.13
    ports:
      - 80:80
    volumes:
      - ./src:/var/www/html
      - ./nginx/nginx.conf:/etc/nginx/nginx.conf
    depends_on:
      - apache
  php:
    image: php:7.2-fpm
    volumes:
      - ./src:/var/www/html
Since I did not find a normal config on the Internet (oops, I just didn’t look for it), and just docker was at hand, it was decided to pull it out of the standard container.
All fit into 3 teams:
docker run -d httpd:2.4
docker ps
docker cp [ID контейнера]:/usr/local/apache2/conf/httpd.conf ./httpd.conf
After executing these commands, the httpd.conf file will appear in the current directory, which we will use as the basis.
In essence, this is a simple copy from a running container.
We create the file /httpd/httpd.conf in the working directory, which after editing looks like this:
ServerRoot"/usr/local/apache2"Listen 80
LoadModule authn_file_module modules/mod_authn_file.so
LoadModule authn_core_module modules/mod_authn_core.so
LoadModule authz_host_module modules/mod_authz_host.so
LoadModule authz_groupfile_module modules/mod_authz_groupfile.so
LoadModule authz_user_module modules/mod_authz_user.so
LoadModule authz_core_module modules/mod_authz_core.so
LoadModule access_compat_module modules/mod_access_compat.so
LoadModule auth_basic_module modules/mod_auth_basic.so
LoadModule reqtimeout_module modules/mod_reqtimeout.so
LoadModule filter_module modules/mod_filter.so
LoadModule mime_module modules/mod_mime.so
LoadModule log_config_module modules/mod_log_config.so
LoadModule env_module modules/mod_env.so
LoadModule headers_module modules/mod_headers.so
LoadModule setenvif_module modules/mod_setenvif.so
LoadModule version_module modules/mod_version.so
LoadModule unixd_module modules/mod_unixd.so
LoadModule status_module modules/mod_status.so
LoadModule autoindex_module modules/mod_autoindex.so
LoadModule dir_module modules/mod_dir.so
LoadModule alias_module modules/mod_alias.so
# additionalLoadModule proxy_module modules/mod_proxy.so
LoadModule proxy_fcgi_module modules/mod_proxy_fcgi.so
ServerAdmin [email protected]
<Directory />AllowOverride none
    Requireall denied
</Directory>DocumentRoot"/var/www/html"<Directory "/var/www/html">Options Indexes FollowSymLinks Includes ExecCGI
    AllowOverrideAllRequireall granted
</Directory><IfModule unixd_module>User daemon
    Group daemon
</IfModule><IfModule dir_module>DirectoryIndex index.php index.pl index.cgi index.asp index.shtml index.html index.htm \
                   default.php default.pl default.cgi default.asp default.shtml default.html default.htm \
                   home.php home.pl home.cgi home.asp home.shtml home.html home.htm
</IfModule><Files ".ht*">Requireall denied
</Files><IfModule log_config_module>LogFormat"%h %l %u %t \"%r\" %>s %b \"%{Referer}i\" \"%{User-Agent}i\"" combined
    LogFormat"%h %l %u %t \"%r\" %>s %b" common
    <IfModule logio_module>LogFormat"%h %l %u %t \"%r\" %>s %b \"%{Referer}i\" \"%{User-Agent}i\" %I %O" combinedio
    </IfModule></IfModule><IfModule alias_module>ScriptAlias /cgi-bin/ "/usr/local/apache2/cgi-bin/"</IfModule><Directory "/usr/local/apache2/cgi-bin">AllowOverrideAllOptions None
    Requireall granted
</Directory><IfModule headers_module>RequestHeader unset Proxy early
</IfModule><IfModule mime_module>TypesConfig conf/mime.types
    AddType application/x-compress .Z
    AddType application/x-gzip .gz .tgz
    AddType text/html .shtml
    AddHandler cgi-script .cgi .pl .asp
    AddOutputFilter INCLUDES .shtml
</IfModule>## Настройка FPM#<IfModule proxy_module><FilesMatch "\.php$">SetHandler"proxy:fcgi://php:9000"</FilesMatch></IfModule>
Create the file /nginx/nginx.conf in the working directory with the following contents:
worker_processes1;
events {
    worker_connections1024;
}
http {
    include       mime.types;
    default_type  application/octet-stream;
    sendfileon;
    keepalive_timeout65;
    server {
        listen80;
        server_name  localhost;
        location~ \.(jpg|jpeg|gif|png|ico|css|zip|tgz|gz|rar|bz2|doc|xls|exe|pdf|ppt|txt|tar|mid|midi|wav|bmp|rtf|js)$ {
            root /var/www/html;
        }
        location~ /\.ht {
            deny  all;
        }
        location / {
            proxy_pass http://apache;
            proxy_set_header Host $host;
            proxy_set_header X-Real-IP $remote_addr;
            proxy_set_header X-Forwarded-For $remote_addr;
            proxy_connect_timeout120;
            proxy_send_timeout120;
            proxy_read_timeout180;
        }
    }
}
In the line proxy_pass http://apachewe again indicate not the IP address, but the name of the container (remember the magic from hosts).
For testing, we will need to check if PHP is working and whether Apache is working.
We form the following project structure:
- nginx
- nginx.conf
- httpd
- httpd.conf
- src
- protected
- .htaccess
- index.html
- index.php
- protected
- docker-compose.yml
The contents of .htaccess :
Deny fromallThe contents of index.php :
<?php
phpinfo();
The contents of index.html :
Apache not working :-(If everything is configured correctly, then the picture should be as follows:
- /index.php - php information will open
- /protected/index.html - 403 apache error will open
- /protected/.htaccess - a 403 nginx error will open (they differ visually)
mariadb + phpmyadmin
https://hub.docker.com/_/mariadb/
https://hub.docker.com/r/phpmyadmin/phpmyadmin/
Let's talk about databases.
The config for the connection is as follows:
version: '3'
services:
  mariadb:
    image: mariadb:10.3
    restart: always
    volumes:
      - ./mariadb:/var/lib/mysql
    environment:
      MYSQL_ROOT_PASSWORD: qwerty
  phpmyadmin:
    image: phpmyadmin/phpmyadmin
    links:
      - mariadb:db
    ports:
      - 8765:80
    environment:
      MYSQL_ROOT_PASSWORD: qwerty
    depends_on:
      - mariadb
For mariadb and phpmyadmin, we specified the environment directive , which contains container-specific variables (for details, see the repositories of the containers themselves).
In this case, this is the password for the root user.
For phpmyadmin, we manually specified the links directive:
links:
      -mariadb:db
This is necessary so that phpmyadmin knows which database it will connect to.
If the mariadb container was called db, then you would not need to specify this directory.
For mariadb, we linked the data directory:
volumes:
    - ./mariadb:/var/lib/mysql
This is done so that the data is stored in the directory of our project, and not inside the container.
If you are not working on a linux machine, then you will have problems placing the database data on the local machine.
Unfortunately, these insurmountable circumstances have not yet been overcome.
Who has the solution, please share.
However, by default (even after the destruction of the container), the database data is saved and you can recreate the container as many times as you like - the data will be stored in the bowels of the local machine.
php + apache + nginx + mariadb + phpmyadmin
https://hub.docker.com/_/nginx/
https://hub.docker.com/_/php/
https://hub.docker.com/_/httpd/
https: //hub.docker. com / _ / mariadb /
https://hub.docker.com/r/phpmyadmin/phpmyadmin/
Well, now we combine our configs, and we get a good web environment:
version: '3'
services:
  apache:
    image: httpd:2.4
    volumes:
      - ./src:/var/www/html
      - ./httpd/httpd.conf:/usr/local/apache2/conf/httpd.conf
    depends_on:
      - php
  nginx:
    image: nginx:1.13
    ports:
      - 80:80
    volumes:
      - ./src:/var/www/html
      - ./nginx/nginx.conf:/etc/nginx/nginx.conf
    depends_on:
      - apache
  php:
    build:
      ./php
    volumes:
      - ./src:/var/www/html
      - ./php/php.ini:/usr/local/etc/php/php.ini
    depends_on:
      - mariadb
  mariadb:
    image: mariadb:10.3
    volumes:
      - ./mariadb:/var/lib/mysql
    environment:
      MYSQL_ROOT_PASSWORD: qwerty
  phpmyadmin:
    image: phpmyadmin/phpmyadmin
    links:
      - mariadb:db
    ports:
      - 8765:80
    environment:
      MYSQL_ROOT_PASSWORD: qwerty
    depends_on:
      - mariadb
For php, we added the build directive (in more detail ), in which we specified the php directory where the Dockerfile is stored with the following contents:
FROM php:7.2-apache
RUN apt-getupdate
RUN docker-php-ext-install pdo pdo_mysql mysqli
In this file we update repositories and install php modules ( more about docker-php-ext-install ).
We also linked the php config so that we can configure it in the way we need.
The contents of php.ini can be taken, for example, here .
We launch, check, rejoice!
If everything is done correctly, then index.php will work without errors, and the database service files will appear in the project / mysql directory .
Docker production
Unfortunately, I can’t say anything on this issue, but official documentation can say .
If you have experience using docker on combat projects, please share your experience in the comments: is it worth it, what difficulties and pitfalls did you encounter, and other useful information for young and inexperienced.
Conclusion
That's all that I wanted to share.
As you can see, it is not necessary to know how docker works in order to successfully work with it.
Yes, of course, for fine-tuning or complex tasks, you must already delve into the docker jungle, but in the average statistical case, this is not necessary.
If you have something to add, or you notice some kind of jamb, or you disagree with something, then please comment, discuss ;-)
Useful links (aka list of references)
Official site documentation
Overview of Docker Compose (official site)
Complete Docker practical guide: from scratch to an AWS cluster
Understanding Docker
Complete automation of development with docker-compose
PS
To be honest, I don’t understand where so much negativity comes from.
Judging by the comments, the main claims to the wording and terminology, and this taking into account the fact that in the preface I wrote that I deliberately simplify many points.
The purpose of the article is to show how easy it is to work with docker-compose, how instead of deploying 100500 environments and software for each of your projects, you can use docker-compose and be content.
There is no talk about prodUction (one paragraph is enough), about deploy, about migration between dev and prod environment.
No, the article is not about that.
PPS
Many thanks to krocos Caravus Vershnik Fesor for helpful comments.
Only registered users can participate in the survey. Please come in.









