Unreal Engine Tutorial. Part 7: sound
- Transfer
- Tutorial
In video games, the term “sound” refers to music, dialogs, and sound effects. Nowadays, playing without sound will seem sloppy and incomplete.
In addition, the sound allows you to enhance the immersion of the player in the game. Music provokes an emotional response. Dialogues reveal the characters and plot. Sound effects provide feedback and believability. All of them can turn a good game into an excellent one.
In this part of the tutorial you will learn the following:
- Play music and loop it
- Play sound effect at specific points in the animation
- Modulate the sound tone at each playback
- Move them to adjust the sound volume depending on its location in 3D space
- Use the UI to individually control the volume of music and sound effects
Please note that in this part we will use Blueprints. If you have not read the previous parts yet, then study them, because they cover various aspects of Blueprints.
It is also recommended to wear headphones in this tutorial, because we will learn about spatial localization of sound.
Note: this article is one of eight parts of the Unreal Engine tutorial:
- Part 1: Introducing the Engine
- Part 2: Blueprints
- Part 3: Materials
- Part 4: UI
- Part 5: How to create a simple game
- Part 6: Animation
- Part 7: Sound
- Part 8: Particle Systems
- Part 9: Artificial Intelligence
- Part 10: How to create a simple FPS
Getting to work
Download the project blank and unzip it. Open the project by going to the project folder and running SkywardMuffin.uproject .
Click on Play to start the game. The goal of the game is to touch as many clouds as possible without falling down. Click on the left mouse button to jump to the first cloud.
GIF
The game is relaxing, isn't it? To enhance the feeling of relaxation, we will start by playing calm piano music.
Playing music
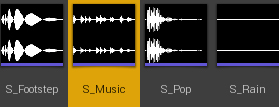
Go to Content Browser and find the Audio folder . Here are all the sounds that will be used in this tutorial. You can listen to them by moving the cursor over their icon , and then clicking on the playback icon that appears .
Playing music is easy: just drag and drop the audio asset into Viewport. However, music is played only once . Looping must be manually enabled in the asset. Double-click on S_Music to open it.
A new window will open with a single Details panel. Go to the Sound Wave section and enable Looping .

Then go back to the main editor and drag the S_Music asset into the Viewport.
GIF
This creates an AmbientSound actor with an S_Music sound source . This actor will automatically play S_Music when the game starts.
Click on Play to listen to music. After 17 seconds (the duration of the music), it will loop and begin again.
Now we need to create a sound effect for the muffin steps. For this we will use Animation Notify .
What is Animation Notify?
Animation Notify allows the developer to trigger an event at a specific point in the animation. They can be used in many different ways. For example, you can create Notify to spawn the particle effect.
GIF
In this game, when the muffin touches the ground, a restart button appears. However, with Notify, you can make it appear at the end of the death animation.
GIF
In this tutorial, we will use Animation Notify to play a sound when each of the muffin's legs touches the ground.
Creating Animation Notify
Go to the Characters \ Muffin folder and open SK_Muffin_Walk . This will open the Animation editor.
The panel under Viewport has an area called Notifies . The light gray area is Notify Track . This is where we will create Notify and manage them.
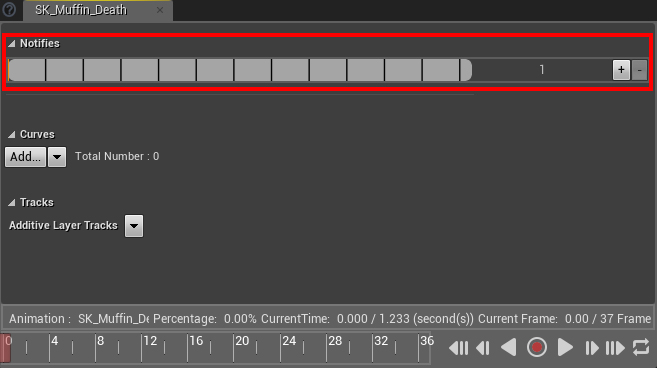
The muffin's legs touch the ground in frame 10 and frame 22 , so we need to create Notify for each of these points. To create Notify, right-click on Notify Track and select Add Notify \ Play Sound . This creates a Notify called PlaySound .

Now you need to position Notify so that it occurs in frame 10 .
Moving Animation Notify
It's a little tricky to figure out where to move Notify, because Notify Track doesn't show where frame 10 is . However, a Timeline marker can be displayed.
First, go to the Timeline located at the bottom of the panel. Drag the red playhead and release when Current Frame is 10 . First you need to pause it!
GIF
Now a red line appears on Notify Track telling you where the playhead is.

Drag Notify PlaySound and release it when it snaps to the red line.
GIF
Now we need to tell Notify that we need to reproduce the sound of steps.
Play step sound
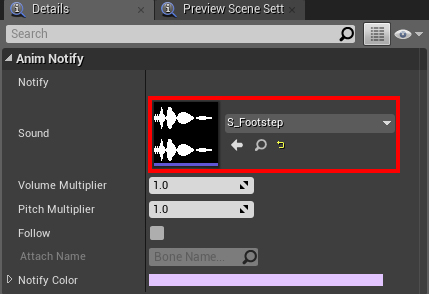
Left-click on PlaySound to select it and go to the Details panel. In the Anim Notify section, set Sound to S_Footstep .
Then repeat the process for the next leg. Do the following:
- Create Another Notify Play Sound
- Move Notify to frame 21
- Select S_Footstep for Notify

Now that the walking animation reaches frame 10 and frame 21 , Notify will fire and start playing S_Footstep sound .
Close SK_Muffin_Walk and return to the main editor. Click on Play and start walking on the ground to hear footsteps.
GIF
After listening to the sound of steps several times, players will notice something. This is the same sound effect every time! If we had a way to vary the sound a little each time ...
In the next section, we will play the sound effect when the player touches the cloud. But this time, every time we will make variations in sounds using Sound Cue .
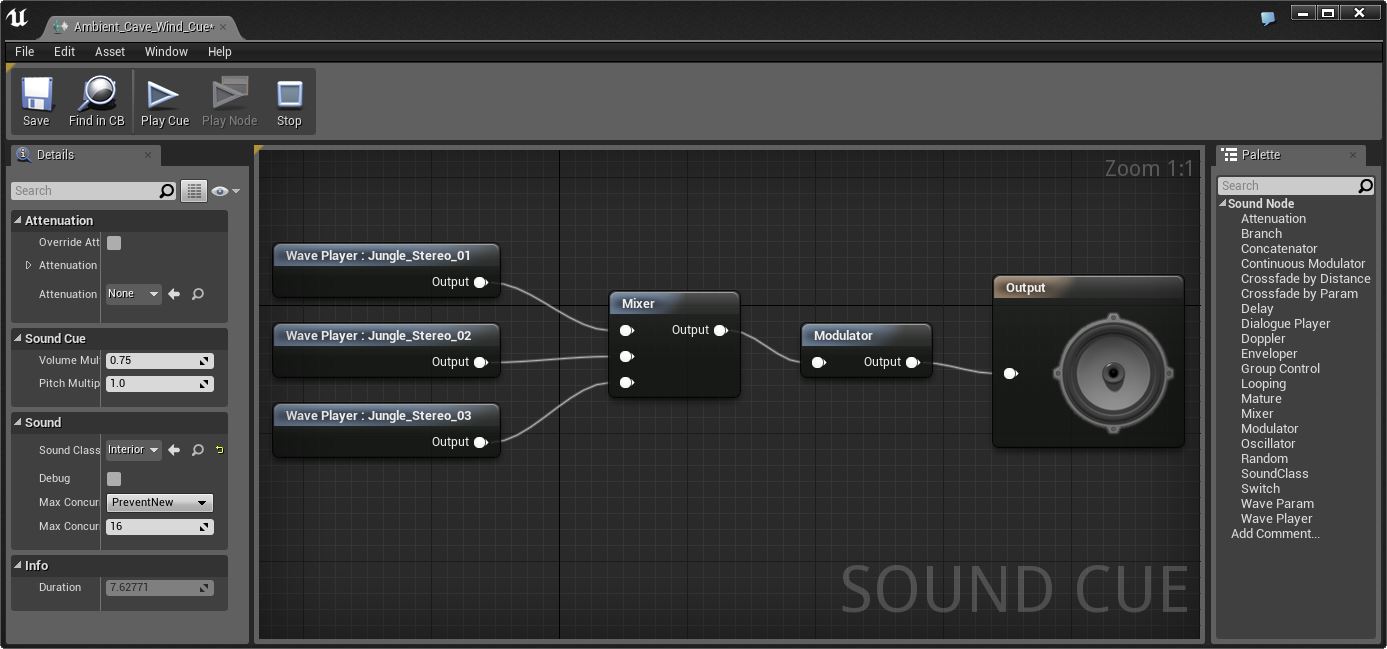
What is a Sound Cue?
Sound Cue is an asset that lets you manipulate and combine multiple sounds. You can think of Sound Cue as your own sound. Where normal sound can be used, you can use Sound Cue instead.
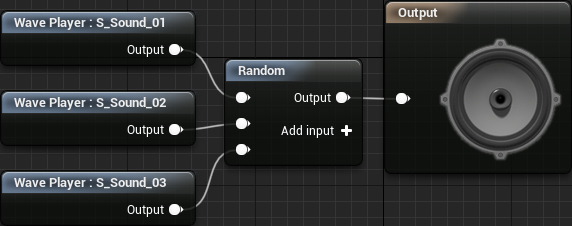
Here is an example Sound Cue using Concatenator to play three different sounds in sequence:

If you use the Random node instead , you can select a random sound each time you play a Sound Cue.
In this tutorial, we will create and use Sound Cue to change the tone of a sound.
Making Sound Cue
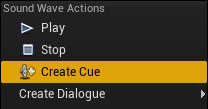
First go back to the Audio folder . There is a sound effect S_Pop , for which we will create a Sound Cue. To do this, right-click on S_Pop and select Create Cue .
This will create a new Sound Cue asset called S_Pop_Cue . Double-click on S_Pop_Cue to open it in the Sound Cue editor.
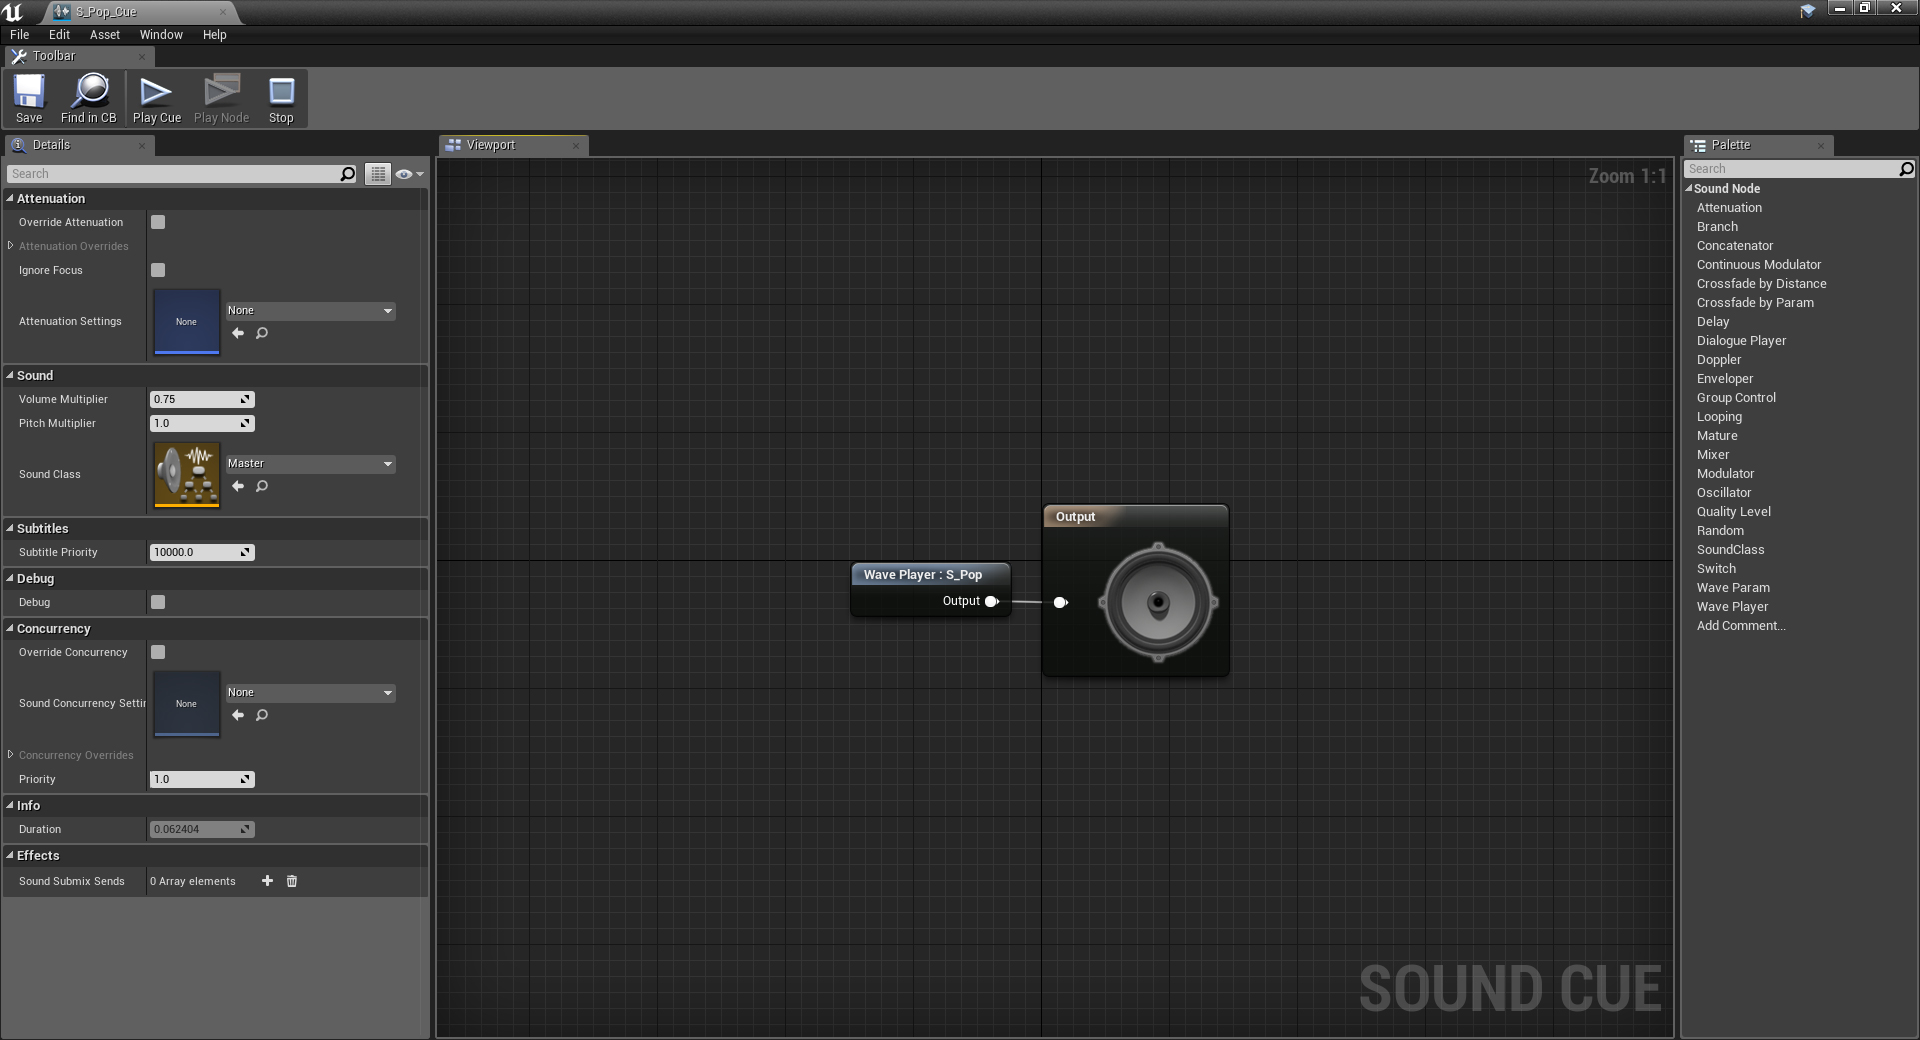
Note: this editor is very similar to the material editor, so I will not consider it in detail. If you are unfamiliar with the material editor, you can find out about it in the section Getting to know the engine .
There are two nodes in the graph: Wave Player: S_Pop and Output . Sound Cue will play everything that is connected to the Output node (in this case, it plays S_Pop sound ). You can listen to Sound Cue by going to the Toolbar and clicking on Play Cue .

Now we need to learn how to change the tone of sound.
Change sound tone
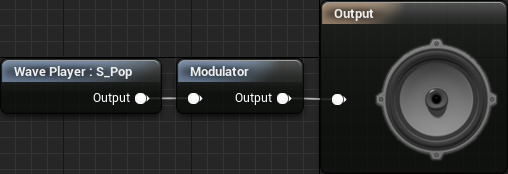
To change the tone, we need a Modulator node . Create it and connect as follows:
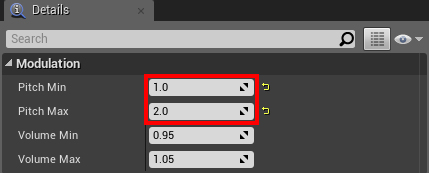
Now you need to set the amount of change in tone. Select the Modulator node and go to the Details panel. There are two tone related fields: Pitch Min and Pitch Max . Values less than 1 indicate that tone can be reduced, and vice versa. A value of 1 indicates that the tone will remain the same.
In this tutorial we will only raise the tone. Set Pitch Min to 1.0 and Pitch Max to 2.0 .
Now, every time you play Sound Cue, the sound will have a tone in the range from the original tone to twice the original tone.
Now we need to make Sound Cue play when the player touches the cloud.
Play Sound Cue
Go back to the main editor and go to the Blueprints folder . Open BP_Cloud and then the CloudTouched function . This function is performed when the player touches the cloud, that is, this is the perfect place to play Sound Cue.
There are two nodes that can be used to play sound:
- Play Sound 2D: plays sound without any attenuation or spatial localization (I will talk about them in more detail below). Use this node for sounds that do not "exist" in the game world, for example, for music and UI sounds.
- Play Sound at Location: plays sound at a point in 3D space. Use this node if you want the sound to change depending on the location and direction of the player.
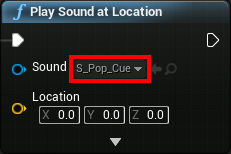
Since the cloud exists in the game world, sound must also exist in the game world. Add a Play Sound at Location node to the end of the node chain .
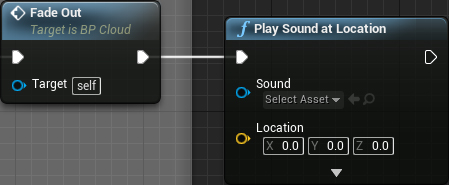
Then set Sound to S_Pop_Cue .
Now when the player touches the cloud, S_Pop_Cue will be played .
Click on Compile and return to the main editor. Click on Play and start playing the game. Each time you touch the cloud, you should hear the same sound with a different tone.
GIF
The tone of the sound is changing, but unlike. that it sounds in 3D space. To do this, you need to position the sound.
What is positioning?
Positioning is the process performed to create the impression of the existence of sound in 3D space. Sounds coming from the left will be heard by the left ear, and vice versa.
GIF
Besides the fact that positioning enhances the feeling of immersion in the game, it can also help the gameplay. In competitive games like Overwatch and Counter-Strike , positioned sound helps players recognize the position of other players.
In this tutorial, we will use positioning to move the sound of a cloud based on its location.
We create positioning
There are two ways to create Sound Cue positioning:
- Sound Attenuation Asset: This asset contains settings related to attenuation and positioning. You can assign various sounds to this asset so that they all have the same settings.
- Override Attenuation: Instead of the Sound Attenuation asset, you can configure the settings inside the Sound Cue. This allows you to create settings for individual Sound Cue.
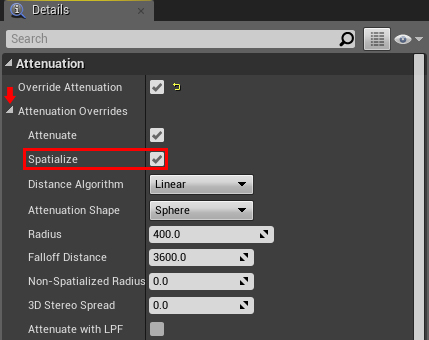
In this tutorial we will use the second method. Open S_Pop_Cue and go to the Details panel. Find the Attenuation section and enable Override Attenuation . At the same time, the Attenuation Overrides section will become active .
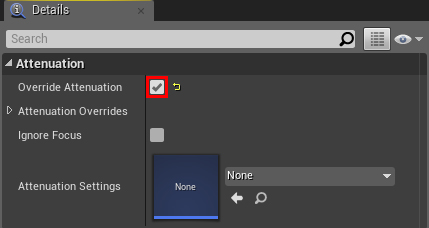
To make sure positioning is turned on, click the arrow next to Attenuation Overrides . The Spatialize setting indicates that sound positioning is in progress .
We are done with the settings, so you can close S_Pop_Cue . Now we need to indicate where the sound is in 3D space.
3D sound reproduction
Open BP_Cloud and create a GetActorLocation node . Now connect it to the Location pin of the Play Sound at Location node .
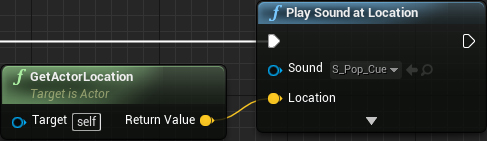
Now the sound will play in the same place where the cloud is located.
Click on Compile and return to the main editor. Click on Play and start touching the clouds. You should hear sounds that appear to be coming from different places.
GIF
Note: the default sound listener is the camera. This means that you will hear sounds from the camera’s location. If you want to replace the listener with another actor, you can use the Set Audio Listener Override node .
You probably noticed that it rains from some of the clouds. But they do not look like clouds, because the sound of rain is not heard! Now we will add the sound of rain and use the attenuation to change its volume depending on the distance.
Adding Rain Sound
Instead of using the node to play the sound of rain, you can use the Audio component . One of the advantages of using a component is that it automatically reproduces at the point where the cloud is located.
Open BP_Cloud and go to the Components panel. Add a new Audio component and name it RainAudio .
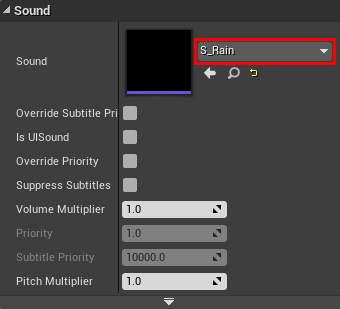
Go to the Details panel and find the Sound section . Change the value of Sound to S_Rain .
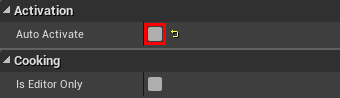
The sound of rain should not play for ordinary clouds. This means that RainAudio needs to be deactivated for them . To do this, scroll down to the Activation section and disable Auto Activate .
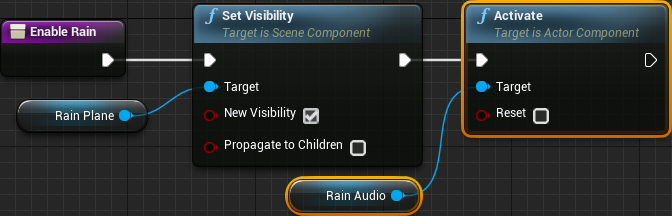
Now we need to activate RainAudio for rain clouds. This will be conveniently done in the EnableRain function . This function is executed if the cloud should be rainy. Open the EnableRain function and add the highlighted nodes:
Now you need to turn on the attenuation and set the attenuation settings.
Attenuation setting
Go to the Components panel and select RainAudio . Go to the Details panel and go to the Attenuation section . Turn on the Override Attenuation setting .
Attenuation settings determine the decrease in sound volume depending on the distance. In the Attenuation Overrides area, there are two settings that we can use:
- Radius: The maximum distance that a player can be before the volume starts to decrease.
- Falloff Distance: The distance that a player can be before the sound becomes inaudible. This distance is added to the radius.
Take a look at an example:
GIF
When the player is within the inner circle (set by the Radius setting ), the volume is 100%. When a player moves from the inner circle to the edge of the outer circle (specified by the Falloff Distance setting ), the volume decreases to 0%.
In this tutorial, we will set Radius to 300 and Falloff Distance to 400 .
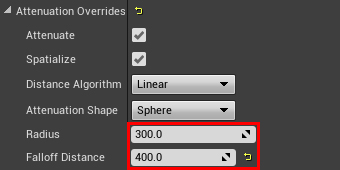
This means that the sound volume will be 100% when the player is within 300 units of the sound. When the distance approaches 700 (300 + 400) units, the volume will begin to fall to 0%.
If the player does not leave the radius of attenuation when the cloud disappears, the sound will abruptly break. To prevent this from happening, we need to gradually lower the sound volume.
Smooth sound reduction
Switch to the Event Graph and find the FadeOut event . This can be done by going to the My Blueprint panel and going to the Graphs section . Double-click on FadeOut in the EventGraph list .
Add the selected nodes to the end of the node chain:

FadeOut is executed when the player touches the cloud. The Timeline node ( FadeTimeline ) outputs a value ( Alpha ), which decreases from 1 to 0 over the specified time. Thanks to this value, RainAudio volume will gradually decrease.
Note: You can double-click on the Timeline node to open it and see how it works. If you want to know more about Timelines , then check out the official documentation .
Before hearing this in action, you need to change one setting in S_Rain. When the sound volume is 0%, its playback stops. Since when the sound begins, when we are out of earshot, the volume of S_Rain will be 0%. When we move within hearing limits, we will not hear anything.
GIF
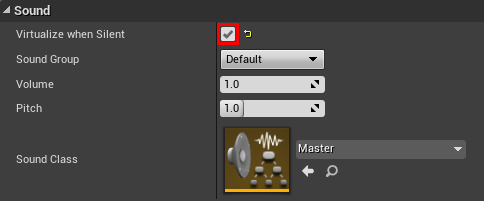
This can be fixed using the Virtualize when Silent setting . This setting will always play sound, regardless of its volume.
Click Compile and close BP_Cloud . Go to the Audio folder and open S_Rain . Go to the Sound section and enable Virtualize when Silent .
Now S_Rain will play even when it is not heard. Close S_Rain and return to the main editor. Click on Play and move within the reach of rain clouds to hear the sound of rain.
GIF
In the last section, we will control the volume of sounds using Sound Class and Sound Mix .
Sound Class and Sound Mix
Sound Class is an easy way to group multiple sounds. For example, you can group all the music in one class, and sound effects in another.

To change the properties of Sound Class (volume, tone, etc.) during the gameplay, we need to use Sound Mix. Sound is a table, each entry of which is a Sound Class. Each entry contains the settings that Sound Class should have.
Here is an example of what might be contained in Sound Mix:

Using the Sound Mix shown above, all sounds in the Music class will play at half volume. All sounds in the Effects class will be doubled in tone.
First, we will create Sound Classes.
Creating Sound Classes
In this tutorial, we will separately adjust the volume of music and effects. This means that we need two Sound Classes. In the Content Browser, click on Add New and select Sounds \ Sound Class . Rename Sound Class to S_Music_Class .
Create another Sound Class and name it S_Effects_Class .

Now you need to bind each sound to the Sound Class. For starters, we will do this with music. Open S_Music and find the Sound section . Change the Sound Class to S_Music_Class .
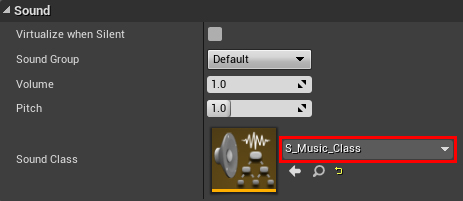
After doing this, close S_Music .
Next will be the sound effects. Instead of opening each sound individually and attaching it to the Sound Class, we can do this at the same time. First select the following assets:
- S_footstep
- S_Pop_Cue
- S_rain
Then right-click on one of the selected assets . Select Asset Actions \ Bulk Edit via Property Matrix . In this case, the assets will open in the property matrix editor.

The property matrix editor allows you to change common properties in one go.
Go to the Details panel and expand the Sound branch . To select Sound Class, click on the grid icon to the right of Sound Class .
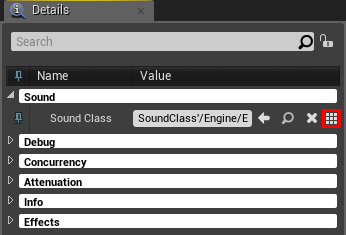
Select S_Effects_Class , and then close the property matrix editor.
All sounds are now in the corresponding Sound Class. Next we will create a Sound Mix and configure it using Blueprints.
Creating and customizing Sound Mix
In the Content Browser, click on Add New and select Sounds \ Sound Mix . Rename Sound Mix to S_Volume_Mix .
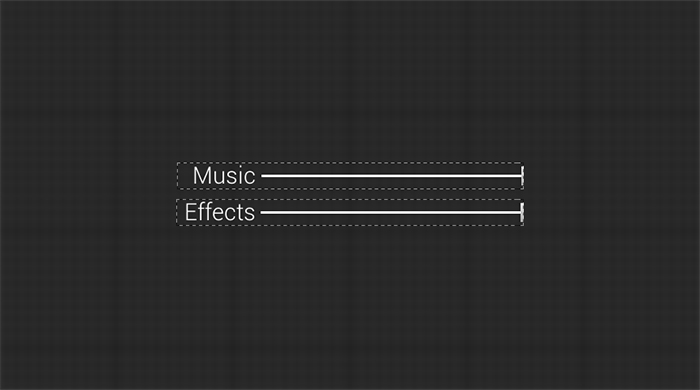
To control the volume of each Sound Class, we will use the sliders. I already created a widget with two sliders so you can use it. Go to the UI folder and open WBP_Options .
To adjust the volume, we need to use the value of these sliders and transfer them to the Sound Mix. First we do it for music.
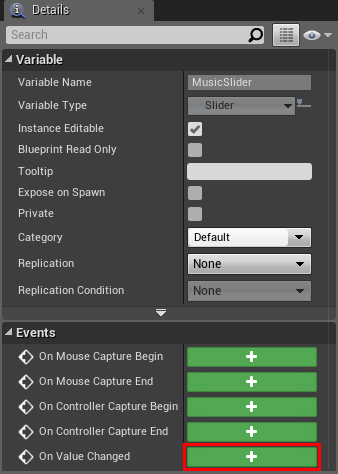
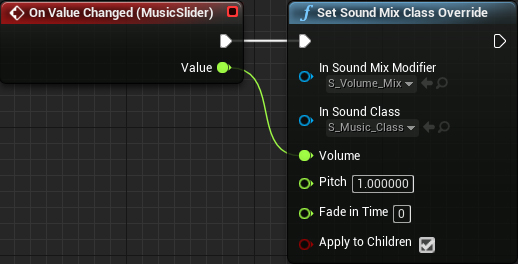
Switch to Graph mode and go to the My Blueprints panel. In the Variables section, select MusicSlider . Go to the Details panel and click on the button next to On Value Changed .
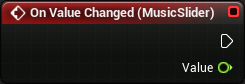
This will create an On Value Changed (MusicSlider) event . This event fires when we move the slider.
Now we need to set the volume of S_Music_Class to S_Volume_Mix . To do this, we need to use the Set Sound Mix Class Override node . This node allows you to specify Sound Mix and Sound Class. If the Sound Class is not in the Sound Mix, then it will be added. If it is already in Sound Mix, then it will be updated.
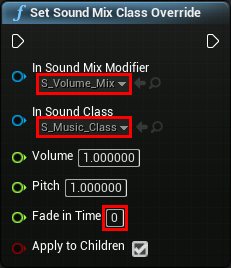
Add a Set Sound Mix Class Override node and select the following options:
- In Sound Mix Modifier: S_Volume_Mix
- In Sound Class: S_Music_Class
- Fade in Time: 0 (thanks to this, volume control will be performed instantly)
Then connect the nodes as follows:
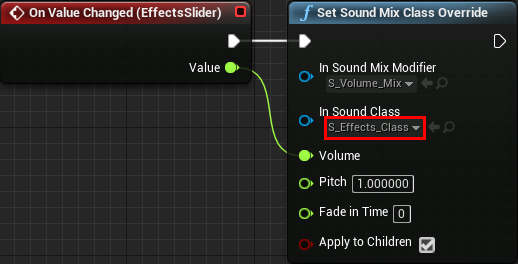
Repeat these steps for EffectsSlider . Replace the In Sound Class contact with S_Effects_Class .
Now when you change the value of the slider, S_Volume_Mix will adjust the volume of the corresponding Sound Class.
For this to work, we need to activate Sound Mix.
Sound Mix Activation
In such cases (when the volume is controlled via the UI), it is better to activate the Sound Mix when the game starts. Thus, the Sound Class will automatically use the volume control from the Sound Mix. However, for the sake of simplicity, we will activate the Sound Mix inside the widget.
Create an Event Pre Construct node . It is similar to the Event BeginPlay node used in Blueprints.
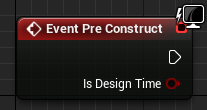
To activate Sound Mix, we need to use the Push Sound Mix Modifier node . Create it and connect to Event Pre Construct . Then set In Sound Mix Modifier to S_Volume_Mix .
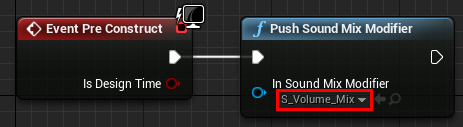
Thanks to this, S_Volume_Mix will be activated when the WBP_Options spawn .
Click Compile and close WBP_Options . Click on Play and press the M key to open the sliders. Move the sliders to change the volume of each Sound Class.
Spoiler heading
Where to go next?
You can download the finished project here .
As you can see, working with sound in Unreal Engine 4 is quite simple. If you want to know more about the sound system, then check out the official documentation . You can create other interesting effects by adding reverb and equalizer. In addition, get acquainted with the possibilities that will appear after the release of a new sound engine !
If you want to continue learning, read the next part in which I will explain how to create particle effects.