Deploying a Windows and Linux Embedded System
- Tutorial
Introduction
In the process of developing devices that have a graphical human-machine interface, sooner or later the problem arises of not only creating the interface itself, but also choosing the platform on which it should work. As such a platform, there can be either a single-board computer with an operating system, or a microcontroller with a screen and a set of relevant libraries, or some other original solution.
It often happens that at the upper level of the control system, on which the interface works, tasks of communication with the outside world and interaction with a wide range of peripheral devices are also performed. Moreover, the interface itself can be quite demanding of graphic resources. Considering this, and in order to save labor costs, it is possible to take a single-board computer as the basis and install a ready-made operating system on it. Development of programs in this case can be greatly simplified through the use of modern frameworks with good documentation and a set of examples.
Interface Requirements
From the user's point of view, the interface should meet the following requirements:
- When loading on the whole screen one application should appear, it is the same interface, it is also a graphical shell;
- In addition to this application, the user should not have access to anything else;
- The application should work all the time, the system should not fall asleep, the screen should not turn off;
- All shortcuts, helpers, special features and other similar functions should be disabled;
- In case of any application failure, it should be automatically restarted by the system;
- The system does not have special requirements for speed or real-time modes, however, it is necessary that the interface responds to user commands without noticeable delays;
- The system must be resistant to repeated hard reboots, there should be no need to perform a special script to complete the work;
- It should be possible to quickly clone the finished assembly on a series of devices with the implementation of all the necessary settings in automatic mode.
In other words, a complete limitation of user actions, resilience and scalability.
As for the operating system for a single-board computer, we will consider two options at once, one based on Windows, the other based on Linux, and compare them to each other.
For example, create a kiosk interface with a touch screen. As an application, let's take one of the Qt Quick training examples and implement it with some changes. The Qt framework is available for both operating systems.
In order not to delve into the nuances of installing Windows and Linux on the ARM platform, the system can easily be built on the basis of some x86-compatible processor. In this case, for the experiments, one of the many available boards on the Intel Bay Trail platform was used.
A package of all programs and scripts is available on GitHub .
Windows path
At one time, Windows Embedded from Microsoft was introduced to create embedded systems. Even in the early version of Windows Embedded XP, developers were provided with a set of tools for assembling the most truncated images, but equipped with the necessary drivers. These assemblies required a minimum of RAM and worked fine even on weak processors. The technology was developed in the version of Windows Embedded Standard 7, where the process of creating your own assemblies was brought to mind. In Windows Embedded, the ideology of an open directory of modules was used, and anyone could equip their system with only the necessary set of components. The latest version in which such an approach was available, although already in a reduced form, is Windows Embedded Standard 8.1.
Modern Windows 10 IoT is positioned as an alternative to Windows Embedded, but is very different from its predecessors. The open component catalog is no longer available. Missing the ability to collect light images from the designer and make them your own installation disks. Special options of the embedded system, such as a write filter, bootloader branding, a keyboard filter, etc., are now configured in the pre-installed system. Moreover, support for these functions is only available as part of the heavy versions of Windows 10 Enterprise.
However, despite the high system requirements, especially in terms of RAM, the use of even heavy versions in embedded solutions does not cause any special problems, primarily due to the availability of hardware components. Moreover, you should not forget that lately it has become more difficult to buy a license for old products from Microsoft.
Fast decision
On first review, it turns out that even in the usual Windows 10 there is an already built-in function “Assigned Access” (Fig. 1), which looks like a ready-made solution to the problem.
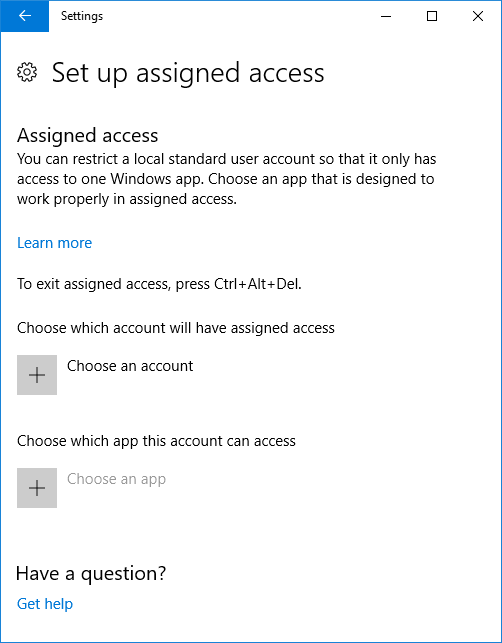
Fig. 1. Function "Assigned Access"
A program that can be used in this case as an interface should be initially developed as a Universal Windows Platform application. These applications in appx format are installed, for example, on Windows Phone. A simple full-screen application, of course, can be converted to appx and signed with the necessary certificates, and then installed. It can work as an interface, but without proper protection. Unfortunately, in the “Assigned access” mode, the user still has access to some system settings and hotkeys. As a result, an interface that meets all the above requirements cannot be obtained with this approach. The system must be configured manually, otherwise.
Correct solution
1. Initial installation
So, first of all, we need the Windows 10 Enterprise LTSB distribution . You can take the original image of Microsoft, you can some lightweight or make your own, using third-party tools. For the experimental board, one of the ready-made assemblies was chosen (a lightweight 32-bit version).
Install the system from the distribution kit on the target board. When installing, we divide the disk into two sections, C: - for the system, D: - for the main application, utilities and magazines. Such a breakdown is useful later for the write filter. After installation, we wait for the settings menu to appear, or the network settings menu and do not continue any further.
Reboot into service mode via Ctrl + Shift + F3.
If there were no errors during the installation, then after rebooting, the system will go into the administrator’s service account and the SysPrep window will appear on the screen (Fig. 2). It must be closed, we will start SysPrep differently, using a special answer file that has yet to be created.
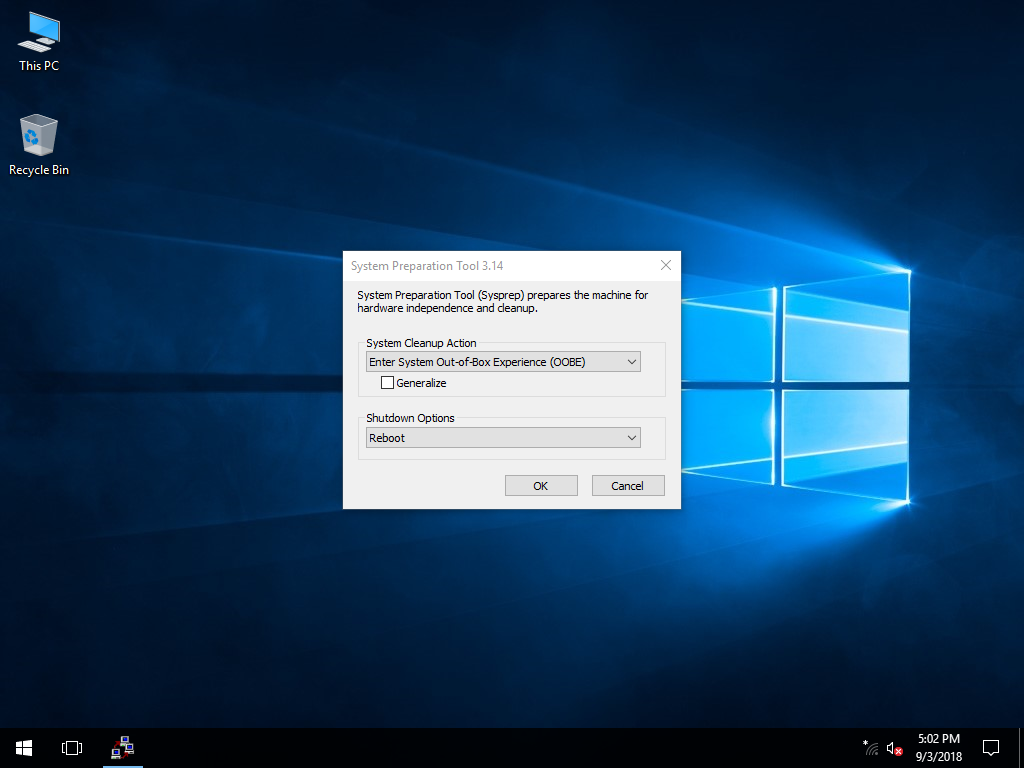
Fig. 2. Utility mode.
2. System configuration
For further action, you will need the Deployment Tools from the Windows 10 Assessment and Deployment Kit .
From the disk with the Windows distribution kit installed on the board, you need to extract the install.wim image file . It happens that in some assemblies this file can be stored in a compressed form with the esd extension . In this case, it must first be unpacked. To do this, use the utility dism .
Find out the sequence number of the required version inside the container (SourceIndex).
dism /Get-WimInfo /WimFile:install.esdThen, retrieve the image file (in this case, the first in the container).
dism /export-image /SourceImageFile:install.esd /SourceIndex:1 /DestinationImageFile:install.wim /Compress:max /CheckIntegrityNow you need to open the image in the Windows System Image Manager (from the Deployment Tools kit) and generate a directory.
It is worth noting that you can work with images in the Windows System Image Manager only if the bit width of the image matches the bit width of the host. That is, it is impossible to edit an image of a 32-bit version in a 64-bit system. Here, as they say, no comment.
When the directory is created, edit the response file for the SysPrep utility . We will enter data about the owner, add the necessary users and configure the first autologin (Fig. 3).
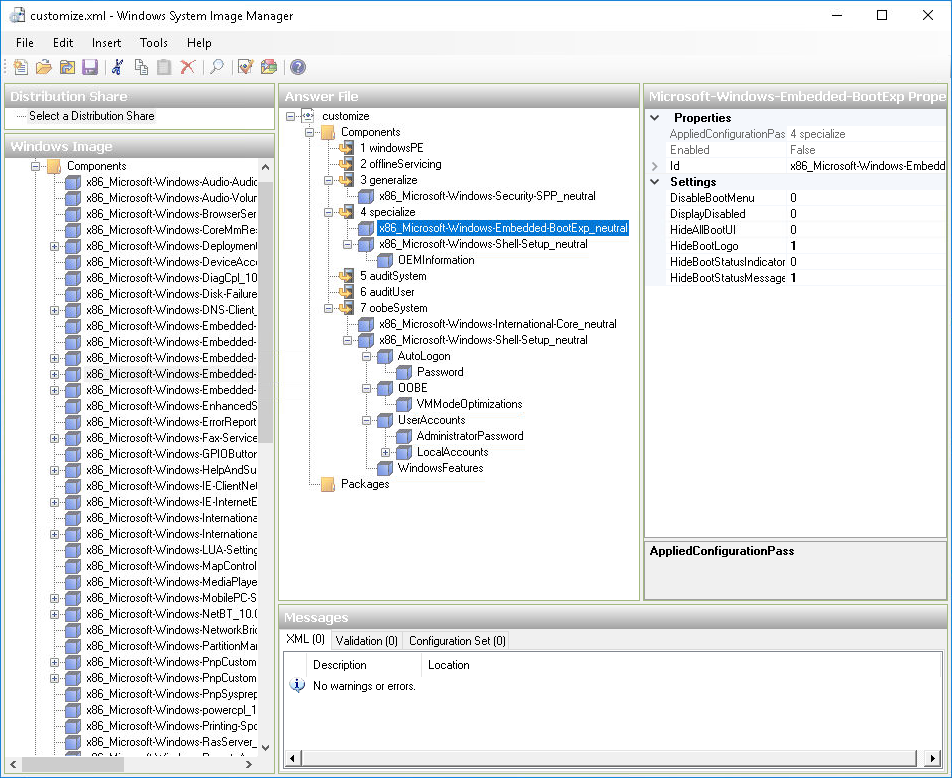
Fig. 3. Creating an answer file.
It makes no sense to list all the parameters; the contents of the response file can be found in the repository. The main thing is not to forget to set the parameters CopyProfile to true , SkipReam to 1 and enable the autologin administrator. Your product key can be entered in section 4 specialize - Microsoft-Windows-Shell-Setup - ProductKey .
3. Installing software
Next, you will need the install.wim image file itself , so you need to put it next to the customize.xml answer file , in which, after saving, you must manually replace the path to the image. At the end of the file, the line should look like this:
<cpi:offlineImage cpi:source="wim:d:/service/install.wim#Windows 10 Enterprise LTSB" xmlns:cpi="urn:schemas-microsoft-com:cpi" />To get the “KioskShell” demo interface, you need to build a version for Windows from source. Build tips are in the repository.
Copy the files to the board and get the following file and directory structure:
C:\
└── Design\
    ├── backgroundDefault.jpg - обои на рабочий стол администратора (с подсказками)
    └── oemlogo.bmp - логотип организации, который будет внедрен в систему
D:\
├── Logs\ - папка для системных и программных логов
├── Service\
│   ├── AfterSetup.bat - установка дополнительных пакетов, настройка журнала и запуск SysPrep
│   ├── FirstLogon.bat - основная автоматическая настройка системы при первом запуске
│   ├── customize.xml - файл ответов
│   ├── install.wim - настраиваемый дистрибутив
│   ├── CustomShellSetup.ps1 - скрипт PowerShell для настройки защищённого интерфейса
│   ├── EnableRules.ps1 - скрипт PowerShell для отключения клавиатурных сочетаний
│   ├── DisableAllRules.ps1 - скрипт для включения горячих клавиш (для администратора)
│   └── UserLogon.bat - автоочистка и отключение клавиатурного фильтра (для администратора)
└── Shell\ - папка с приложением интерфейса "KioskShell.exe" и набором библиотек
4. Manual system setup
When the system is in service mode, you can reboot as many times as necessary, the system will return to it automatically. With a long idle time before the power setting, however, the screen may be locked and you will not be able to return, only a reboot helps Since each specific project may have its own configuration features, it is better to do it manually, but you can also use automation scripts.
Install the necessary components of the embedded system and disable user account control (see AfterSetup.bat from the repository)
Install all the drivers, configure the hardware (IP of the network card, resolution and screen orientation, ports of external devices, etc.), disable key sticking and all special features.
Since in the future I would like to be able to remotely administer, we will enable access via RDP. The administrator password will be removed during the automatic configuration phase.
Next, you need to disable the system update in the Local Group Policy Editor (in the Computer Configuration - Administrative Templates section - Windows Components - Windows Update, you must set the Configured Automatic Updates value to Disabled ). In addition, you also need to disable the automatic scanning of Windows Update (in the Task Scheduler in the Microsoft - Windows section , UpdateOrchestrator, you need to disable all tasks), otherwise a black window will pop up every time you boot, and when connected to the Internet, Windows may suddenly start updating.
Next, configure the power settings. To do this, you must first make all the power settings visible in the Advanced Power Settings section (for this, in the registry in each subsection, HKEY_LOCAL_MACHINE \ SYSTEM \ CurrentControlSet \ Control \ Power \ PowerSettings \ 238C9FA8-0AAD-41ED-83F4-97BE242C8F20 must be assigned with the Attributes parameter its value is 2 ). Now, when all settings are available, disable sleep mode, absence mode, remove the action by the power button (unless, of course, need otherwise) and disable the authorization timer when idle. Next, remove the connection with the standby mode (in the section HKEY_LOCAL_MACHINE \ SYSTEM \ CurrentControlSet \ Control \ Power, you must assign the parameter CsEnabledvalue 0 ). If necessary, turn off the adaptive adjustment of the brightness of the screen.
When all the system settings are completed, we have the last opportunity to make any changes, since the second launch of the AfterSetup.bat script will start the automatic configuration mechanism using SysPrep , which cannot be stopped. You still need to remember to activate the system (it is proposed to familiarize yourself with the options for activating corporate versions of Windows). Even at this stage, you can make a backup copy of the entire disk and fix the preliminary state of the image in case of any changes in the future.
When the work is finished, SysPrep will not restart, but turn off the computer — at this point you can create a working image ready for porting to the series.
5. Final automatic system setup
After the first working image is loaded (see FirstLogon.bat from the repository), the protected interface will be set up, autologin will be reconfigured to the User account and keyboard shortcuts with which you can break the system will be disabled. Next, Unified Write Filter will be configured and activated. In this case, the filter is configured to protect all partitions, except for the Service and Logs folders , and uses a 256 MB swap. The system will reboot several times and, if everything is done correctly, then at the next boot a protected interface will appear, running on behalf of the User account .
To maintain the system in place, it is possible to access the login screen and, for example, log in to the administrator account. In Windows 10, there is a regular way for this, you need to press the "Win" key 5 times in a row.
Linux path
There is no single standard way to create embedded GUI systems based on Linux. As there is no single common distribution, all the same, this is a family of systems that is created on completely different principles. The closest in subject might seem to be the Yocto Linux project. However, it is quite difficult to collect images rich in applications, drivers and third-party libraries. To solve the problem, it is easier to take a ready-made, well-supported distribution and configure it manually.
A simple solution
1. Initial installation
So, first of all, we need the distribution itself, for example Debian . You can take another, you can make your own. The main thing is that the distribution does not have an automatic update system. Debian Linux 9 (64-bit version, kernel 4.9) was chosen for the experimental board.
Install the system in the traditional way. When installing, we divide the disk into two partitions, sda1 - / for the system, sda2 - / var / log for system and program logs. Such a breakdown is useful later for the write filter. Install the xfce full-time GUI and ssh server . Add administrator during the installation process and set the password.
After installing the first thing from the root account, we add the user administrator to the sudo group .
apt install sudo
adduser administrator sudo
Log in as administrator and add a new user user .
sudo useradd -m userFor convenience, you can remove the password for it altogether, since access for this account will still be denied everywhere.
sudo passwd -d user2. System configuration
Install drivers, firmware packages, additional programs at will.
To enable remote administration in the future, if necessary, you can install and configure a vnc server . However, in this case there is no point in this, since all administration tasks can be easily performed via the console, and for this you only need ssh access .
Linux has the ability to use different window managers for different users. For the user interface to work, we install a minimalist manager with the ability to fine-tune. And for the configuration will need a few more applications.
sudo apt install fluxbox arandr plymouthUsing arandr, you can change the resolution and orientation of the screen, if necessary, and then save the configuration as a script (Fig. 4).
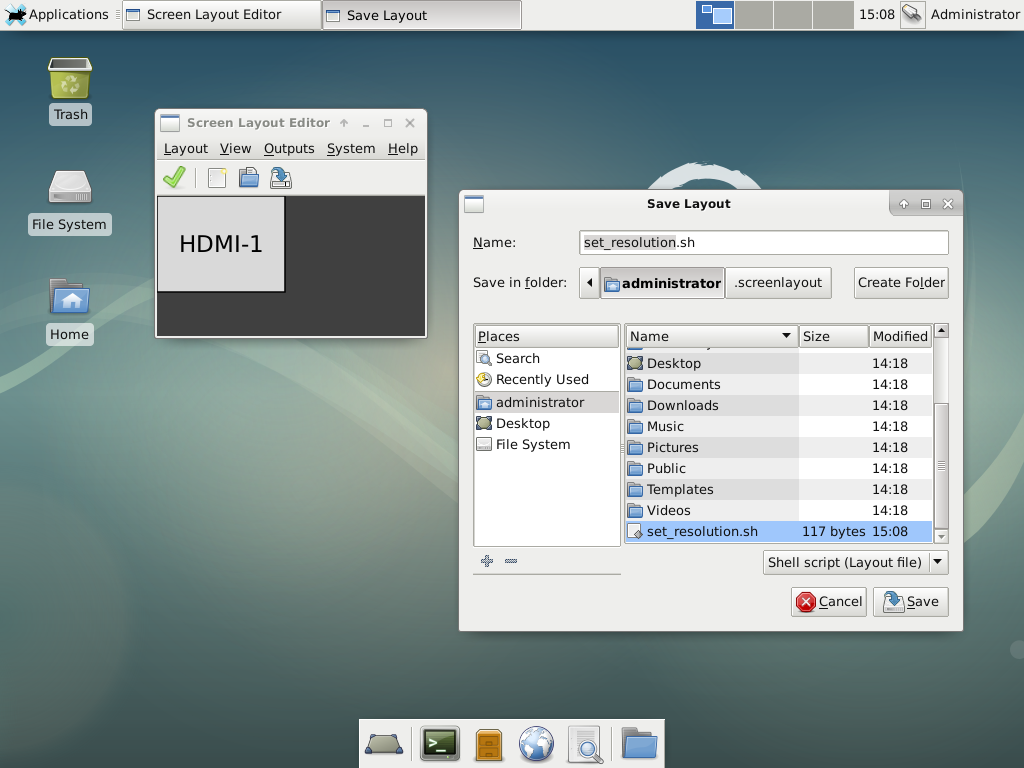
Fig. 4. Customize the screen.
Next, once logged on as an account user , after selecting as the window manager previously installed fluxbox , and then back out. This is necessary in order for the fluxbox to create all the configuration files on the first launch and be selected as the standard manager for the user account (see the .dmrc file in the user 's home directory).
Now you need to configure fluxbox to meet the interface requirements described above. To do this, turn off the session.screen0.toolbar.visible panel in /home/user/.fluxbox/init : false , comment out all the shortcut keys except the volume buttons, and / home / user / in /home/user/.fluxbox/keys . fluxbox / startup will add the launch of the screen customization script, disable the energy-saving monitor functions and autorun the full-screen application. The script will restart the application in case of an unexpected failure.
set_resolution.sh
xset -dmps s off
/home/user/autostart.sh &
Now you need to speed up the boot process and hide it from the user. To do this in / etc / default / grub establish GRUB_TIMEOUT = 0 and /etc/grub.d/10_linux expose quiet_boot = «1» . To display the animation when loading into the kernel parameters GRUB_CMDLINE_LINUX, you need to add the splash option , and if the screen orientation changes, another option is fbcon = rotate: 1 or fbcon = rotate: 3 depending on the direction. If necessary, you can change the resolution and orientation on the login screen. To do this, in /etc/lightdm/lightdm.conf you need to specify display-setup-script = set_resolution.sh. And if you need to hide the cursor, then add xserver-command = X -core -nocursor .
Choose a download style animation.
sudo plymouth-set-default-theme -R textAnd finally fix all the changes.
sudo update-grub23. Installing software
To get the demo interface “KioskShell”, you need to build a version for Linux from source. Build tips are in the repository.
Copy files to the board and get the following file and directory structure:
/
├── usr/ - каталог для установки приложения интерфейса "KioskShell" и набора библиотек
├── local/
│   └── bin/
│       └── set_resolution.sh
└── home/
    ├── administrator/
    │   └── relogin.sh - скрипт для изменения пользователя в автологине
    └── user/
        └── autostart.sh - скрипт автозапуска главного приложения
4. Final system setup
At this stage, you can make a backup of the entire disk and fix the preliminary state of the image in case of any changes in the future.
Configure automatic login using an account user , for this purpose in /etc/lightdm/lightdm.conf set the autologin-user = user .
Now set the write protection.
sudo apt install bilibopWhen installing, select the dynamic fake device map .
Edit the settings file /etc/bilibop/bilibop.conf . Activate the module with the parameter BILIBOP_LOCKFS = "true" and add a section with logs to the exceptions BILIBOP_LOCKFS_WHITELIST = "/ var / log" . Let us allow the possibility of temporarily disabling protection if necessary BILIBOP_LOCKFS_POLICY = "soft" . And since there is no encryption in the system, you need to set BILIBOP_LOCKFS_SWAP_POLICY = "soft" .
Reboot the system and, if everything is done correctly, a protected interface will appear, running under the user account .
The last stage can be easily automated to get the system with automatic configuration at the first start. This will allow creating a distribution kit for scaling to several devices (this mechanism is proposed to be implemented independently).
For on-site system maintenance, it is possible to access the login screen and log in to the administrator account. In Linux, you first need to get to the console via Ctrl + Alt + F1. After logging in to the administrator account is forced to withdraw user user from the system.
sudo skill -KILL -u userThen return to the graphic mode via Ctrl + Alt + F7 and log in again under the administrator.
findings
Regardless of which path was chosen, ultimately you will get the same result. When properly configured, the user interface will meet all the requirements described above. Only visual differences are possible, usually connected with the features of drawing graphic elements using hardware acceleration on different platforms.
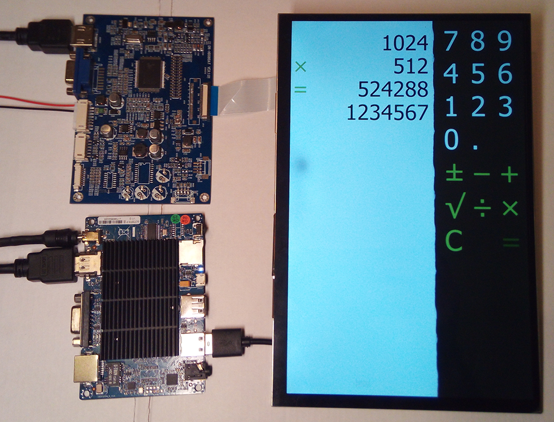
Fig. 5. Interface in working mode.
Since the core of the system is a single-board computer, it is easy to install any touchscreen or other controls. If you have an appropriate application, you can create not only an instrument control console or an interactive dashboard, but also other devices, such as information or trading terminals, on this base.
Problem of choice
It is believed that Linux is very difficult to configure and maintain, but it is free, while Windows is simple and convenient, but it costs money. This is probably true, but only at the household level. When it comes to the creation of embedded systems, other circumstances should be taken into account. For example, fine-tuning Windows, especially in terms of power management and other low-level elements, no longer seems simple and convenient. And do not forget that Windows 10 is quite demanding on resources. In this example, we managed to measure several times the memory consumption of a clean system, and it was about 400 MB in an idle state. For comparison, Linux Debian with all additions occupied about 200 MB in memory. Of course, if you have several gigabytes of RAM, this is not a problem, but still, when using Windows and high-load client applications, one has to take more powerful single board computers. Linux is less demanding of resources, but really difficult to set up and requires a careful approach, especially when working with the bootloader. Moreover, when developing and introducing some elements into the system, it is sometimes necessary to build your own kernel with special parameters. It is effective, but requires an appropriate level of qualification.
As part of the creation of a secure interface, it is difficult to make a straightforward choice The complexity of deploying systems is about the same. The cost of acquiring licenses for Windows for a series of devices can be equal to the costs of maintaining systems on Linux. What system to choose, you decide.
Various man-machine interfaces, created on the basis of the examples described, were introduced by the author into electronic devices for a variety of applications and proved their performance in the real world.
