 November 9, 2017 at 19:49
How I stopped worrying and started cutting rectangles in Unity correctly
In my previous article, I promised to tell you my way of working with rectangles . While developing OneLine , I wrote several extensions of the Rect class, which significantly simplify the work with the GUI. Now I have allocated them to a separate library: RectEx .
Details under the cut.
The essence of the problem
When we write PropertyDrawer in Unity, we are forced to use the GUI class (instead of GUILayout), which means working with markup by hand. The code is overgrown with lots new Rect(...)and rect.y += rect.height + 5complexity for reading and changes. When magic numbers get mixed up (hereinafter examples from the Internet), the code becomes so inert that every new change is perceived by the programmer as a mockery by the game designer.
For a long time I put up with the problem, just trying not to do too bad things. But when he started developing OneLine , he also wrote a number of extensions for the Rect class, which simplify routine work.
How do people
On the Internet, I found many ways to cut rectangles in tutorials and source codes on github. Next is a small selection. Will you find your favorite among them? If not, write your option in the comments, I will add to the article.
I found the rules I found at my discretion in order to remove all unnecessary and make them more visible.
Prepare the rectangles in advance
// Calculate rects
var amountRect = new Rect (position.x, position.y, 30, position.height);
var unitRect = new Rect (position.x+35, position.y, 50, position.height);
var nameRect = new Rect (position.x+90, position.y, position.width-90, position.height);
// Draw fields - passs GUIContent.none to each so they are drawn without labels
EditorGUI.PropertyField (amountRect, property.FindPropertyRelative ("amount"), GUIContent.none);
EditorGUI.PropertyField (unitRect, property.FindPropertyRelative ("unit"), GUIContent.none);
EditorGUI.PropertyField (nameRect, property.FindPropertyRelative ("name"), GUIContent.none);
The source is here .
Rect minRect = new Rect(position.x,
                        position.y,
                        position.width * 0.4f - 5,
                        position.height);
Rect mirroredRect = new Rect(position.x + position.width *
                             position.y,
                             position.width * 0.2f,
                             position.height);
Rect maxRect = new Rect(position.x + position.width * 0.6f + 5,
                        position.y,
                        position.width * 0.4f - 5,
                        position.height);
The source is here .
var firstRect = new Rect(position){
    width = position.width / 2
};
var secondRect = new Rect(position){
    x = position.x + position.width / 2,
    width = position.width / 2
};
EditorGUI.PropertyField(firstRect, property.FindPropertyRelative("first"));
EditorGUI.PropertyField(secondRect, property.FindPropertyRelative("second"));
The source is here .
Okay, good tutorials if taught to do one thing, and do not contain all of the best practices . Specifically, these are taught to draw more magic numbers.
float curveWidth = 50;
var sliderRect = new Rect (rect.x, rect.y, rect.width - curveWidth, rect.height)
EditorGUI.Slider (sliderRect, scale, min, max, label);
var curveRect = new Rect (rect.width - curveWidth, rect.y, curveWidth, rect.height);
EditorGUI.PropertyField (curveRect, curve, GUIContent.none);
The source is here .
Such code is difficult to read in cases where a large number of properties are drawn.
This code is hard to maintain. Even if we draw three properties and suddenly we need to add a fourth / fifth.
However, there is a better way!
One rectangle: painted => moved
float count = labels.Length;
float space = 2;
float width = (position.width - (count - 1) * space) / count;
position.width = num2;
for (int i = 0; i < count; i++){
    EditorGUI.PropertyField(position, properties[i], labels[i]);
    position.x += count + space;
}
Source here
public override void OnGUI(Rect rect, SerializedProperty prop, GUIContent label) {
    Rect position = rect;
    float height = EditorGUIUtility.singleLineHeight;
    float space = EditorGUIUtility.standardVerticalSpacing;
    position.height = height;
    var property = prop.FindPropertyRelative("m_NormalColor");
    var property2 = prop.FindPropertyRelative("m_HighlightedColor");
    var property3 = prop.FindPropertyRelative("m_PressedColor");
    var property4 = prop.FindPropertyRelative("m_DisabledColor");
    var property5 = prop.FindPropertyRelative("m_ColorMultiplier");
    var property6 = prop.FindPropertyRelative("m_FadeDuration");
    EditorGUI.PropertyField(position, property);
    position.y += height + space;
    EditorGUI.PropertyField(position, property2);
    position.y += height + space;
    EditorGUI.PropertyField(position, property3);
    position.y += height + space;
    EditorGUI.PropertyField(position, property4);
    position.y += height + space;
    EditorGUI.PropertyField(position, property5);
    position.y += height + space;
    EditorGUI.PropertyField(position, property6);
}
The source is here .
This time, the code reads much better, and it will be slightly easier to maintain. However, everything looks so good only as long as all the fields of the class have the same size on the screen (in the first example, the width is divided into equal parts, in the second example, the height).
This code is much more complicated if you need to draw elements of different sizes.
How to do it with RectEx
RectEx adds several methods that extend the Rect class, but two are most useful: Column and Row .
Why such strange names?
First I called them SplitVertically and SplitHorizontally. It turned out to be too long, uncomfortable, and even not read.
I tried SplitV and SplitH. It turned out shorter and more convenient. However, you constantly forget what each of them does. One cuts with horizontal lines, the other with vertical ones. Or does one return a horizontal column, the other a vertical one?
As always, mathematics came to the rescue, to be more precise, the gentlemen Vector-Column and Vector-Row (both words are large, because the surnames are double). Looking at it rect.Row(5)right away, you realize that the method returns a row, and rect.Column(5)a column.
Next come the demonstrations.
var rects = rect.Row(3);
EditorGUI.PropertyField(rects[0], property.FindPropertyRelative("first"));
EditorGUI.PropertyField(rects[1], property.FindPropertyRelative("second"));
EditorGUI.PropertyField(rects[2], property.FindPropertyRelative("third"));I added i++to make it easier to swap lines.
var rects = rect.Column(3);
int i = 0;
EditorGUI.PropertyField(rects[i++], property.FindPropertyRelative("first"));
EditorGUI.PropertyField(rects[i++], property.FindPropertyRelative("second"));
EditorGUI.PropertyField(rects[i++], property.FindPropertyRelative("third"));In this example, we pass the relative weights to the Column method, based on which we get: the second element is two times the first, and the third is three.
var rects = rect.Column(new float[]{1, 2, 3});
EditorGUI.PropertyField(rects[0], property.FindPropertyRelative("first"));
EditorGUI.PropertyField(rects[1], property.FindPropertyRelative("second"));
EditorGUI.PropertyField(rects[2], property.FindPropertyRelative("third"));
For clarity, I drew two symmetrical pictures, in which I tried to show an example of using the Raw and Column methods (clickable pictures).
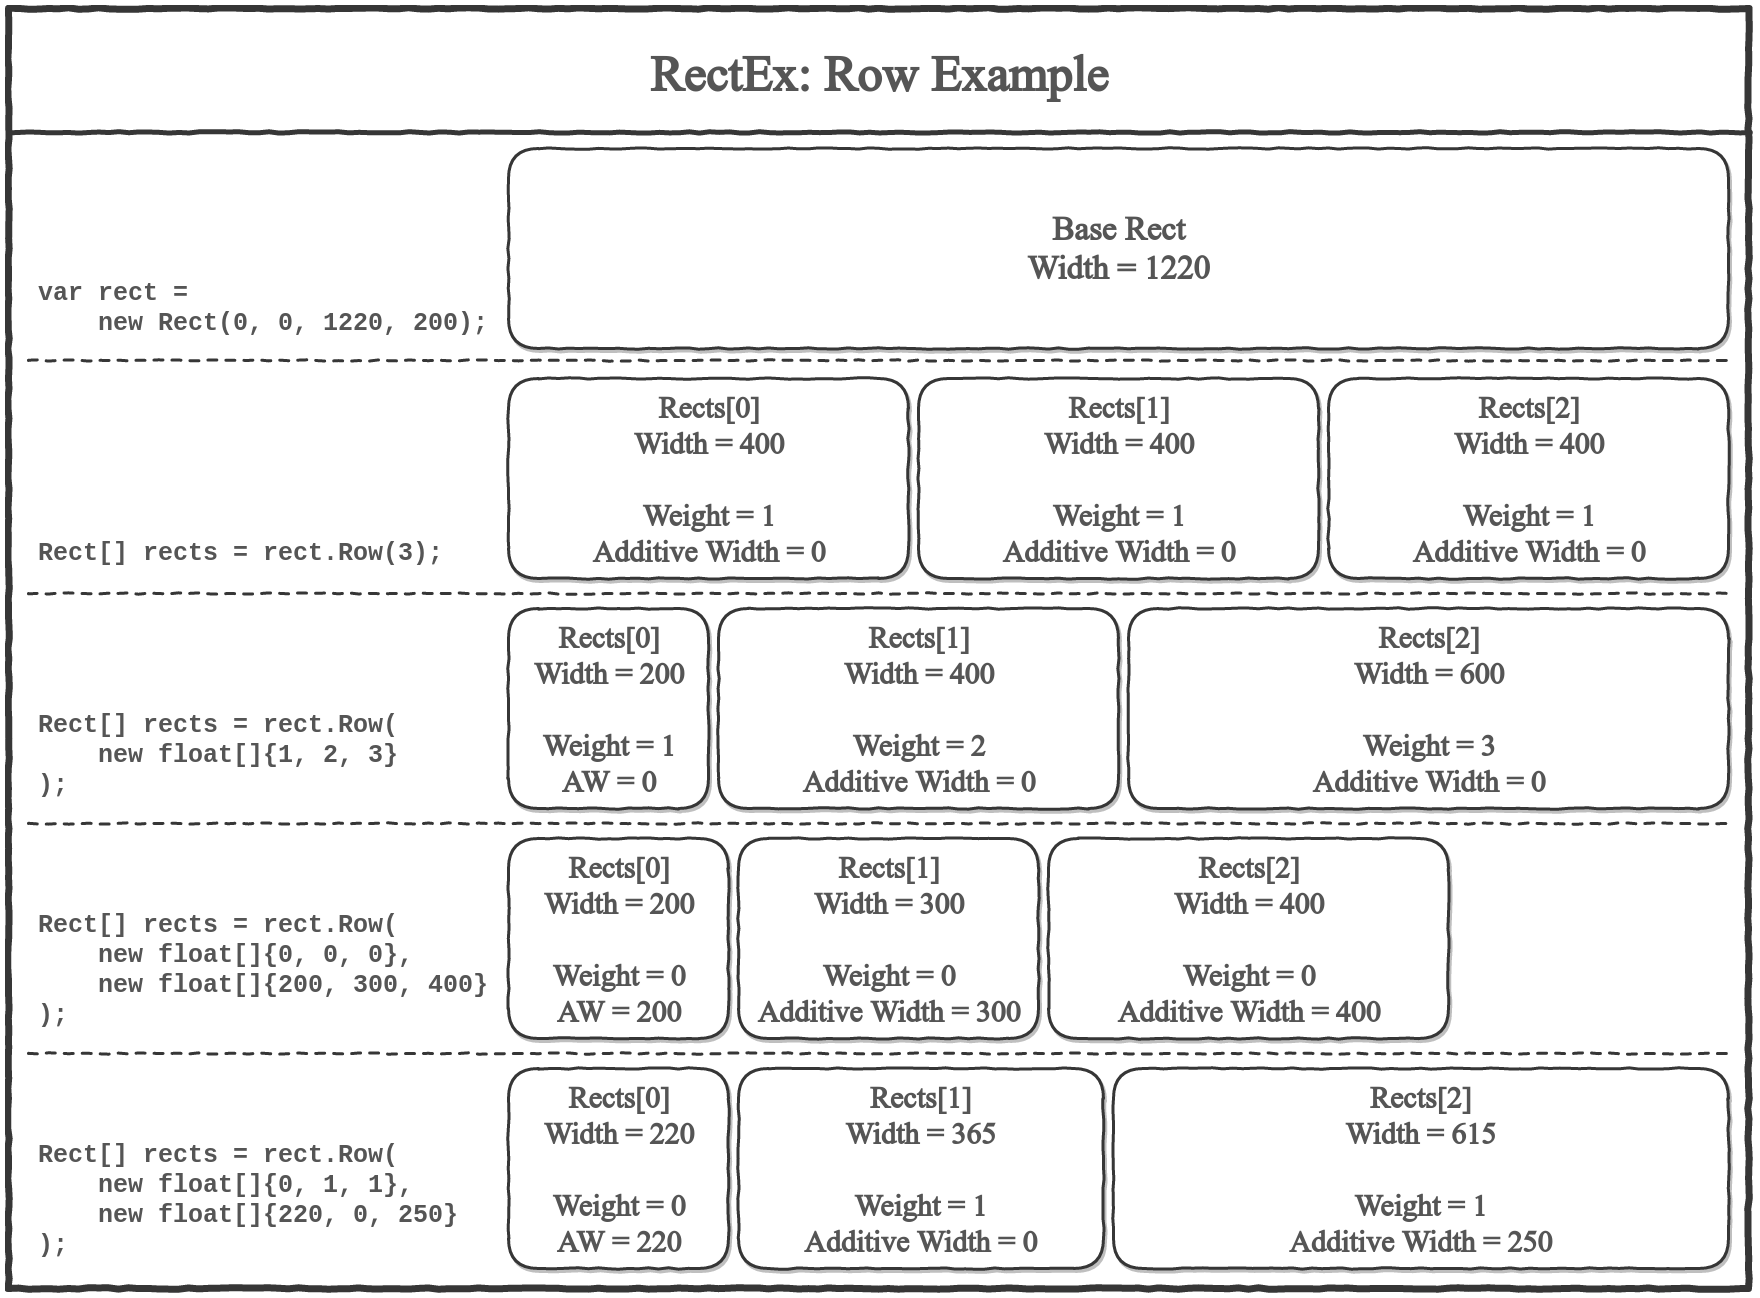
The second picture is simply the transposed first: the rows become columns. But I decided it was worth drawing her.
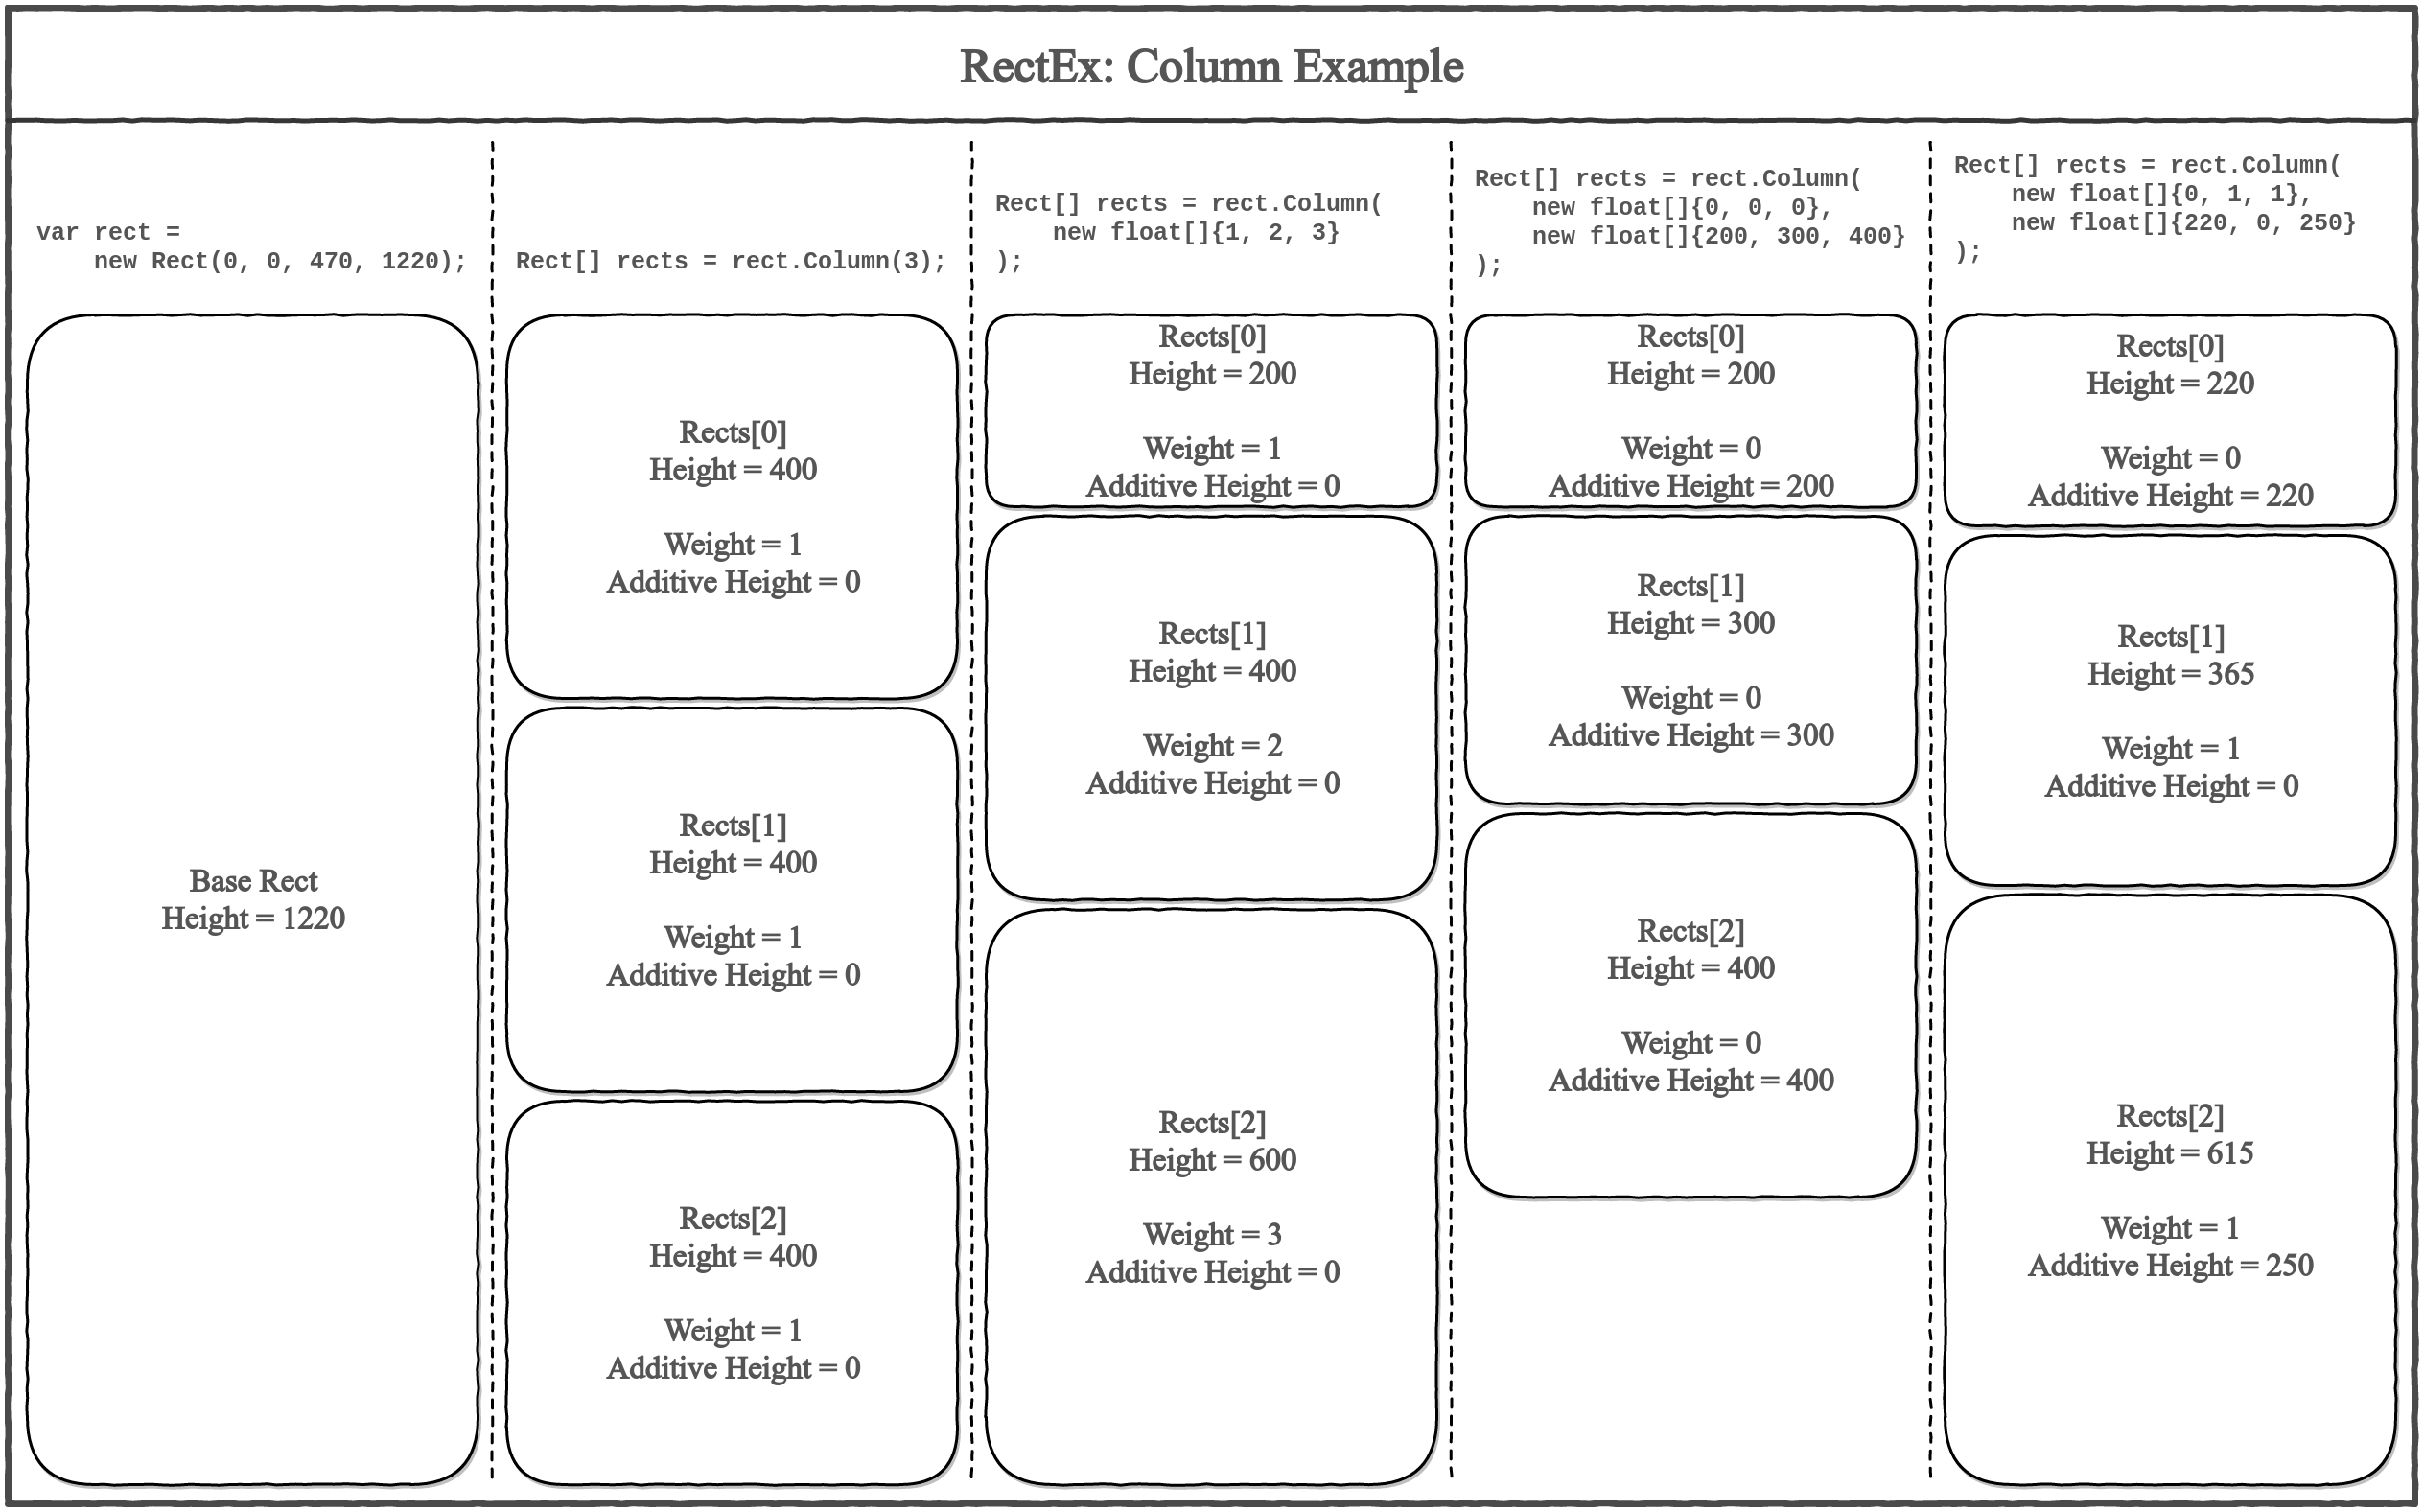
Where to get?
Current version: v0.1.0 .
You can try on github . The readme describes the rest of the methods.









