 September 21, 2017 at 14:15
Writing for the UEFI BIOS in Visual Studio. Part 2 - create your first driver and speed up debugging
- Tutorial
Introduction
This article will cover some basic things about text I / O programming. In the program, which this time we will create from scratch, first we enter from the keyboard, and then we display the text string, touching along the way some unobvious features of programming for UEFI.
The second half of the article will be about accelerating the loading of the driver when starting up for debugging, since the two minutes that are spent on it now, when launched repeatedly during debugging, your driver will be very annoying.

Those who are interested - welcome to cat.
Training
Immediately make our own catalog for our exercises in the root edk2 and call it EducationPkg . All projects will be created inside it. You can create every separate project in the root of edk2 , there are no obstacles to this, but about the tenth project will radically divorce the zoo from its projects and edk2 framework packages , which will lead, at best, to confusion. So, create the directory C: \ FW \ edk2 \ EducationPkg .
Using the UEFI Driver Wizard
Creating a file set for an edk2 project is a big topic that deserves a separate article. You can read about it if you want to know the truth right now, in the document EDK II Module Writer's Guide , chapter 3 Module Development - here or google. In the meantime, we will use the Intel UEFI Driver Wizard utility , which lies in the downloaded directory in C: \ FW \ UEFIDriverWizard, to
launch the UEFI Driver Wizard , and the first thing to do is specify the Workspace C: \ FW \ edk2 by team the File → the OPEN WORKSPACE . If this is not done at first, thenThe UEFI Driver Wizard will carefully guide us through all the stages of creation, and then, with an apology, will say that the driver project cannot be created.
After specifying Workspace, select File → New UEFI Driver and perform the following actions:
1. Click on the Browse button , go to the C: \ FW \ edk2 \ EducationPkg directory and create your own MyFirstDriver directory inside it , in which we will continue to work. The driver name will take the same name
2. Set Driver Revision to 1.0. I don’t recommend setting less than one - the Wizard has an error, as a result of which the revision is 0.0 after creating the project files.
3. We leave the rest unchanged, so that it
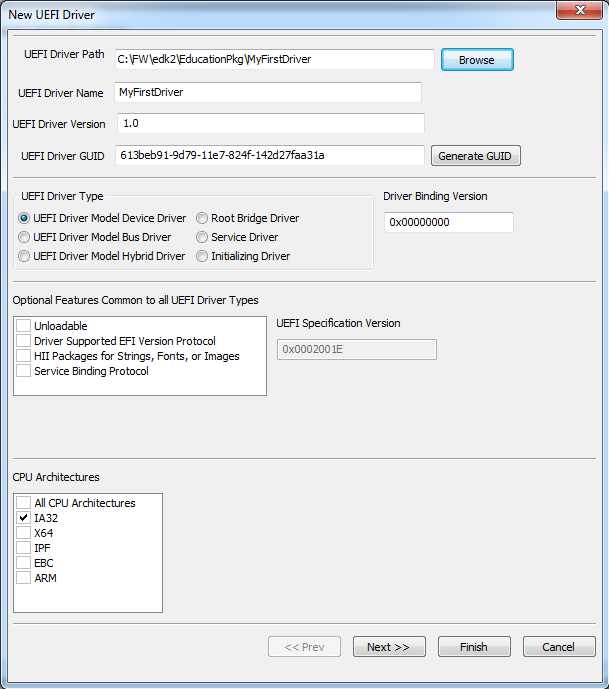
turns out, as shown in the screenshot, click Next and go to the next screen:
Put checkmarks next to Component Name Protocol and Component Name 2 Protocol , do not touch the rest:
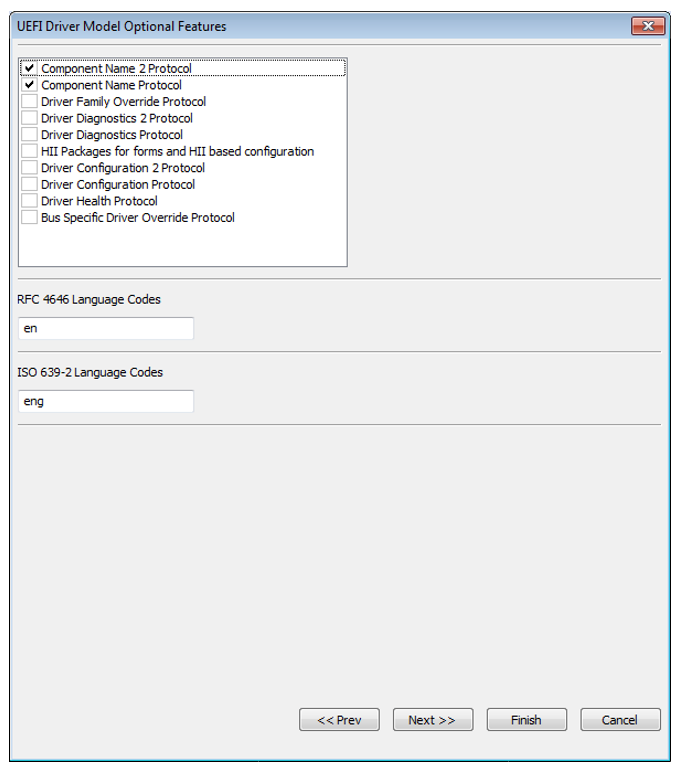
and immediately click Finish, without touching the others settings. We receive a message about the successful creation of the project:

Click OK and close the UEFI Driver Wizard , we will no longer need it.
Adding a module to the compilation list
Since there is nothing perfect in the world, we will have to manually add the line for our driver to the list of modules for compilation. Here you need to stop and give a little help.
All modules in edk2 are included in the so-called packages - groups of modules that are interconnected according to some common feature. To include a new module as part of any package , we need to add the path to the module sources to the PackageName.dsc file ( dsc - short for Description), and this module will be compiled as a part of Package . UEFI Wizard Driverunfortunately, it cannot automatically add our driver for compilation for objective reasons (well, how can he know what you created for your new package (or which one you intend to work with?). Therefore, we prescribe with pens.
Please understand that our EducationPkg is not a package yet , but just a set of projects, and no more.Open the
file C: \ FW \ edk2 \ Nt32Pkg \ Nt32Pkg.dsc , look for a line in it
# Add new modules hereand after this line we write the path to the file MyFirstDriver.inf of our driver relative to C: \ FW \ edk2 . It should look like this:
# Add new modules here
EducationPkg/MyFirstDriver/MyFirstDriver.inf
##############################################################################
Very important lyrical digression
Now you sadly think that you have to set up the project in Visual Studio again , and in vain. Remember, we did not indicate anywhere in the first article about which project in question. Therefore, you do not need to edit anything, compilation after adding our inf-file to Nt32Pkg will do the same. This leads us to a very important corollary: we can add to the existing Visual Studio project , for example, NT32 , the files of any project from the huge edk2 tree and all of them will be available for editing and - this is most important - setting breakpoints, viewing Watch and all others features that Visual Studio offers. Actually, this is one of the most interesting advantages of this approach to working in UEFI using Visual Studio . And when you press F5 before starting the compilation, the autosave of the modified sources added to the project will be performed. True, we pay for this approach with increased compilation time, but then we will deal with this problem as well.
Let's do what we just talked about for our project. In Visual Studio, right- click on the NT32 project (do not forget to switch it to the default project in Solution ), select Add → Existing Item , go to our directory , select
C:\FW\edk2\EducationPkg\MyFirstDriverall the files with the mouse and click onAdd by adding them to our NT32 project .
Compiling and starting the driver
Click in Visual Studio on F5 or the Debugging button , wait for the Shell to load , enter in it: And then we look at the message about the successful loading of our driver. It does nothing, which is not at all surprising - we have not added any functionality to it yet. We just need to verify that we correctly added our driver to the edk2 environment , and nothing more. Here is what we should see (the address can be any): Close the window by pressing the Stop Debugging , or Shift + F5 buttons in Visual Studio .
fs0:

load MyFirstDriver.efi
Adding Your Code
Open the MyFirstDriver.c file from the resulting project tree in Visual Studio and add our code to it. But first, a little theory, before moving on to practice. In the UEFI BIOS, all interaction with the hardware - in our case, its emulation on a virtual machine - occurs through protocols , it’s impossible to directly pick and write a specific byte to a specific port. In a very simplified form, you can consider the protocol as the name of the “class”, an instance of which is created to work with the device when it is registered in the system. Like a regular class instance, the protocol contains data and functions, and all work with the equipment is provided by calling the corresponding private functions of the class. When working in
UEFI uses tables that contain pointers to all instances of "classes". There are several of these tables, in the case of our driver, we use the System Table , using the already declared gST pointer . The hierarchy of these tables is quite simple: there is the main System Table , which contains (among other things) links to Boot Services and Runtime Services tables . However, it will probably be easier to show the code:
gST = *SystemTable;
gBS = gST->BootServices;
gRT = gST->RuntimeServices;
By the names of the variables: gST stands for:
g - means that the global
ST variable , you guessed it, means System Table
So, our task is to send the line I have written my first UEFI driver to the output device (in our case, the display) . It would be nice, of course, to use the same printf in unix-style and just specify different streams, but alas, there are very serious restrictions on using printf in UEFI , so for now, let's leave it aside, until better times.
Insert the output of our line into the function EntryPoint ()our driver. Add our variable of type CHAR16 (using double-byte character encoding UCS-2 ) in the MyFirstDriverDriverEntryPoint () function in MyFirstDriver.c in the variable declaration area :
CHAR16 *MyString = L"I have written my first UEFI driver\r\n";Lyrical digression
edk2 does not forgive Warning , for it all is the same - that Warning , that Error - it sends, hmm, a fix in both cases, so the compiler options in edk2 are configured by default. Thus, he implicitly says, “Pioneers have no place here.” Of course, you can disable this option in configs, but you should not explain how to do it here - if you can disable it, you can also remove Warning sources in the code, and you do not need it. Therefore, cast types explicitly and comment on unused variables. Sometimes, in the case of using third-party sources, the complete suppression of errors can be a rather difficult task.
After, at the very end of the MyFirstDriverDriverEntryPoint () function, paste the output code of our text variable into the output console (default screen, in our case):
gST->ConOut->OutputString(gST->ConOut, MyString);Click on F5, enter fs0 :, load MyFirstDriver.efi, and get our line on the screen:
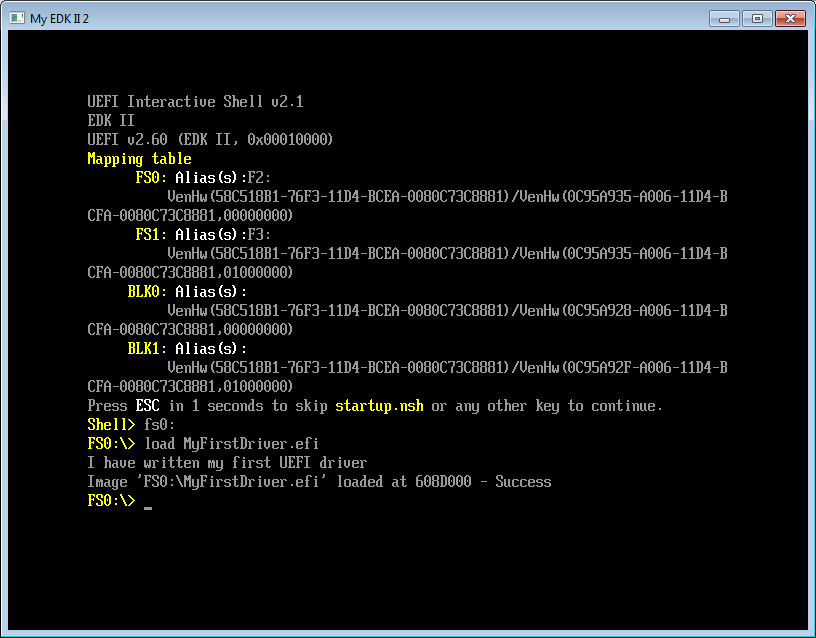
The first program is written from scratch and works. We can congratulate ourselves.
Now we will analyze this line of ours:
gST->ConOut->OutputString(gST->ConOut, MyString);In it:
gST is a pointer to the System Table
ConOut table is a protocol , or, as we conditionally called it, the "class" of text output
OutputString is the output function itself. The first parameter in it, as you might guess, is this for our protocol EFI_SIMPLE_TEXT_OUTPUT_PROTOCOL .
Let's reformulate the above in a different form, for a better understanding. Here is the hierarchy of the main System Table obtained in the Watch window when stopping at breakpoint in Visual Studio . The function OutputString used by us is highlighted . Pay attention to the elements of BootServices.and RuntimeServices at the bottom of the table, as discussed earlier:

Entering text from the keyboard and displaying it on the screen
Well, we inferred the text contained in the string constant. Now you need to enter something into the string variable and then display this variable on the screen to make sure that there is no mistake in the process anywhere.
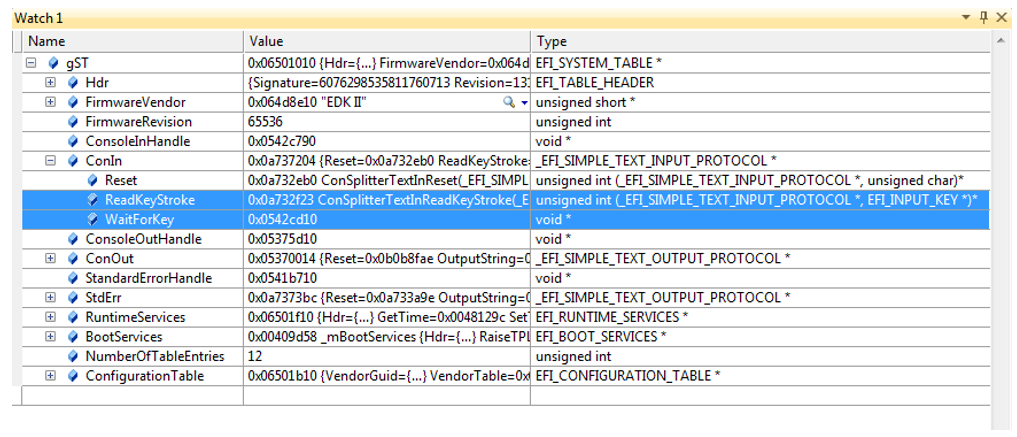
Let's take another screenshot of the same gST , but already in the ConIn part . It looks like this:
In our next example, we will remember the password entered from the keyboard, displaying the entered characters with colorful stars in the New Year (or drug addict, as one comrade noted) style, and after pressing Enter , display the password in the next line. This is just a case study, replacing the entered password with asterisks has already been implemented in the HII API , as well as re-entering the password, and checking if the re-entry is correct.
Disclaimer
According to Feng Shui, it would be necessary to make a * simplifying "pointer * ConOut = gST-> ConOut , but for training purposes, we will leave it as it is so as not to remember which table we are accessing at the moment.
First, add local variables to the MyFirstDriverDriverEntryPoint () function instead of our previously added MyString variable.
  UINTN					EventIndex;
  UINTN					Index = 0;
  EFI_INPUT_KEY				Keys;
  CHAR16		        	PasswordString[256];
Now enter the text of the program, replacing the previously added function
gST->ConOut->OutputString(gST->ConOut, MyString);to the following:
gST->ConOut->ClearScreen(gST->ConOut); // Надеюсь, понятно
gST->ConOut->SetCursorPosition(gST->ConOut, 3, 10); // Ставим курсор в 10-ю строку, 3-ю позицию
gST->ConOut->OutputString(gST->ConOut, L"Enter password up to 255 characters lenght, then press 'Enter' to continue\r\n"); //Выводим нашу строку с вышеуказанной позиции
	do {
                //ждем нажатия на клавишу
		gBS->WaitForEvent (1, &gST->ConIn->WaitForKey, &EventIndex);
                // считываем код нажатия на клавишу
		gST->ConIn->ReadKeyStroke (gST->ConIn, &Keys);
                //Изменяем цвета шрифта и фона
		gST->ConOut->SetAttribute(gST->ConOut, Index & 0x7F);
                // формируем строку для вывода
		PasswordString[Index++] = (Keys.UnicodeChar);
                // Заменяем текст на звездочки – пароль же, враги рыщут повсюду
		gST->ConOut->OutputString(gST->ConOut, L"*");
	} //пока не нажали Enter или пока не ввели 255 символов, заполняем текстовый массив вводимыми буквами
           while (!(Keys.UnicodeChar == CHAR_LINEFEED || Keys.UnicodeChar == CHAR_CARRIAGE_RETURN || Index == 254));
// Терминация текстовой строки, занимает 1 элемент массива
PasswordString[Index++] = '\0';
// Возвращаем исходные цвета шрифта и фона
gST->ConOut->SetAttribute(gST->ConOut, 0x0F);
// Дальше понятно, уже проходили
gST->ConOut->OutputString(gST->ConOut, L"\r\nEntered password is: \r\n");
gST->ConOut->OutputString(gST->ConOut, PasswordString);
gST->ConOut->OutputString(gST->ConOut, L"\r\n");
Press F5 and settle in the already familiar pose for a couple of minutes:

After the Shell prompt , as always, enter fs0: and load MyFirstDriver (or load my and then double-click on Tab , because Shell ). We get a picture like this (of course, the text will be the one you entered yourself):

Press Shift + F5 to close the debugging after you have stopped at it.
Further in the article we will get to know more closely the UEFI Shell environment , PCD and debugging messages - you cannot move on without this. But we will get to know each other not in an abstract way, but in the useful process of accelerating and automating the driver launch for debugging.
Creating and editing a UEFI Shell boot script
Now, since you have probably already recompiled the program more than once or twice, you have matured mentally to reduce this annoying waiting time for loading the UEFI Shell and driving the same commands each time to load our driver. To begin with, we remove all manual text input in Shell by writing the appropriate script. We will write the script directly in Shell . From the point of view of common sense, it is better to open the script file in Far Manager and edit it there, but you never know what fate will throw you into the Shell of a real machine, rather than a virtual machine with access to its file system from the host. Therefore, once we create a script in the Shell editorand write it down to get the appropriate skill.
The script file executed at startup (similar to autoexec.bat or bashrc ) for the UEFI Shell is called startup.nsh , the same one that Shell invites us to skip at boot each time. Boot into the UEFI Shell by pressing F5 in Visual Studio and type fs0: to go to our file system. Now from the Shell we enter the command
edit startup.nshand in the editor that opens, enter, with a line break by Enter :
FS0:
load MyFirstDriver.efi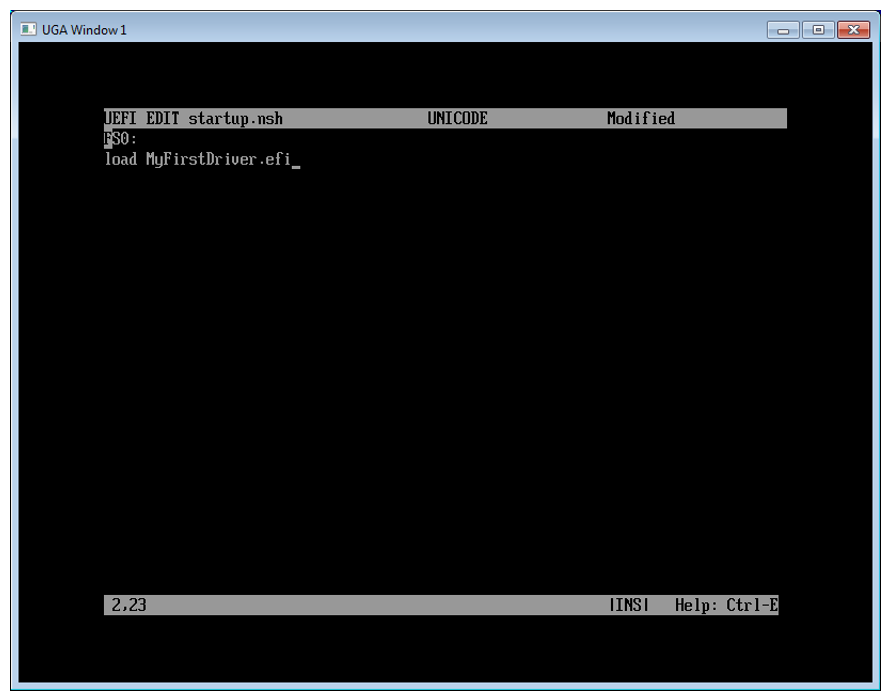
Next, press F2 , then Enter to write and then F3 to exit the editor back to Shell .
We will not recompile everything again this time, since we did not change anything in the program. We type in the Shell command Exit , and in the text box a-la BIOS Setup that opens , and in terms of UEFI - Main Form , select Continue . After that, we will be thrown into Shell again , but this time the startup.nsh script we created will be executed and our driver will start automatically.
Debug messages
While we can write debugging messages on the screen, but when we work with the HII ( Human Interface Infrastructure ) forms , this will not be possible, the screen will be occupied by the hardware configuration forms. What to do in this case?
A somewhat abstract topic
At the very beginning, after receiving a new board from the factory, it’s not always, oh, the debug output display console is not always available. By the probability of possible connection errors, the display goes much ahead of the serial port, which can be screwed up except with the RX-TX direction. Therefore, there is also output to the serial port, which is completely similar to the output to the screen, with ConOut replaced by StdErr . Those. function
will display “Test string” on the display, and the function
will output a test message to the serial port. Give it a try. Later we will redirect the output in the virtual machine from the serial port to the log file, which may be useful in the future - write logs to the USB flash drive inserted into the USB port on real hardware.
gST->ConOut->OutputString(gST->ConOut, L”Test string”);will display “Test string” on the display, and the function
gST->StdErr->OutputString(gST->StdErr, L”Test string”);will output a test message to the serial port. Give it a try. Later we will redirect the output in the virtual machine from the serial port to the log file, which may be useful in the future - write logs to the USB flash drive inserted into the USB port on real hardware.
Outputting debugging information to the OVMF window
To display information in the OVMF window there is a DEBUG macro, which is usually used as follows:
DEBUG((EFI_D_INFO, "Test message is: %s\r\n", Message));Where the first argument is a certain analogue of the Linux level of error messages ERROR_LEVEL , and the second, as you might guess, a pointer to a line to be output to the OVMF console.
The first argument can take the following values: By adjusting the level of appearance of these messages in the log, we can maintain the required balance between the level of logging and the performance of the system as a whole.
#define EFI_D_INIT 0x00000001 // Initialization style messages

#define EFI_D_WARN 0x00000002 // Warnings

#define EFI_D_LOAD 0x00000004 // Load events

#define EFI_D_FS 0x00000008 // EFI File system

#define EFI_D_POOL 0x00000010 // Alloc & Free's

#define EFI_D_PAGE 0x00000020 // Alloc & Free's

#define EFI_D_INFO 0x00000040 // Informational debug messages

#define EFI_D_VARIABLE 0x00000100 // Variable

#define EFI_D_BM 0x00000400 // Boot Manager (BDS)

#define EFI_D_BLKIO 0x00001000 // BlkIo Driver

#define EFI_D_NET 0x00004000 // SNI Driver

#define EFI_D_UNDI 0x00010000 // UNDI Driver

#define EFI_D_LOADFILE 0x00020000 // UNDI Driver

#define EFI_D_EVENT 0x00080000 // Event messages

#define EFI_D_VERBOSE 0x00400000 // Detailed debug messages that may significantly impact boot performance

#define EFI_D_ERROR 0x80000000 // Error
A little more about the macro DEBUG
1. Its output is formatted and works like printf formatting . For debugging, the % r format is very useful , which displays the Status diagnostic variable not as a 32-bit number in HEX, but as a human-readable string like Supported , Invalid Argument , etc.
2. This macro is automatically disabled when you change Debug to Release , so do not rush to comment on it or weight it with ifndefs - everything has already been done for us.
3. Double brackets are really needed there. Try to clean and see what happens.
A small example
To illustrate what is written, we add to the function MyFirstDriverDriverEntryPoint () , immediately after declaring the variables, output text from several messages to the log with different debugging levels and see which of them are displayed and which will be filtered:
DEBUG((EFI_D_INFO, "Informational debug messages\r\n"));
DEBUG((EFI_D_ERROR, "Error messages\r\n"));
DEBUG((EFI_D_WARN, "Warning messages\r\n"));
We start for debugging and look at the OVMF window :
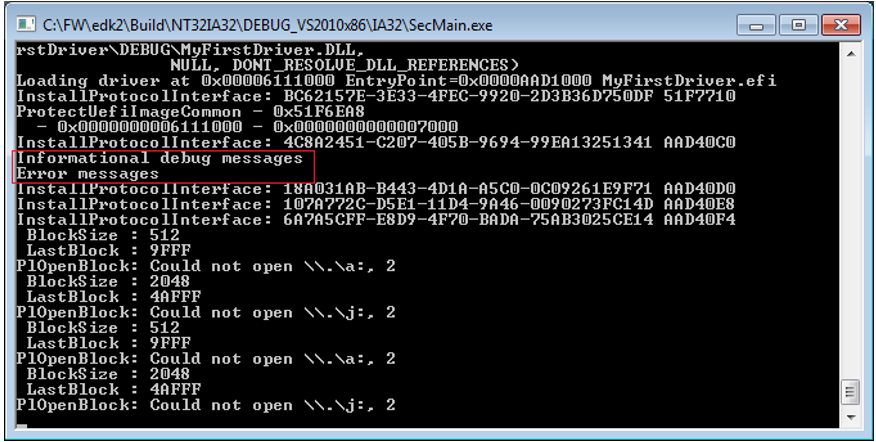
It can be seen that messages with the level EFI_D_INFO and EFI_D_ERROR got into the log, but with the level EFI_D_WARN it didn’t.
The mechanism for regulating debugging levels is quite simple: as we see in the list above, each level is characterized by one bit in a 32-bit word. To filter out messages that we don’t need at the moment, we put the bitmask on the value of the level that cuts off bits that do not fall into this mask. In our case, the mask was 0x80000040 , because the EFI_D_WARN level with a value of 0x00000002 was filtered out and did not get into the output, and the level was EFI_D_INFOwith the value 0x00000040 , and EFI_D_ERROR with its value 0x80000000 got into the mask and the corresponding messages were displayed.
Now we will not go further into consideration of the implementation of the mechanism for setting the debug output level, we will only consider ways to change it in practice. There are two of them, the first one is fast and the second one is correct. We start, of course, with a quick one. Open the file c: \ FW \ Nt32Pkg \ Nt32Pkg.dsc and look for the line containing PcdDebugPrintErrorLevel in it . Here it is:
gEfiMdePkgTokenSpaceGuid.PcdDebugPrintErrorLevel|0x80000040Change the value of the mask to 0x80000042 and start building and debugging again.
Since we changed the configuration file, edk2it will again reassemble all-all-all binaries for Nt32Pkg for a long time , but this process is finite, and now we see all three lines in the log, which was required to prove: We

quickly figured out how to do it. Now let's do it right.
Platform Configuration Database (PCD)
Проблема предыдущего подхода в том, что дерево edk2 и пакет Nt32Pkg у нас единственные, и менять системные настройки ради единственного проекта – прямой путь в преисподнюю, ибо в лучшем случае через неделю вы про это изменение забудете напрочь и будете проклинать исчадье ада под названием edk2, что месяц назад исправно создавало из оттестированных исходников под версионным контролем именно то, что надо, а сейчас выдает нечто совершенно другое. Поэтому в edk2 реализован механизм изменения системных настроек под единственный проект, чтобы локализовать изменения этих настроек только для данного проекта. Называется этот механизм PCD — Platform Configuration Database, and allows a lot. In general, a good style in edk2 is considered to be any parameter that can be changed in the future from the source in PCD . The volume of the article does not allow us to dwell on the PCD description in more detail, therefore it is better to look at the details about PCD here in clause 3.7.3 or here . For the first time, it’s enough to limit yourself to reading the file C: \ FW \ edk2 \ MdeModulePkg \ Universal \ PCD \ Dxe \ Pcd.inf
From the point of view of practice, configuration using PCD is done like this: in the same file c: \ FW \ Nt32Pkg \ Nt32Pkg.dsc we change the level of message display in the OVMF window :
EducationPkg/MyFirstDriver/MyFirstDriver.inf {

    gEfiMdePkgTokenSpaceGuid.PcdDebugPrintErrorLevel|0x80000042
 }
Do not rush to immediately write the file. First, adjust back 0x80000042 to the default value 0x80000040 in the line that we edited earlier:
gEfiMdePkgTokenSpaceGuid.PcdDebugPrintErrorLevel|0x80000042And now you can write the file and rebuild the project. We start debugging by F5 and see our treasured three lines in the debug console.
Speed up debugging further
Let's remove a couple of annoying delays when starting up for debugging. Obviously, the first candidate is waiting for those same 5 seconds before running the startup.nsh script . Of course, it is possible to press the spacebar, but any
Now you have to contradict what was said earlier. The problem is that in these 5 seconds the delays are registered not through the PCD, but contrary to Feng Shui, directly in the Shell source code. Therefore, we, whether we like it or not, will have to do the same: open the file C: \ FW \ edk2 \ ShellPkg \ Application \ Shell \ Shell.c and change the value "5" to "1" in the initialization
ShellInfoObject.ShellInitSettings.Delay = 1;//5;It would be possible to set it to 0, but you never know ... Let's forget to change it on a real hardware system, and then there will be no possibility to recompile.
Press F5 and enjoy 1 sec. delays instead of 5.
If someone knows how to set this delay value correctly, through PCD and without editing Shell sources - let me know in PM or in comments, I will correct it.
Still accelerating
We recall the progress bar, but in fact - just a timer waiting for the download option to be selected. This is how it looks on the main screen:

And in the OVMF launch window it looks a little different:

As Winnie the Pooh said, “Well, it’s good reason!” We need to find the source and also reduce it to 1 second.
We start the search for all files with the * .c extension of the Zzzzz line , find this line in the source C: \ FW \ MdeModulePkg \ Universal \ BdsDxe \ BdsEntry.c and see here such a block of code:
  DEBUG ((EFI_D_INFO, "[Bds]BdsWait ...Zzzzzzzzzzzz...\n"));
  TimeoutRemain = PcdGet16 (PcdPlatformBootTimeOut);
  while (TimeoutRemain != 0) {
    DEBUG ((EFI_D_INFO, "[Bds]BdsWait(%d)..Zzzz...\n", (UINTN) TimeoutRemain));
    PlatformBootManagerWaitCallback (TimeoutRemain);
Accordingly, it is clear that the TimeoutRemain variable is read from the PCD configuration database , in the PcdPlatformBootTimeOut parameter . Ok, open our configuration file c: \ FW \ Nt32Pkg \ Nt32Pkg.dsc , look for the line with PcdPlatformBootTimeOut there :
gEfiMdePkgTokenSpaceGuid.PcdPlatformBootTimeOut|L"Timeout"|gEfiGlobalVariableGuid|0x0|10There is already an option, as before, with the PcdDebugPrintErrorLevel configuration exclusively for our driver, it will not work - in this case, the delay will be executed long before our MyFirstDriver module is loaded with the startup.nsh startup script , so we will have to change globally whether we want it or not . In this case, we want it, because this delay in the process of developing drivers is usually useless. We change 10 to 1 in our configuration file, press F5 and enjoy a quick download. On my car, it now takes 23 seconds.
Another tuning, this time - the interface
We remove the second display, which we do not need so far, but already started to annoy. Edit the lines in our favorite configuration file c: \ FW \ Nt32Pkg \ Nt32Pkg.dsc , opening it and removing ! My EDK II 2 and ! UGA Window 2 in two lines to get:
gEfiNt32PkgTokenSpaceGuid.PcdWinNtGop|L"UGA Window 1"|VOID|52and
gEfiNt32PkgTokenSpaceGuid.PcdWinNtUga|L"UGA Window 1"|VOID|52You can, of course, change the very inscription in the title bar of the UGA Window 1 to something spiritually closer to you personally, but that's up to you.
For the future
There is another big reserve to reduce the compilation and launch time of the project (at times) - to compile not all edk2 , but only our module. But about this, as they say - in the next series. You can try to do it yourself for now, the solution is elementary, as you will see later.
It may seem superfluous to you now - paying so much attention to reducing compilation and launch time, but believe me - when you start writing your programs, the difference between the target 10 seconds before the launch, which we will come to, and the 2 minutes that were at the beginning is huge. The time spent now will pay off very quickly - the third article is just around the corner, and you will have to debug a lot in it.
Only registered users can participate in the survey. Please come in.
Highlighting keywords in an article in bold ...
- 75.5% Useful, improves the perception of the text of article 37
- 6.1% Not necessary and only distracting 3
- 18.3% I don't care 9









