September 13, 2017 at 14:01
When size matters: create a ruler application using ARKit
- Tutorial
So the day passed for the long-awaited official release of iOS 11, which means you can’t postpone your acquaintance with ARKit, Apple’s SDK for creating applications with augmented reality. Many have heard about the essence of the tool: using ARKit, you can overlay the created virtual reality on the real world around us. At the same time, the iPhone or iPad acts as a viewing window through which we can observe what is happening and change something in it. Many different demo applications have already been presented on the Internet - they can be used to arrange furniture, park a car in a parking lot, draw in the surrounding space, create doors to other worlds, and much more. In a word, the range of possibilities is wide, you only need to deal with technical implementation.
ARKit support devices exclusively with iOS 11 and an A9 or A10 processor. Accordingly, to write and run the application, we need, firstly, Xcode 9, and secondly, a device with one of these processors and the latest version of iOS installed. The starter project can be downloaded from here .
ARKit uses data from the camera and other sensors of the device to recognize key points and horizontal surfaces in the surrounding space in real time. In parentheses, we note that the process is quite resource-intensive - the device will heat up. First, add the line to the viewDidLoad () method:
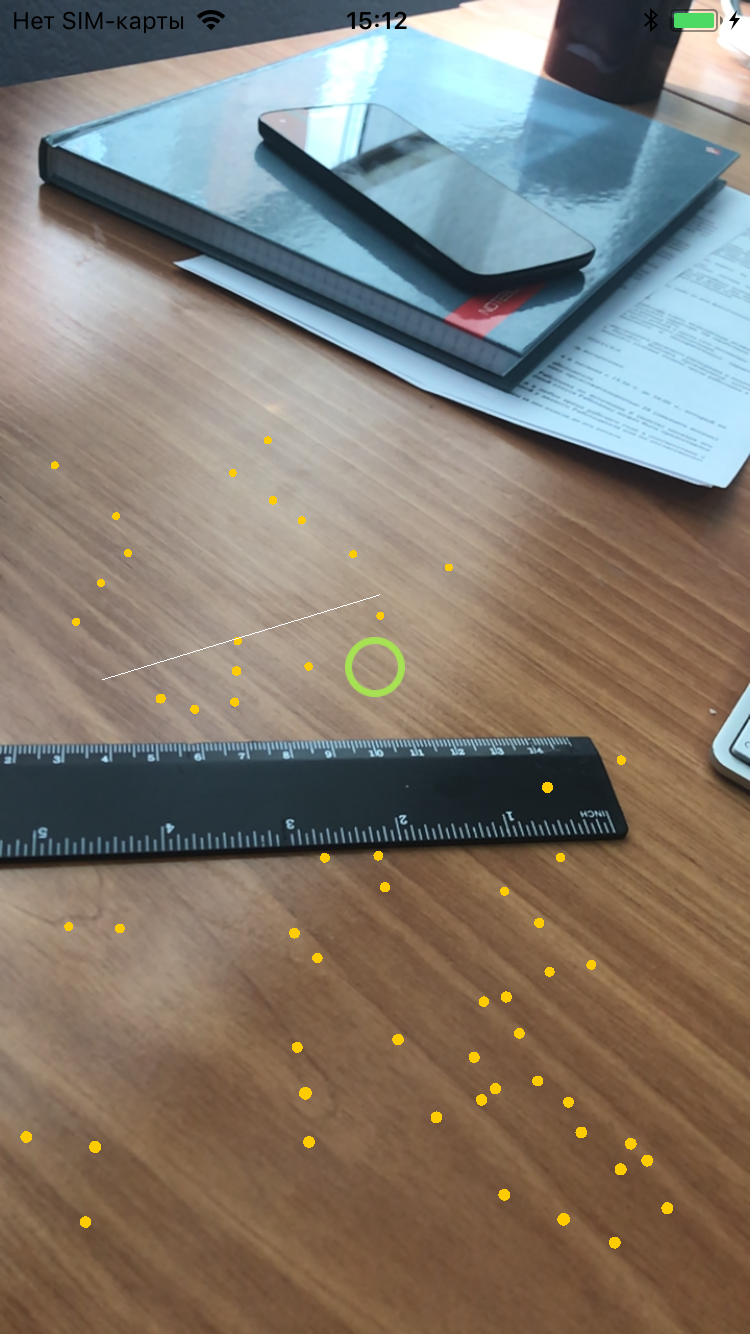
sceneView.debugOptions = ARSCNDebugOptions.showFeaturePointsThis will allow us to see the key points that ARKit finds. Now you can start the application, and after a while the following picture will appear before us:
 /
/ 
It is worth noting that the device needs to be moved a little in space - in the process of moving more changing information will come into the system than in a stationary state. The abundance of data helps ARKit identify key points, and as a result, there are more of them.
In order to "test" the capabilities of ARKit, we take as an example a simple line application and follow the entire process of its creation. First, we need to implement the drawing of a line between two points, then calculate its length, adjust the output to the screen, and our primitive ruler will be ready. Add the variables that we need to draw the line in space:
private var points: (start: SCNVector3?, end: SCNVector3?)
private var line = SCNNode()
private var isDrawing = false
private var canPlacePoint = false
The points tuple will contain the start and end points of the line. line is SCNNode, an object that is added to the SceneKit scene, isDrawing is a variable indicating whether we have finished selecting points or not. The variable canPlacePoint speaks for itself: it shows whether it is possible to position the point in focus. In our case, the focus will be the center of the screen.
In order to determine if we can put a point in focus, we need to use the hitTest method of the ARSCNVeiw object. This method, based on ARKit data, detects all recognized objects and surfaces that intersect the beam directed from the camera and returns the received intersection data in the order of removal from the device.
We will use it in ARSCNViewDelegate, in the method
func renderer(_ renderer: SCNSceneRenderer, updateAtTime time: TimeInterval) to receive data in real time. As a result, we get something like this:
func renderer(_ renderer: SCNSceneRenderer, updateAtTime time: TimeInterval) {
    DispatchQueue.main.async {
	self.measure()
    }
}
private func measure() {
    let hitResults = sceneView.hitTest(view.center, types: [.featurePoint])
    if let hit = hitResults.first {
        canPlacePoint = true
        focus.image = UIImage(named: "focus")
    } else {
        canPlacePoint = false
        focus.image = UIImage(named: "focus_off")
    }
}
This code checks for hitTest results in real time, and then, depending on them, sets the canPlacePoint value and the image of our focus (green or red). The hitTest method also has a list of options that defines which objects to consider in the implementation - in our case, these are key points. If desired, you can add horizontal surfaces.
Tap on the screen will indicate the start or end point. Directly in the function of implementing tapas on the screen, we will change the variable isDrawing and zero the values of the beginning and end each time we start a new line:
@objc private func tapped() {
    if canPlacePoint {
        isDrawing = !isDrawing
        if isDrawing {
                points.start = nil
                points.end = nil
        }
    }
}
Back to the updateAtTime delegate function. Having the result of hitTest, we get the coordinates of the point and then, depending on the value of the variables, set the start or end point of the line:
if isDrawing {
   let hitTransform = SCNMatrix4(hit.worldTransform)
   let hitPoint = SCNVector3Make(hitTransform.m41, hitTransform.m42, hitTransform.m43)
   if points.start == nil {
       points.start = hitPoint
   } else {
       points.end = hitPoint
   }
}
Now we have the coordinates of the beginning and end of the line - it remains to draw it. To do this, add a function that will return the geometry of the line (according to it SceneKit will understand how and where to draw SCNNode):
func lineFrom(vector vector1: SCNVector3, toVector vector2: SCNVector3) -> SCNGeometry {
    let indices: [Int32] = [0, 1]
    let source = SCNGeometrySource(vertices: [vector1, vector2])
    let element = SCNGeometryElement(indices: indices, primitiveType: .line)
    return SCNGeometry(sources: [source], elements: [element])
}
And finally, add code that will draw our line in space:
if points.start == nil {
    points.start = hitPoint
} else {
    points.end = hitPoint
    line.geometry = lineFrom(vector: points.start!, toVector: points.end!)
    if line.parent == nil {
        line.geometry?.firstMaterial?.diffuse.contents = UIColor.white
        line.geometry?.firstMaterial?.isDoubleSided = true
        sceneView.scene.rootNode.addChildNode(line)
    }
}
Now, having launched the application, we can draw a line between two points: the first tap marks the beginning and begins to draw a line to a point in focus, the second tap stops drawing mode and fixes the line. It remains only to calculate its length and display the resulting value on the screen.
func distance(from startPoint: SCNVector3, to endPoint: SCNVector3) -> Float {
    let vector = SCNVector3Make(startPoint.x - endPoint.x, startPoint.y - endPoint.y, startPoint.z - endPoint.z)
    let distance = sqrtf(vector.x * vector.x + vector.y * vector.y + vector.z * vector.z)
    return distance
}
This function calculates the distance between two points in space. The point is small: add a text field and display the result in it. In SceneKit 0.01 is equal to one centimeter. As a result, we get the following:
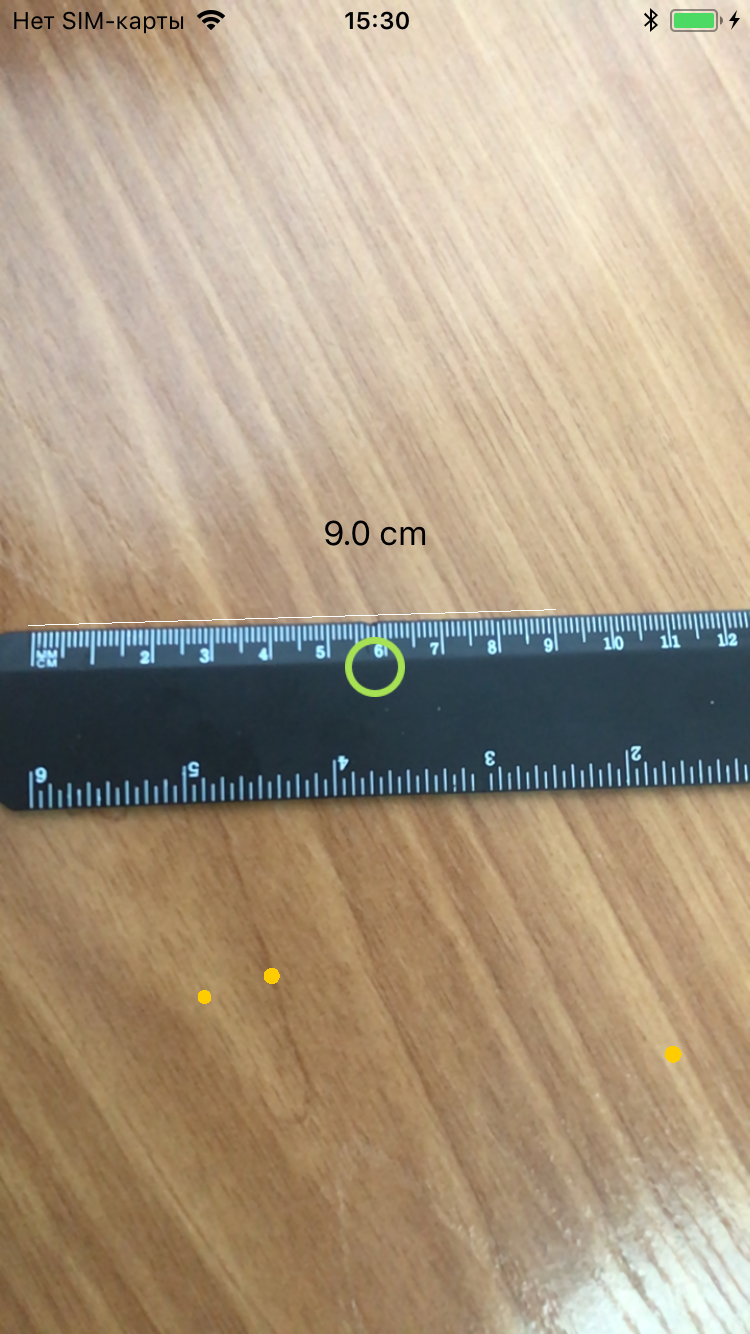
The length of the drawn line, according to the application, is 9 cm, which is pretty good correlated with the readings of a real ruler. But, in fact, the accuracy is not too high. Maximum accuracy is obtained in cases when objects are located at a small distance from the camera and the measurement is made from the device’s position perpendicular to the surface (that is, you need to move the phone parallel to the surface, and not rotate it). Measurement on horizontal surfaces will be more accurate. Also, if you aim the camera at distant objects, hitTest may return invalid results - the distance to the found objects is not determined correctly. Although here you need to make a reservation that all this was tested on the iPhone 7, which does not have a dual camera. And if you look at the demo of various rulers on the Internet,
Here is the result .
To summarize: ARKit is an excellent SDK for creating games and entertainment applications, you can come up with a lot of interesting things. Apple’s significant merit is that they launched augmented reality into the masses: there are a lot of devices that support ARKit and now you don’t need to buy special helmets and other accessories. In addition, ARKit supports working with native SpriteKit SceneKit and Metal, as well as with Unity and Unreal Engine, which simplifies development.