September 19, 2017 at 17:58
DevOps with Kubernetes and VSTS. Part 2: Cloud History
- Transfer
- Tutorial
Continuation of the story about Kubernetes, containers and CI / CD pipeline organization. Finally, the Azure cloud and Visual Studio Team Services appear. Interestingly, the VSTS CI / CD pipeline uses the kubectl cluster to work with k8s, so you can deploy the application not only in Azure Container Services, but also in any other Kubernetes installation.

Read the translation of the second part of the DevOps article from Kubernetes and VSTS.
1. Fast deployment containers .
2. DevOps with Kubernetes and VSTS. Part 1: Local history.
3. DevOps with Kubernetes and VSTS. Part 2: Cloud History.
4. A node with an infinite capacity for Kubernetes.
In the first part, I demonstrated an approach to developing multi- container applications using Kubernetes (k8s), or rather minikube , a full-fledged k8s environment that runs a single node on a virtual machine on your laptop. In a previous article, I cloned this repository (make sure the docker branch is deployed) with two containers: DotNet Core API and frontend SPA ( Aurelia) (as static files in the DotNet Core app). I showed how to create containers locally and run them in minikube, and also use the capabilities of ConfigMaps to work with configurations.
In this article I will tell you how to transfer local development to CI / CD and create a pipeline for automated build / release generation using VSTS. We will create a container registry and container services in Azure using k8s as an orchestration mechanism.
I strongly recommend that you study Nigel Poulton’s excellent entry-level course called Getting Started with Kubernetes on PluralSight (a translator's note in English, you need a paid subscription), as well as an article by Atul Malaviya from Microsoft. Nigel’s course was an excellent introduction to Kubernetes for beginners, and Atul’s article helped to understand how VSTS and k8s interact, but neither the course nor the article covered the pipeline completely. Of these, I still did not understand how the image update was implemented in the CI / CD pipeline. Well, I had to conduct a series of experiments myself and prepare this article!
k8s can be run locally in AWS or Google Cloud or Azure. We will use the Azure Container Service. However, the CI / CD pipeline that I demonstrate in this article does not depend on a particular cloud hosting, it is suitable for any k8s cluster. We will also create a private container registry in Azure, but again, you can use any container registry of your choice.
You can also create a k8s cluster on the Azure portal. However, the Azure CLI allows you to do this faster, and you save the keys that you will need to connect, so I decided to use this mechanism. I will also use Bash for Windows with kubectl, but any platform with kubectl and the Azure CLI will do.
Here are the commands:
Notes:
If you launch the browser, go to the Azure portal and open your resource group, you will see how much was created by these simple commands:
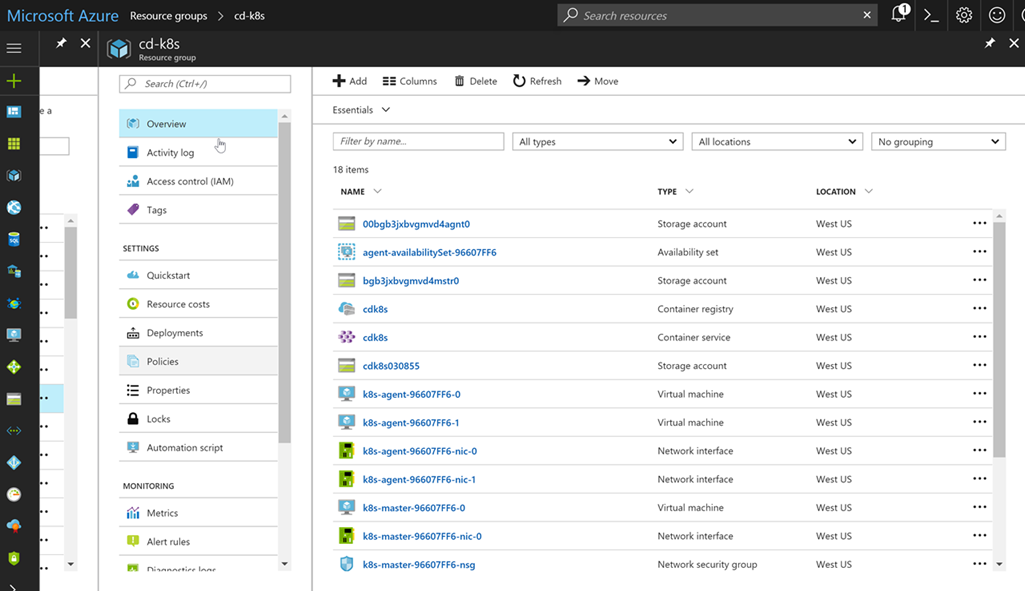
Don’t worry, you won’t have to manage the resources yourself. Azure and the k8s cluster take over!
Before we build and build our container applications, let's look at a promotion model. Typically, the scheme is something like this: development -> user acceptance tests -> production environment (Dev -> UAT -> Prod). In the case of c k8s, minikube is a local development environment, which is great. This is a full-fledged k8s cluster on your laptop, so you can run your code locally, including using k8s constructs like configMaps. What about UAT and Prod? The option is to deploy separate clusters, but this approach can be expensive. You can also share cluster resources using namespaces.
Namespaces in k8s act as security boundaries, but they can also become boundaries of isolation. I can deploy new versions of my application in the dev namespace, which will use the prod namespace resources, but remain completely invisible (native IP addresses, etc.). Of course, you should not carry out load testing within such a configuration, since we will consume significant resources intended for applications in a production environment. This concept resembles the deployment slots in Azure application services, which are used to seamlessly test applications before they are transferred to the production environment.
If you create a k8s cluster, then in addition to the kube-system and kube-public namespaces (with pods k8s), you get a default namespace. Unless you have clear instructions, any services, deployments, or pods that you create fall into this namespace. But we will create two additional namespaces: dev and prod. Here is our yaml:
This file contains definitions for both namespaces. Run the Apply command to create namespaces. After completing all the procedures, you can list all the namespaces in the cluster:
Before proceeding to the code, we will make the final settings: when the k8s cluster retrieves the images to run, it must access the container registry that we created. This registry has secure access since the registry is private. Therefore, we need to set up a registry secret that can be simply referenced in our yaml deployment files. Here are the commands:
The first command uses az to get the keys for a user with administrator rights (the username with administrator rights is the same as the container registry name, so I created cdk8s.azurecr.io and the administrator username will be cdk8s). Pass one of the keys (no matter which) as a password. Email address is not used, so you can specify any. We now have a registry secret called regsecret, which we can reference when deploying to the k8s cluster. K8s will use this secret to authenticate with the registry.
We set up a k8s cluster and container registry. Now add these endpoints to VSTS so that we can transfer containers to the registry when you create the assembly and execute the commands for the k8s cluster during preparation for the release. Endpoints allow us to abstract authentication so that credentials are not stored directly in our release definitions. You can also create roles to restrict access to view and use endpoints.
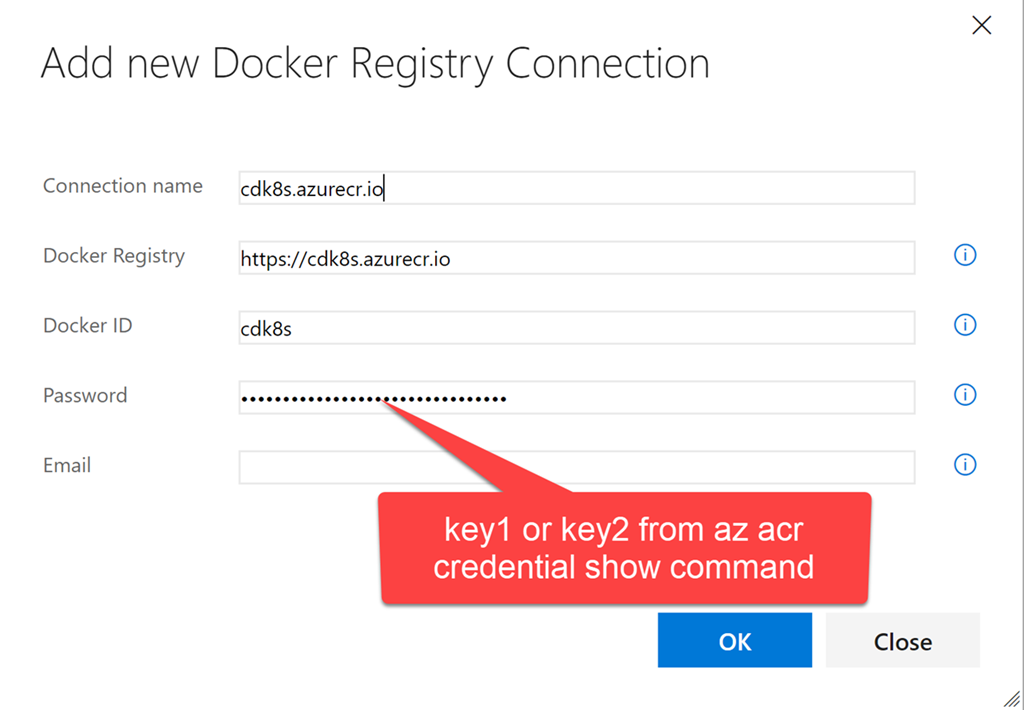
Launch VSTS and open a team project (or just create a new one). Go to the team project and click the gear icon to open the settings node for this team project. Click Services. Click + New Services and create a new Docker Registry endpoint. Enter the same credentials that you used to create the registry secret in k8s using kubectl:
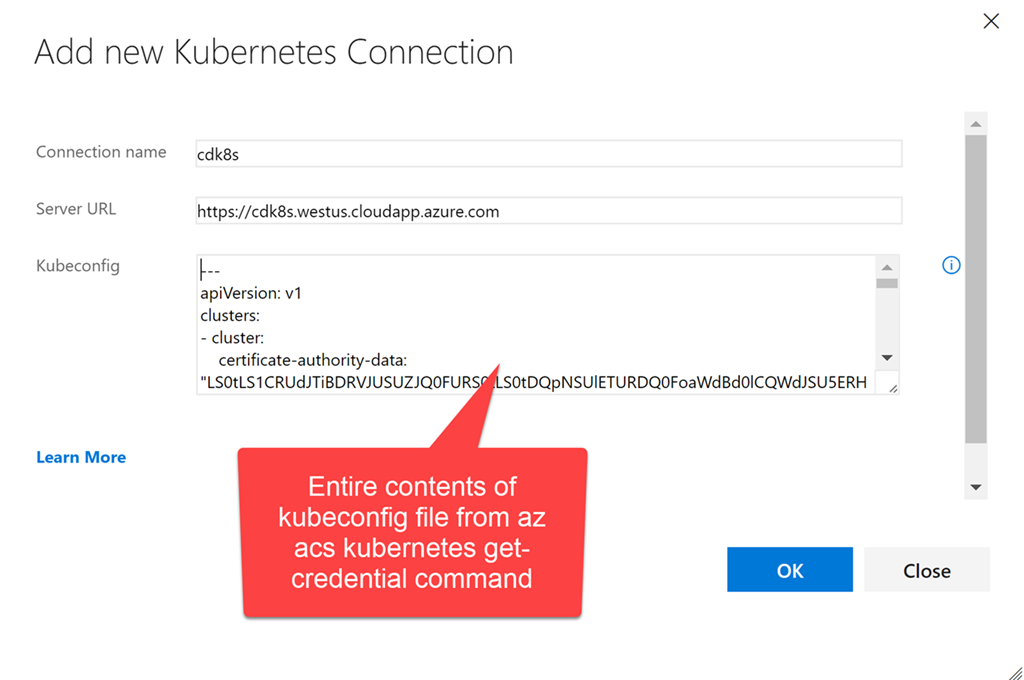
Now create the k8s endpoint. Enter the URL: https: //$ClusterName.$location.cloudapp.azure.com (clustername and location are the variables that we used when creating the cluster). You need to copy the entire contents of the ~ / cdk8s / kubeconfig file (you could name it differently) to the credential text box, which was created after the az acs kubernetes get-credential command was run:
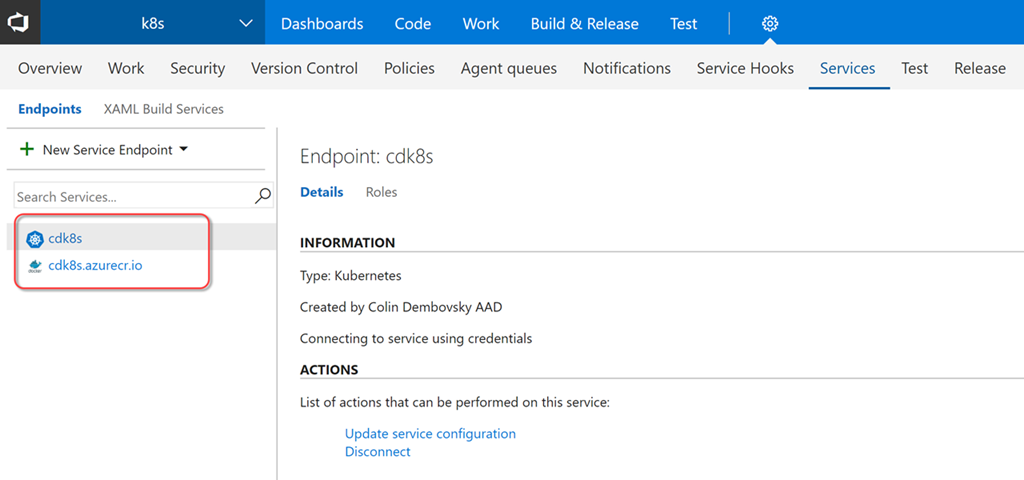
Now we have two endpoints that we can use in build and release definitions:
Now we can create an assembly that will compile / test our code, create docker images and put them in the container registry, marking them accordingly. Click Build & Release, and then Builds to open the assembly node. Create a new assembly definition. Select the ASP.NET Core template and click Apply. The following settings must be made:
The final task list should look like this:
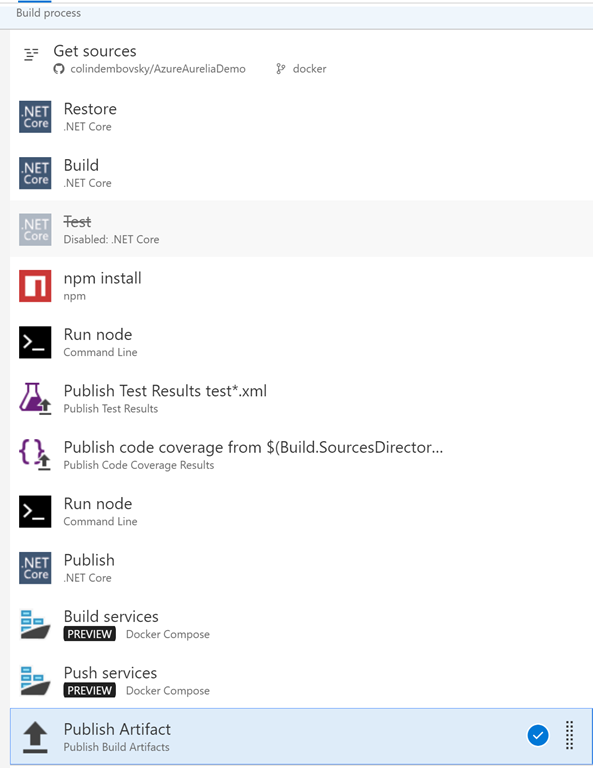
Now you can click Save and Queue to save the assembly and put it in the queue. When the build process is complete, you will see a summary of the testing / coverage.

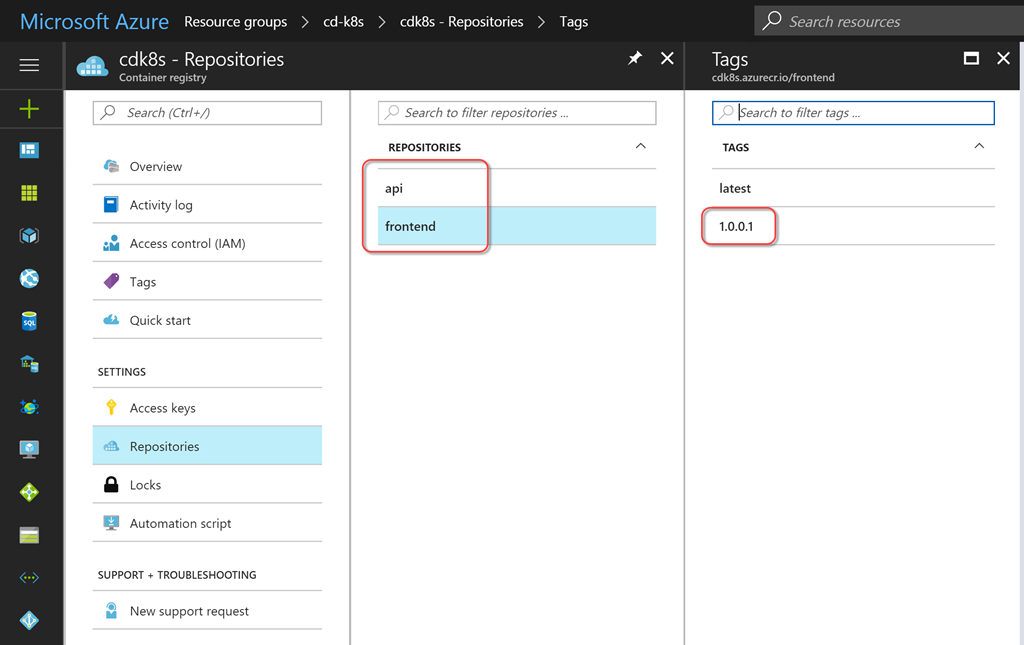
You can also view the contents of your container registry to see newly migrated service images with a label corresponding to the build number.
Now we can configure the release, which will create / update the necessary services. To do this, provide configuration management. You could just include the configuration in the code, but in this case sensitive data (for example, passwords) would fall into the version control tool. I prefer tokenize any configuration so that the release management solution places sensitive data outside the area controlled by the version control tool. VSTS Release Management allows you to create secrets for individual environments or releases, and you can also create them in variable groups with support for reuse. In addition, seamless integration with Azure Key Vault is now supported .
To use environment-specific values instead of tokens, we need a task to replace the token. Fortunately, I have a cross-platform ReplaceTokens task from the Colin's ALM Corner Build & Release Tasks extension module , which I downloaded from the VSTS Marketplace. Click the link to go to the desired page, then click Install to install the extension for your account.
On the assembly summary page, scroll to the Deployments section on the right and click the Create release link. You can also click Releases and create a new definition from there. Start with an empty template (Empty), select your team project and the assembly you just created as the source assembly. Select the Continuous Deployment check box to automatically create a release for each correct build.
Specify k8s or something descriptive as the name for the definition. On the General tab, change the format of the release number to $ (Build.BuildNumber) - $ (rev: r) so that you can always easily determine the build number from the release name. Return to the Environments section and enter dev instead of Environment 1. Click the Run on Agent link and make sure Hosted Linux Preview is selected in the Deployment queue field.
Add the following tasks:
This sets environment-specific values for all variables in yml files. The Replace Tokens task will write the necessary values to files for us. Let's take a quick look at one of the tokenized files (tokenized lines are highlighted):
Comment regarding the value for BackendServiceIP: we use 10.0.0.1 as the replacement text, since Azure will assign an IP address to this service when k8s starts the service on the server side (you will see the public IP address in the resource group in the Azure portal). We will need to do this once to create the services, and then update to get the real IP address and ensure the service is working on the client side. We also use $ (Release.EnvironmentName) as the value for namespace, so for dev (and then for prod) the namespaces should match the ones we created (including the case of characters).
If the service / deployment and configuration does not change, then the first three k8s tasks essentially do not work. Some result will be given only by the set command. But this is just great, since service / deployment and configuration files can be applied idempotently! They change when necessary, and do not introduce any disturbance in all other situations - an ideal approach for repetitive releases!
Save the definition. Click + Release to create a new release. Click on the release number (it will be something like 1.0.0.1-1) to open it. Click logs to view the logs.
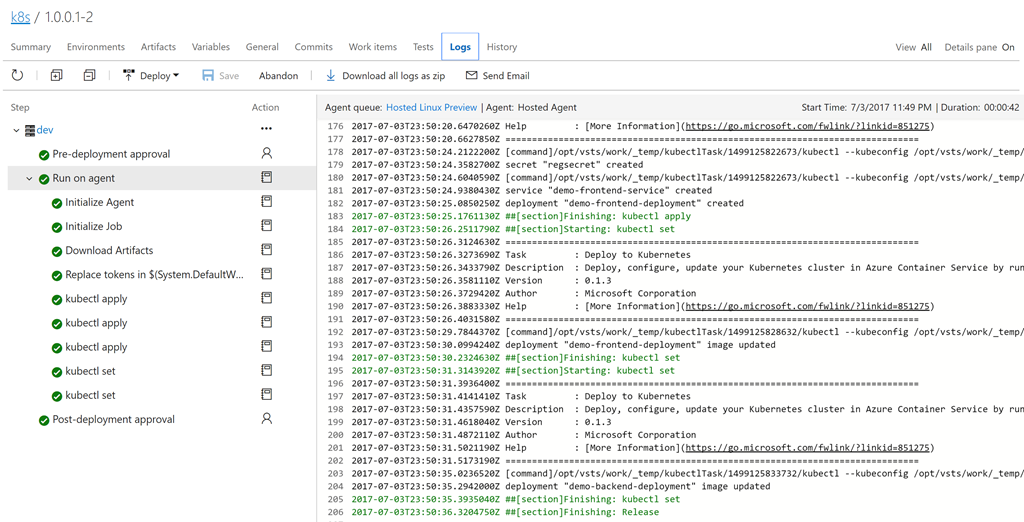
When the release creation is complete, you will see the deployment in the Kubernetes dashboard. Use the following command to open the dashboard:
The last argument is the path to the SSH key file that is generated when the cluster is created (specify the current path). Now you can open the browser page http: // localhost: 8001 / ui . From the namespace drop-down menu, select dev and click Deployments. You should see two successful deployments with two workable hearths in each. You can also see images that run in deployments. Pay attention to the assembly number indicated as a tag!
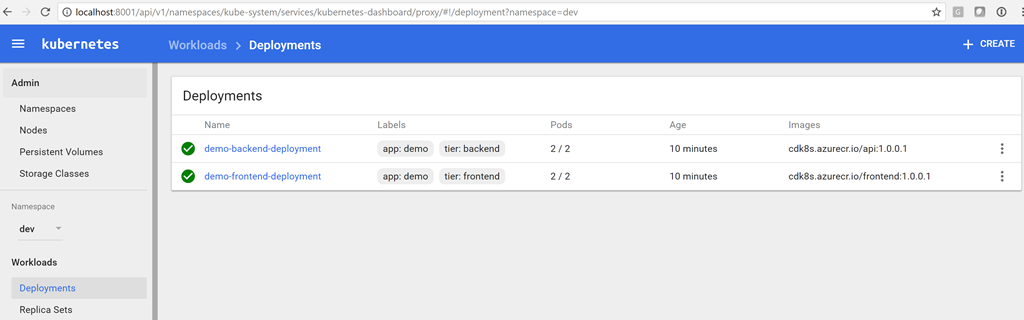
To see the services, click Services.
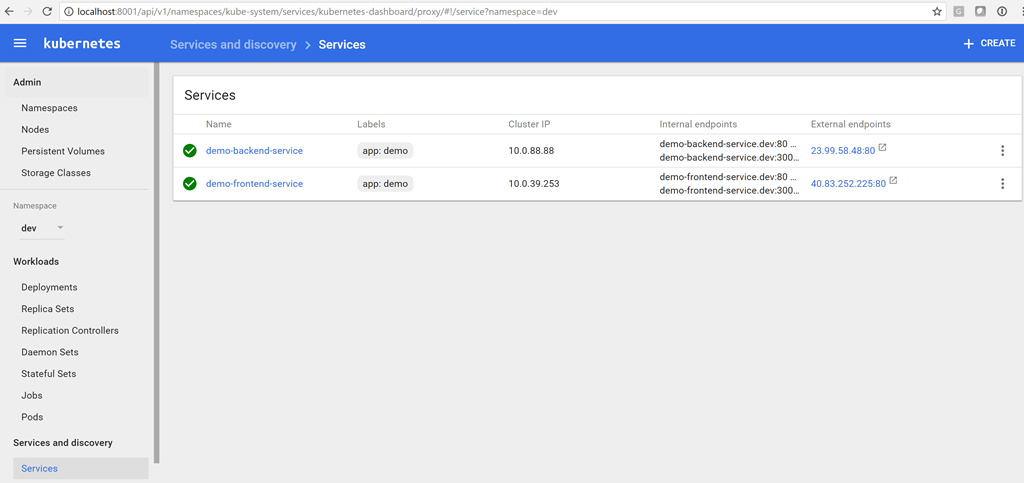
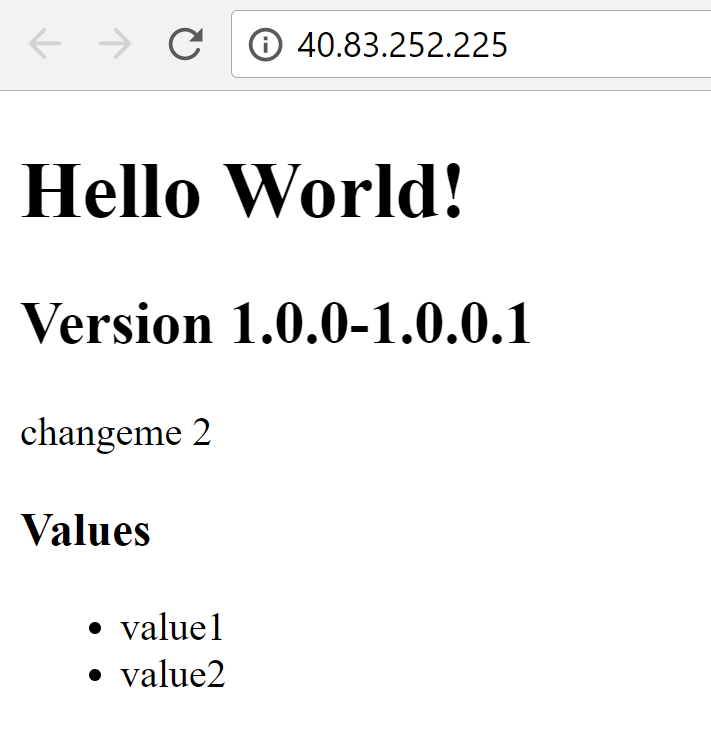
Now we have the server IP address of the service, so we can update the variable in the release. Then we can queue the new version, and this time in the client configuration the correct IP address for the service on the server side will be indicated (in our case it is 23.99.58.48). We can enter the IP address of our customer service in a browser and make sure that now everything works!
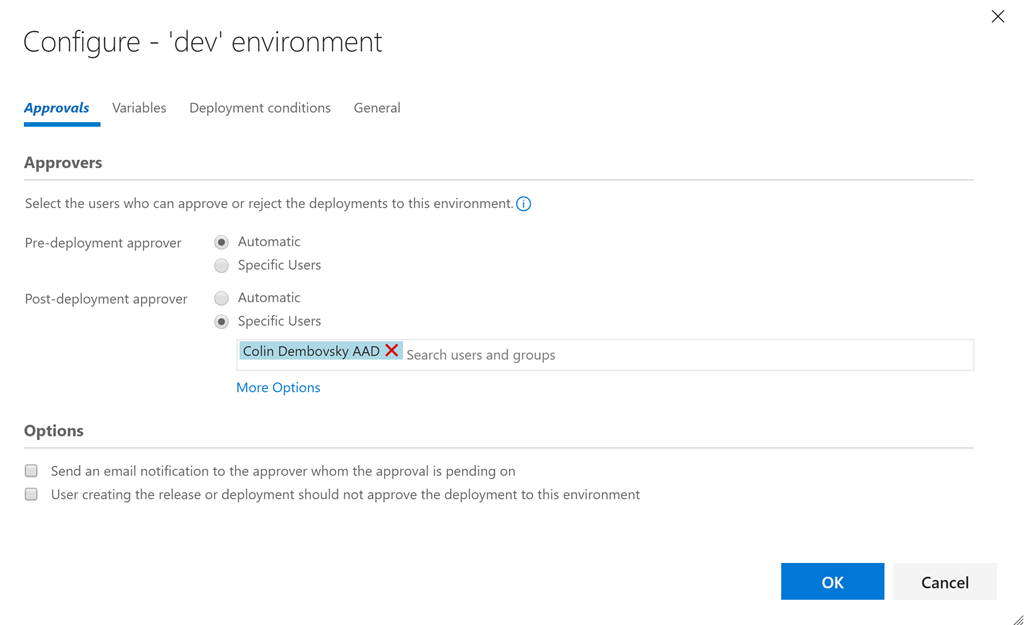
Now that we’ve made sure the dev environment is working, we can go back to release, clone the dev environment and name the copy prod. Indicate ex-post approval for dev (or pre-approval for prod) so that there is a breakpoint between the two environments.
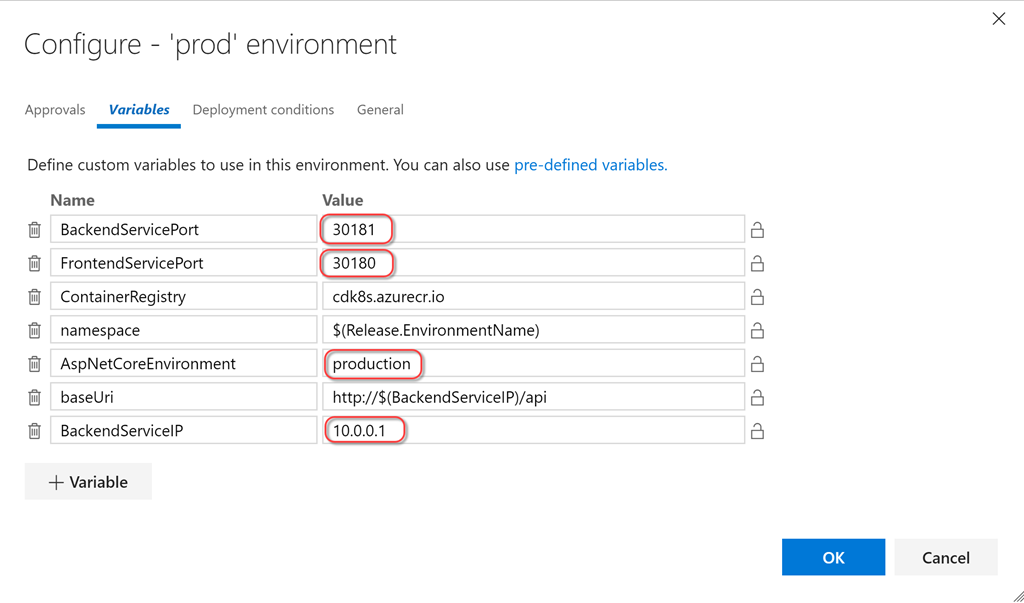
Then we can just change the ports for the nodes, as well as the values of the AspNetCoreEnvironment and BackendServiceIP variables, and you're done! Of course, we need to deploy to the prod namespace first before we see the IP address assigned by k8s / Azure to the prod server. Then you must restart the release creation procedure to update the configuration.
We could remove the nodePort parameter from the definitions and let the k8s platform choose the host port itself, but if the port is specified explicitly, then we will know exactly which port the service will use in the cluster (not for external access).
I don’t like to specify --namespace for each command, I don’t like it so much that I created a Pull Request in the vsts-tasks repository on Github to give access to the namespace as an additional user interface element!
Now that our dev and prod environments in the CI / CD pipeline are configured, we can make changes to the code. I will change the text under the version to “K8s demo” and apply the changes. So we initiate the build, creating a newer container image and running tests, which in turn will launch the release in the dev environment. Now I see a change in the dev environment (version 1.0.0.3 or newer, i.e. more than 1.0.0.1), while the prod version is still 1.0.0.1.
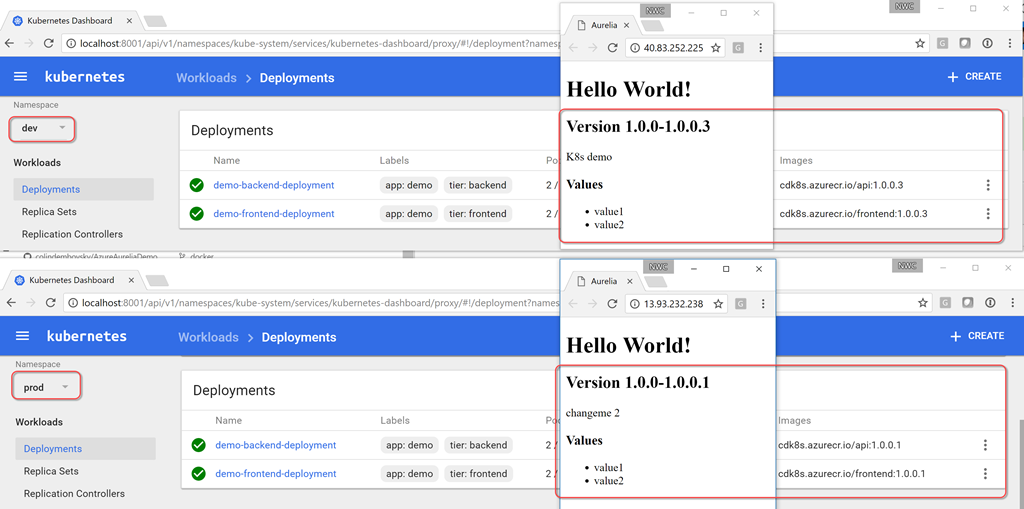
Approve dev in the release management solution and the process for prod will start, after a few seconds the prod version will also be 1.0.0.3.
I exported json definitions for assembly and release to this directory, you can try to import them (I'm not sure if this will work, but you can use them for reference anyway).
k8s has great potential as a reliable container orchestration mechanism. Yml technology allows you to implement the concept of "infrastructure as code" and is great for version control. The deployment mechanism minimizes or completely eliminates downtime during deployment, and the ability to use configMaps and secrets ensures the security of the entire process. The Azure CLI command-line interface allows you to create a k8s cluster and an Azure container registry with a couple of simple commands. Integration with VSTS using k8s tasks simplifies the configuration of the CI / CD pipeline, together they form the optimal development workflow. And taking into account the minikube solution, which I wrote about in the first part of this series of articles and which provides you with a full-fledged k8s cluster for local development on your laptop,
Of course, the CI / CD pipeline does not load test real applications in a production environment! I would like to know about your experience with k8s in production environments. Write in the comments if you have experience running applications in a k8s cluster in a production environment!
Good luck with k8sing!
PS Thanks to Konstantin Kichinsky ( Quantum Quintum ) for illustrating this article.
Read the translation of the second part of the DevOps article from Kubernetes and VSTS.
A series of articles “Talking about containers”:
1. Fast deployment containers .
2. DevOps with Kubernetes and VSTS. Part 1: Local history.
3. DevOps with Kubernetes and VSTS. Part 2: Cloud History.
4. A node with an infinite capacity for Kubernetes.
In the first part, I demonstrated an approach to developing multi- container applications using Kubernetes (k8s), or rather minikube , a full-fledged k8s environment that runs a single node on a virtual machine on your laptop. In a previous article, I cloned this repository (make sure the docker branch is deployed) with two containers: DotNet Core API and frontend SPA ( Aurelia) (as static files in the DotNet Core app). I showed how to create containers locally and run them in minikube, and also use the capabilities of ConfigMaps to work with configurations.
In this article I will tell you how to transfer local development to CI / CD and create a pipeline for automated build / release generation using VSTS. We will create a container registry and container services in Azure using k8s as an orchestration mechanism.
CI / CD pipeline for Kubernetes in VSTS
I strongly recommend that you study Nigel Poulton’s excellent entry-level course called Getting Started with Kubernetes on PluralSight (a translator's note in English, you need a paid subscription), as well as an article by Atul Malaviya from Microsoft. Nigel’s course was an excellent introduction to Kubernetes for beginners, and Atul’s article helped to understand how VSTS and k8s interact, but neither the course nor the article covered the pipeline completely. Of these, I still did not understand how the image update was implemented in the CI / CD pipeline. Well, I had to conduct a series of experiments myself and prepare this article!
Deploy k8s using Azure Container Services
k8s can be run locally in AWS or Google Cloud or Azure. We will use the Azure Container Service. However, the CI / CD pipeline that I demonstrate in this article does not depend on a particular cloud hosting, it is suitable for any k8s cluster. We will also create a private container registry in Azure, but again, you can use any container registry of your choice.
You can also create a k8s cluster on the Azure portal. However, the Azure CLI allows you to do this faster, and you save the keys that you will need to connect, so I decided to use this mechanism. I will also use Bash for Windows with kubectl, but any platform with kubectl and the Azure CLI will do.
Here are the commands:
# set some variables
export RG="cd-k8s"
export clusterName="cdk8s"
export location="westus"
# create a folder for the cluster ssh-keys
mkdir cdk8s
# login and create a resource group
az login
az group create --location $location --name $RG
# create an ACS k8s cluster
az acs create --orchestrator-type=kubernetes --resource-group $RG --name=$ClusterName --dns-prefix=$ClusterName --generate-ssh-keys --ssh-key-value ~/cdk8s/id_rsa.pub --location $location --agent-vm-size Standard_DS1_v2 --agent-count 2
# create an Azure Container Registry
az acr create --resource-group $RG --name $ClusterName --location $location --sku Basic --admin-enabled
# configure kubectl
az acs kubernetes get-credentials --name $ClusterName --resource-group $RG --file ~/cdk8s/kubeconfig --ssh-key-file ~/cdk8s/id_rsa
export KUBECONFIG="~/cdk8s/kubeconfig"
# test connection
kubectl get nodes
NAME                    STATUS                     AGE       VERSION
k8s-agent-96607ff6-0    Ready                      17m       v1.6.6
k8s-agent-96607ff6-1    Ready                      17m       v1.6.6
k8s-master-96607ff6-0   Ready,SchedulingDisabled   17m       v1.6.6
Notes:
- Lines 2–4: create variables.
- Line 6: create a directory for the ssh keys and the kubeconfig configuration file.
- Line 9: log in to Azure (request to open a page in the browser with the login menu; if you do not have an Azure subscription, create a free one now!).
- Line 10: create a group to host all the resources we are going to create.
- Line 13: deploy the k8s cluster using the newly created resource group and the name we pass; generate ssh keys and put in the specified directory; we need two agents (nodes) with the specified virtual machine size.
- Line 16: create an Azure container registry in the same resource group with administrator access.
- Line 19: get the credentials for connecting to the cluster using kubectl; we use the received ssh key and save the credentials in the specified kubeconfig file.
- Line 20: ask kubectl to use this configuration instead of the default configuration (which may have other k8s clusters or a minikube configuration).
- Line 23: check the ability to connect to the cluster.
- Lines 24–27: We Connect Successfully!
If you launch the browser, go to the Azure portal and open your resource group, you will see how much was created by these simple commands:
Don’t worry, you won’t have to manage the resources yourself. Azure and the k8s cluster take over!
Namespaces
Before we build and build our container applications, let's look at a promotion model. Typically, the scheme is something like this: development -> user acceptance tests -> production environment (Dev -> UAT -> Prod). In the case of c k8s, minikube is a local development environment, which is great. This is a full-fledged k8s cluster on your laptop, so you can run your code locally, including using k8s constructs like configMaps. What about UAT and Prod? The option is to deploy separate clusters, but this approach can be expensive. You can also share cluster resources using namespaces.
Namespaces in k8s act as security boundaries, but they can also become boundaries of isolation. I can deploy new versions of my application in the dev namespace, which will use the prod namespace resources, but remain completely invisible (native IP addresses, etc.). Of course, you should not carry out load testing within such a configuration, since we will consume significant resources intended for applications in a production environment. This concept resembles the deployment slots in Azure application services, which are used to seamlessly test applications before they are transferred to the production environment.
If you create a k8s cluster, then in addition to the kube-system and kube-public namespaces (with pods k8s), you get a default namespace. Unless you have clear instructions, any services, deployments, or pods that you create fall into this namespace. But we will create two additional namespaces: dev and prod. Here is our yaml:
apiVersion: v1
kind: Namespace
metadata:
  name: dev
---
apiVersion: v1
kind: Namespace
metadata:
  name: prod
This file contains definitions for both namespaces. Run the Apply command to create namespaces. After completing all the procedures, you can list all the namespaces in the cluster:
kubectl apply -f namespaces.yml
namespace "dev" created
namespace "prod" created
kubectl get namespaces
NAME          STATUS    AGE
default       Active    27m
dev           Active    20s
kube-public   Active    27m
kube-system   Active    27m
prod          Active    20s
Configure secret for container registry
Before proceeding to the code, we will make the final settings: when the k8s cluster retrieves the images to run, it must access the container registry that we created. This registry has secure access since the registry is private. Therefore, we need to set up a registry secret that can be simply referenced in our yaml deployment files. Here are the commands:
az acr credential show --name $ClusterName --output table
USERNAME    PASSWORD                          PASSWORD2
----------  --------------------------------  --------------------------------
cdk8s       some-long-key-1                   some-long-key-2
kubectl create secret docker-registry regsecret --docker-server=$ClusterName.azurecr.io --docker-username=$ClusterName --docker-password= [email protected]
secret "regsecret" created
The first command uses az to get the keys for a user with administrator rights (the username with administrator rights is the same as the container registry name, so I created cdk8s.azurecr.io and the administrator username will be cdk8s). Pass one of the keys (no matter which) as a password. Email address is not used, so you can specify any. We now have a registry secret called regsecret, which we can reference when deploying to the k8s cluster. K8s will use this secret to authenticate with the registry.
Configure VSTS Endpoints
We set up a k8s cluster and container registry. Now add these endpoints to VSTS so that we can transfer containers to the registry when you create the assembly and execute the commands for the k8s cluster during preparation for the release. Endpoints allow us to abstract authentication so that credentials are not stored directly in our release definitions. You can also create roles to restrict access to view and use endpoints.
Launch VSTS and open a team project (or just create a new one). Go to the team project and click the gear icon to open the settings node for this team project. Click Services. Click + New Services and create a new Docker Registry endpoint. Enter the same credentials that you used to create the registry secret in k8s using kubectl:
Now create the k8s endpoint. Enter the URL: https: //$ClusterName.$location.cloudapp.azure.com (clustername and location are the variables that we used when creating the cluster). You need to copy the entire contents of the ~ / cdk8s / kubeconfig file (you could name it differently) to the credential text box, which was created after the az acs kubernetes get-credential command was run:
Now we have two endpoints that we can use in build and release definitions:
Assembly
Now we can create an assembly that will compile / test our code, create docker images and put them in the container registry, marking them accordingly. Click Build & Release, and then Builds to open the assembly node. Create a new assembly definition. Select the ASP.NET Core template and click Apply. The following settings must be made:
- Tasks -> Process: enter a name, for example k8s-demo-CI, and select the Hosted Linux Preview queue.
- Optional: change the assembly number format to $ 1.0.0 (rev: .r) so that your assemblies have the format 1.0.0.x.
- Tasks -> Get Sources: Select a Github repository with OAuth or PAT authentication. Select AzureAureliaDemo and then docker as the default branch. You may need to create a “fork” for the repository (or just import it into VSTS) if you follow the steps with me.
- Tasks -> DotNet Restore: Do not make any changes.
- Tasks -> DotNet Build: Add --version-suffix $ (Build.BuildNumber) to the build arguments to ensure the version and build number match.
- Tasks → DotNet Test: disable this task, because our solution does not use DotNet tests (of course, if you have tests, the task can be enabled again).
- Tasks -> add an npm task. Select frontend as the working directory and verify that the install command is used.
- Tasks -> add a Command line task. As a tool, select node, specify the arguments: node_modules / aurelia-cli / bin / aurelia-cli.js test and the working directory: frontend. So you run the Aurelia tests.
- Tasks -> add the Publish test results task. In the Test Results files field, specify test * .xml, and in the Search Folder field, enter $ (Build.SourcesDirectory) / frontend / testresults. This will publish your Aurelia test results.
- Tasks -> add the Publish code coverage task. In the Coverage Tool field, enter Cobertura, in the Summary File field - $ (Build.SourcesDirectory) /frontend/reports/coverage/cobertura.xml, in the Report Directory field - $ (Build.SourcesDirectory) / frontend / reports / coverage / html. This is how you publish Aurelia test coverage data.
- Tasks -> add a Command line task. As a tool, select node, specify the arguments: node_modules / aurelia-cli / bin / aurelia-cli.js build --env prod and the working directory: frontend. This way you compile, process and package the Aurelia SPA application.
- Tasks → DotNet Publish. For arguments, enter -c $ (BuildConfiguration) -o publish and uncheck Zip Published Projects.
- Tasks -> add a Docker Compose task. In the Container Registry Type field, specify Azure Container Registry, as the subscription and registry of Azure containers, specify the registry for which we created the endpoint earlier. In the Additional Docker Compose Files field, specify docker-compose.vsts.yml, in the Action field - Build service images, in the Additional Image Tags field - $ (Build.BuildNumber) so that the assembly number is used as a tag for images.
- Create a clone of the Docker Compose task. For the name, select Push service images and select the Push service images action. Check the Include Latest Tag box.
- Tasks → Publish Artifact. In the Path to Publish and Artifact Name fields, select k8s. This will publish the k8s yaml files to include in the release.
The final task list should look like this:
Now you can click Save and Queue to save the assembly and put it in the queue. When the build process is complete, you will see a summary of the testing / coverage.
You can also view the contents of your container registry to see newly migrated service images with a label corresponding to the build number.
Release
Now we can configure the release, which will create / update the necessary services. To do this, provide configuration management. You could just include the configuration in the code, but in this case sensitive data (for example, passwords) would fall into the version control tool. I prefer tokenize any configuration so that the release management solution places sensitive data outside the area controlled by the version control tool. VSTS Release Management allows you to create secrets for individual environments or releases, and you can also create them in variable groups with support for reuse. In addition, seamless integration with Azure Key Vault is now supported .
To use environment-specific values instead of tokens, we need a task to replace the token. Fortunately, I have a cross-platform ReplaceTokens task from the Colin's ALM Corner Build & Release Tasks extension module , which I downloaded from the VSTS Marketplace. Click the link to go to the desired page, then click Install to install the extension for your account.
On the assembly summary page, scroll to the Deployments section on the right and click the Create release link. You can also click Releases and create a new definition from there. Start with an empty template (Empty), select your team project and the assembly you just created as the source assembly. Select the Continuous Deployment check box to automatically create a release for each correct build.
Specify k8s or something descriptive as the name for the definition. On the General tab, change the format of the release number to $ (Build.BuildNumber) - $ (rev: r) so that you can always easily determine the build number from the release name. Return to the Environments section and enter dev instead of Environment 1. Click the Run on Agent link and make sure Hosted Linux Preview is selected in the Deployment queue field.
Add the following tasks:
- Replace Tokens.
- Source Path: in Explorer, open the k8s directory.
- Target File Pattern: * -release.yml. Thus, the token will be replaced in any yml file with a name that ends in -release. There are three such files: service / deployment files for the server and client, and also the client configuration file. This task finds tokens in the file (with the prefix and postfix __) and looks for variables with the same name. Each variable is replaced by its value. After a while we will create the variables.
- Kubernetes Task 1 (apply configuration for client).
- Configure k8s connection to the previously created endpoint. You also need to configure the connection to the Azure container registry. This applies to all Kubernetes tasks. In the Command field, select apply, select the Use Configuration Files check box and specify the k8s / app-demo-frontend-config-release.yml file using the file picker. Specify --namespace $ (namespace) in the text box for the arguments.

- Configure k8s connection to the previously created endpoint. You also need to configure the connection to the Azure container registry. This applies to all Kubernetes tasks. In the Command field, select apply, select the Use Configuration Files check box and specify the k8s / app-demo-frontend-config-release.yml file using the file picker. Specify --namespace $ (namespace) in the text box for the arguments.
- Kubernetes Task 2 (apply server / service definition of the server).
- Set the same connection settings for the k8s service and the Azure container registry. This time, specify regsecret in the Secret Name field (this is the name of the secret that we created when configuring the k8s cluster, as well as the name that we refer to in the imagePullSecret parameter in the deployment definitions). Check the Force update secret checkbox. This ensures that the k8s secret values match the key from Azure. This parameter could be skipped, since we created the key manually.
- In the Command field, select apply, select the Use Configuration Files check box and specify the k8s / app-demo-backend-release.yml file using the file picker. Specify --namespace $ (namespace) in the text box for the arguments.
- Kubernetes Task 3 (apply client / service definition of the client).
- The settings are similar to the previous task, just select the k8s / app-demo-frontend-release.yml file.
- Kubernetes Task 4 (update the image on the server side).
- Set the same connection settings for the k8s service and the Azure container registry. The secret is not required here. In the Command field, select set, and in the Arguments field, specify image deployment / demo-backend-deployment backend = $ (ContainerRegistry) / api: $ (Build.BuildNumber) --record --namespace = $ (namespace).
- So you update the version (tag) of the container image used. K8s will perform a sequential update by launching new containers and disabling old ones, and the service will be operational all this time.
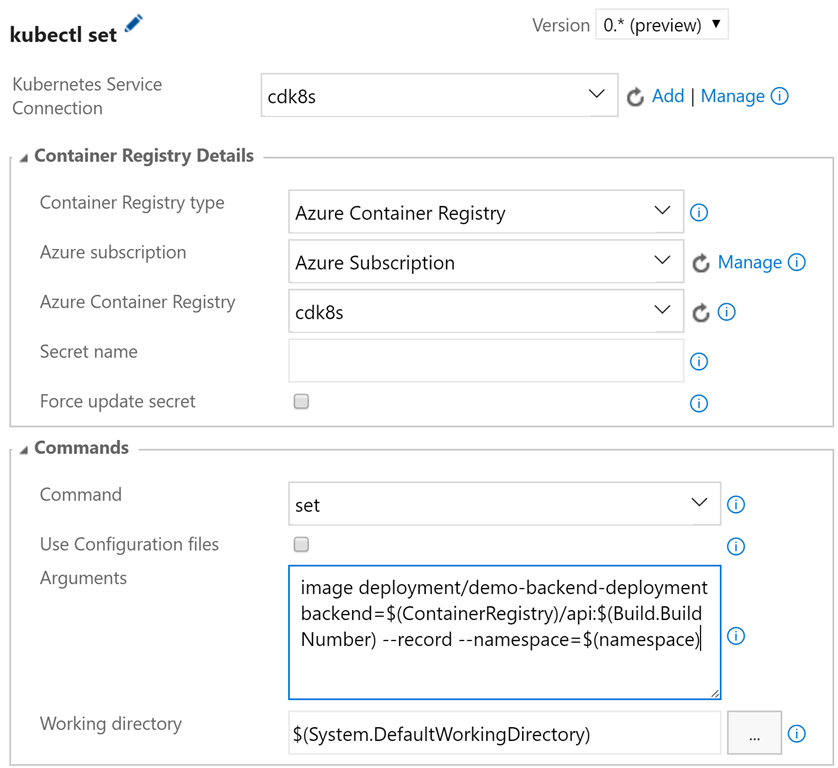
- Kubernetes Task 5 (upgrade image on the client side).
- The parameters are similar to the previous task, only in the Arguments field you need to specify image deployment / demo-frontend-deployment frontend = $ (ContainerRegistry) / frontend: $ (Build.BuildNumber) --record --namespace = $ (namespace)
- Click the “...” button on the dev card and click Configure Variables to configure the variables. Set the following values:
- BackendServicePort: 30081
- FrontendServicePort: 30080
- ContainerRegistry: <your container registry> .azurecr.io
- namespace: $ (Release.EnvironmentName)
- AspNetCoreEnvironment: development
- baseUri: http: // $ (BackendServiceIP) / api
- BackendServiceIP: 10.0.0.1
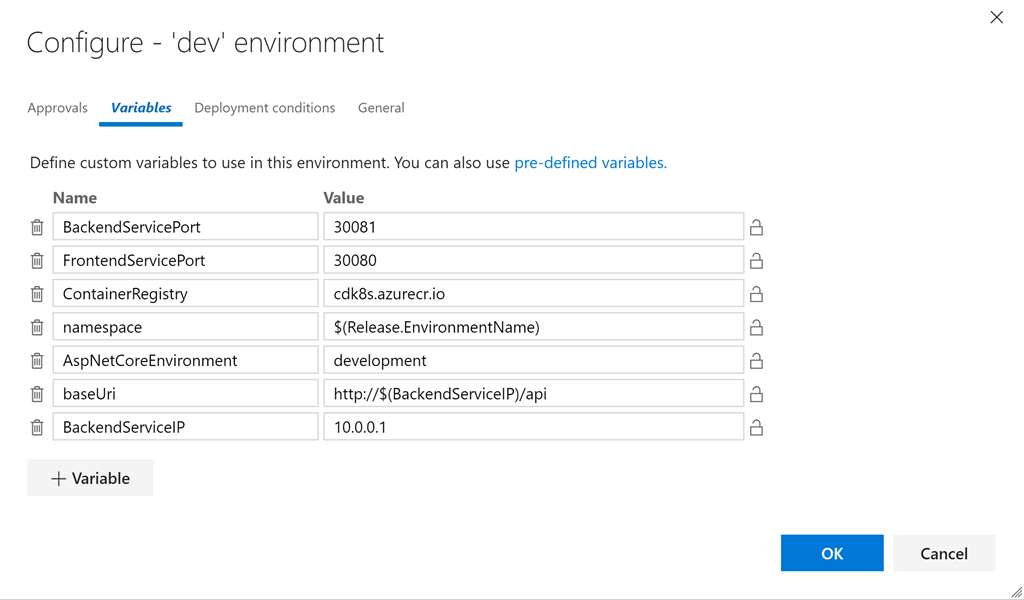
This sets environment-specific values for all variables in yml files. The Replace Tokens task will write the necessary values to files for us. Let's take a quick look at one of the tokenized files (tokenized lines are highlighted):
apiVersion: v1
kind: Service
metadata:
  name: demo-frontend-service
  labels:
    app: demo
spec:
  selector:
    app: demo
    tier: frontend
  ports:
    - protocol: TCP
      port: 80
      nodePort: __FrontendServicePort__
  type: LoadBalancer
---
apiVersion: apps/v1beta1
kind: Deployment
metadata:
  name: demo-frontend-deployment
spec:
  replicas: 2
  template:
    metadata:
      labels:
        app: demo
        tier: frontend
    spec:
      containers:
        - name: frontend
          image: __ContainerRegistry__/frontend
          ports:
          - containerPort: 80
          env:
          - name: "ASPNETCORE_ENVIRONMENT"
            value: "__AspNetCoreEnvironment__"
          volumeMounts:
            - name: config-volume
              mountPath: /app/wwwroot/config/
          imagePullPolicy: Always
      volumes:
        - name: config-volume
          configMap:
            name: demo-app-frontend-config
      imagePullSecrets:
        - name: regsecret
Comment regarding the value for BackendServiceIP: we use 10.0.0.1 as the replacement text, since Azure will assign an IP address to this service when k8s starts the service on the server side (you will see the public IP address in the resource group in the Azure portal). We will need to do this once to create the services, and then update to get the real IP address and ensure the service is working on the client side. We also use $ (Release.EnvironmentName) as the value for namespace, so for dev (and then for prod) the namespaces should match the ones we created (including the case of characters).
If the service / deployment and configuration does not change, then the first three k8s tasks essentially do not work. Some result will be given only by the set command. But this is just great, since service / deployment and configuration files can be applied idempotently! They change when necessary, and do not introduce any disturbance in all other situations - an ideal approach for repetitive releases!
Save the definition. Click + Release to create a new release. Click on the release number (it will be something like 1.0.0.1-1) to open it. Click logs to view the logs.
When the release creation is complete, you will see the deployment in the Kubernetes dashboard. Use the following command to open the dashboard:
az acs kubernetes browse -n $ClusterName -g $RG --ssh-key-file ~/cdk8s/id_rsa
Proxy running on 127.0.0.1:8001/ui
Press CTRL+C to close the tunnel...
Starting to serve on 127.0.0.1:8001
The last argument is the path to the SSH key file that is generated when the cluster is created (specify the current path). Now you can open the browser page http: // localhost: 8001 / ui . From the namespace drop-down menu, select dev and click Deployments. You should see two successful deployments with two workable hearths in each. You can also see images that run in deployments. Pay attention to the assembly number indicated as a tag!
To see the services, click Services.
Now we have the server IP address of the service, so we can update the variable in the release. Then we can queue the new version, and this time in the client configuration the correct IP address for the service on the server side will be indicated (in our case it is 23.99.58.48). We can enter the IP address of our customer service in a browser and make sure that now everything works!
Creating a production environment
Now that we’ve made sure the dev environment is working, we can go back to release, clone the dev environment and name the copy prod. Indicate ex-post approval for dev (or pre-approval for prod) so that there is a breakpoint between the two environments.
Then we can just change the ports for the nodes, as well as the values of the AspNetCoreEnvironment and BackendServiceIP variables, and you're done! Of course, we need to deploy to the prod namespace first before we see the IP address assigned by k8s / Azure to the prod server. Then you must restart the release creation procedure to update the configuration.
We could remove the nodePort parameter from the definitions and let the k8s platform choose the host port itself, but if the port is specified explicitly, then we will know exactly which port the service will use in the cluster (not for external access).
I don’t like to specify --namespace for each command, I don’t like it so much that I created a Pull Request in the vsts-tasks repository on Github to give access to the namespace as an additional user interface element!
Pass through the entire CI / CD conveyor
Now that our dev and prod environments in the CI / CD pipeline are configured, we can make changes to the code. I will change the text under the version to “K8s demo” and apply the changes. So we initiate the build, creating a newer container image and running tests, which in turn will launch the release in the dev environment. Now I see a change in the dev environment (version 1.0.0.3 or newer, i.e. more than 1.0.0.1), while the prod version is still 1.0.0.1.
Approve dev in the release management solution and the process for prod will start, after a few seconds the prod version will also be 1.0.0.3.
I exported json definitions for assembly and release to this directory, you can try to import them (I'm not sure if this will work, but you can use them for reference anyway).
Conclusion
k8s has great potential as a reliable container orchestration mechanism. Yml technology allows you to implement the concept of "infrastructure as code" and is great for version control. The deployment mechanism minimizes or completely eliminates downtime during deployment, and the ability to use configMaps and secrets ensures the security of the entire process. The Azure CLI command-line interface allows you to create a k8s cluster and an Azure container registry with a couple of simple commands. Integration with VSTS using k8s tasks simplifies the configuration of the CI / CD pipeline, together they form the optimal development workflow. And taking into account the minikube solution, which I wrote about in the first part of this series of articles and which provides you with a full-fledged k8s cluster for local development on your laptop,
Of course, the CI / CD pipeline does not load test real applications in a production environment! I would like to know about your experience with k8s in production environments. Write in the comments if you have experience running applications in a k8s cluster in a production environment!
Good luck with k8sing!
PS Thanks to Konstantin Kichinsky ( Quantum Quintum ) for illustrating this article.