August 15, 2017 at 17:26
Add two-factor OTP authentication to SSH in 10 minutes
- Tutorial
Situation: you have a fleet of Linux servers where you regularly visit via SSH. Two-factor authentication for SSH by some iron key or Google Authenticator can be configured, it can be simple, but it is not always convenient to make this setting on each server, there may be too many of them, or it is just scary to restart sshd :)
Exiting this situation there may be an intermediate authentication server. We already wrote about laying out our solution (Isolate) in open source , in the same article - instructions for setting up an authentication server with two-factor authentication using one-time keys through Google Authenticator.

Let's start by deploying Isolate, for this you need CentOS 7, Ubuntu 16.04, or a Debian 8 machine:
1. Prepare the system for the installation of Isolate:
Centos:
Ubuntu:
2. Download Isolate itself:
3. To run ansible on the same machine, we bring it to the view (you can run either from a remote machine, server or desktop Linux / MacOS, or directly on the machine on which we deploy Isolate):
4.
Waiting for completion. In case Ubuntu swears at the step Upgrading installed packages (APT), we do:
5. Add / etc / bashrc (Centos) or /etc/bash.bashrc (Ubuntu) to the end
6. Reboot the machine. Done!
1. Add to the end of /etc/pam.d/sshd (Centos) a line, or in /etc/pam.d/common-auth (Ubuntu)
2.
3. At the end of / etc / ssh / sshd_config
4.
5. Add the user to whom we enable oauth
6. We generate TOTP or HOTP tokens:

Add the token through the QR code in Google Authenticator:

7.
8. The line obtained in step 6 is added to /etc/oath/users.oath
9. We look at the password from redis
Add an entry to / etc / bashrc (Centos) or /etc/bash.bashrc (Ubuntu)
Now that we have a ready-made server for two-factor authentication, you can add your own servers. To do this, first add the server information to Isolate, then create users and put the keys on the target server.
Add the server we will go to:
You can view the list of servers using the s command:
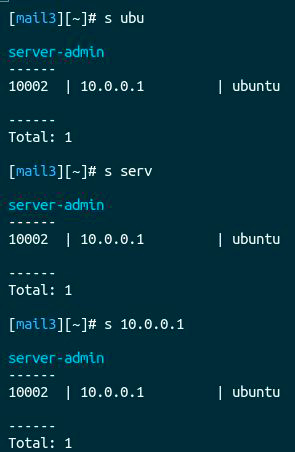
On the server 10.0.0.1, create the user support and write the key to it from /home/auth/.ssh/id_rsa.pub from the Isolate server:
Now on the Isolate server we can use the s commands to find the desired server and g to go to a specific server:
Now you need to go to all the added servers from the authentication one: by a one-time code and password, go to Isolate, and then to the desired server. You should not go directly to the server in this case, since then the meaning of two-factor authentication is lost. Well, in general, remove user keys, etc. :)
As usual, comments, additions and, of course, pool requests are welcome! Github project .
Exiting this situation there may be an intermediate authentication server. We already wrote about laying out our solution (Isolate) in open source , in the same article - instructions for setting up an authentication server with two-factor authentication using one-time keys through Google Authenticator.
Let's start by deploying Isolate, for this you need CentOS 7, Ubuntu 16.04, or a Debian 8 machine:
1. Prepare the system for the installation of Isolate:
Centos:
yum install ansible gitUbuntu:
apt update; apt install git python-pip
pip install ansible
2. Download Isolate itself:
git clone https://github.com/itsumma/isolate.git3. To run ansible on the same machine, we bring it to the view (you can run either from a remote machine, server or desktop Linux / MacOS, or directly on the machine on which we deploy Isolate):
[main]
localhost ansible_connection=local
4.
ansible-playbook -i isolate/ansible/hosts.ini isolate/ansible/main.ymlWaiting for completion. In case Ubuntu swears at the step Upgrading installed packages (APT), we do:
apt dist-upgrade5. Add / etc / bashrc (Centos) or /etc/bash.bashrc (Ubuntu) to the end
if [ -f /opt/auth/shared/bash.sh ]; then
    source /opt/auth/shared/bash.sh;
fi
6. Reboot the machine. Done!
Getting started with oauth
1. Add to the end of /etc/pam.d/sshd (Centos) a line, or in /etc/pam.d/common-auth (Ubuntu)
auth required pam_oath.so usersfile=/etc/oath/users.oath window=20 digits=62.
sed -i -e 's/ChallengeResponseAuthentication no/ChallengeResponseAuthentication yes/g' /etc/ssh/sshd_config3. At the end of / etc / ssh / sshd_config
Match Group auth
    AuthenticationMethods keyboard-interactive
4.
systemctl restart sshd5. Add the user to whom we enable oauth
auth-add-user имя_юзера6. We generate TOTP or HOTP tokens:
gen-oath-safe имя_юзера totp
gen-oath-safe имя_юзера hotp
Add the token through the QR code in Google Authenticator:
7.
touch /etc/oath/users.oath
chmod 0600 /etc/oath/users.oath
8. The line obtained in step 6 is added to /etc/oath/users.oath
9. We look at the password from redis
grep requirepass /etc/redis.confAdd an entry to / etc / bashrc (Centos) or /etc/bash.bashrc (Ubuntu)
ISOLATE_BACKEND=redis
ISOLATE_REDIS_HOST="127.0.0.1";
ISOLATE_REDIS_PORT="6379";
ISOLATE_REDIS_DB=0;
ISOLATE_REDIS_PASS=redis_pass;
export ISOLATE_REDIS_HOST;
export ISOLATE_REDIS_PORT;
export ISOLATE_REDIS_PASS;
export ISOLATE_REDIS_DB;
Adding Servers
Now that we have a ready-made server for two-factor authentication, you can add your own servers. To do this, first add the server information to Isolate, then create users and put the keys on the target server.
Add the server we will go to:
auth-add-host --project server-admin --server-name ubuntu --ip 10.0.0.1You can view the list of servers using the s command:
Adding a user to the server
On the server 10.0.0.1, create the user support and write the key to it from /home/auth/.ssh/id_rsa.pub from the Isolate server:
SUPPORT_USER="support"
KEY=""
useradd -m ${SUPPORT_USER}
mkdir /home/${SUPPORT_USER}/.ssh
echo ${KEY} >> /home/${SUPPORT_USER}/.ssh/authorized_keys
chmod 600 /home/${SUPPORT_USER}/.ssh/authorized_keys
chmod 700 /home/${SUPPORT_USER}/.ssh/
chown -R ${SUPPORT_USER}:${SUPPORT_USER} /home/${SUPPORT_USER}/.ssh/
echo "${SUPPORT_USER} ALL=(ALL) NOPASSWD: ALL" >> /etc/sudoers
Now on the Isolate server we can use the s commands to find the desired server and g to go to a specific server:
g ip_сервера - g 10.0.0.1
g проект имя_сервера - g server-admin ubuntu
Now you need to go to all the added servers from the authentication one: by a one-time code and password, go to Isolate, and then to the desired server. You should not go directly to the server in this case, since then the meaning of two-factor authentication is lost. Well, in general, remove user keys, etc. :)
As usual, comments, additions and, of course, pool requests are welcome! Github project .