A bottom-up look or Ubuntu Server for an electronics developer. Part 1
When solving electronics problems, all methods are good if they suit the technical specifications, budget and developer. Linux was unknown to me, but along with the tasks you solve, you grow yourself. This post will talk about how to use a computer with Ubuntu to connect a large computer with a controller in accordance with the diagram:
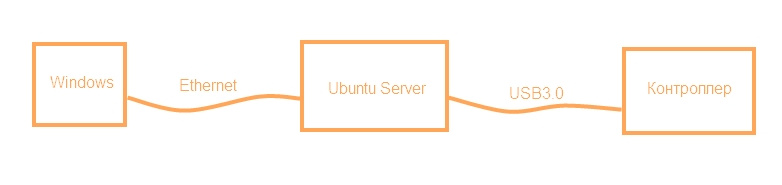
The article describes the practice of using the described technique and does not set out to cover all the depths and capabilities of modern equipment. This is one of the options for solving the problem.
Description : you need to transfer considerable amounts of data (for example, 50 MB / s) generated by the controller of a certain device to a Windows computer for their subsequent mathematical processing, display in some form on the screen, and so on ...
Solution options :
The first option will not be simple. If you make garlic, then it’s expensive. The implementation of each protocol is a matter of time and skill of the programmer, but this is not the task that you want to spend time on when creating the device. Without a protocol or only up to the UDP level, compatibility issues. Add something new - like a horse to travel around.
The second option is also not a gift. Implementing an interface for the sake of the interface is not the goal of the project. And such a chip will eat a bunch of legs that could come in handy. As a result, the FPGA is growing, the board is growing, the budget is growing. But there is no simplicity ...
In this regard, we decided to experiment - to build an Ethernet conglomerate on a computer and a controller with a USB interface. The notorious manufacturer FTDI recently proposed a solution for USB3.0 based on FT600. And this small computer will connect a large and convenient Windows managed PC with a controller, it is possible to process primary data.
The question is, how will a small computer work?
For some reason, the desire to use Windows for this purpose did not even appear, but Linux is a real option. But the trouble is that no one in the team knows what to do with it. Without hesitation, Ubuntu Desktop appeared in the virtual machine . Yes, he is working. There was no doubt, but I wanted to see. Now to the point ...
I will not describe all the torment of a person who has been using Windows for 20 years and Linux is on you. But I will try to give directions where to look and what to look for if something goes wrong.
Stages:
At this stage I want to stop and see the reviews of respected readers, and most importantly, knowledgeable people. Maybe it’s worth making adjustments. Nevertheless, according to the results, the second part will appear, more substantial.
The article describes the practice of using the described technique and does not set out to cover all the depths and capabilities of modern equipment. This is one of the options for solving the problem.
Description : you need to transfer considerable amounts of data (for example, 50 MB / s) generated by the controller of a certain device to a Windows computer for their subsequent mathematical processing, display in some form on the screen, and so on ...
Solution options :
- Build a controller with a Gigabit ethernet interface on the FPGA
- The same, but on some piece (for example, AX88180)
- Your option
The first option will not be simple. If you make garlic, then it’s expensive. The implementation of each protocol is a matter of time and skill of the programmer, but this is not the task that you want to spend time on when creating the device. Without a protocol or only up to the UDP level, compatibility issues. Add something new - like a horse to travel around.
The second option is also not a gift. Implementing an interface for the sake of the interface is not the goal of the project. And such a chip will eat a bunch of legs that could come in handy. As a result, the FPGA is growing, the board is growing, the budget is growing. But there is no simplicity ...
In this regard, we decided to experiment - to build an Ethernet conglomerate on a computer and a controller with a USB interface. The notorious manufacturer FTDI recently proposed a solution for USB3.0 based on FT600. And this small computer will connect a large and convenient Windows managed PC with a controller, it is possible to process primary data.
The question is, how will a small computer work?
For some reason, the desire to use Windows for this purpose did not even appear, but Linux is a real option. But the trouble is that no one in the team knows what to do with it. Without hesitation, Ubuntu Desktop appeared in the virtual machine . Yes, he is working. There was no doubt, but I wanted to see. Now to the point ...
I will not describe all the torment of a person who has been using Windows for 20 years and Linux is on you. But I will try to give directions where to look and what to look for if something goes wrong.
Stages:
- Computer selectionI did not want to take single-board computers yet, because not everywhere there is USB 3.0, not every Gigabit Ethernet, which may suddenly be needed, and the real performance of such boards is a question. I made a solution in a box with an Intel processor, very similar to nuc: HDD 500Gb, RAM 2Gb, USB 3.0, Ethernet 100/1000. I do not think this is a matter of principle.
- We put Ubuntu ServerCome from here . Download the latest version with the inscription LTS, which means long-term support and the release of updates up to 5 years.
I had Ubuntu Server 16.04.2.
We put on a PC from a flash drive. To do this: instructions on how to put a boot image on a flash drive, and instructions on how to install the OS.
Do not forget to check the OpenSSH server checkbox during installation to access the computer via the network. We will transfer files and control the computer using utilities from Putty. - We configure and supplement the serverIn addition to direct contact with the controller, you need to create an ecosystem that allows you to compile the project (it seemed to me convenient to do this on a prototype, and not on a working machine with cross-compilation), to allocate an IP address for the user's control computer. The most convenient way to install additional packages is to use the online deb package repository, accessible via apt-get, which works when connected to the Internet. Fortunately, this is not the only installation option. If you want to not depend on the Internet and any changes in libraries and packages, you can download the necessary packages and install them yourself using:
sudo dpkg -i <имя_пакета>.deb
But for this you need to know all the dependencies. For example, the installation of isc-dhcp-server pulled the following packages from me:
- libisccfg-export140
- libirs-export141
- isc-dhcp-server_4.3.3
First, connect the server to the Internet through a router that will give it an IP (if you look in search engine for configuring the file / etc / network / interfaces), and do the following:
Installing the compiler
FTD3XX driver examples from FTDI are written in C ++ 11. You can install the g ++ compiler, and when compiling you will need to specify the option -std = c ++ 11sudo apt-get install g++
We enter the password and agree.
Now in the folder where there is the correct Makefile, you can write
and the project will be compiled, but more on that later.make
Installing a DHCP server
I used isc-dhcp-server. On ubunte we write:sudo apt-get install isc-dhcp-server
We enter the password and agree. - We put the driver from FTDI
- We compile the program
- Making a daemon for startup and tracking the program
- We control processes
At this stage I want to stop and see the reviews of respected readers, and most importantly, knowledgeable people. Maybe it’s worth making adjustments. Nevertheless, according to the results, the second part will appear, more substantial.