Ssh magic
Many have been familiar with SSH for a long time, but, like me, not everyone suspects what opportunities lie behind these magical three letters. I would like to share my little experience using SSH to solve various administrative tasks.
Table of contents:
1) Local TCP forwarding
2) Remote TCP forwarding
3) TCP forwarding chain through several nodes
4) TCP forwarding ssh connections
5) SSH VPN Tunnel
6) Briefly about passwordless access
7) Thanks (links)
Let's start with a simple one - local TCP forwarding:

We have a remote host2 server with some application, for example, a PostgreSQL server that accepts TCP connections on port 5432. It’s quite logical that there is a firewall on this server that has direct connections from the outside to the port 5432 does not allow, but there is access via SSH (by default, port 22, I recommend changing it). It is required to connect from our workstation “host1” by the client application to the PostgreSQL server on “host2”.
To do this, on “host1” in the console, type:
Now on “host1” we can connect to the PostgreSQL server through local port 9999:
We can also connect to the application not on “host2” itself, but on any machine accessible to it:
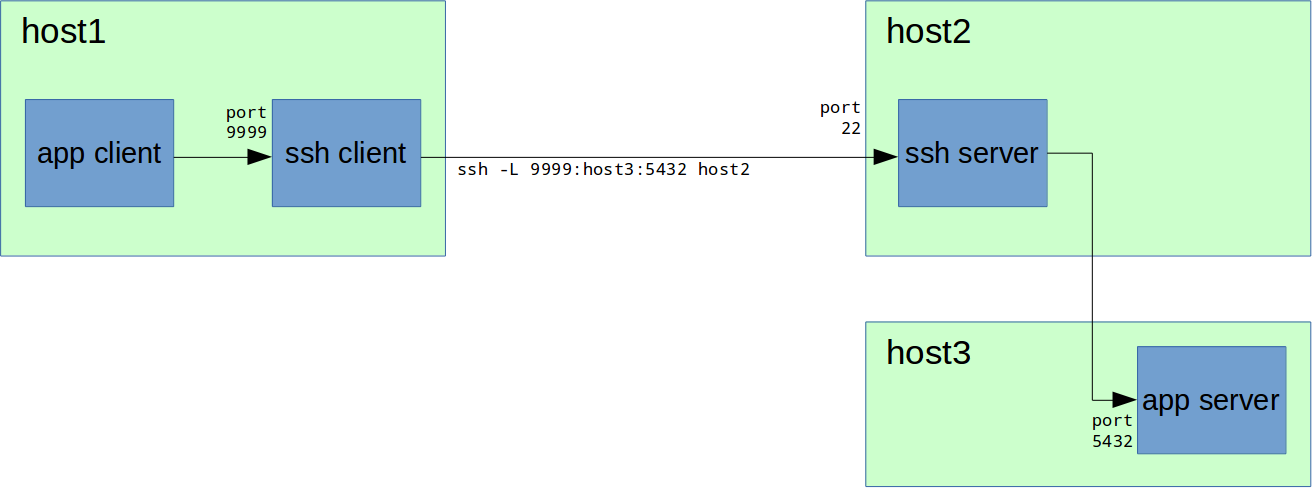
For this, when forwarding ports, instead of “localhost”, specify the host name, for example, “host3”:
It is important to note that “host3” must be known ( if it is a name, not an IP address) and is accessible to the host2 machine.
It is also possible through “host1” to provide access to any other host (let's call it “host1A”) to the service on “host3”:

To do this, insert the IP address of the interface on the ssh connection command, on which local port 9999 will be raised:
In this example, the port 9999 will be open on all IPv4 interfaces available on host1.
But what if, for example, "host2" does not have a white IP address, is located behind NAT, or are all incoming connections to it closed? Or, for example, on “host2” is Windows and there is no way to put an SSH server?
For this case, there is Remote TCP forwarding:

Now you need to establish an ssh connection in the opposite direction - from "host2" to "host1". Those. our administrative workstation will be an SSH server and will be accessible via SSH with "host2", and on "host2" you will need to connect using an SSH client:
Also, you will have additional difficulties with ensuring security on "host1" if you do not trust the host "host2". However, this is beyond the scope of this article.
And, of course, you somehow (yourself or with outside help) must initiate an ssh connection from the side of "host2" by entering the command above, and "host1" should have a white IP address and an open SSH port.
After the ssh connection is established, everything works similarly to the previous chapter.
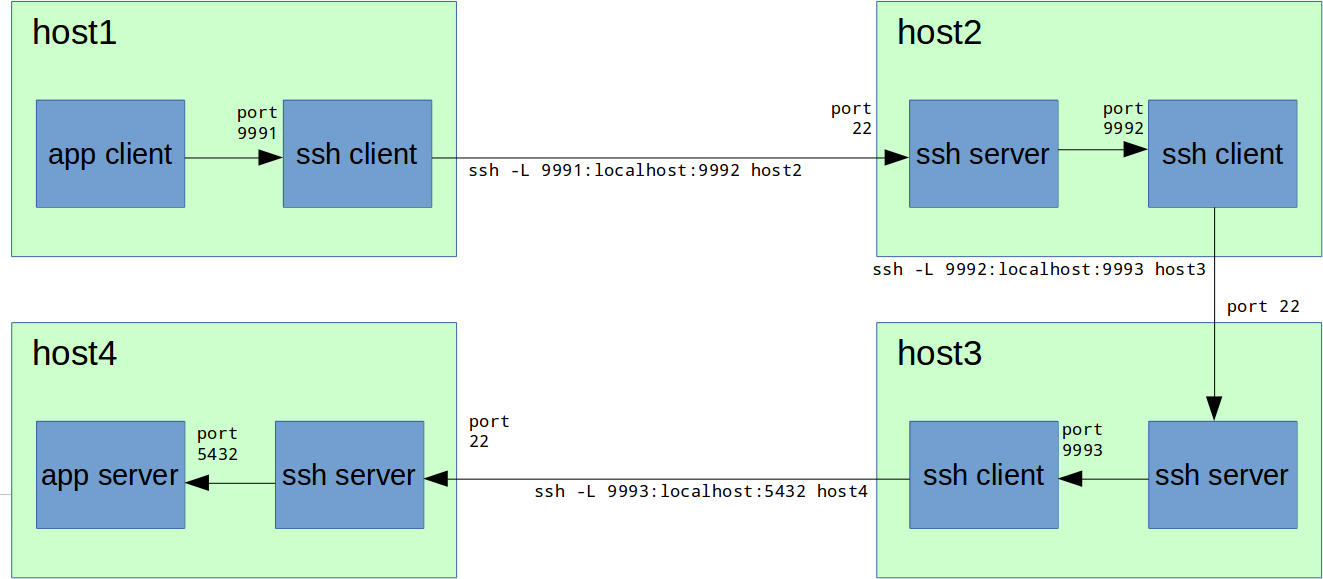
In closed networks, it often happens that the node we need is not directly accessible. Those. we can only enter the host through the chain, for example, host1 → host2 → host3 → host4: This can happen, for example, if these nodes are gateways, or if gateways are available on them only in neighboring subnets. In this case, we can also do TCP forwarding in a chain: Here, ports 9991, 9992, 9993 are selected for clarity, in practice, you can use the same port (for example, 9999) if it is free on all nodes. In total, you need to run the following chain of commands:
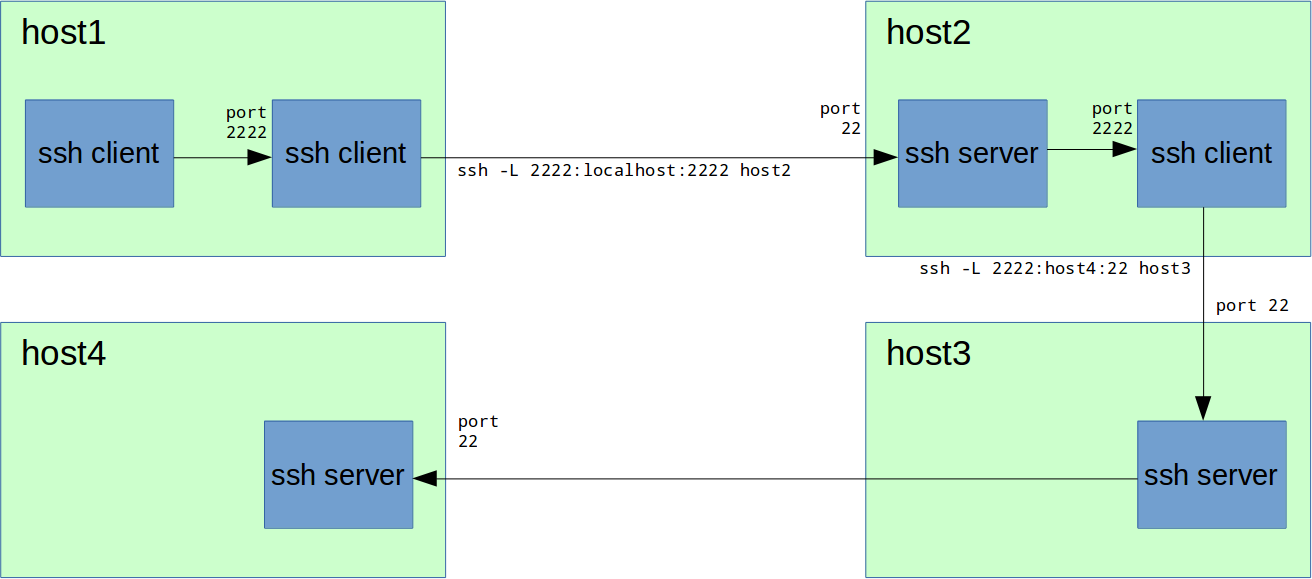
Sometimes you need to connect via ssh to a server that is not directly accessible, and access is possible only through a chain of ssh servers (see the previous chapter). Now we have the necessary knowledge to do the following: Thus, on port 2222 on "host1" we now have forwarding on the SSH (22) port on "host4". We can connect: It would seem, why is this necessary? For example, here's why: Well, it's great that now host4 is so close :) Conclusion: you can do TCP forwarding with a large level of nesting.
TCP port forwarding is a great feature. But what if we need more? Access over UDP, access to multiple ports and hosts, access to dynamic ports? The answer is obvious - VPN. And omnipotent SSH starting from version 4.3 will come to our aid here.
Looking ahead, I’ll say: this SSH functionality works well if you need a temporary solution for some administrative tasks. To build permanent VPNs, this option is far from the most suitable, because it involves TCP-over-TCP, which will adversely affect the speed of the connection.
Configuring SSH server:
PermitTunnel in sshd settings is turned off by default, it must be included in / etc / ssh / sshd_config:
or
IMPORTANT : to raise the new network interface of the tunnel, both the ssh client and the ssh server need superuser rights. You can argue for a long time about how unsafe this is, but in most cases the ssh server has enough settings:
Thus, you prohibit root login with a password, and only allow it by other means, for example, using the RSA key, which is much safer.
Restart sshd:
or the
tunnel rises when using the -w magic key:
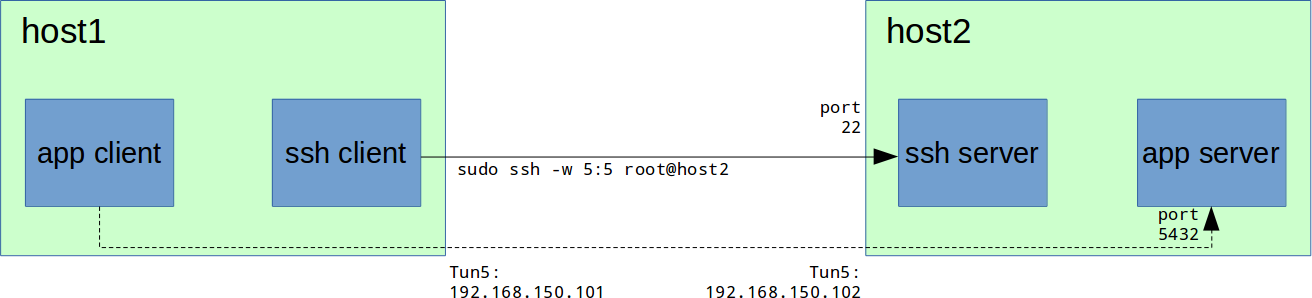
Where 5: 5 is the interface number on the local machine and on the remote, respectively. Here you may be confused that ifconfig will not give out “tun5” in the list of the interface. This is because it is in the “down” state, but if you call “ifconfig -a” or “ifconfig tun5”, the interface will be visible: Assign interfaces IP addresses and raise them: If there is a firewall, do not forget to allow connections from the tun5 interface : On host1, this is optional, here it is done only for ping to work in both directions. Enjoying the ping: If we look at an earlier example with PostgreSQL, now the scheme will be like this: A command to connect to a PostgreSQL server will look like this:
Well, then you can make any of these nodes a gateway if you need to provide access not to one node, but to the network. For example: After finishing work, do not forget to return net.ipv4.ip_forward and the firewall to their original state.
I think everyone already knows that password authorization is not about us. But just in case, I’ll cram here a brief instruction on setting authentication using the RSA key:
1. On client machines, we generate our own RSA key for the user:
By default, the private key is stored in ~ / .ssh / id_rsa, and the public key is stored in ~ / .ssh / id_rsa .pub. Keep the private key as the apple of your eye and do not give it to anyone, do not copy it anywhere.
When creating a key, you can set a password (passphrase) by which the key will be encrypted.
2. Client public keys must be saved on the ssh server in the file ~ / .ssh / authorized_keys (~ this is the home directory of the user you will login to), each on a separate line. In order not to do this manually, on each client, you can use the command:
Where user is the username on the server, sshserver is the name or IP address of the ssh server.
3. Verify that you can enter the server by key, without entering a password (not to be confused with passphrase): I
recommend that you do not close at least one active ssh-session with the server until you finish the setup and make sure that everything works.
4. Disable the ability to log in to the / etc / ssh / sshd_config file on the SSH server:
The public key logon option is usually already enabled by default:
I usually also disable the following two options: In some cases, this speeds up the connection process (for example when the server does not have Internet access). 5. Restart sshd: or In case of errors, it is useful to look at the / var / log / secure log or use the -v, -vv or -vvv options to display a detailed connection log:
help.ubuntu.com/community/SSH_VPN
habrahabr.ru/post/87197
blog.backslasher.net/ssh-openvpn-tunneling.html
Table of contents:
1) Local TCP forwarding
2) Remote TCP forwarding
3) TCP forwarding chain through several nodes
4) TCP forwarding ssh connections
5) SSH VPN Tunnel
6) Briefly about passwordless access
7) Thanks (links)
1) Local TCP forwarding
Let's start with a simple one - local TCP forwarding:
We have a remote host2 server with some application, for example, a PostgreSQL server that accepts TCP connections on port 5432. It’s quite logical that there is a firewall on this server that has direct connections from the outside to the port 5432 does not allow, but there is access via SSH (by default, port 22, I recommend changing it). It is required to connect from our workstation “host1” by the client application to the PostgreSQL server on “host2”.
To do this, on “host1” in the console, type:
host1# ssh -L 9999:localhost:5432 host2Now on “host1” we can connect to the PostgreSQL server through local port 9999:
host1# psql -h localhost -p 9999 -U postgresIf on "host1" Windows
For example, in PuTTy this is done as follows:
We go through the settings tree: Connection → SSH → Tunnels.
Next, in the “Source port” field, drive 9999, in “Destination” - localhost: 5432, and click Add.
After that, do not forget to save the session settings, if necessary.
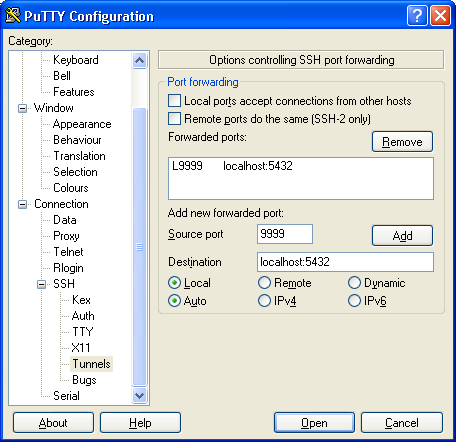
We go through the settings tree: Connection → SSH → Tunnels.
Next, in the “Source port” field, drive 9999, in “Destination” - localhost: 5432, and click Add.
After that, do not forget to save the session settings, if necessary.
How it works
After successfully connecting to the SSH server on “host2”, on “host1”, the SSH client starts listening on port 9999. When connecting to port 9999 on “host1”, the SSH server on “host2” establishes a connection with localhost (which is what itself “host2”) to port 5432 and transmits via this connection the data received by the ssh client on “host1” to port 9999.
IMPORTANT! All connections indicated on the diagrams by arrows are separate TCP connections (sessions).
IMPORTANT! All connections indicated on the diagrams by arrows are separate TCP connections (sessions).
SSH server setup
Port forwarding is usually already enabled in sshd by default.
/ etc / ssh / sshd_config:
/ etc / ssh / sshd_config:
AllowTcpForwarding yesWe can also connect to the application not on “host2” itself, but on any machine accessible to it:
For this, when forwarding ports, instead of “localhost”, specify the host name, for example, “host3”:
host1# ssh -L 9999:host3:5432 host2It is important to note that “host3” must be known ( if it is a name, not an IP address) and is accessible to the host2 machine.
It is also possible through “host1” to provide access to any other host (let's call it “host1A”) to the service on “host3”:
To do this, insert the IP address of the interface on the ssh connection command, on which local port 9999 will be raised:
ssh -L 0.0.0.0:9999:host3:5432 host2In this example, the port 9999 will be open on all IPv4 interfaces available on host1.
2) Remote TCP forwarding
But what if, for example, "host2" does not have a white IP address, is located behind NAT, or are all incoming connections to it closed? Or, for example, on “host2” is Windows and there is no way to put an SSH server?
For this case, there is Remote TCP forwarding:
Now you need to establish an ssh connection in the opposite direction - from "host2" to "host1". Those. our administrative workstation will be an SSH server and will be accessible via SSH with "host2", and on "host2" you will need to connect using an SSH client:
ssh -R 9999:localhost:5432 host1If on "host2" Windows
For example, in PuTTy this is done as follows:
We go through the settings tree: Connection → SSH → Tunnels.
Next, drive 9999 into the “Source port” field, localhost: 5432 into the “Destination” field, and select “Remote” below, and click Add.
After that, do not forget to save the session settings, if necessary.
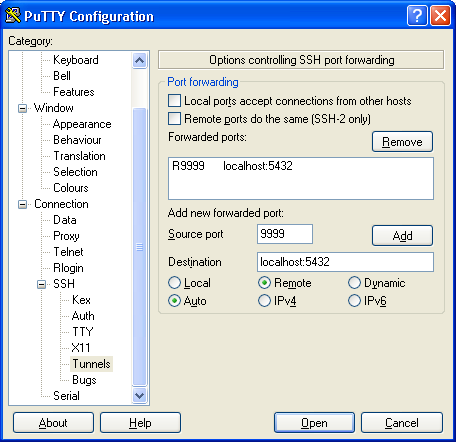
We go through the settings tree: Connection → SSH → Tunnels.
Next, drive 9999 into the “Source port” field, localhost: 5432 into the “Destination” field, and select “Remote” below, and click Add.
After that, do not forget to save the session settings, if necessary.
How it works
After a successful connection, on “host1” the SSH server starts listening on port 9999. When connected to port 9999 on “host1”, the SSH client on “host2” establishes a connection with localhost (which is “host2” for itself) on the port 5432 and transmits over this connection the data received by the ssh server on "host1" to port 9999.
Also, you will have additional difficulties with ensuring security on "host1" if you do not trust the host "host2". However, this is beyond the scope of this article.
And, of course, you somehow (yourself or with outside help) must initiate an ssh connection from the side of "host2" by entering the command above, and "host1" should have a white IP address and an open SSH port.
After the ssh connection is established, everything works similarly to the previous chapter.
3) TCP forwarding chain across multiple nodes
In closed networks, it often happens that the node we need is not directly accessible. Those. we can only enter the host through the chain, for example, host1 → host2 → host3 → host4: This can happen, for example, if these nodes are gateways, or if gateways are available on them only in neighboring subnets. In this case, we can also do TCP forwarding in a chain: Here, ports 9991, 9992, 9993 are selected for clarity, in practice, you can use the same port (for example, 9999) if it is free on all nodes. In total, you need to run the following chain of commands:
host1# ssh host2

host2# ssh host3

host3# ssh host4

host4# echo hello host4
host1# ssh -L 9991:localhost:9992 host2
host2# ssh -L 9992:localhost:9993 host3
host3# ssh -L 9993:localhost:5432 host4How it works
After successful execution of the above commands, the following is performed on the nodes:
Thus, when connecting to port 9991 on "host1", the data is redirected along the chain to "host4" on port 5432.
IMPORTANT! All connections indicated on the diagrams by arrows are separate TCP connections (sessions).
- to "host1": port 9991 opens, when connected to it, data is redirected via ssh connection to port 9992 to "host2";
- to "host2": port 9992 opens, when connected to it, data is redirected via ssh-connection to port 9993 to "host3";
- to "host3": port 9993 opens, when connected to it, data is redirected via ssh-connection to port 5432 to "host4";
Thus, when connecting to port 9991 on "host1", the data is redirected along the chain to "host4" on port 5432.
IMPORTANT! All connections indicated on the diagrams by arrows are separate TCP connections (sessions).
4) TCP forwarding ssh connections
Sometimes you need to connect via ssh to a server that is not directly accessible, and access is possible only through a chain of ssh servers (see the previous chapter). Now we have the necessary knowledge to do the following: Thus, on port 2222 on "host1" we now have forwarding on the SSH (22) port on "host4". We can connect: It would seem, why is this necessary? For example, here's why: Well, it's great that now host4 is so close :) Conclusion: you can do TCP forwarding with a large level of nesting.
host1# ssh -L 2222:localhost:2222 host2

host2# ssh -L 2222:host4:22 host3
host1# ssh -p 2222 localhost
host4# echo hello host4# копируем файл на host4
host1# scp -P 2222 /local/path/to/some/file localhost:/path/on/host4
# копируем файл с host4
host1# scp -P 2222 localhost:/path/on/host4 /local/path/to/some/file
# делаем еще один замечательный TCP forwarding на host4
host1# ssh -p 2222 -L 9999:localhost:5432 localhost
host1# psql -h localhost -p 9999 -U postgres
# обратите внимание, что порт для команды ssh задается ключем -p в нижнем регистре,
# а для команды scp -P в верхнем регистреRSA fingerprint notes
In some cases, scp will not work until you first go through ssh -p 2222 localhost and accept the RSA fingerprint of the remote server.
If you use the same port (2222) to access different remote servers, then there will be RSA fingerprint errors that remain from the previous server. It will need to be removed from ~ / .ssh / known_hosts.
If you use the same port (2222) to access different remote servers, then there will be RSA fingerprint errors that remain from the previous server. It will need to be removed from ~ / .ssh / known_hosts.
5) SSH VPN Tunnel
TCP port forwarding is a great feature. But what if we need more? Access over UDP, access to multiple ports and hosts, access to dynamic ports? The answer is obvious - VPN. And omnipotent SSH starting from version 4.3 will come to our aid here.
Looking ahead, I’ll say: this SSH functionality works well if you need a temporary solution for some administrative tasks. To build permanent VPNs, this option is far from the most suitable, because it involves TCP-over-TCP, which will adversely affect the speed of the connection.
More on TCP forwarding
But TCP port forwarding with SSH, if it is enough, will outperform VPN in many cases, because with TCP port forwarding only application data is transmitted, not the original packets together with the headers, see the link: http: //blog.backslasher.net/ssh-openvpn-tunneling.html
Configuring SSH server:
PermitTunnel in sshd settings is turned off by default, it must be included in / etc / ssh / sshd_config:
PermitTunnel yesor
PermitTunnel point-to-pointIMPORTANT : to raise the new network interface of the tunnel, both the ssh client and the ssh server need superuser rights. You can argue for a long time about how unsafe this is, but in most cases the ssh server has enough settings:
PermitRootLogin without-passwordThus, you prohibit root login with a password, and only allow it by other means, for example, using the RSA key, which is much safer.
Restart sshd:
sudo service sshd restart # centosor the
/etc/init.d/ssh restart # (debian/ubuntu)tunnel rises when using the -w magic key:
host1# sudo ssh -w 5:5 root@host2Where 5: 5 is the interface number on the local machine and on the remote, respectively. Here you may be confused that ifconfig will not give out “tun5” in the list of the interface. This is because it is in the “down” state, but if you call “ifconfig -a” or “ifconfig tun5”, the interface will be visible: Assign interfaces IP addresses and raise them: If there is a firewall, do not forget to allow connections from the tun5 interface : On host1, this is optional, here it is done only for ping to work in both directions. Enjoying the ping: If we look at an earlier example with PostgreSQL, now the scheme will be like this: A command to connect to a PostgreSQL server will look like this:
host1# ifconfig tun5

tun5 Link encap:UNSPEC HWaddr 00-00-00-00-00-00-00-00-00-00-00-00-00-00-00-00

 POINTOPOINT NOARP MULTICAST MTU:1500 Metric:1

 RX packets:0 errors:0 dropped:0 overruns:0 frame:0

 TX packets:0 errors:0 dropped:0 overruns:0 carrier:0

 collisions:0 txqueuelen:500

 RX bytes:0 (0.0 b) TX bytes:0 (0.0 b)
host1# sudo ifconfig tun5 192.168.150.101/24 pointopoint 192.168.150.102
host2# sudo ifconfig tun5 192.168.150.102/24 pointopoint 192.168.150.101host1# # сохраняем исходные правила файрвола
host1# sudo iptables-save > /tmp/iptables.rules.orig
host1# sudo iptables -I INPUT 1 -i tun5 -j ACCEPT
host2# # сохраняем исходные правила файрвола
host2# sudo iptables-save > /tmp/iptables.rules.orig
host2# sudo iptables -I INPUT 1 -i tun5 -j ACCEPThost1# ping 192.168.150.102
host2# ping 192.168.150.101host1# psql -h 192.168.150.102 -U postgresWell, then you can make any of these nodes a gateway if you need to provide access not to one node, but to the network. For example: After finishing work, do not forget to return net.ipv4.ip_forward and the firewall to their original state.
host2# # разрешаем IP forwarding

host2# sudo sysctl -w net.ipv4.ip_forward=1

host2# # разрешаем IP forwarding с host1

host2# sudo iptables -I FORWARD 1 -s 192.168.150.101 -j ACCEPT

host2# # разрешаем IP forwarding на host1

host2# sudo iptables -I FORWARD 1 -d 192.168.150.101 -j ACCEPT

host2# # маскируем IP адрес host1

host2# sudo iptables -t nat -A POSTROUTING -s 192.168.150.101 -j MASQUERADE
host1# # Предположим, у host2 есть доступ к сети 192.168.2.x, куда нам нужно попасть с host1
host1# # Прописываем host2 как шлюз в сеть 192.168.2.x
host1# sudo ip route add 192.168.2.0/24 via 192.168.150.2
host1# # Наслаждаемся доступом в сеть с host1
host1# ping 192.168.2.1host1# sudo iptables-restore < /tmp/iptables.rules.orig
host2# sudo iptables-restore < /tmp/iptables.rules.origUnder the spoiler, a more interesting case with the temporary sharing of the Internet
Suppose you need to configure a server in a closed network where Internet access is prohibited, but nevertheless you have a loophole there - access through one ssh server or a chain of ssh servers. For example, to configure a server, you need Internet access on it. Then it’s easier to set up temporary Internet access on a server that needs to be configured on your own, than to ask service personnel to do this.
Suppose you have ssh access from your host1 host machine to host2 server, from it to host3, and from there to host4 you need. Then we do TCP forwarding for ssh (if you can connect to host4 immediately with host1, skip this step): Next, connect to host4 and raise the tun5 interface: We look at the routing table on host4, let's see the following: IMPORTANT
! Next, we most likely want to make the default route tun5 interface with a gateway 192.168.150.101 through which the Internet will be available. Therefore, at this stage it is important to know exactly which routes need to be added in order to replace the default route. This is important, because quite often routes to separate networks are not assigned separately, but simply set the default route (0.0.0.0/0) with a gateway through which all network traffic goes. Moreover, it is likely that your ssh connection to the server also uses the original default gateway.
For simplicity, in this example, suppose that the server does not need any routes other than 192.168.56.0/24 for normal operation and that the previous ssh host3 has an IP address from the same network.
We remember and write somewhere the original routing table with the default gateway:
We configure our host1 to work as an Internet gateway for host4:
Changing the default route to host4 (CAUTION, see warning above!): If we don’t need the entire Internet, but only specific IP addresses / masks, then we can not change the default route, but add only the addresses we need through the gateway on tun5. We check that there is Internet: Excellent. It remains to configure DNS. There are many ways to do this, the easiest way is to edit the /etc/resolv.conf file and add the lines there: After that, the Internet should be fully accessible: After finishing work, do not forget to return everything to its original state:
Suppose you have ssh access from your host1 host machine to host2 server, from it to host3, and from there to host4 you need. Then we do TCP forwarding for ssh (if you can connect to host4 immediately with host1, skip this step): Next, connect to host4 and raise the tun5 interface: We look at the routing table on host4, let's see the following: IMPORTANT
host1# ssh -L 2222:localhost:2222 host2

host2# ssh -L 2222:host4:22 host3
host1# sudo ssh -p 2222 -w 5:5 root@localhost
host1# # или если host4 доступен сразу: sudo ssh -w 5:5 root@host4
host1# sudo ifconfig tun5 192.168.150.101/24 pointopoint 192.168.150.102
host4# sudo ifconfig tun5 192.168.150.102/24 pointopoint 192.168.150.101host4# route -n
Kernel IP routing table
Destination Gateway Genmask Flags Metric Ref Use Iface
192.168.150.0 0.0.0.0 255.255.255.0 U 0 0 0 tun5
192.168.56.0 0.0.0.0 255.255.255.0 U 1 0 0 eth0
0.0.0.0 192.168.56.254 0.0.0.0 UG 0 0 0 eth0! Next, we most likely want to make the default route tun5 interface with a gateway 192.168.150.101 through which the Internet will be available. Therefore, at this stage it is important to know exactly which routes need to be added in order to replace the default route. This is important, because quite often routes to separate networks are not assigned separately, but simply set the default route (0.0.0.0/0) with a gateway through which all network traffic goes. Moreover, it is likely that your ssh connection to the server also uses the original default gateway.
For simplicity, in this example, suppose that the server does not need any routes other than 192.168.56.0/24 for normal operation and that the previous ssh host3 has an IP address from the same network.
We remember and write somewhere the original routing table with the default gateway:
host4# route -n > routes.origWe configure our host1 to work as an Internet gateway for host4:
host1# # разрешаем IP forwarding

host1# sudo sysctl -w net.ipv4.ip_forward=1

host1# # сохраняем исходные правила файрвола

host1# sudo iptables-save > /tmp/iptables.rules.orig

host1# # разрешаем IP forwarding с host4

host1# sudo iptables -I FORWARD 1 -s 192.168.150.102 -j ACCEPT

host1# # разрешаем IP forwarding на host4

host1# sudo iptables -I FORWARD 1 -d 192.168.150.102 -j ACCEPT

host1# # маскируем IP адрес host4

host1# sudo iptables -t nat -A POSTROUTING -s 192.168.150.102 -j MASQUERADE
Just in case, you can register gray networks to the gateway from the current route by default
If not registered:
sudo ip route add 192.168.0.0/16 via 192.168.56.254

sudo ip route add 10.0.0.0/8 via 192.168.56.254

sudo ip route add 172.16.0.0/12 via 192.168.56.254
Changing the default route to host4 (CAUTION, see warning above!): If we don’t need the entire Internet, but only specific IP addresses / masks, then we can not change the default route, but add only the addresses we need through the gateway on tun5. We check that there is Internet: Excellent. It remains to configure DNS. There are many ways to do this, the easiest way is to edit the /etc/resolv.conf file and add the lines there: After that, the Internet should be fully accessible: After finishing work, do not forget to return everything to its original state:
host4# sudo ip route replace default via 192.168.150.101

host4# route -n

Kernel IP routing table

Destination Gateway Genmask Flags Metric Ref Use Iface

192.168.150.0 0.0.0.0 255.255.255.0 U 0 0 0 tun5

192.168.56.0 0.0.0.0 255.255.255.0 U 1 0 0 eth0

0.0.0.0 192.168.150.101 0.0.0.0 UG 0 0 0 tun5
host4# ping 8.8.8.8nameserver 8.8.8.8
nameserver 8.8.4.4host4# ping ya.ruhost1# # восстанавливаем правила файрвола на host1
host1# sudo iptables-restore < /tmp/iptables.rules.orig
host1# # не забудьте восстановить также значение net.ipv4.ip_forwardhost2# # восстановите маршрут по-умолчанию на host4:
host2# sudo ip route replace default via 192.168.56.254
host2# # и уберите добавленные ранее DNS-сервера из /etc/resolv.conf6) Briefly about passwordless access
I think everyone already knows that password authorization is not about us. But just in case, I’ll cram here a brief instruction on setting authentication using the RSA key:
1. On client machines, we generate our own RSA key for the user:
client1# ssh-keygen -t rsaBy default, the private key is stored in ~ / .ssh / id_rsa, and the public key is stored in ~ / .ssh / id_rsa .pub. Keep the private key as the apple of your eye and do not give it to anyone, do not copy it anywhere.
When creating a key, you can set a password (passphrase) by which the key will be encrypted.
2. Client public keys must be saved on the ssh server in the file ~ / .ssh / authorized_keys (~ this is the home directory of the user you will login to), each on a separate line. In order not to do this manually, on each client, you can use the command:
ssh-copy-id user@sshserverWhere user is the username on the server, sshserver is the name or IP address of the ssh server.
File permissions ~ / .ssh / authorized_keys
Sabio UPD : If you manually create the ~ / .ssh / authorized_keys file on the ssh server, you must set the following rights:
chmod 0700 ~/.ssh

chmod 0600 ~/.ssh/authorized_keys
3. Verify that you can enter the server by key, without entering a password (not to be confused with passphrase): I
ssh user@sshserverrecommend that you do not close at least one active ssh-session with the server until you finish the setup and make sure that everything works.
4. Disable the ability to log in to the / etc / ssh / sshd_config file on the SSH server:
PasswordAuthentication noThe public key logon option is usually already enabled by default:
PubkeyAuthentication yesI usually also disable the following two options: In some cases, this speeds up the connection process (for example when the server does not have Internet access). 5. Restart sshd: or In case of errors, it is useful to look at the / var / log / secure log or use the -v, -vv or -vvv options to display a detailed connection log:
GSSAPIAuthentication no

UseDNS no
service sshd restart/etc/init.d/ssh restartssh -vvv user@sshserver7) Thank you (links)
help.ubuntu.com/community/SSH_VPN
habrahabr.ru/post/87197
blog.backslasher.net/ssh-openvpn-tunneling.html