How to create a simple Scala SBT application for Android
Good day, friends. While developing tools for developers, I came across a question about the interaction of the aforementioned tool, programming language and platform. If the first two entities are simply created for each other (SBT is the main, most often used build tool for development on Scala), then their applicability to the Andriod platform is not for granted. Nevertheless, in a huge and constantly evolving software industry, there are situations when this set of technologies will be a rational choice. The question is when this choice is rational, is not the subject of this article. And I’ll tell you exactly how to do it.
I investigated the applicability of this approach to work in Android Studio and IntelliJ IDEA . For this purpose, there is practically no significant difference in the environments. There are nuances - with them I will acquaint you in the course of the article. But in general, the technologies that we will use are equally integrated both in the Studio and in the Idea. After all, the first is based on the same IntelliJ platform as the Idea. Therefore, your choice should rather be based on the specifics of the project.
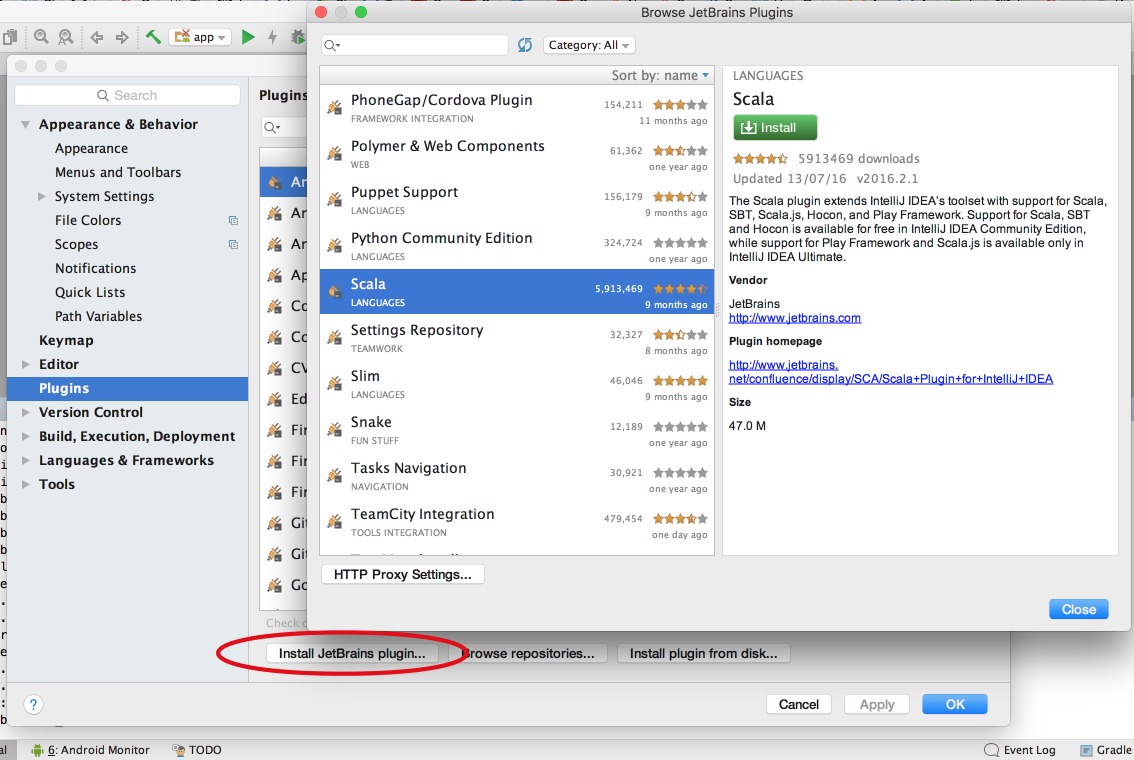
The first tool in our business will be the Scala plugin , designed for development in the Scala language in IntelliJ IDEA and Android Studio. This plugin also provides SBT. It does not come with development environments, so we need to download it from the JetBrains repository.
Now we can create a basic Scala SBT project. And here we have the first difference between the media: Scala plugin provides a wizard (Wizard) to create a new project SBT available in the Idea:
In the import wizard, specify the Android SDK (currently 25), remove the add-on check boxes. action and import. In the Idea, when creating a new SBT project, there is no way to select the Android SDK - select the Java SDK (currently 1.8) and the Scala 2.11. * Version. And the Android SDK itself will subsequently be substituted after turning on the Android Framework. SBT project is ready.
Next, you need to adapt the project to run on the Android platform.
Result:
At the moment, we have the simplest application running. If we begin to expand it, for example, at least add to
we’ll run into a problem. Android platform has a limit on the number of references - 64K. Due to the nature of Scala code, this limit is reached quickly. And just by turning on this library we get an error when starting the project:
Standard approach to solving this problem:
As a rule, if the problem can be solved only by the first step, then only it is used. A MultiDexing is already if the first is not enough. Within this task, ProGuard will be enough.
Is included in the tool options Facet's All Android:
When processing the bytecode of the Scala and Scaloid libraries, ProGuard will pour Warnings, which in our case do not affect the result, but block the further launch process. Therefore, the option
When I started, I encountered two errors:
I did not observe any more problems, and successfully launched the project with the Scaloid library included in it, which was cut by ProGuard at startup. To achieve a certain project complexity, it makes sense to include a plug-in for working with ProGuard in it. There are several of them, but at the moment, I found one: sbt-proguard . According to ProGuard himself, there is also a manual on his website.
On this, friends, I will complete this article. If it causes interest, I will study and describe in more detail the use of libraries for development for Android on Scala, such as Scaloid or Macroid , and how, using the features of the Scala language, to solve common tasks / problems on this mobile platform. In many ways, they helped me in studying the material.Android SBT plugin resource and just an informational site dedicated to development on Scala for Android. Thank you for your attention, I will be once constructive criticism, questions, comments and suggestions. Thanks!
Development environment
I investigated the applicability of this approach to work in Android Studio and IntelliJ IDEA . For this purpose, there is practically no significant difference in the environments. There are nuances - with them I will acquaint you in the course of the article. But in general, the technologies that we will use are equally integrated both in the Studio and in the Idea. After all, the first is based on the same IntelliJ platform as the Idea. Therefore, your choice should rather be based on the specifics of the project.
Creating a basic project
The first tool in our business will be the Scala plugin , designed for development in the Scala language in IntelliJ IDEA and Android Studio. This plugin also provides SBT. It does not come with development environments, so we need to download it from the JetBrains repository.
Now we can create a basic Scala SBT project. And here we have the first difference between the media: Scala plugin provides a wizard (Wizard) to create a new project SBT available in the Idea:
[File → New → Project → Scala → SBT]. But Android Studio does not give us the opportunity to choose the Wizard and immediately launches its own (based on another build tool - Gradle). Therefore, we can only import a project into SBT Studio. Basically, this is a matter of 20 seconds:- In a separate folder we create a file
build.sbtwith the contentsname := "example". - With the console team,
sbt compilewe generate everything you need for a basic project. (the terminal is launched inside the Studio to have access to SBT)
- In the welcome window of Android Studio, do the Import project and select the one we created
build.sbt
In the import wizard, specify the Android SDK (currently 25), remove the add-on check boxes. action and import. In the Idea, when creating a new SBT project, there is no way to select the Android SDK - select the Java SDK (currently 1.8) and the Scala 2.11. * Version. And the Android SDK itself will subsequently be substituted after turning on the Android Framework. SBT project is ready.
Plugin for integrating SBT and Android
Next, you need to adapt the project to run on the Android platform.
- First of all, add the
projectfile to the folderplugins.sbtand add the plugin to itaddSbtPlugin("org.scala-android" % "sbt-android" % "1.7.7") - We modify
build.sbtby adding a build-plug insertion procedure sbt-android and TASK to runname := "example" scalaVersion := "2.11.8" enablePlugins(AndroidApp) run <<= run in Android install <<= install in Android - Add to the project AndroidManifest.xml. In Studio, you can put this file in the root of the project. In the Idea, because the wizard has already created a folder structure; put it on the same level as the Source root folder, i.e. c
src/main. After creating the file, Idea / Studio will tell us to include the Android Framework in the project. We accept the offer. Minimum manifest completion: - If we work in Android Studio, we create the source root directory scr (in the Idea already exists
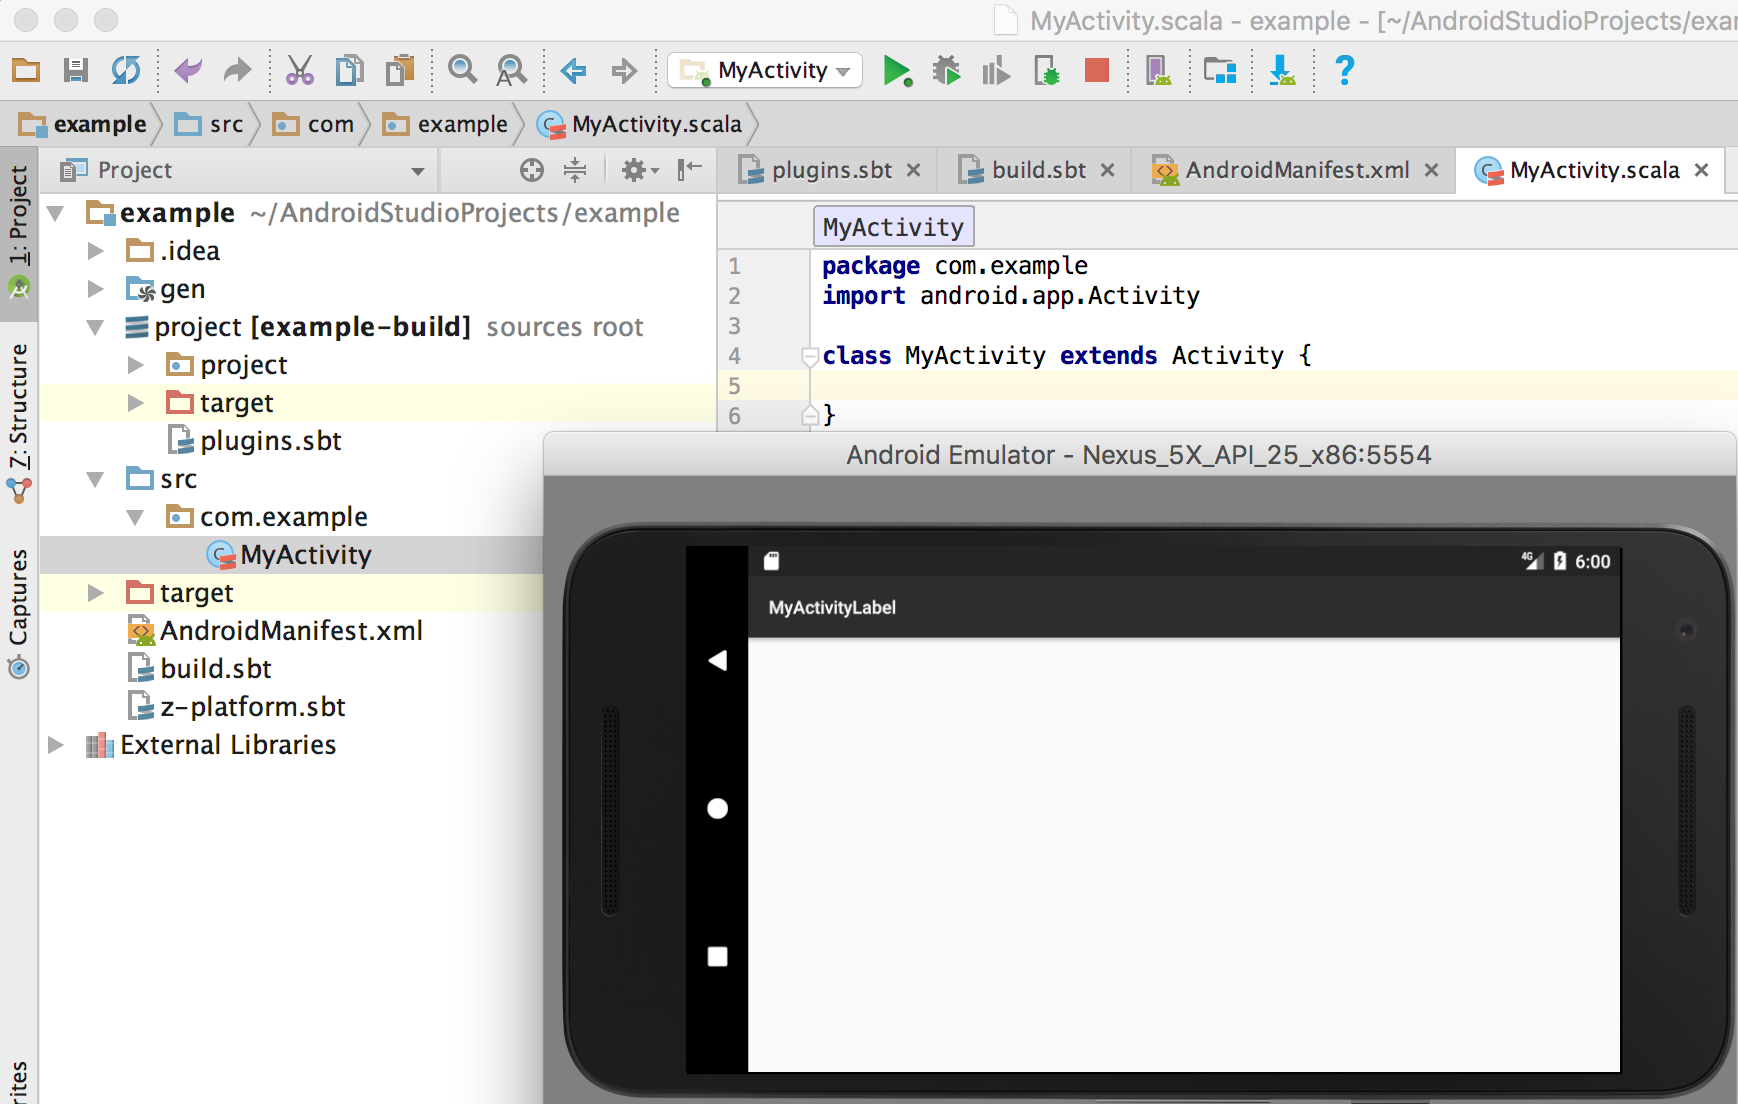
src/main/scala). In it, we create the com.example package with a fileMyActivity.scala, with a simple Activitypackage com.example import android.app.Activity class MyActivity extends Activity { } - Open and turn on the Android emulator
- Refresh the project to activate all the new settings. If you work in IDEA, then with this action, ProGuard (which we will talk about later) is automatically turned on. Now it should be disabled in
[Project Structure → Facets → Android → Proguard → Run proguard ...]. - And run the default run configuration
[Run -> Run ... -> MyActivity
Result:
ProGuard Tool - Adapting Scala to Android
At the moment, we have the simplest application running. If we begin to expand it, for example, at least add to
build.sbtthe Scaloid library (which we will talk about later)libraryDependencies += "org.scaloid" %% "scaloid" % "4.2"we’ll run into a problem. Android platform has a limit on the number of references - 64K. Due to the nature of Scala code, this limit is reached quickly. And just by turning on this library we get an error when starting the project:
Error:Android Pre Dex: [scaloid_2.11-4.2.jar] trouble writing output: Too many method references: 81694; max is 65536.Standard approach to solving this problem:
- Cutting out unused code from a project using the ProGuard tool ;
- Separation of project sources into several .dex files, each of which will contain an acceptable number of methods. The name of the procedure is MultiDexing .
As a rule, if the problem can be solved only by the first step, then only it is used. A MultiDexing is already if the first is not enough. Within this task, ProGuard will be enough.
Is included in the tool options Facet's All Android:
[Project Structure → Facets → Android → Proguard → Run proguard ...]. Note that, by default, a text file with basic settings is already specified: Studio includes a file from the SDK .../Android/sdk/tools/proguard/proguard-android.txt, Idea includes and creates a configuration file in the root of the project .../example/proguard-sbt.txt. For the successful execution of our project, it will be enough to add three additional options to it:-dontwarn scala.**
-dontwarn org.scaloid.**
-keep class com.example.**When processing the bytecode of the Scala and Scaloid libraries, ProGuard will pour Warnings, which in our case do not affect the result, but block the further launch process. Therefore, the option
-dontwarnwe remove them. Also, you must specify that ProGuard does not cut out our handwritten code. This provides an option -keep class. When I started, I encountered two errors:
Unsupported class version number [52.0] (maximum 51.0, Java 1.7). Its reason is that the Android SDK is based on Java 1.8, and ProGuard supports a maximum of 1.7. This is solved by updating ProGuard to version 5 and higher, right inside the Android SDK;Error:ProGuard: Cannot find file /Users/.../Caches/AndroidStudio2.3/compile-server/.../proguard.txt- this is a bug of the platform itself, and it is solved by manually or scripting a file liningproguard-android.txtfrom the Android SDK to the same cache, followed by renaming toproguard.txt. Not the most convenient way, but still, this procedure is not often used, especially because users usually specify all these options in thebuild.sbtfile.
I did not observe any more problems, and successfully launched the project with the Scaloid library included in it, which was cut by ProGuard at startup. To achieve a certain project complexity, it makes sense to include a plug-in for working with ProGuard in it. There are several of them, but at the moment, I found one: sbt-proguard . According to ProGuard himself, there is also a manual on his website.
On this, friends, I will complete this article. If it causes interest, I will study and describe in more detail the use of libraries for development for Android on Scala, such as Scaloid or Macroid , and how, using the features of the Scala language, to solve common tasks / problems on this mobile platform. In many ways, they helped me in studying the material.Android SBT plugin resource and just an informational site dedicated to development on Scala for Android. Thank you for your attention, I will be once constructive criticism, questions, comments and suggestions. Thanks!