VHD Native Boot inside and out
The purpose of this article is to tell about my experience with a very useful and not very well-known Windows function called VHD Native Boot, that is, the ability to boot from a VHD / VHDx format virtual hard disk.
Starting from the 7th version, Windows has the opportunity to create virtual disks VHD / VHDx (hereinafter simply referred to as VHD), as well as connect and disconnect them via the "Disk Management" graphical interface and diskpart command-line utility. In addition, Windows learned to boot from such disks, and everything would be fine, but this same Native Boot was only available to owners of older versions, that is, from Pro and higher. Obviously, this was only a marketing limitation, because with the advent of Windows 10, and I checked Anniversary Update (1607) and Creators Update (1703), there are no more restrictions. This also works in Windows 10 Home, and it can act both as a host and as a guest. You will learn about how it looks and how to use it below.
For a long time I was interested in the idea of using virtualization in relation to a working computer, internal virtualization, so to speak. How useful and convenient virtual machines are for software developers, security experts, and testing specialists. But this business still did not reach the level of a home / work computer and its operating system. Well, it is obvious that if the operating system is such a complex and sensitive component, you can not trust its user indiscriminately, he tries to infect or damage it with something. Yes, there is a backup and restore from recovery points (i.e. from a shadow copy), and these are great things. But these are very error-sensitive components, and may not save, in addition, many malware can delete shadow copies, leaving no chance for the user. I would like something simple and banal at the copy-paste level, so that the “fallen” or “spoiled” system is returned to working condition within a few minutes. Of course, it would be ideal for the solution to be in the system itself, simply embedded in it. Hyper-V is still not quite right, although it can be doped to the required level. After all, I want all the capabilities of the machine, all its iron, all the power to be available, with minimal casualties.
Using a virtual hard disk instead of a real one seems a perfectly acceptable sacrifice, given that the entire system fits in one file, and it is enough to copy this file from time to time somewhere to the side, and everything will be fine. After all, copying one file, albeit a large one, is clearly easier than tens of thousands. In addition, such a file can be easily used to deploy Windows in an organization.
When there are several (few) types of computers, it is enough to install the system and all the required software on VHD, and then simply copy this file to all similar computers, minimizing field work. It would be nice to have some kind of shell, without loading Windows, something like a "hypervisor console" that allows you to get into it and work with VHD at the file level, copy, replace, update, etc. Moreover, Windows itself has such a shell in its composition, and it is called the Windows Recovery Environment, then WinRE. Let's see how it all looks in practice.
This topic is widely covered on the Web, there are dozens of sensible guides (see links at the end of the article), so I will stop only in passing, simultaneously considering possible options.
In general, it all comes down to pressing the magic combination Shift-F10 at the moment when the computer booted from the installation disk. At the same time, a command line window opens, where you should use diskpart to format and partition the real hard disk (if the computer / disk is new) and create a VHD of the required size. For simplicity, I will consider installing a 64-bit version and hard drives with MBR.
So, the hard disk is broken, the VHDs folder on the corresponding volume is created, now in the diskpart you need to create a virtual hard disk in this folder, giving it a friendly name, and perform the attachment, then the next letter will be assigned to the virtual disk. Now you can return to the Windows installation window and select this particular letter for installation. Everything, then the installer will do everything herself. Including and adds the desired entry in the BCD file.
I must say right away that using bcdedit seemed to me too cruel self-torture, so I allowed myself to use one third-party tool for manipulation, this is the Bootice utility of the corresponding capacity. Suppose you have it on the same installation disk. If not, in the future I will show how it can be “thrown” into our “hypervisor” shell.
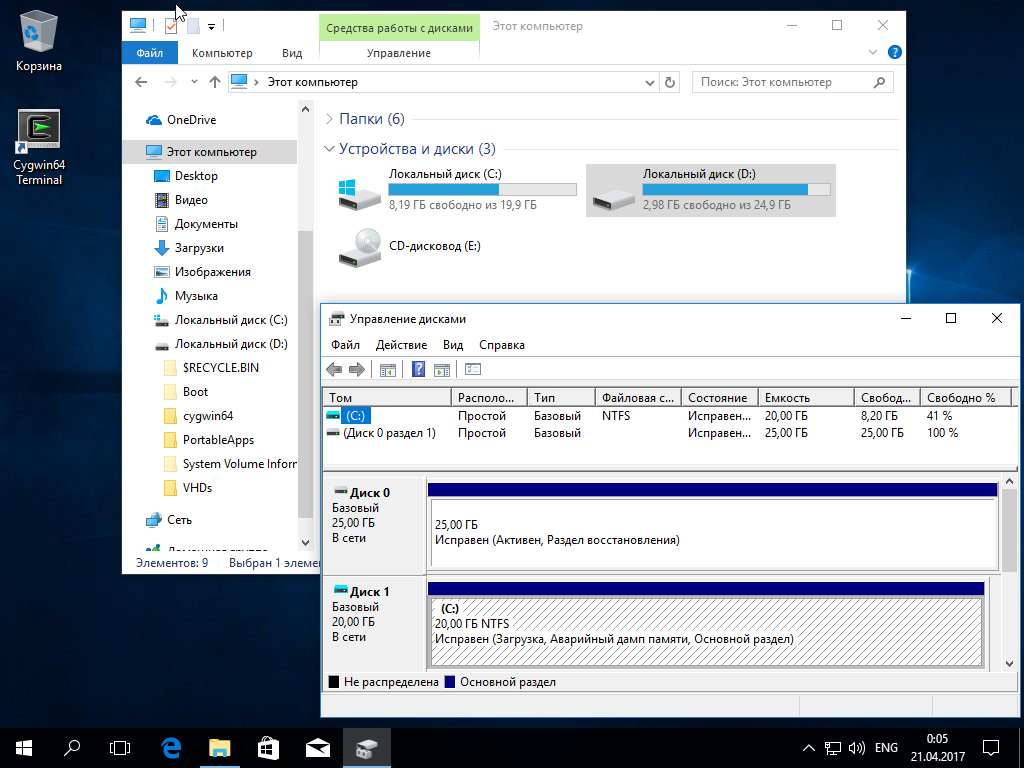
So, for demonstration, let me have one 25 Gb hard drive (I will use my favorite Virtualbox to show), it has one section, there is the VHDs folder where I created the virtual disk and installed Windows 10 on it.
This is how the boot menu will look systems in Bootice (section BCD, Easy Mode)

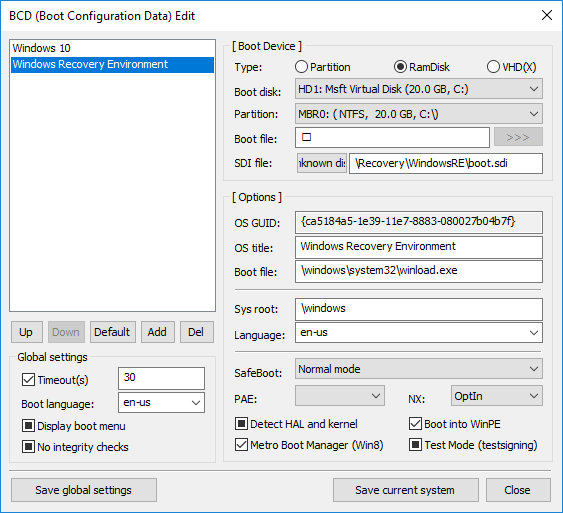
Here 25 Gb C: this is the “physical” disk on which I created a virtual 20 Gb and where I installed Windows 10. Everything is fine, but then we need to create a shell for management. As you know, WinRE is always installed along with Windows and comes to the rescue when problems with booting are detected. We need it for another purpose, I want to get there to work with VHD files. Add the WinRE item to the boot menu. To do this, we’ll use Professional Mode in Bootice, the last object in the list on the left is just Windows Recovery, on the right you can see its location on VHD:

This object, or rather, a link to it, must be added to the boot menu list, select the Windows Boot Manager branch at the top left, in the right panel, select the Display Order item and add the item about WinRE from the drop-down list:

Now, the Windows Recovery Environment item will be shown in the boot menu of the system, which we can see by returning to Easy Mode: It
remains to reboot and select the second item, WinRE will start loading, and there we are only interested in the item Troubleshooting, Advanced options, Command line . All this resembles both the Windows installer and the progenitor WinRE, the widely known Windows Preinstallation Environment. From here, in fact, the work with the shell begins, and it is not so important which one you choose, since everything is approximately the same there.
Our main hard drive is in it a C: drive, our master.vhd is found in its VHDs folder, and we can easily copy it somewhere. In WinRE, we connect the network with the magic command:
the network adapter driver is automatically selected and launched, the IP address from the DHCP server is obtained, and we can work with the network. In Virtualbox, I can connect a network folder with this command:
and from there already copy the necessary tools to work in the shell. Since the x64 version is selected, then the programs running in WinRE must be x64, no surrogates will start.
In addition to Bootice, Far Manager, 7-zip are easily added, and with them it is already somehow more fun. I even managed to find a working Palemoon Portable web browser, and with it it’s very easy to download the necessary components from the Web. Cygwin64 worked perfectly, which opens the way for ssh / rsync in mixed environments. Further it is clear, we have the ability to safely archive and copy vhd files. If something is wrong in master.vhd, we boot into WinRE and take its backup copy from the network storage, then exit WinRE and get our system back.
Directly from the WinRE shell, using diskpart or Bootice, you can create a new VHD disk, run the Windows installer, if you want to add some other version and install this new Windows on a new VHD, the desired item in the OS boot menu will be added itself.
All that remains is to play it safe in case everything is so bad with master.vhd that you won’t boot into the WinRE shell, because it is part of this disk. Of course, this is not fatal, you can always boot from the Windows installation disk and press Shift-F10, but with some effort, you can make WinRE located on our host disk and boot into it from there. The boot menu will look like this:

It is not a problem to add an additional operating system to your computer by creating a new VHD and attaching it, then running the installer and selecting the letter assigned to the attached drive. Much more difficult task will be to transfer the current configuration, already installed on the physical disk of the system to the virtual disk. Several options come to mind here. The first one that I remembered was to use Windows Backup, because it just creates a VHD (vhdx) file in the system image creation mode. It would seem that all that is required is to add a link to such a VHD in the boot menu and see what happens. So I did, when I first booted up Windows, I got an error, and with all the subsequent ones, something was loaded carefully, for a very long time, and even glimpsed a window with a picture of the lock screen of the original system, but it disappeared again. I don’t know why, but Windows cannot be loaded from the VHD-disk received from backup. I had to go the other way, use Disk2vhd from the Sysinternals suite.
Everything is quite simple, you select the partition of the physical disk, or the entire disk, and Disk2vhd makes a VHD file from it:

But then the inconvenience begins. The resulting VHD, no matter what its real size, reports about itself that it is the size of our entire physical disk. That is, if I had a physical disk of 180 Gb, and I selected only the first partition of 100 Gb in size, the VHD file turned out to be about 50 Gb, but it reports itself as about 180 GB. The problem here is that if you boot from such a VHD, then Windows will require 180 GB of space for it to work. That is, no matter how you optimize it (defrag, sdelete -z), or compress it (compact vdisk, shrink), you won’t get rid of the original characteristics taken by Disk2vhd. I had to go for a complicated conversion, create an empty VHD, load it into Virtualbox PartedMagic, slipping the converted and empty VHD into it and using Gparted (and Clonezilla, if I don't want to mess with bootrec), move the partition. The result is a VHD of 20 Gb,
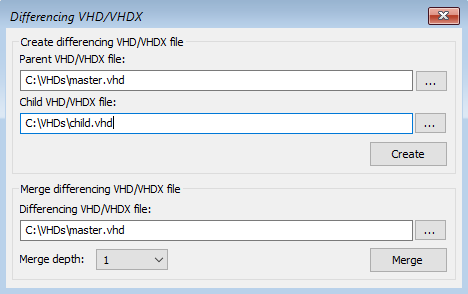
In particularly unreliable environments, on public computers or during some dangerous experiments, it may be useful to use differential VHD disks on which only difference, changed information is recorded, and the original VHD remains unchanged. It is clear that for starters you must already have a working system on a VHD-drive, and then add the option with a differential drive. You can create such a disk in diskpart or all in the same Bootice. Let master.vhd be our main disk, create a differential child.vhd for it by clicking the Create button:
Now we need to add / fix to the BCD the item responsible for booting from VHD, specifying the differential child.vhd instead of master.vhd.
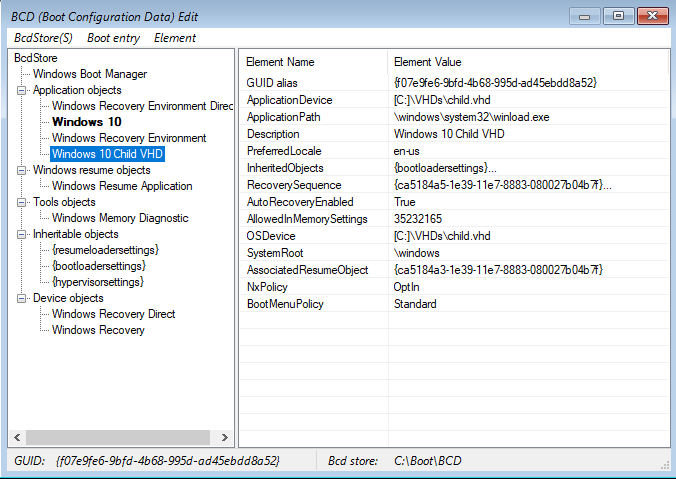
To do this, use the Professional Mode in Bootice, make a copy of the existing Windows 10 item (right-click, Duplicate this entry) and rename the new one in Windows 10 Child VHD. Now, at this point, we fix ApplicationDevice and OsDevice by changing the name of the vhd file:
That's it, now the desired item is added to the boot menu. If you select Windows 10 Child VHD, Windows will start and from now on all changes will be written to child.vhd. Please note that under child.vhd at the time of loading, the same amount of space will be reserved as specified in master.vhd, that is, in our case 20 Gb, even if its actual size is hundreds of times smaller. From time to time, it makes sense to perform the merge procedure, that is, send the accumulated difference from child to master so as not to lose anything. The fact is that if you boot not in child, but in master or even WinRE based on master.vhd, the connection between master and child will be broken, you will have to repair child, but Bootice can do this:

I would suggest partitioning the physical disk as follows.
One section, large enough, to keep VHD files for storage, it all depends on how many different VHD you need. Minimum installation of Windows x64 requires 20 GB, you can create dynamic disks, that is, increasing their actual size only as they become internal. But once again I emphasize that at the time of loading dynamic VHD Windows reserves a space for it in accordance with the specified maximum size.
Microsoft advises using fixed-size VHDs in a production environment, and dynamic ones for test use only, but I didn’t feel much performance loss in dynamic VHDs.
The second section, I would prefer to create for user data and a set of portable applications, if you want, for example, to boot from different VHD, and work with the same files and programs. Such a division can also be useful in order to hide the VHD partition altogether, in order to avoid unreasonable actions of the end user.
And you can hide the partition using this simple scenario for diskpart, taking into account the selected drive and the partition for storing VHD.
Now the section is hidden, the letter is not assigned to it, but Windows will still boot from the VHD stored in this section. The only caveat is choosing the location on the physical disk for the swap file. If it is selected by the system, and this is exactly the section that will be hidden, every time you start Windows it will ask where to create the page file.
And to return the chest back, it is enough to execute the command in diskpart
Thanks for attention
Starting from the 7th version, Windows has the opportunity to create virtual disks VHD / VHDx (hereinafter simply referred to as VHD), as well as connect and disconnect them via the "Disk Management" graphical interface and diskpart command-line utility. In addition, Windows learned to boot from such disks, and everything would be fine, but this same Native Boot was only available to owners of older versions, that is, from Pro and higher. Obviously, this was only a marketing limitation, because with the advent of Windows 10, and I checked Anniversary Update (1607) and Creators Update (1703), there are no more restrictions. This also works in Windows 10 Home, and it can act both as a host and as a guest. You will learn about how it looks and how to use it below.
For a long time I was interested in the idea of using virtualization in relation to a working computer, internal virtualization, so to speak. How useful and convenient virtual machines are for software developers, security experts, and testing specialists. But this business still did not reach the level of a home / work computer and its operating system. Well, it is obvious that if the operating system is such a complex and sensitive component, you can not trust its user indiscriminately, he tries to infect or damage it with something. Yes, there is a backup and restore from recovery points (i.e. from a shadow copy), and these are great things. But these are very error-sensitive components, and may not save, in addition, many malware can delete shadow copies, leaving no chance for the user. I would like something simple and banal at the copy-paste level, so that the “fallen” or “spoiled” system is returned to working condition within a few minutes. Of course, it would be ideal for the solution to be in the system itself, simply embedded in it. Hyper-V is still not quite right, although it can be doped to the required level. After all, I want all the capabilities of the machine, all its iron, all the power to be available, with minimal casualties.
Using a virtual hard disk instead of a real one seems a perfectly acceptable sacrifice, given that the entire system fits in one file, and it is enough to copy this file from time to time somewhere to the side, and everything will be fine. After all, copying one file, albeit a large one, is clearly easier than tens of thousands. In addition, such a file can be easily used to deploy Windows in an organization.
When there are several (few) types of computers, it is enough to install the system and all the required software on VHD, and then simply copy this file to all similar computers, minimizing field work. It would be nice to have some kind of shell, without loading Windows, something like a "hypervisor console" that allows you to get into it and work with VHD at the file level, copy, replace, update, etc. Moreover, Windows itself has such a shell in its composition, and it is called the Windows Recovery Environment, then WinRE. Let's see how it all looks in practice.
1. Install Windows on VHD from scratch
This topic is widely covered on the Web, there are dozens of sensible guides (see links at the end of the article), so I will stop only in passing, simultaneously considering possible options.
In general, it all comes down to pressing the magic combination Shift-F10 at the moment when the computer booted from the installation disk. At the same time, a command line window opens, where you should use diskpart to format and partition the real hard disk (if the computer / disk is new) and create a VHD of the required size. For simplicity, I will consider installing a 64-bit version and hard drives with MBR.
So, the hard disk is broken, the VHDs folder on the corresponding volume is created, now in the diskpart you need to create a virtual hard disk in this folder, giving it a friendly name, and perform the attachment, then the next letter will be assigned to the virtual disk. Now you can return to the Windows installation window and select this particular letter for installation. Everything, then the installer will do everything herself. Including and adds the desired entry in the BCD file.
I must say right away that using bcdedit seemed to me too cruel self-torture, so I allowed myself to use one third-party tool for manipulation, this is the Bootice utility of the corresponding capacity. Suppose you have it on the same installation disk. If not, in the future I will show how it can be “thrown” into our “hypervisor” shell.
So, for demonstration, let me have one 25 Gb hard drive (I will use my favorite Virtualbox to show), it has one section, there is the VHDs folder where I created the virtual disk and installed Windows 10 on it.
This is how the boot menu will look systems in Bootice (section BCD, Easy Mode)
Here 25 Gb C: this is the “physical” disk on which I created a virtual 20 Gb and where I installed Windows 10. Everything is fine, but then we need to create a shell for management. As you know, WinRE is always installed along with Windows and comes to the rescue when problems with booting are detected. We need it for another purpose, I want to get there to work with VHD files. Add the WinRE item to the boot menu. To do this, we’ll use Professional Mode in Bootice, the last object in the list on the left is just Windows Recovery, on the right you can see its location on VHD:
This object, or rather, a link to it, must be added to the boot menu list, select the Windows Boot Manager branch at the top left, in the right panel, select the Display Order item and add the item about WinRE from the drop-down list:
Now, the Windows Recovery Environment item will be shown in the boot menu of the system, which we can see by returning to Easy Mode: It
remains to reboot and select the second item, WinRE will start loading, and there we are only interested in the item Troubleshooting, Advanced options, Command line . All this resembles both the Windows installer and the progenitor WinRE, the widely known Windows Preinstallation Environment. From here, in fact, the work with the shell begins, and it is not so important which one you choose, since everything is approximately the same there.
Our main hard drive is in it a C: drive, our master.vhd is found in its VHDs folder, and we can easily copy it somewhere. In WinRE, we connect the network with the magic command:
wpeutil initializenetworkthe network adapter driver is automatically selected and launched, the IP address from the DHCP server is obtained, and we can work with the network. In Virtualbox, I can connect a network folder with this command:
net use z: \\10.0.2.2\d$and from there already copy the necessary tools to work in the shell. Since the x64 version is selected, then the programs running in WinRE must be x64, no surrogates will start.
In addition to Bootice, Far Manager, 7-zip are easily added, and with them it is already somehow more fun. I even managed to find a working Palemoon Portable web browser, and with it it’s very easy to download the necessary components from the Web. Cygwin64 worked perfectly, which opens the way for ssh / rsync in mixed environments. Further it is clear, we have the ability to safely archive and copy vhd files. If something is wrong in master.vhd, we boot into WinRE and take its backup copy from the network storage, then exit WinRE and get our system back.
Directly from the WinRE shell, using diskpart or Bootice, you can create a new VHD disk, run the Windows installer, if you want to add some other version and install this new Windows on a new VHD, the desired item in the OS boot menu will be added itself.
All that remains is to play it safe in case everything is so bad with master.vhd that you won’t boot into the WinRE shell, because it is part of this disk. Of course, this is not fatal, you can always boot from the Windows installation disk and press Shift-F10, but with some effort, you can make WinRE located on our host disk and boot into it from there. The boot menu will look like this:
2. Installing Windows on VHD on a running computer
It is not a problem to add an additional operating system to your computer by creating a new VHD and attaching it, then running the installer and selecting the letter assigned to the attached drive. Much more difficult task will be to transfer the current configuration, already installed on the physical disk of the system to the virtual disk. Several options come to mind here. The first one that I remembered was to use Windows Backup, because it just creates a VHD (vhdx) file in the system image creation mode. It would seem that all that is required is to add a link to such a VHD in the boot menu and see what happens. So I did, when I first booted up Windows, I got an error, and with all the subsequent ones, something was loaded carefully, for a very long time, and even glimpsed a window with a picture of the lock screen of the original system, but it disappeared again. I don’t know why, but Windows cannot be loaded from the VHD-disk received from backup. I had to go the other way, use Disk2vhd from the Sysinternals suite.
Everything is quite simple, you select the partition of the physical disk, or the entire disk, and Disk2vhd makes a VHD file from it:
But then the inconvenience begins. The resulting VHD, no matter what its real size, reports about itself that it is the size of our entire physical disk. That is, if I had a physical disk of 180 Gb, and I selected only the first partition of 100 Gb in size, the VHD file turned out to be about 50 Gb, but it reports itself as about 180 GB. The problem here is that if you boot from such a VHD, then Windows will require 180 GB of space for it to work. That is, no matter how you optimize it (defrag, sdelete -z), or compress it (compact vdisk, shrink), you won’t get rid of the original characteristics taken by Disk2vhd. I had to go for a complicated conversion, create an empty VHD, load it into Virtualbox PartedMagic, slipping the converted and empty VHD into it and using Gparted (and Clonezilla, if I don't want to mess with bootrec), move the partition. The result is a VHD of 20 Gb,
3. Using differential VHD
In particularly unreliable environments, on public computers or during some dangerous experiments, it may be useful to use differential VHD disks on which only difference, changed information is recorded, and the original VHD remains unchanged. It is clear that for starters you must already have a working system on a VHD-drive, and then add the option with a differential drive. You can create such a disk in diskpart or all in the same Bootice. Let master.vhd be our main disk, create a differential child.vhd for it by clicking the Create button:
Now we need to add / fix to the BCD the item responsible for booting from VHD, specifying the differential child.vhd instead of master.vhd.
To do this, use the Professional Mode in Bootice, make a copy of the existing Windows 10 item (right-click, Duplicate this entry) and rename the new one in Windows 10 Child VHD. Now, at this point, we fix ApplicationDevice and OsDevice by changing the name of the vhd file:
That's it, now the desired item is added to the boot menu. If you select Windows 10 Child VHD, Windows will start and from now on all changes will be written to child.vhd. Please note that under child.vhd at the time of loading, the same amount of space will be reserved as specified in master.vhd, that is, in our case 20 Gb, even if its actual size is hundreds of times smaller. From time to time, it makes sense to perform the merge procedure, that is, send the accumulated difference from child to master so as not to lose anything. The fact is that if you boot not in child, but in master or even WinRE based on master.vhd, the connection between master and child will be broken, you will have to repair child, but Bootice can do this:
4. Recommended physical disk configuration when working with bootable VHD
I would suggest partitioning the physical disk as follows.
One section, large enough, to keep VHD files for storage, it all depends on how many different VHD you need. Minimum installation of Windows x64 requires 20 GB, you can create dynamic disks, that is, increasing their actual size only as they become internal. But once again I emphasize that at the time of loading dynamic VHD Windows reserves a space for it in accordance with the specified maximum size.
Microsoft advises using fixed-size VHDs in a production environment, and dynamic ones for test use only, but I didn’t feel much performance loss in dynamic VHDs.
The second section, I would prefer to create for user data and a set of portable applications, if you want, for example, to boot from different VHD, and work with the same files and programs. Such a division can also be useful in order to hide the VHD partition altogether, in order to avoid unreasonable actions of the end user.
And you can hide the partition using this simple scenario for diskpart, taking into account the selected drive and the partition for storing VHD.
sel disk 0
sel part 1
set id=17
Now the section is hidden, the letter is not assigned to it, but Windows will still boot from the VHD stored in this section. The only caveat is choosing the location on the physical disk for the swap file. If it is selected by the system, and this is exactly the section that will be hidden, every time you start Windows it will ask where to create the page file.
And to return the chest back, it is enough to execute the command in diskpart
set id=07set id=27List of useful links
msdn.microsoft.com/en-us/windows/hardware/commercialize/manufacture/desktop/understanding-virtual-hard-disks-with-native-boot
msdn.microsoft.com/ru-ru/windows/hardware/commercialize/manufacture / desktop / windows-recovery-environment - windows-re - technical-reference
gotch.techfaq.ru/archives/91
gotch.techfaq.ru/archives/115
winitpro.ru/index.php/2017/01/27/ vosstanovlenie-sredy-windows-recovery-environment-winre-v-windows-10
https://technet.microsoft.com/en-us/library/cc766465(v=ws.10).aspx
Thanks for attention