April 20, 2017 at 12:45
Huawei CloudEngine 6800: review and experience

The central link of any IT infrastructure, commercial organization, state-owned company or cloud hosting provider is the network infrastructure. The main TOR switches in our infrastructure are the Huawei CloudEngine 6800 switches.
The mClouds.ru project team has quite serious experience in technologies, however, their practical application as an end-user has its own characteristics. Therefore, having gained experience, a year later we launched our blog on Habré in order to share our experience and practices in the process.
When launching a project for leasing virtual resources, we used up-to-date design guides from various vendors, including the Huawei NDG (Network-Design Guide) and CVD (Cisco Validated Design Program), which are guidelines for building optimal and secure data center networks.
CloudEngine at a Glance

Marketing Minute: In 2012, Huawei introduced the CloudEngine line of switches (hereinafter CE), which was developed for data centers and high-performance campus networks. The flagship in this line is CE 12800 with one of the highest performance in the world.
Ruler | Maximum throughput | Port type | Number of ports |
CE 12800 | up to 1032 Tbps | 100GE | up to 36 ports per card |
40GE | up to 36 ports per card | ||
10GE | up to 48 ports per card | ||
1GE | up to 84 ports per card | ||
CE 8800 | up to 6.4 Tbps | 100GE | up to 32 ports |
40GE | up to 64 ports | ||
25 / 10GE | up to 128 ports | ||
CE 7800 | up to 2.56 Tbps | 40GE | 32 ports |
CE 6800 | up to 1.6 Tbps | 100GE | up to 8 ports |
40GE | up to 8 ports | ||
25 / 10GE | up to 48 ports | ||
1 / 10GE | up to 48 ports | ||
CE 5800 | up to 336 Gbps | 40GE | up to 2 ports |
10GE | up to 4 ports | ||
1GE | up to 48 ports |
Port Summary in the CE
Line A key component in the line is Huawei Cloud Fabric Solutions data center solutions. This is a platform for building SDN (software-defined networking) DC (datacenter) with the ability to integrate with the VMware environment using the OVSDB protocol (Open vSwitch Database, RFC 7047). This integration reduces the operational and labor costs associated with managing and deploying services and services on the VMware virtualization platform. You can read more about Cloud Fabric on the Huawei blog on Habré.
Cloud engine
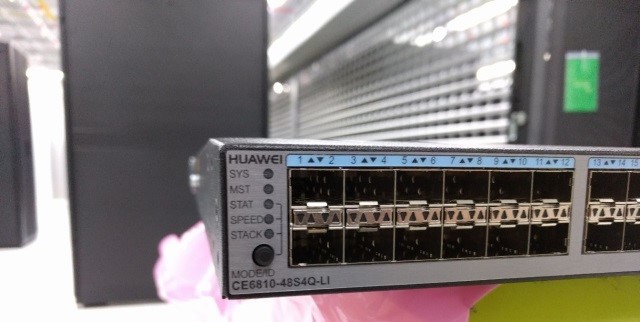
As access switches we use the Huawei CloudEngine 6800 (CE6810-48S4Q-LI), which provide a high density of 10GE ports (48 x 10 GE SFP +) with the ability to stack and connect to the network core using 40GE ports (4 x 40 GE QSFP +).
Parameter | Characteristic |
SFP + | 48 |
QSFP + | 4 |
Switching matrix | 1.28 Tbit / s |
Processing speed | 960 Mpps |
Device Virtualization | iStack Super virtual fabric |
Network virtualization | M-LAG |
Network convergence | Fcoe DCBX, PFC, ETS |
Routing | IPv4 routing protocols, such as RIP, OSPF, BGP, and IS-IS |
Summary of CE6810
Summary of the differences between the EI and LI switch versions.
Ei | Li | |
TRILL | + | - |
ECMP | + | - |
FCF | + | - |
NPV | + | - |
GRE | + | - |
IPv6 | + | - |
Multicast (excluding IGMP Snooping) | + | - |
DHCP Server | + | - |
VLANIF | 1K | 64 |
ARP | 4K | 1.5K |
VRF | 128 | 2 |
IPv4 FIB | 16K | 1.5K |
Detailed specifications are available at the following link: huawei.com
iStack
As an example, we would like to demonstrate the iStack configuration based on the Huawei CE6810. When using iStack, it is possible to stack up to 16 switches (supported firmware V100R003C10 and later) using the 10GE, 40GE, and 100GE ports. Additional licensing iStack is not required.
Benefits of iStack Technology
1. Simplified management and configuration: devices on the stack are one logical device. Managing switches is possible from any member of the stack.
2. Redundancy Control Plane: each switch is equipped with two MPUs, where master processes requests, and standby acts as a backup of master and constantly synchronizes with it. In case of failure of master, standby becomes the main one and continues to process service packages. IStack technology implements 1: 1 redundancy. On the stack, one main switch processes service packets, and one standby switch functions as a backup copy of the master switch and synchronizes information with it. Other switches in the stack are slaves, when master fails, standby becomes master, and a new standby switch is selected from slave. This scheme with slave switches can further increase the reliability of the system.
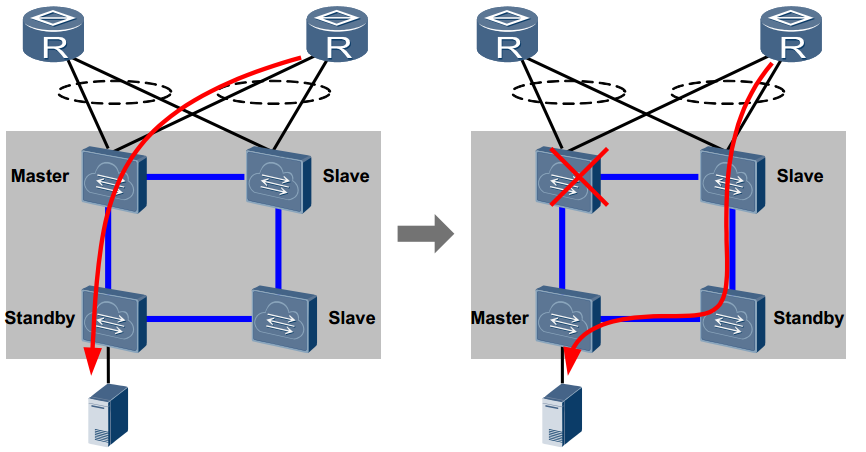
Traffic path before and after the Master change
3. Redundancy of uplink and downlink

4. Redundancy of links and interfaces: in a ring topology, when the link drops, the topology becomes consistent, and the aggregation of several interfaces can increase fault tolerance and increase the overall throughput of interfaces.
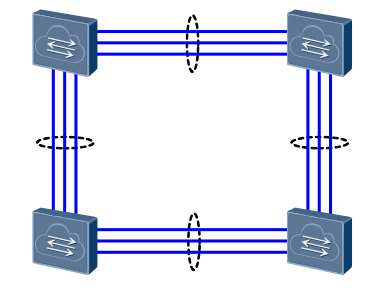
Fault tolerance of stack ports and interfaces
Basic concepts
Switch roles - switches in the stack are classified by the following roles:
- Master - the main switch in the stack. One on the stack.
- Standby - backup switch. There can only be one standby on the stack.
- Slave - slave switch, maximum number: N-2, where N - maximum number of switches in the stack.
Stack domain- The area in which the switches are combined into one logical device. Multiple domains can be combined.
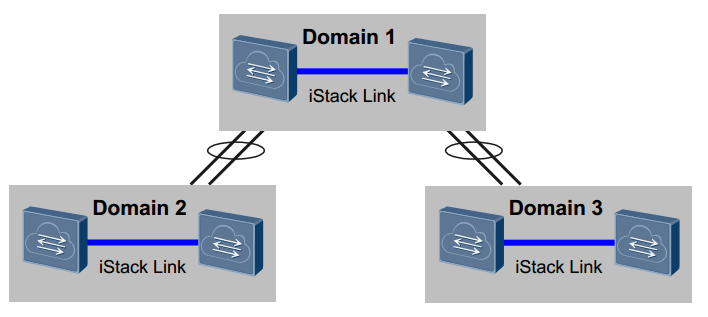
Stack ID - identifier for identifying switches; otherwise, member ID, these IDs are unique on the stack.
Stack priority - switch priority, one of the parameters on the basis of which the switch roles are selected.
Physical member interface - physical ports that are used on the stack between the switches.
Stack interface - a logical interface that integrates physical ports into a virtual interface, referred to as stack-port N / 1, stack-port N / 2.
Topologies
Stacking is possible using two topologies: sequential (chain) and ring (ring).

Chain topology
The advantages of a serial connection are stacking of switches over long distances (up to 16 switches). Of the minuses, insufficient reliability and low bandwidth utilization can be noted. Ring topology The advantages of
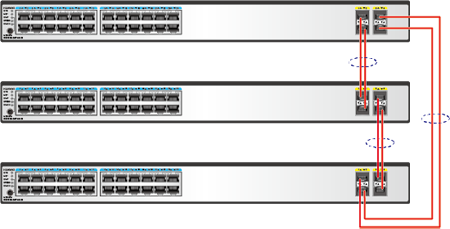
ring
topology are its high reliability and high throughput of the stack.
Defining the master switch
The master is selected according to the following scenario:
1. Running status: the first switch that was started and added to iStack becomes Master
2. Stack priority: the switch with the highest priority becomes Master
3. Software version: the switch with the latest firmware becomes Master
4 . Mac: The switch with the lowest MAC address becomes Master
Adding and removing a switch from the stack
Adding a new switch to the stack:
1. If the switch is not involved in any other stack (there is no unique stack ID), it becomes a slave.
2. If the switch was previously on stack A, then master is selected from two switches with master roles in stacks A and B. The switch that received the master role, for example, from stack B, synchronizes the switches from stack A (data is rebooted and synchronized with the new stack ), the remaining roles remain unchanged.
Switching the switch off:
1. If the master switch is turned off, then standby becomes master. The topology is updated and a new standby
2 is selected . If the standby switch is turned off, the topology is updated and a new standby is selected
3. If the slave switch is disconnected, the topology stack is updated
. 4. If the master and slave switches are disconnected, then all the switches reboot and form a new stack.
Configuration
The stack is configured in several stages:
0. Check software and switch compatibility
1. Preset participants
2 . Setting up ports within the stack interface
3. Verify the configuration
4. Save configuration and restart
5. physical cable connections
6. Enabling switches
to demonstrate iStack technology on the test stand, we spolzuem two CE6810 line switch.
0. Before configuring, we recommend that you contact the iStack Assistantfor information on required firmware versions and stacking capabilities.
Note: if master has a new firmware version, then the slave switches will automatically synchronize the software version, reboot and then be added to the stack.
1. Setting stack parameters on switches
a. SW01 Switch Configuration
> system-view
[~HUAWEI] sysname SW01
[*HUAWEI] commit
[~SW01] stack
[~SW01-stack] stack member 1 priority 150
[*SW01-stack] stack member 1 domain 100
[*SW01-stack] quit
[*SW01] commit
b. SW02 Switch Configuration
> system-view
[~HUAWEI] sysname SW02
[*HUAWEI] commit
[~SW02] stack
[~SW02-stack] stack member 1 renumber 2 inherit-config
Warning: The stack configuration of member ID 1 will be inherited to member ID 2 after the device resets. Continue? [Y/N]: y
[*SW02-stack] stack member 1 domain 100
[*SW02-stack] quit
[*SW02] commit
After stacking devices, a reboot is required. Description of the commands:
system-view - switch to privileged
sysname mode - indicate the hostname of the
committer commit - apply the changes made
stack - switch to the stack configuration mode
stack member priority <1-255> - set the priority for the switch
stack member domain <1-65535> - setting domain_ID
stack member renumber inherit-config - add a switch with a unique member_ID. Specifying inherit-config inherits the original stack configuration after restart, otherwise the configuration will be downloaded from the Master switch.
Note: if the switch with the slave role has the same ID as master, then master will assign a unique ID to the switch.
2. Stack Port Configuration
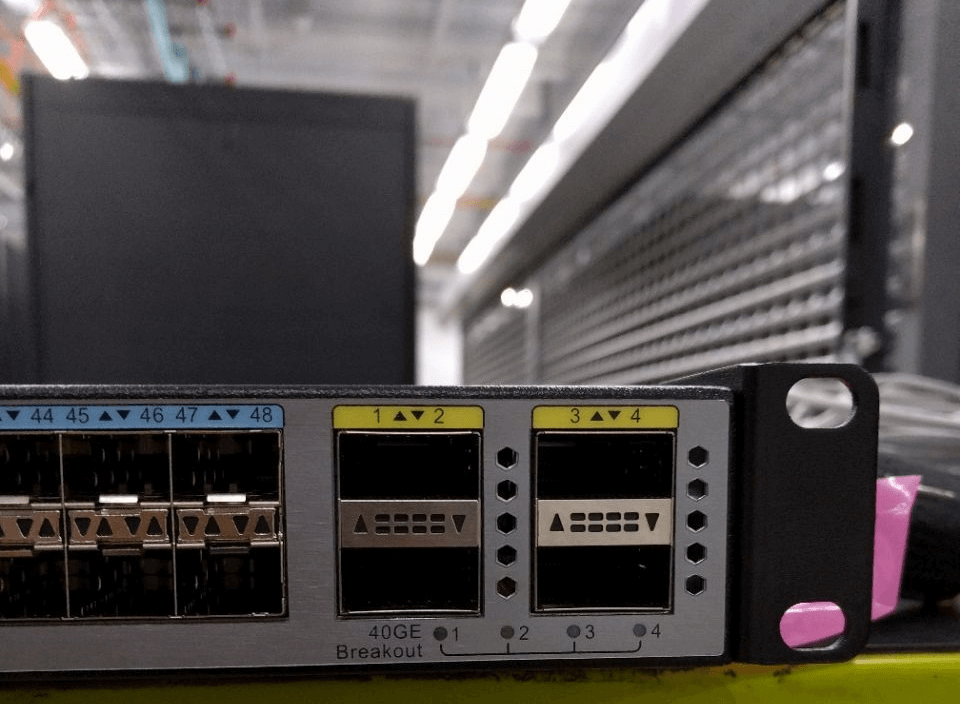
a. Port Configuration on Switch SW01
[SW01]interface stack-port 1/1
[SW01-stack-port1/1]port member-group interface 40GE 1/0/1 to 40GE 1/0/2
b. Port Configuration on the SW02 Switch
[SW02]interface stack-port 1/1
[SW02-stack-port1/1]port member-group interface 40GE 1/0/1 to 40GE 1/0/2
Description of commands:
interface stack-port / <1-2> - create a stack
member group port member-group interface 40GE to 40GE - add switch ports to the stack port
3. Verify the configuration
[SW01]display stack config
Oper          : Operation
Conf          : Configuration
*             : Offline configuration
Attribute Configuration:
-----------------------------------------
MemberID      Domain         Priority
Oper(Conf)   Oper(Conf)      Oper(Conf)
-----------------------------------------
1(1)         --(100)           100(150)
-----------------------------------------
Stack-Port Configuration:
------------------------------------------
Stack-Port      Member Ports
------------------------------------------
Stack-Port1/1   40GE1/0/1           40GE/1/0/2
-----------------------------------------
4. Saving configuration and rebooting devices
> save
Warning: The current configuration will be written to the device. Continue? [Y/N]: y
> reboot
Warning: The system will reboot. Continue? [Y/N]: y
5. Physical connection of stacking cables
Since we use two switches in our configuration, we perform the connection according to the Chain topology.
6. Configuration Check
> display stack
--------------------------------------------------------------------------------
MemberID Role MAC Priority DeviceType Description
--------------------------------------------------------------------------------
+1 Master 0004-yyyy-yyyy 150 CE6810-48S4Q-LI
2 Standby 0004-xxxx-xxxx 100 CE6810-48S4Q-LI
--------------------------------------------------------------------------------
+ indicates the device through which the user logs in.
To cat-guides To create an environment a la “IOS like”, it is possible to create aliases (pseudo-ones). Using aliases, it is possible to make a convenient environment and save time on entering commands for frequently used commands.
Command format alias
alias [parameter] command ""
- name - alias name
- parameter - list of parameters
- command - command for the alias
List of aliases we use
] command alias
-cmdalias] alias show command "display"
-cmdalias] alias exit command "quit"
-cmdalias] alias no command "undo"
-cmdalias] alias write command "save"
-cmdalias] alias config command "system-view"
View created aliases:
] display command alias
Delete unused aliases:
] command alias
-cmdalias] undo alias% alias
Comparison with Cisco
One of the most interesting choice points, but what are the differences from others? With Huawei's Analyze Product Advantages, we can find out what Huawei CE6810 can compare with the following models:
- Cisco Nexus 2K (N2K-C2348UPQ)
- Cisco Nexus (NEXUS 2248PQ)
Unfortunately, these models are Fabric Extenders, which can be controlled with the Cisco Nexus 5K and 7K, so do not take it into account, but take into account the Nexus 3K (Nexus 3172PQ), which is an analog of Huawei CE6851-48S6Q-HI.
Parameter | Nexus 3172PQ | Huawei CE6851-48S6Q-HI |
Switching capacity | 1.4 Tbps | 2.56 Tbps |
Forwarding performance | up to 1000 Mpps | 1080 Mpps |
10GE | 48 + 24 (QSFP + to SFP +) | 48 |
40GE | 6 | 6 |
L3 | + | + |
MAC | 288K | 288K |
VLAN | 4K | 4k |
IPv4 FIB | 16K / 16K | 16K / 128K |
IPv6 FIB | + | + |
FCoE | - | + |
VXLAN | - | + |
Cost | from $ 20,000 GPL | from $ 16,000 RPL |
Conclusion
For a long time, the engineering department of the VPS and IaaS team of the mCloduds.ru provider had a positive opinion on the Huawei CloudEngine line:
multifunctionality, efficient technical support service, a unit of which is present in Russia, ease of management and much more. This allows us to provide high accessibility to the computing environment of our customers.
For more information on the Huawei CloudEngine line and other solutions, you can contact us by e-mail info [at] mclouds.ru, we will be happy to help you :)