 March 14, 2017 at 11:16
Turning Ubuntu Server into a domain controller using samba-tool
- Transfer
What if the domain controller is needed, and I want to save? Today we will bring to your attention one of the answers to this question. We will talk about the Samba package, about Ubuntu Server, and how to quickly and correctly configure all this.

Using Samba, you can turn a server running Linux family of OS into a domain controller (Domain Controller, DC) Active Directory. The DC that we are going to raise will be able to work as a Windows NT4 domain controller. It is suitable for centralized data storage of user accounts and computers.
It should be noted that we will not talk about the task of creating a primary domain controller (Primary Domain Controller, PDC) Active Directory, although the Ubuntu Server / Samba bundle discussed here (with the addition of OpenLDAP) may well play such a role.
So, our goal is to quickly and economically acquire AD DC. An interactive tool will help us with this.
Let's start by installing the necessary software.
The first step is to install the Samba and Winbind packages on the server. You can do this with the following command:
The installation time is short, even taking into account the fact that the system may need to download some dependencies.
After installation, you can proceed to the settings.
Before starting,
Here
Next, you need to specify the host name for the server. As can be judged by the above file fragment
After the server reboots, you need to remove the existing file
The figure below shows the results of the execution of these commands, which can be used to delete unnecessary files. If such files do not exist in the system, you can immediately move on.
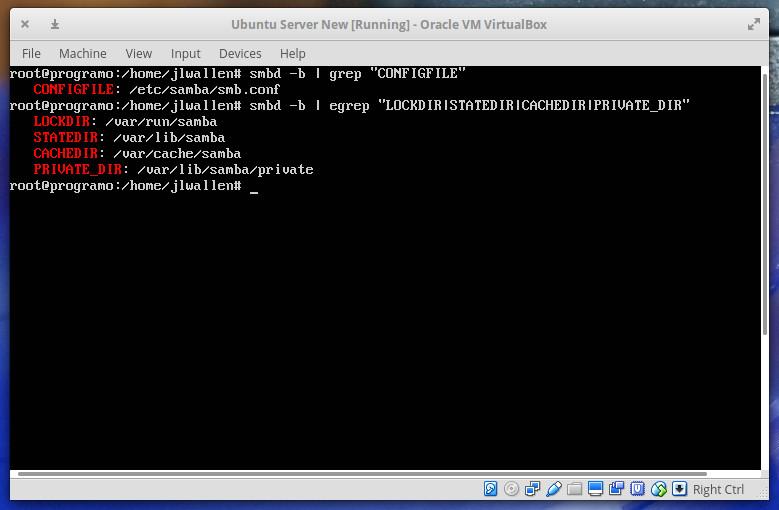
Search for files to be deleted
Now it's time to take advantage
By executing the command with the key
After the system receives answers to its questions, it will
Before proceeding, take care of registering users in Samba. This step is very important - otherwise users will not be able to authenticate. This is done with the following commands:
Here
We need him as the DNS server on the domain controller. In order to do this, edit the file
There are also settings for using the network interface with a static IP address. Please note that everything in CAPITAL letters must be configured in accordance with the parameters of your system.
After completing the settings, restart the network services with this command:
In addition, you should edit the file
Here, instead
Kerberos has its own standard configuration file, which must be replaced by the file
Please note that you may encounter a missing file in the system
The hardest part is behind. Now everything is ready to test the newly created Samba domain controller and connect to it. You can quickly check whether everything works, using the following command:
After entering the password for the Samba user, you should see a message about a successful connection.
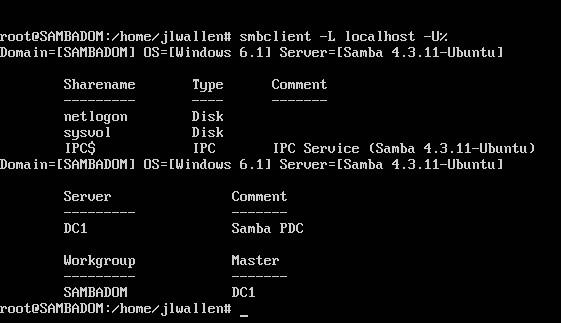
Successful connection
As you can see, during the scan
Now the domain controller is ready to accept connections. However, it may turn out that you have to edit the file
Dear readers! And what options for the interaction of Linux and Windows ecosystems seem most interesting and useful to you?
Using Samba, you can turn a server running Linux family of OS into a domain controller (Domain Controller, DC) Active Directory. The DC that we are going to raise will be able to work as a Windows NT4 domain controller. It is suitable for centralized data storage of user accounts and computers.
It should be noted that we will not talk about the task of creating a primary domain controller (Primary Domain Controller, PDC) Active Directory, although the Ubuntu Server / Samba bundle discussed here (with the addition of OpenLDAP) may well play such a role.
So, our goal is to quickly and economically acquire AD DC. An interactive tool will help us with this.
samba-tool, which is designed for automated preparation of the server for work, namely, it allows you to create a configuration file /etc/smb.conf. Let's start by installing the necessary software.
Installation
The first step is to install the Samba and Winbind packages on the server. You can do this with the following command:
sudo apt install samba libpam-winbindThe installation time is short, even taking into account the fact that the system may need to download some dependencies.
After installation, you can proceed to the settings.
Preparation for setup
Before starting,
samba-toolyou need to check the file /etc/hosts, namely, whether the fully qualified domain name and IP address of the domain controller recorded in it are correct. There you can find something like this:127.0.0.1 localhost.localdomain
IP_ADDRESS_OF_SERVER localhost
IP_ADDRESS_OF_SERVER SAMBADOM.EXAMPLE.NET
SAMBADOMHere
IP_ADDRESS_OF_SERVERis the real address of the Samba server. Check that the file contains current data. Next, you need to specify the host name for the server. As can be judged by the above file fragment
/etc/hosts, in our case the node name is - SAMBADOM. In order to configure it, open the file /etc/hostnameand modify it accordingly. Next - restart the server. After the server reboots, you need to remove the existing file
smb.conf, as well as - any database files Samba data (this .tdband .ldb-files). In order to find directories containing these files, run the following commands:mbd -b | grep "CONFIGFILE"
smbd -b | egrep "LOCKDIR|STATEDIR|CACHEDIR|PRIVATE_DIR"The figure below shows the results of the execution of these commands, which can be used to delete unnecessary files. If such files do not exist in the system, you can immediately move on.
Search for files to be deleted
Using samba-tool
Now it's time to take advantage
samba-tool. We will launch this tool interactively by running the following command:sudo samba-tool domain provision --use-rfc2307 --interactiveBy executing the command with the key
--use-rfc2307, we enable the NIS extensions. Samba-toolprompts you to configure the following parameters:Realm. This is the fully qualified DNS domain name that is configured in the filehosts. For example:SAMBADOM.EXAMPLE.NET.Domain. Samba NetBIOS domain name. Please note that the first part of the DNS domain name is recommended here. EgSAMBADOM.Server Role. This parameter is intended to indicate the type of server role. By default, the value is set heredc, it will suit us.DNS backend. This option allows you to configure the DNS server. Here we also leave the default parameter -SAMBA_INTERNAL.DNS forwarder IP address. This parameter allows you to specify the IP address of the DNS server to which requests that Samba server cannot resolve will be redirected. If you do not need to redirect DNS queries, do not enter anything in response to this question. Read more about this here .Administrator password. Here you must specify the password of the domain administrator.
After the system receives answers to its questions, it will
samba-toolconfigure Samba as a domain controller. You can view the file /etc/samba/smb.confand, if necessary, make changes to it. Before proceeding, take care of registering users in Samba. This step is very important - otherwise users will not be able to authenticate. This is done with the following commands:
smbpasswd -a USERNAME
smbpasswd -e USERNAME
Here
USERNAME is the name of the existing user to be added to Samba. You will only need to enter the password after entering the first command. The first command adds a new user and asks for a password for him; the second - activates the created account.DNS server setup
We need him as the DNS server on the domain controller. In order to do this, edit the file
/etc/network/interfaces, bringing it to this form:auto INTERFACE_NAME
iface INTERFACE_NAME inet static
address IP_ADDRESS_FOR_SERVER
netmask NETMASK
gateway GATEWAY
dns-nameservers IP_ADDRESS_FOR_SERVERThere are also settings for using the network interface with a static IP address. Please note that everything in CAPITAL letters must be configured in accordance with the parameters of your system.
After completing the settings, restart the network services with this command:
sudo service networking restartIn addition, you should edit the file
/etc/resolv.conf, making changes that are consistent with those mentioned above. Namely, here we are interested in the following line:nameserver IP_ADDRESS_FOR_SERVERHere, instead
IP_ADDRESS_FOR_SERVER, you need to enter the same address that was recorded in the parameter dns-nameserversabove.Configure Kerberos
Kerberos has its own standard configuration file, which must be replaced by the file
krb5.confgenerated during the preparation of Samba for work. To do this, run the following commands:sudo mv /etc/krb5.conf /etc/krb5.conf.orig
sudo ln -sf /var/lib/samba/private/krb5.conf /etc/krb5.confPlease note that you may encounter a missing file in the system
/etc/krb5.conf. If this is true, only the second of the above commands will suffice.Test and connect
The hardest part is behind. Now everything is ready to test the newly created Samba domain controller and connect to it. You can quickly check whether everything works, using the following command:
smbclient -L localhost -U%After entering the password for the Samba user, you should see a message about a successful connection.
Successful connection
As you can see, during the scan
smbclient, information about netlogonand sysvolhow about shared resources is displayed . They are created by default and must exist on a domain controller. In addition, you /var/lib/samba/sysvol/REALM/scriptsshould put any login scripts that clients need. Here, it REALMcorresponds to the parameter REALMthat was set during the work with the team samba-tool.Summary
Now the domain controller is ready to accept connections. However, it may turn out that you have to edit the file
/etc/samba/smb.conf, add data to it reflecting your server requirements. This generated file is samba-toolvery concise, although it is a good starting point for fine-tuning your AD DC, built on the basis of Samba and Ubuntu Server. Dear readers! And what options for the interaction of Linux and Windows ecosystems seem most interesting and useful to you?









