Quadstor - virtual SAN for public sector employees
About a year ago, I came across an article “50 tools for automating cloud infrastructure” that described tools for working with virtualization and flashed a tool called Quadstor in it. And recently, finally, hands have reached this wonderful software, and now I want to tell a little about it, what it is and what it is eaten with!
Quadstor is iSCSI-based storage virtualization. quadstor.com
And so that he can:
Quadstor runs on Linux and supports RHEL / CentOS, SLES, and Debian.
The most interesting features are HA (High Availability), high availability (synchronous mirroring), it can be: Active-Active, Active-Pasive. And also support for ZFS , which is very convenient if you use a regular PC with several disks and without hardware RAID.
Installing and configuring Quadstor is simple and does not require “dancing with tambourines.”
And now I will describe the installation and configuration of Quadstor using the example of OS CentOS 7.
At the same time, on the server, one disk or partition must be unformatted and unallocated (raw).
Install packages for convenience and work:
Install the packages necessary for QUADStor to work:
Next, disable selinux. Using vi nano or mc, open the file / etc / selinux / config
and set SELINUX = disabled. We do reboot. Download the QUADStor distribution. At the moment, the latest version is 3.2.11, and install:
If everything went well, the installation process passes without errors, and if there is not enough package, then during the installation there will be errors and the installer will indicate which packages are missing.
QUADStor has a web-based interface and uses apache for this. You do not need to configure it especially, just install it at startup and install “ServerName”. We go in / etc / httpd / conf / and open the httpd.conf file. We find the lines starting on ServerName, remove the comment sign (#) and change:
If you want to configure authentication / authorization (SSL) for the QUADStor web-interface, then this is easily done using the Apache web server. And such a setting can be easily found on the Internet or on the QUADStor website .
We start the quadstor and apache service and turn it on at startup.
If you leave firewallD (CentOS 7) enabled, then you need to register the ports:
Using a browser, we go to the server at the ip address http: // <QUADStor address> The
web interface is very simple and contains only 4 menu items:

1. System An
item in which general information: server name, QUADStor version, server status, service restart buttons and the system as a whole, as well as a button that allows you to generate a log of QUADStor and save it to your PC.
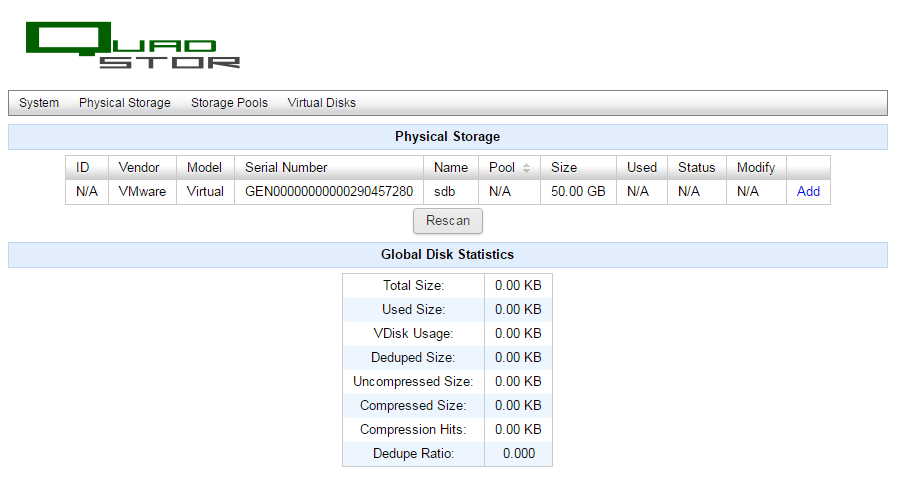
2. Physical Storage
A list of disks that can be added to the general disk pool, as well as global disk statistics: size, use of deduplication, compression, etc.
3. Storage Pools
In this section, we create a disk pool and give it a name, as well as inclusion logging and deduplication.
4. Virtual Disks
This section focuses on the almost basic settings of virtual disks: create virtual disks and include them in the disk pool, enable / disable compression, deduplication, verification, as well as High Availability mirroring and iSCSI settings.
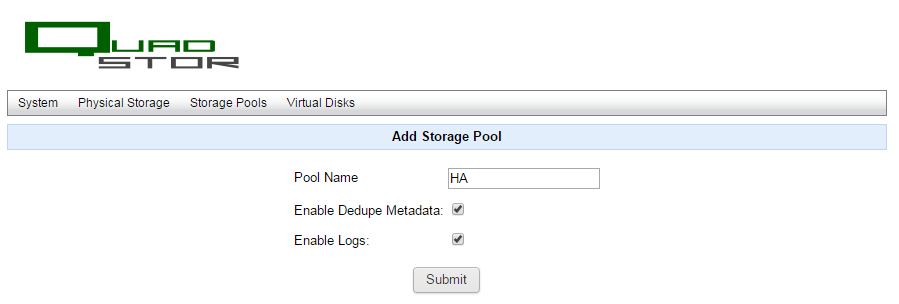
To create a virtual disk, first you need to create a disk pool. We go to the menu item "Storage Pools", click on the button "Add Pool".
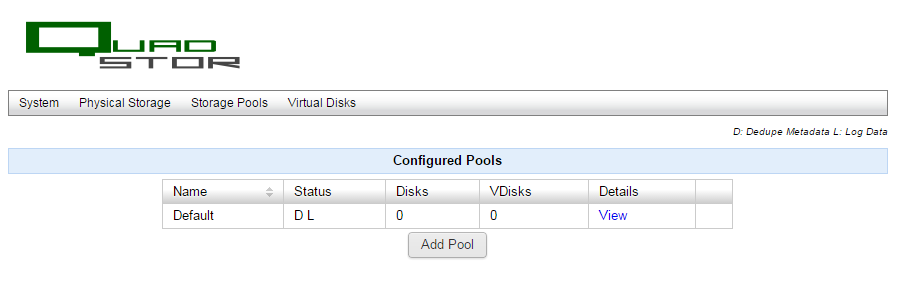
Give a name to the disk pool (for example, HA) and put a checkmark in front of “Enable Dedupe Metadata” and “Enable Logs” and click the “Submit” button.
Next, go to “Physical Storage” and on the free disk click the “Add” link.
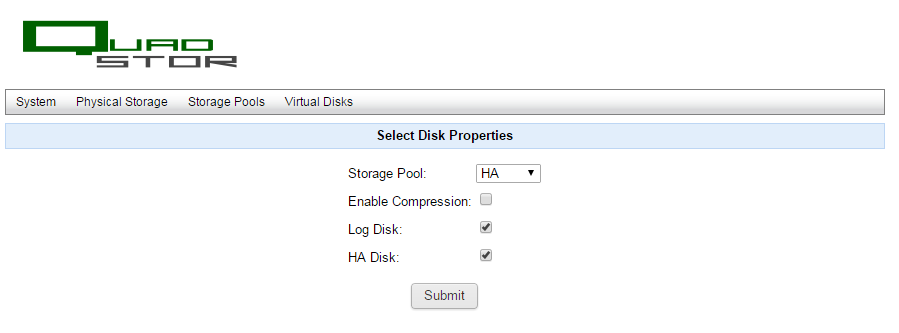
Choose the name of the pool to which we want to bind a physical disk. Check the box “Log Disk” (Enable Log) and “HA Disk” (Enable HA).
“Enable Compression” - enable data compression. You can enable it if you want to save space, but compression requires a powerful processor and a lot of RAM (min 4GB). If there is a weak PC or server, then writing / reading will slow down.
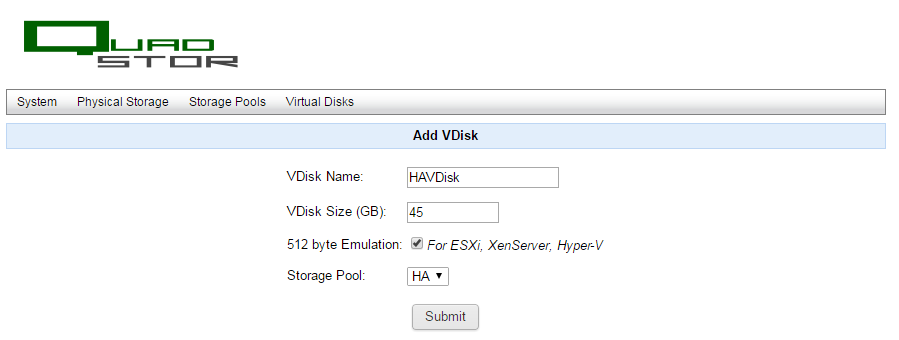
The final step is to create a virtual disk.
We go into the "Virtual Disks" and click "Add Vdisk". Set the name of the virtual disk (any - for example: HAVDisk). We set the disk size in GB (but not larger than the size of the physical disk). Specify the pool in which we want to create the virtual disk. And click "Submit".
If you use only one node, the disk creation process is completed and now it can be connected to any server via iSCSI.
HA (High Availability) requires two physical or virtual servers with two network interfaces, some network interfaces look at a common or public network, while others are only connected for synchronization.
To configure the HA cluster, do two nodes according to the instructions above. We configure a separate network for nodes so that there is synchronization.
Node1
Name: vm-qs1
lan1 - 10.5.113.207 - shared network (public network)
lan2 - 192.168.0.1 - internal network (jumper between nodes)
Node2
Name: vm-qs1
lan1 - 10.5.113.208 - shared network (public network)
lan2 - 192.168.0.2 - internal network (jumper between nodes)
The addresses 10.5.113.207 and 10.5.113.208 will connect the server via iscsi. The addresses 192.168.0.1 and 192.168.0.2 enable synchronization of nodes.
To enable synchronization, on each node we create the file /quadstor/etc/ndrecv.conf - we write RecvAddr = 192.168.0.1 in this file # For node1
RecvAddr = 192.168.0.2 # For node2
This means that we enable synchronization by the ip address on the node. Next, restart the quadstor service.
Now, using a browser, go to one of the nodes (for example vm-qs1) at 10.5.113.207 and create a virtual disk (as described above), and on the second node (ip-10.5.113.208) create only “Storage Pools” and “Physical Storage. " All actions (names and settings) must exactly match the first node. You do not need to create a virtual disk on the second node. It is created automatically when mirroring is configured. After that, on the first node, go to “Virtual Disks” and on the virtual disk click the “Modify” link.
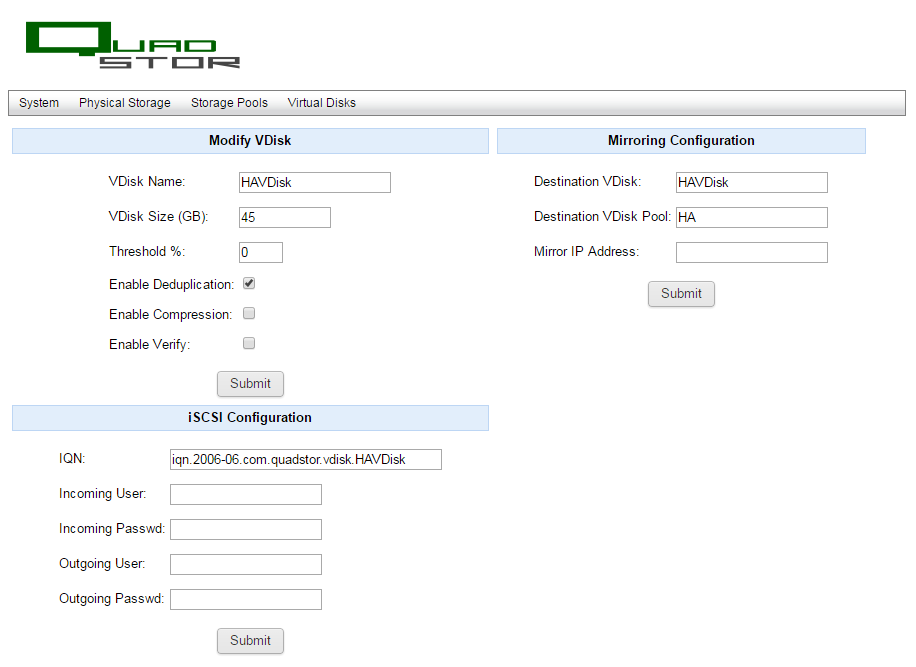
And before us opens all the settings of the virtual disk. We can enable / disable: deduplication, compression and verification. And also we can configure the login and password for the iSCSI client. And most importantly, specify the second node for mirroring.
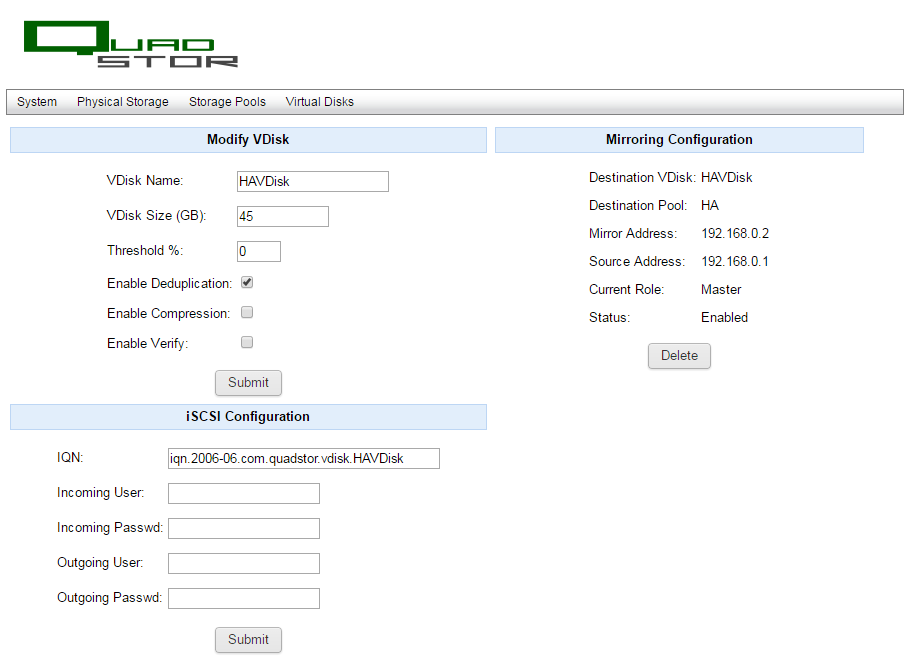
In the line “Mirror IP Address” indicate the IP address of the second node 192.168.0.2 (IP address for synchronization) And click “Submit”. If everything is successful, then in the line we will see “Mirror Address”, “Source Address”, “Curent Role” and “Status”.
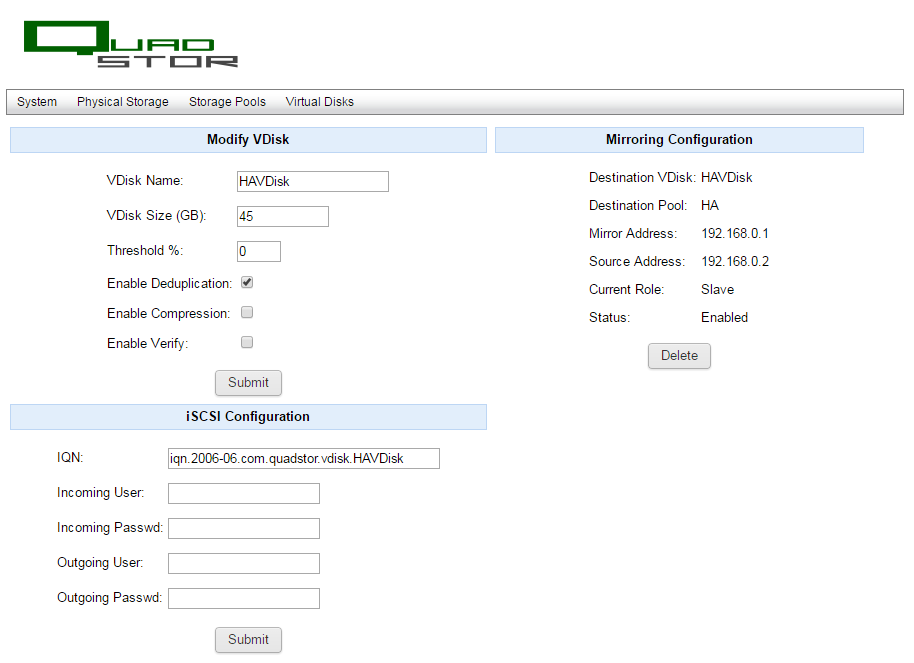
On the second node in Virtual Disks, a virtual disk will be created automatically. We click on the “Modify” link and there are the same settings as on the first node, but only vice versa.
HA mirroring is configured and now you can connect the disk to servers at addresses 10.5.113.207 and 10.5.113.208. On the client, you will need to configure iSCSI multipath (support for multipath drives).
Now it remains to make another important setting. The fact is that if one of the nodes "crashes", then the entire virtual disk on the client will fall off. To prevent this from happening, you need to enable “ignore mirror fall” on the nodes. First, go to the first node (vm-qs1) via ssh and give the command (from root)
Then we go to the second node (vm-qs2) via ssh and give the command (from root)
Now the nodes will not control each other’s “fall”, and if one of the nodes “falls” then the second one will not disconnect, but will seize the initiative of the virtual disk operation on itself.
To see the operating mode, you can give a command.
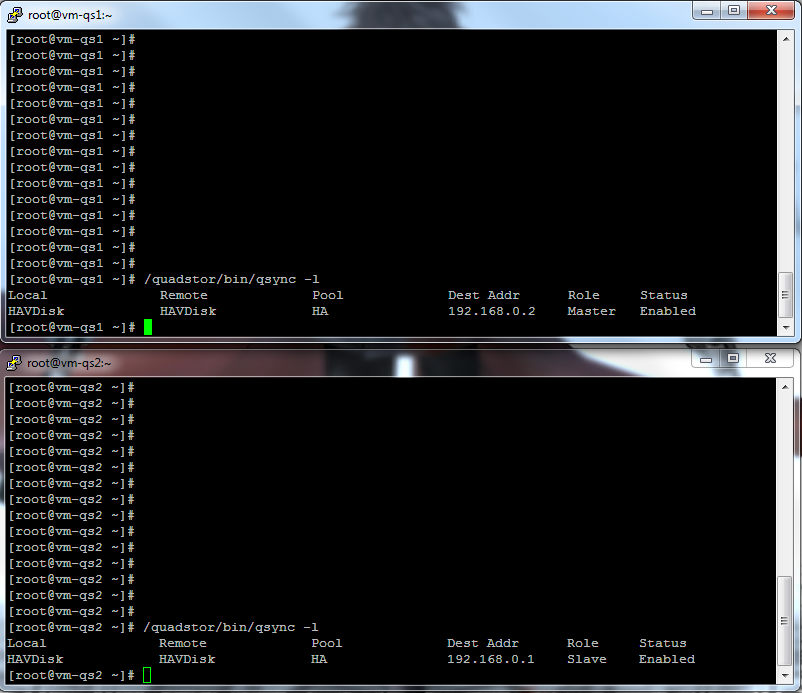
As soon as the "fallen" node is restored, data synchronization will begin and this can be seen using the command
That's probably all. In the next post I will try to compare the performance of Quadstor HA and StarWind HA.
Quadstor is iSCSI-based storage virtualization. quadstor.com
And so that he can:
- Support virtual disks over Fiber Channel, iSCSI or locally.
- Thin disks (Thin Provisioning)
- Data deduplication
- High Availability
- Support for VAAI (Hardware Acceleration)
- Cluster support for Windows server 2012, Hyper-V, VMware
- ZFS support
- And most importantly - it’s free (well, support for the money).
- Virtual disk size up to 64Tb.
Quadstor runs on Linux and supports RHEL / CentOS, SLES, and Debian.
The most interesting features are HA (High Availability), high availability (synchronous mirroring), it can be: Active-Active, Active-Pasive. And also support for ZFS , which is very convenient if you use a regular PC with several disks and without hardware RAID.
Installing and configuring Quadstor is simple and does not require “dancing with tambourines.”
And now I will describe the installation and configuration of Quadstor using the example of OS CentOS 7.
At the same time, on the server, one disk or partition must be unformatted and unallocated (raw).
Install Quadstor
Install packages for convenience and work:
yum update && yum upgrade
yum install epel-release
yum install mc wget unzip bash-completion screen htop logwatch net-tools
Install the packages necessary for QUADStor to work:
yum install httpd gcc perl kernel-devel sg3_utils iotop sysstat lsscsi
yum install fence-agents
Next, disable selinux. Using vi nano or mc, open the file / etc / selinux / config
and set SELINUX = disabled. We do reboot. Download the QUADStor distribution. At the moment, the latest version is 3.2.11, and install:
wget http://www.quadstor.com/virtentdub3z/quadstor-virt-3.2.11-rhel.x86_64.rpm
rpm -i quadstor-virt-3.2.11-rhel.x86_64.rpm
If everything went well, the installation process passes without errors, and if there is not enough package, then during the installation there will be errors and the installer will indicate which packages are missing.
QUADStor has a web-based interface and uses apache for this. You do not need to configure it especially, just install it at startup and install “ServerName”. We go in / etc / httpd / conf / and open the httpd.conf file. We find the lines starting on ServerName, remove the comment sign (#) and change:
ServerName localhost:80If you want to configure authentication / authorization (SSL) for the QUADStor web-interface, then this is easily done using the Apache web server. And such a setting can be easily found on the Internet or on the QUADStor website .
We start the quadstor and apache service and turn it on at startup.
systemctl start httpd
systemctl start quadstor
chkconfig httpd on
chkconfig quadstor on
If you leave firewallD (CentOS 7) enabled, then you need to register the ports:
firewall-cmd --permanent --add-port=22/tcp
firewall-cmd --permanent --add-port=25/tcp
firewall-cmd --permanent --add-port=80/tcp
firewall-cmd --permanent --add-port=443/tcp
firewall-cmd --permanent --add-port=8090/tcp
firewall-cmd --permanent --add-port=8091/tcp
firewall-cmd --permanent --add-port=860/tcp
firewall-cmd --permanent --add-port=3260/tcp
firewall-cmd --permanent --add-port=3261/tcp
firewall-cmd --permanent --add-port=9950/tcp
firewall-cmd --permanent --add-port=9951/tcp
firewall-cmd --permanent --add-port=9952/tcp
firewall-cmd --permanent --add-port=9953/tcp
firewall-cmd --permanent --add-port=9954/tcp
firewall-cmd --permanent --add-port=9955/tcp
firewall-cmd --permanent --add-port=9956/tcp
firewall-cmd --reload
firewall-cmd --permanent --list-all
QUADStor Web Interface
Using a browser, we go to the server at the ip address http: // <QUADStor address> The
web interface is very simple and contains only 4 menu items:
1. System An
item in which general information: server name, QUADStor version, server status, service restart buttons and the system as a whole, as well as a button that allows you to generate a log of QUADStor and save it to your PC.
2. Physical Storage
A list of disks that can be added to the general disk pool, as well as global disk statistics: size, use of deduplication, compression, etc.
3. Storage Pools
In this section, we create a disk pool and give it a name, as well as inclusion logging and deduplication.
4. Virtual Disks
This section focuses on the almost basic settings of virtual disks: create virtual disks and include them in the disk pool, enable / disable compression, deduplication, verification, as well as High Availability mirroring and iSCSI settings.
To create a virtual disk, first you need to create a disk pool. We go to the menu item "Storage Pools", click on the button "Add Pool".
Give a name to the disk pool (for example, HA) and put a checkmark in front of “Enable Dedupe Metadata” and “Enable Logs” and click the “Submit” button.
Next, go to “Physical Storage” and on the free disk click the “Add” link.
Choose the name of the pool to which we want to bind a physical disk. Check the box “Log Disk” (Enable Log) and “HA Disk” (Enable HA).
“Enable Compression” - enable data compression. You can enable it if you want to save space, but compression requires a powerful processor and a lot of RAM (min 4GB). If there is a weak PC or server, then writing / reading will slow down.
The final step is to create a virtual disk.
We go into the "Virtual Disks" and click "Add Vdisk". Set the name of the virtual disk (any - for example: HAVDisk). We set the disk size in GB (but not larger than the size of the physical disk). Specify the pool in which we want to create the virtual disk. And click "Submit".
If you use only one node, the disk creation process is completed and now it can be connected to any server via iSCSI.
Configuring QUADStor High Availability
HA (High Availability) requires two physical or virtual servers with two network interfaces, some network interfaces look at a common or public network, while others are only connected for synchronization.
To configure the HA cluster, do two nodes according to the instructions above. We configure a separate network for nodes so that there is synchronization.
Node1
Name: vm-qs1
lan1 - 10.5.113.207 - shared network (public network)
lan2 - 192.168.0.1 - internal network (jumper between nodes)
Node2
Name: vm-qs1
lan1 - 10.5.113.208 - shared network (public network)
lan2 - 192.168.0.2 - internal network (jumper between nodes)
The addresses 10.5.113.207 and 10.5.113.208 will connect the server via iscsi. The addresses 192.168.0.1 and 192.168.0.2 enable synchronization of nodes.
To enable synchronization, on each node we create the file /quadstor/etc/ndrecv.conf - we write RecvAddr = 192.168.0.1 in this file # For node1
echo "RecvAddr=192.168.0.1" > /quadstor/etc/ndrecv.confRecvAddr = 192.168.0.2 # For node2
echo "RecvAddr=192.168.0.2" > /quadstor/etc/ndrecv.confThis means that we enable synchronization by the ip address on the node. Next, restart the quadstor service.
systemctl stop quadstor
systemctl start quadstor
Now, using a browser, go to one of the nodes (for example vm-qs1) at 10.5.113.207 and create a virtual disk (as described above), and on the second node (ip-10.5.113.208) create only “Storage Pools” and “Physical Storage. " All actions (names and settings) must exactly match the first node. You do not need to create a virtual disk on the second node. It is created automatically when mirroring is configured. After that, on the first node, go to “Virtual Disks” and on the virtual disk click the “Modify” link.
And before us opens all the settings of the virtual disk. We can enable / disable: deduplication, compression and verification. And also we can configure the login and password for the iSCSI client. And most importantly, specify the second node for mirroring.
In the line “Mirror IP Address” indicate the IP address of the second node 192.168.0.2 (IP address for synchronization) And click “Submit”. If everything is successful, then in the line we will see “Mirror Address”, “Source Address”, “Curent Role” and “Status”.
On the second node in Virtual Disks, a virtual disk will be created automatically. We click on the “Modify” link and there are the same settings as on the first node, but only vice versa.
HA mirroring is configured and now you can connect the disk to servers at addresses 10.5.113.207 and 10.5.113.208. On the client, you will need to configure iSCSI multipath (support for multipath drives).
Now it remains to make another important setting. The fact is that if one of the nodes "crashes", then the entire virtual disk on the client will fall off. To prevent this from happening, you need to enable “ignore mirror fall” on the nodes. First, go to the first node (vm-qs1) via ssh and give the command (from root)
/quadstor/bin/qmirrorcheck -a -t ignore -r 192.168.0.2Then we go to the second node (vm-qs2) via ssh and give the command (from root)
/quadstor/bin/qmirrorcheck -a -t ignore -r 192.168.0.1Now the nodes will not control each other’s “fall”, and if one of the nodes “falls” then the second one will not disconnect, but will seize the initiative of the virtual disk operation on itself.
To see the operating mode, you can give a command.
/quadstor/bin/qsync -lAs soon as the "fallen" node is restored, data synchronization will begin and this can be seen using the command
/quadstor/bin/qsync -lThat's probably all. In the next post I will try to compare the performance of Quadstor HA and StarWind HA.