 February 21, 2017 at 21:09
Managing application state with Vuex
- Tutorial

When creating a web application, at some point we ask ourselves a question - how to manage its state? Vue provides us with a way to manage it within one component, the approach is very simple, and it works great. But what if the application has many components that must have access to the same data? One solution to this problem is Vuex, a tool for centralized state management. In this article we will look at what it consists of and how to use it.
What is Vuex?
The official documentation for Vuex is described as follows:
Vuex is a state management pattern and library for applications on Vue.js. It serves as the central data warehouse for all application components and provides predictability of data changes using certain rules.
The following scheme will help to better understand the location of Vuex in the application:
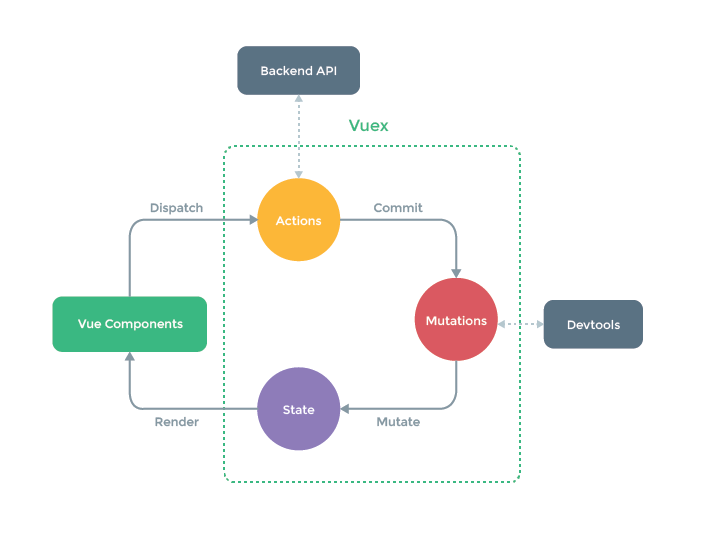
As you can see, the storage becomes a kind of connecting link for all other parts of the application. A detailed description of this is in the documentation, ( including in Russian ), the purpose of this article will be a quick dive.
In order to start using Vuex we need to connect it to our project - this can be done through npm, or just connect the library with cdnjs . We will not focus on this, but proceed immediately to the creation of a basic repository:
Vue.use(Vuex)
const store = new Vuex.Store({
    state: {},
    actions: {},
    mutations: {},
    getters: {},
    modules: {}
})
The storage consists of five objects, each of which plays a certain logical role in the application. Let's consider them in order.
State
Here we define the data structure of our application, and we can also specify default values. In order not to be unfounded, let's decide that we will write an application for notes. Accordingly, you need to put an array with notes in the repository:
state: {
    notes: []
}
Actions
This part declares methods that will cause any changes to the repository. Here we can make a request to the server, and after receiving the response, cause a state change. Actions can be called from components using the dispatch method. We will still see it in action, but for now just add a method to add a note. Since we do not have a server, it will contain only the following:
actions: {
    addNote({commit}, note) {
        commit('ADD_NOTE', note)
    }
}
commit is a way to cause a mutation, a state change. The naming of mutations with capital letters is not mandatory, but it makes sense - if such a method name is found in the code, we can be sure of its purpose (it changes state).
Mutations
In mutations, the state changes. There cannot be asynchronous function calls, calculations, etc. - only a change in state. In our example with the addition of a note, it will look something like this:
mutations: {
    ADD_NOTE(state, note) {
        state.notes.push(note)
    }
}
Getters
In order to use the data stored in the storage, you need to get it out of there. And often we need not just data, but only part of them - we want to apply some filters to them. Getters give us this opportunity. In the basic version, we can simply return notes in the form in which they are:
getters: {
    notes(state) {
        return state.notes
    }
}
Modules
As the application grows, storage increases and the ability to break it into pieces becomes more and more popular. Modules allow you to split a single repository into several repositories, but at the same time store them as a single repository tree.
const moduleA = { state: {}, mutations: {}, actions: {}, getters: {} }
const moduleB = { state: {}, mutations: {}, actions: {}, getters: {} }
const store = new Vuex.Store({
    modules: {
        a: moduleA,
        b: moduleB
    }
})
store.state.a // -> состояние модуля moduleA
store.state.b // -> состояние модуля moduleB
You can read more about modules and namespaces in the documentation .
We pass from words to deeds
Having figured out what Vuex consists of, we’ll put together our mini-application. First, combine the five parts discussed above in the repository and pass it as an argument to the Vue object in order to use it. Storage will be available through this. $ Store and in child components. You will also need the addNew method to add a new note. Pay attention to the use of the getter and the dispatch method for working with storage.
const store = new Vuex.Store({
    state: {
        notes: []
    },
    actions: {
        addNote({commit}, note) {
            commit('ADD_NOTE', note)
        }
    },
    mutations: {
        ADD_NOTE(state, note) {
            state.notes.push(note)
        }
    },
    getters: {
        notes(state) {
            return state.notes
        }
    }
})
new Vue({
    el: '#app',
    store,
    computed: {
        notes() {
            return this.$store.getters.notes;
        }
    },
    methods: {
        addNew() {
            this.$store.dispatch('addNote', { text: 'новая заметка' })
        }
    }
})
Thus, we made the simplest application that allows you to add and store notes. It remains to add markup to display them on the page. The source code is available in the codepen sandbox .
Conclusion
We examined the Vuex device and a basic example of its use. As you can see, the tool is simple and intuitive. But you need to understand its scope. When creating a simple application, such as what we wrote above, using Vuex seems redundant, but as the application grows, it can become an indispensable tool in managing state.
Documentation in English
Documentation in Russian









