OSSI Protocol and Avaya Communication Manager
In this article I will try to talk in detail about using the OSSI protocol to interact with the Avaya Communication Manager PBX. There is very little information on this topic in the public domain, and in the Russian segment everything is limited to a superficial article on Habré for 2013. It is necessary to eliminate this injustice.
The OSSI protocol (Operations Support Systems Interface) is used in Avaya products for the interaction of various add-on modules with the main PBX module, in this case Communication Manager. You can access it by simply selecting the correct terminal type during connection to the server.
Two types of terminal deserve major attention: ossi and ossimt . The first type is used for direct work with CM, obtaining information and making changes to the PBX settings. The second type is used to match the identifier of the field used in the first type with its actual purpose. This is necessary because in different versions of CM different identifiers are used and in advance to find out what’s not possible.
Standard ossi terminal output:

This type is characterized by the fact that the characters typed in the terminal are not displayed and are not deleted.
Standard output of the ossimt terminal:
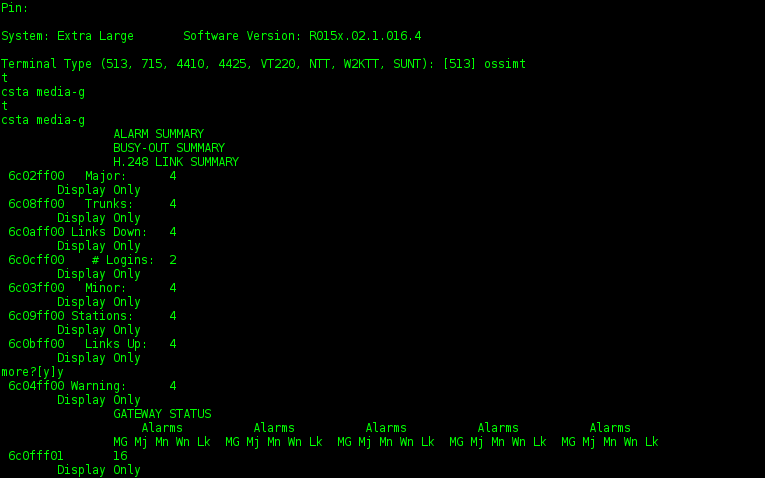
Protocol interaction is performed by transmitting strings of a certain type. The type of line is determined by the pointer, substituted at the beginning of the line. List of these pointers:
Input and output of information in the terminal is performed in the following format:
Those. each line ends with a linefeed character (pressing Enter) and inside lines of type field and data elements are separated by a tab character (pressing Tab).
Let's take a closer look at the first 3 types of lines:
This line should contain a command to execute. In general, the commands are identical to the commands used in standard administration in the terminal. Call the entire list of available commands by typing:
This line lists the field identifiers for the entered command. Separation between fields is carried out by a tab character. These identifiers are written in the HEX format, and to understand which field corresponds to what, you need to contact ossimt . There can be several lines of this type, depending on the amount of information transmitted by the command.
This line lists data related to the corresponding fields specified in the line of the previous type. Data is also separated by tabs. Keep in mind that the number of lines of this type must be a multiple of the number of lines of type field.
Lines such as field and data are mainly used to display information after entering a command, but in addition they can be used when making changes to the system (e.g. change station XXXX ), or when outputting a command that accepts additional parameters (e.g. display alarms ). It is enough only after the command line to add these lines, indicating in them the corresponding fields and data that you want to change.
For example, typing in the terminal:
We will change the extension name for IC Wiener for extension 1000.
Strictly speaking, there are several terminals such as ossi . I know at least 3: ossi , ossi3 , ossis . There is not much difference between them. Of the visible features, only that ossis, when outputting the result of a command, does not return a string with the command itself.
Everything described, of course, is good. But how can this protocol be used for good? Well, for example, you can make some kind of monitoring. For example, consider monitoring media gateways.
The regular status media-gateways and Python command will help us with this .
Step 1: connect and get information.
Now we have the information in the form of a line with which we can create anything.
Step 2: parse the received information.
We need to separate the available information depending on the types of lines indicated above. Because the number of lines of one type can be several, we need to take into account their sequence.
As a result of these actions, we get the following parse variable:
Step 3: match the fields and data.
Finally, we need to map the field identifier to a specific value from the data.
As a result, we get a dictionary in which the field identifier is used as the key, and the data corresponding to this field is used as the value.
Final: PROFIT
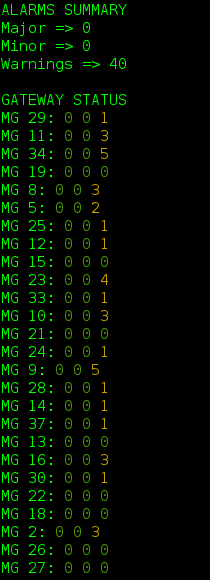
So, we have a dictionary that contains all the information on the status of media gateways. We can only find out what identifier that means. This is done, as we recall, using ossimt . For example, the fields major alarms , minor alarms , warnings correspond to identifiers 6c02ff00 , 6c03ff00 , 6c04ff00 . We are looking for them in our dictionary and understand that we do not have a single serious error and “only” 40 warnings. You can live.
Having worked a little with the obtained data, you can get quite suitable monitoring of media gateways available directly from the terminal. For example, we can get this picture:
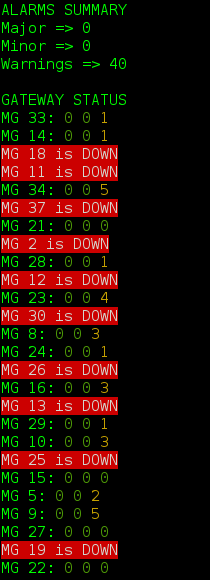
And if you're not lucky, then this one:
For convenience, I developed a small class for working with this protocol, you can see it here .
Theory
The OSSI protocol (Operations Support Systems Interface) is used in Avaya products for the interaction of various add-on modules with the main PBX module, in this case Communication Manager. You can access it by simply selecting the correct terminal type during connection to the server.
Two types of terminal deserve major attention: ossi and ossimt . The first type is used for direct work with CM, obtaining information and making changes to the PBX settings. The second type is used to match the identifier of the field used in the first type with its actual purpose. This is necessary because in different versions of CM different identifiers are used and in advance to find out what’s not possible.
Standard ossi terminal output:
This type is characterized by the fact that the characters typed in the terminal are not displayed and are not deleted.
Standard output of the ossimt terminal:
Protocol interaction is performed by transmitting strings of a certain type. The type of line is determined by the pointer, substituted at the beginning of the line. List of these pointers:
- c (command) - pointer to a string containing an executable command;
- f (field) - pointer to a string containing field identifiers;
- d (data) - pointer to the line containing the data, in accordance with the field;
- e (error) - pointer to the line containing the error message;
- t (terminate) - pointer to the end of input / output of information
Input and output of information in the terminal is performed in the following format:
с<команда>[RETURN]

f<поле 1>[TAB]<поле 2>[TAB]<поле 3>[RETURN]

d<данные 1>[TAB]<данные 2>[TAB]<данные 3>[RETURN]

t[RETURN]
Those. each line ends with a linefeed character (pressing Enter) and inside lines of type field and data elements are separated by a tab character (pressing Tab).
Let's take a closer look at the first 3 types of lines:
c (command)
This line should contain a command to execute. In general, the commands are identical to the commands used in standard administration in the terminal. Call the entire list of available commands by typing:
chelp

t
f (field)
This line lists the field identifiers for the entered command. Separation between fields is carried out by a tab character. These identifiers are written in the HEX format, and to understand which field corresponds to what, you need to contact ossimt . There can be several lines of this type, depending on the amount of information transmitted by the command.
d (data)
This line lists data related to the corresponding fields specified in the line of the previous type. Data is also separated by tabs. Keep in mind that the number of lines of this type must be a multiple of the number of lines of type field.
Lines such as field and data are mainly used to display information after entering a command, but in addition they can be used when making changes to the system (e.g. change station XXXX ), or when outputting a command that accepts additional parameters (e.g. display alarms ). It is enough only after the command line to add these lines, indicating in them the corresponding fields and data that you want to change.
For example, typing in the terminal:
сcha st 1000

f8003ff00

dI.C. Wiener

t
We will change the extension name for IC Wiener for extension 1000.
Strictly speaking, there are several terminals such as ossi . I know at least 3: ossi , ossi3 , ossis . There is not much difference between them. Of the visible features, only that ossis, when outputting the result of a command, does not return a string with the command itself.
Practice
Everything described, of course, is good. But how can this protocol be used for good? Well, for example, you can make some kind of monitoring. For example, consider monitoring media gateways.
The regular status media-gateways and Python command will help us with this .
Step 1: connect and get information.
import telnetlib
tn = telnetlib.Telnet('127.0.0.1', '5023') # Подключаемся по телнету на стандартный порт 5023
tn.read_until('login'.encode()) # Ждем прихода строки с вводом логина
tn.write('username\n'.encode())
tn.read_until('Password'.encode()) # Ждем прихода строки с вводом пароля
tn.write('password\n'.encode())
tn.read_until('Pin'.encode()) # Ждем прихода строки с вводом пин-кода
tn.write('pin\n'.encode())
tn.read_until('Terminal'.encode()) # Ждем прихода строки с вводом типа терминала
tn.write('ossi\n'.encode())
tn.read_until('t\n'.encode()) # Ждем прихода строки с идентификатором окончания ввода\вывода
# Как только идентификатор пришел, можно слать команду
tn.write('csta media-g\n'.encode()) # Строка типа command
tn.write('t\n'.encode()) # Строка типа terminate
output = tn.read_until('t\n'.encode()) # Записываем всю информацию, пока не придет terminate.
output = output.decode('utf-8') # Конвертируем пришедшие байты в строку
Now we have the information in the form of a line with which we can create anything.
output
'\ncsta media-g\nf6c02ff00\t6c08ff00\t6c0aff00\t6c0cff00\t6c03ff00\nf6c09ff00\t6c0bff00\t6c04ff00\t6c0fff01\t6c0fff02\nf6c0fff03\t6c0fff04\t6c0fff05\t6c0fff06\t6c0fff07\nf6c0fff08\t6c10ff09\t6c10ff0a\t6c10ff0b\t6c10ff0c\nf6c10ff0d\t6c10ff0e\t6c10ff0f\t6c10ff10\t6c11ff11\nf6c11ff12\t6c11ff13\t6c11ff14\t6c11ff15\t6c11ff16\nf6c11ff17\t6c11ff18\t6c12ff19\t6c12ff1a\t6c12ff1b\nf6c12ff1c\t6c12ff1d\t6c12ff1e\t6c12ff1f\t6c12ff20\nf6c13ff21\t6c13ff22\t6c13ff23\t6c13ff24\t6c13ff25\nf6c13ff26\t6c13ff27\t6c13ff28\nd0\t0\t0\t01\t0\nd0\t26\t40\t2 0| 0| 3|up\t5 0| 0| 2|up\nd8 0| 0| 3|up\t9 0| 0| 5|up\t10 0| 0| 3|up\t11 0| 0| 3|up\t12 0| 0| 1|up\nd13 0| 0| 0|up\t14 0| 0| 1|up\t15 0| 0| 0|up\t16 0| 0| 3|up\t180| 0| 0|up\nd19 0| 0| 0|up\t21 0| 0| 0|up\t22 0| 0| 0|up\t23 0| 0| 4|up\t24 0| 0| 1|up\nd25 0| 0| 1|up\t26 0| 0| 0|up\t27 0| 0| 0|up\t28 0| 0| 1|up\t29 0| 0| 1|up\nd30 0| 0| 1|up\t33 0| 0| 1|up\t34 0| 0| 5|up\t37 0| 0| 1|up\t\nd\t\t\t\t\nd\t\t\t\t\nd\t\t\nt\n'
Step 2: parse the received information.
We need to separate the available information depending on the types of lines indicated above. Because the number of lines of one type can be several, we need to take into account their sequence.
fields = {} # словарь для хранения полей
data = {} # словарь для хранения данных
lines = output.split('\n') # разделяем построчно
for line in lines: # проходимся по строкам и заносим в соответствующий словарь
    if line.startswith('d'): # строка типа data
        data.update({
            len(data): line[1:] # Ключом словаря делаем номер строки
	})
    elif line.startswith('f'): # строка типа field
        fields.update({
	    len(fields): line[1:]
	})
    elif line.startswith('t'): # строка terminate
	break
    else: # остальные типа строк нам не интересны
	pass
parse = {
    'fields': fields,
    'data': data,
}
As a result of these actions, we get the following parse variable:
parse
{
    'fields': {
        0: '6c02ff00\t6c08ff00\t6c0aff00\t6c0cff00\t6c03ff00',
        1: '6c09ff00\t6c0bff00\t6c04ff00\t6c0fff01\t6c0fff02',
        2: '6c0fff03\t6c0fff04\t6c0fff05\t6c0fff06\t6c0fff07',
        3: '6c0fff08\t6c10ff09\t6c10ff0a\t6c10ff0b\t6c10ff0c',
        4: '6c10ff0d\t6c10ff0e\t6c10ff0f\t6c10ff10\t6c11ff11',
        5: '6c11ff12\t6c11ff13\t6c11ff14\t6c11ff15\t6c11ff16',
        6: '6c11ff17\t6c11ff18\t6c12ff19\t6c12ff1a\t6c12ff1b',
        7: '6c12ff1c\t6c12ff1d\t6c12ff1e\t6c12ff1f\t6c12ff20',
        8: '6c13ff21\t6c13ff22\t6c13ff23\t6c13ff24\t6c13ff25',
        9: '6c13ff26\t6c13ff27\t6c13ff28'
    },
    'data': {
        0: '0\t0\t0\t01\t0',
        1: '0\t26\t40\t2  0| 0| 3|up\t5  0| 0| 2|up',
        2: '8  0| 0| 3|up\t9  0|0| 5|up\t10  0| 0| 3|up\t11  0| 0| 3|up\t12  0| 0| 1|up',
        3: '13  0| 0| 0|up\t14  0| 0| 1|up\t15  0| 0| 0|up\t16  0| 0| 3|up\t18  0| 0| 0|up',
        4: '19  0| 0| 0|up\t21  0| 0| 0|up\t22  0| 0| 0|up\t23  0| 0| 4|up\t24  0| 0| 1|up',
        5: '25  0| 0| 1|up\t26  0| 0| 0|up\t27  0| 0| 0|up\t28  0| 0| 1|up\t29  0| 0|1|up',
        6: '30  0| 0| 1|up\t33  0| 0| 1|up\t34  0| 0| 5|up\t37  0| 0| 1|up\t',
        7: '\t\t\t\t',
        8: '\t\t\t\t',
        9: '\t\t'
    }
}
Step 3: match the fields and data.
Finally, we need to map the field identifier to a specific value from the data.
result = {} # Сюда будем сохранять результат
for i in range(len(parse['fields'])): # считаем количество строк и проходимся по ним
    fids = parse['fields'][i].split('\t') # разделяем строку на элементы
    data = parse['data'][i].split('\t')
    for i in range(len(fids)):
        result.update({
            fids[i]: data[i] # сопоставляем поле соответствующим данным
        })
As a result, we get a dictionary in which the field identifier is used as the key, and the data corresponding to this field is used as the value.
result
{
    '6c10ff0e': '21  0| 0| 0|up',
    '6c11ff16': '29  0| 0| 1|up',
    '6c13ff22': '',
    '6c0fff01': '2  0| 0| 3|up',
    '6c10ff0c': '18  0| 0| 0|up',
    '6c11ff15': '28  0| 0| 1|up',
    '6c10ff0d': '19  0| 0| 0|up',
    '6c12ff20': '',
    '6c10ff09': '14  0| 0| 1|up',
    '6c0fff03': '8  0| 0| 3|up',
    '6c10ff0f': '22  0| 0| 0|up',
    '6c11ff14': '27  0| 0| 0|up',
    '6c04ff00': '40',
    '6c13ff26': '',
    '6c10ff0b': '16  0| 0| 3|up',
    '6c10ff0a': '15  0| 0| 0|up',
    '6c0fff08': '13  0| 0| 0|up',
    '6c13ff25': '',
    '6c0cff00': '01',
    '6c12ff1f': '',
    '6c11ff18': '33  0| 0| 1|up',
    '6c13ff27': '',
    '6c11ff12': '25  0| 0| 1|up',
    '6c0fff06': '11  0| 0| 3|up',
    '6c0bff00': '26',
    '6c03ff00': '0',
    '6c11ff11': '24  0| 0| 1|up',
    '6c0aff00': '0',
    '6c10ff10': '23  0| 0| 4|up',
    '6c13ff28': '',
    '6c0fff07': '12  0| 0| 1|up',
    '6c12ff1b': '',
    '6c02ff00': '0',
    '6c0fff05': '10  0| 0| 3|up',
    '6c13ff23': '',
    '6c12ff1e': '',
    '6c08ff00': '0',
    '6c12ff1d': '',
    '6c12ff1a': '37  0| 0| 1|up',
    '6c11ff13': '26  0| 0| 0|up',
    '6c12ff1c': '', '6c13ff24': '',
    '6c13ff21': '',
    '6c0fff02': '5  0| 0| 2|up',
    '6c09ff00': '0',
    '6c12ff19': '34  0| 0| 5|up',
    '6c0fff04': '9  0| 0| 5|up',
    '6c11ff17': '30  0| 0| 1|up'
}
Final: PROFIT
So, we have a dictionary that contains all the information on the status of media gateways. We can only find out what identifier that means. This is done, as we recall, using ossimt . For example, the fields major alarms , minor alarms , warnings correspond to identifiers 6c02ff00 , 6c03ff00 , 6c04ff00 . We are looking for them in our dictionary and understand that we do not have a single serious error and “only” 40 warnings. You can live.
Having worked a little with the obtained data, you can get quite suitable monitoring of media gateways available directly from the terminal. For example, we can get this picture:
And if you're not lucky, then this one:
For convenience, I developed a small class for working with this protocol, you can see it here .









