January 19, 2017 at 17:22
Visual C ++ for Linux Development Extension
- Transfer
The Visual C ++ for Linux Development extension allows you to create C ++ solutions for servers, desktops, and Linux devices. You can manage connections to them directly in Visual Studio. VS will automatically copy and remotely collect the source code of the programs. Also, the environment allows you to run your application in debug mode. The project management system supports the creation of solutions for specific architectures, including APM. Under the cat, we’ll show you how to get started with new projects for Linux.

So far, the extension only supports remote builds on the target Linux machine. There are no restrictions on the Linux distribution, but certain tools must be installed on the system. In particular, you will need openssh-server, g ++, gdb, and gdbserver. Install them using any package manager. For example, on Debian based systems, you can use the command:
Download the Visual C ++ for Linux Development extension or install it using the Visual Studio Extension Manager.
To get started, create a new project and choose Templates> Visual C ++> Cross Platform> Linux .
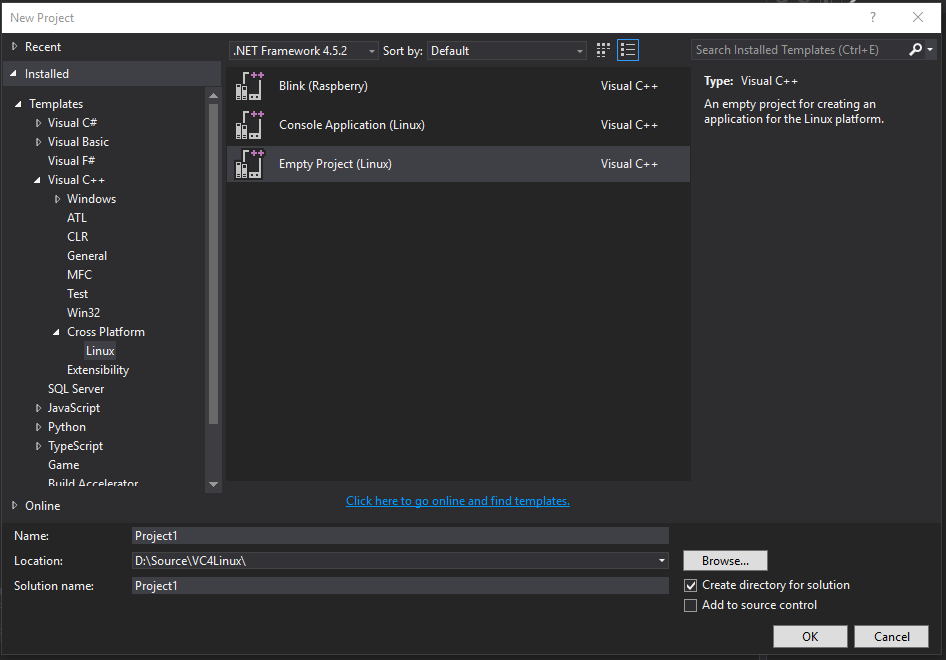
Three templates are currently available: Blink (for IoT devices such as Raspberry Pi), Console Application (a console application, an almost empty framework for your code) and Empty (an empty template for adding source files and settings yourself).
First, create a console application. Create a project based on this template and add a breakpoint on the printf line. Then press F5 or click the Remote GDB Debugger button. By default, the debug / x64 configuration will be selected for the console application. If the architecture of the remote target computer is x86 or ARM, then these settings will need to be changed. In this example, I will use the Ubuntu x64 virtual machine.
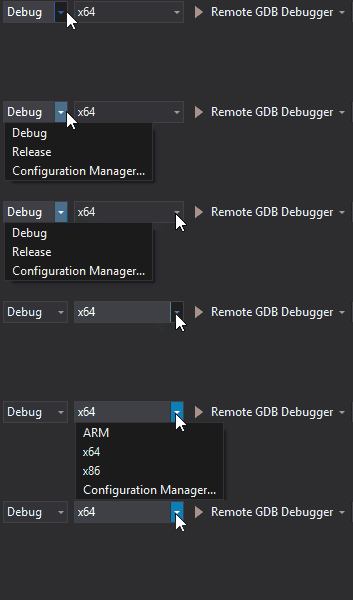
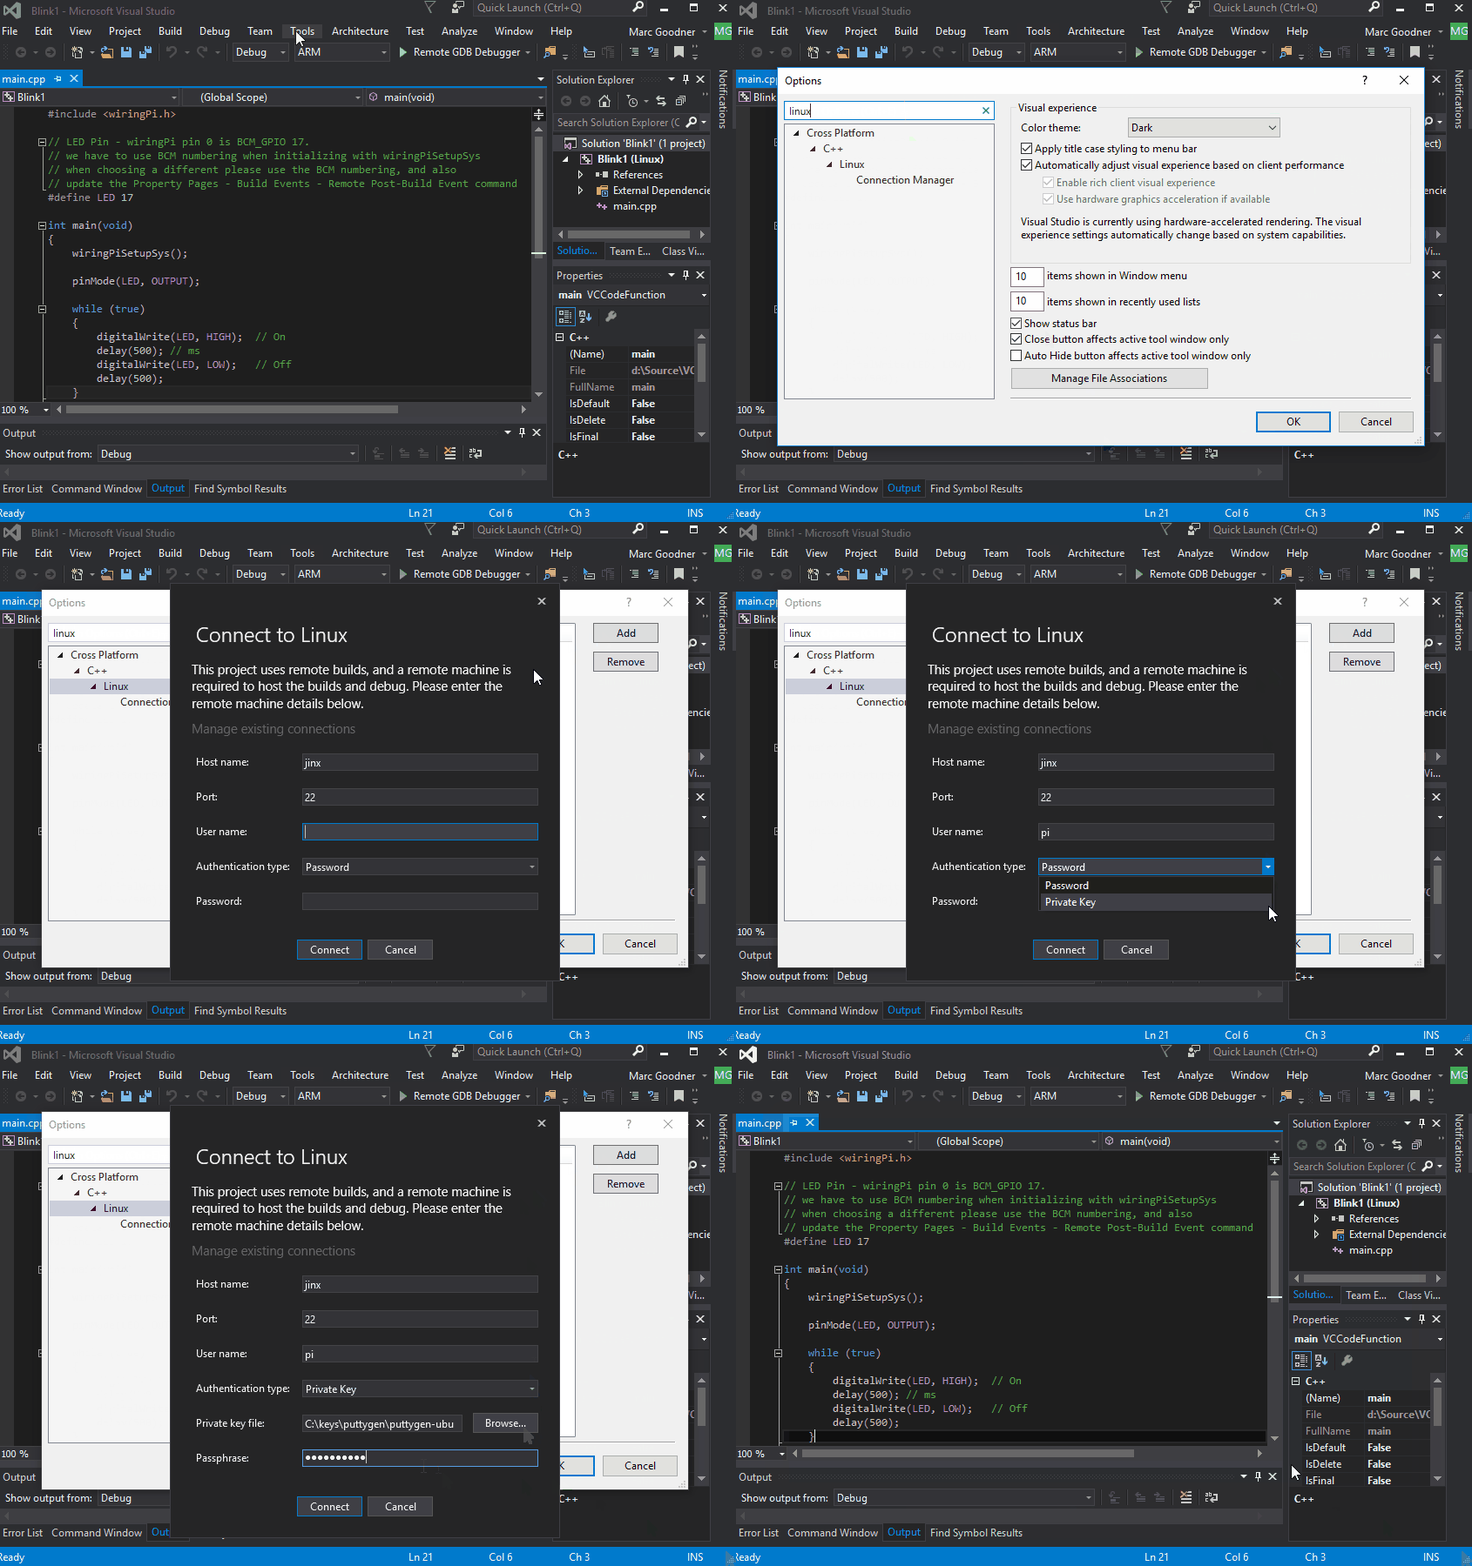
Since this is the first time we are building a solution for a Linux computer, the environment will ask for connection information. The corresponding form opens when you try to build the project.

The add-on supports password or certificate authorization, including through passphrases with certificates. Successful connection information is saved for future connections. To manage saved connections, select Tools → Options → Cross Platform → Linux . Yes, passwords and passphrases are stored in encrypted form. In a future update, we are going to add the ability to connect without saving data about it.
After connecting, your source files will be copied to the remote Linux computer, and the extension will run gcc to build them with the parameters specified in the project properties. After successful assembly, your code will run on the remote machine and will work until it reaches the previously set breakpoint.

To understand where files are deployed on a remote Linux computer, take a look at the project properties.
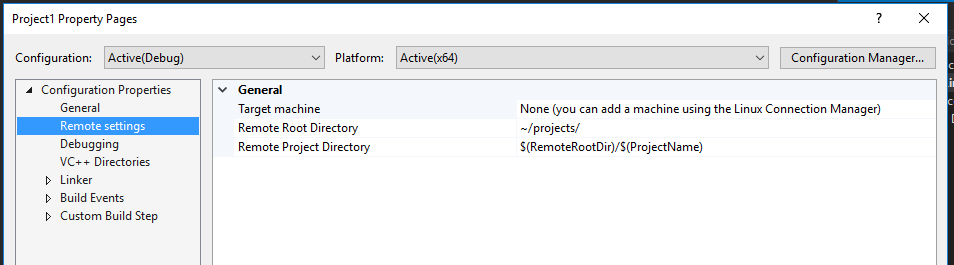
As indicated in Remote settings, by default, the ~ / projects / directory is used as the root folder on the remote computer, and the name of the remote project directory corresponds to the name of our project. If we look at the contents of directories on a remote Linux computer, we find main.cpp and the files generated during the build process in the ~ / projects / ConsoleApplication1 folder.

The General section shows the paths to the output directory and intermediate files. In addition, as you can see, the Application configuration type is set for the project. Therefore, the executable file is saved in the bin / x64 / Debug / directory under the name ConsoleApplication1.out. Please note: two other types of configuration are available - static and dynamic library.
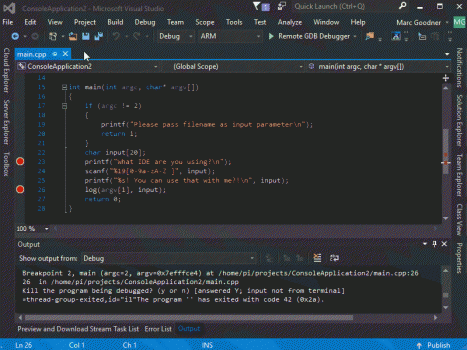
You can work with remote executable files through the console window. In this window, you can view the result of the program and enter the input data. To activate this window, select Debug → Linux Console . This is how it looks in practice.
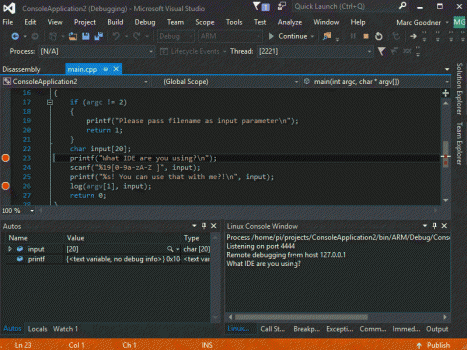
Below is the code for a simple program - use it to work with the console yourself.
In the project properties on the Debugging page, in the Command Arguments field, specify the file name. On this page you can also change the working folder if for some reason your home directory is not suitable.
Now consider the work with the device of the Internet of things - Raspberry Pi. The extension supports any Pi device running Raspbian. In our Blink template, we will use wiringPi - if you do not have such a system, it can be installed via apt or from the source code. To add a connection, select Tools → Options and enter Linux in the search field. Now click Add to connect to your Raspberry Pi device.
Open the project properties and in the Build Events section, find the Remote Post-Build Events category.
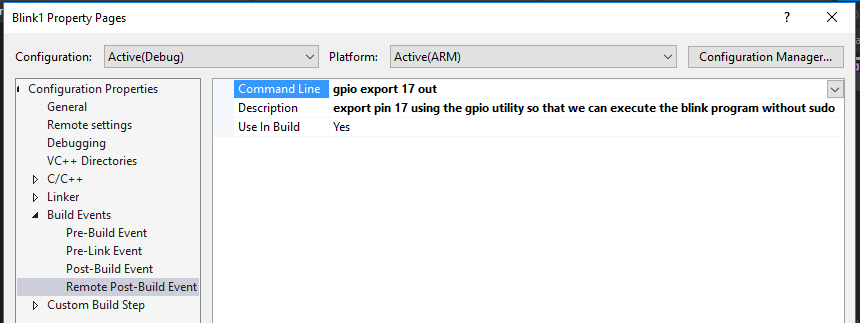
In these parameters, you can specify the execution of the command on the remote Linux computer after the assembly is completed. This template is initially configured to export the GPIO pin for the LED indicator - thanks to this, the executable file does not need to be run as root.
Now connect the pin indicator to pin 17 of your Raspberry Pi, as shown below.

Open main.cpp and set a breakpoint to call delay after the first digitalWrite statement. Press F5. When a breakpoint is reached, execution will pause. In this case, the LED will light. Continue code execution until the next call to digitalWrite. The LED on it will turn off.
Working with the Intel Edison board through the VC ++ for Linux extension is practically no different from using other Linux systems. First of all, you need to configure the board in accordance with the instructions from Intel . After connecting Edison to a Wi-Fi network, you can connect to it using our connection manager. If you need to connect to Edison directly, use the instructions for connecting to Edison via Ethernet via USB - our connection manager also supports this option.
Edison makes it easy to start creating an IoT application that processes data from sensors. Devices such as Arduino expansion cards let you plug in additional modules, such as the Seeve Studios Grove expansion board. This expansion board will help you work with the many Grove sensors available without worrying about wiring to connect to the breadboard — you can start writing code right away. Intel has released the UPM sensor library, which makes the task even easier: it provides support for a wide range of sensors, including Grove.
The image shows an Edison compute module in an Arduino circuit with a connected Grove expansion board and a connected temperature sensor.

Create a new project in Visual Studio. SelectVC ++ -> Cross Platform -> Linux -> Empty Project . When building solutions for Edison, choose x86 as the solution platform. Add the C ++ file to the project. Use the code from Intel's Grove Temperature Sample . UPM libraries are included in the Yocto Linux image, which is used by default in Edison, so you do not need to install them additionally. Modify the include options with the appropriate file location.
After that, the code can be assembled and executed. This example shows the result of running this example in Visual Studio debugging mode. Perhaps you were confused by the first line of output. The fact is that the first attempt to read data from sensors of this type usually does not give an entirely accurate result.
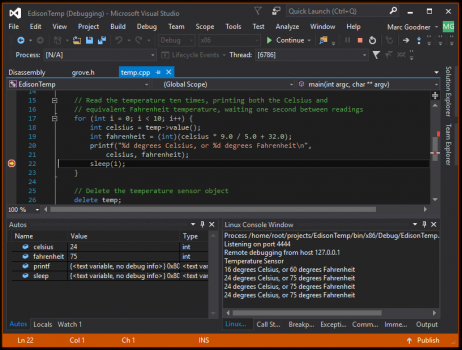
To enable IntelliSense, follow the instructions below. You will need to copy the plugins from Edison to your local environment. So far, IntelliSense is working with the error that appears in this example. In a future update, this will be fixed.
So, we looked at creating applications for systems without monitors and for specialized devices running Linux. But what about desktop PCs? We have prepared something special for you. We will now launch the OpenGL application on a Linux desktop. First, make sure your Linux PC is properly configured to develop OpenGL solutions. We used the following apt packages: libgles1-mesa, libgles1-mesa-dev, freeglut3, freeglut3-dev.
Now create an empty Linux project and download the Spinning Cube source code from the link from the Julien Guertault tutorial on OpenGL. Unzip the archive and add main.c to your project. To use IntelliSense technology, you need to add OpenGL header files to VC ++ directories. You can download them fromOpenGL registry . Now open the project properties and in the Pre-Launch Command field, enter "export DISPLAY =: 0.0".
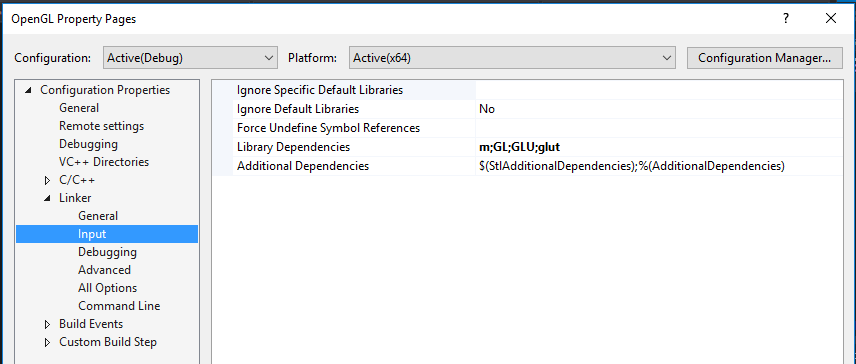
In the Linker Input field, specify the library dependencies: “m; GL; GLU; glut”.
Make sure that the correct computer is specified in the remote connection settings.

Now press F5.
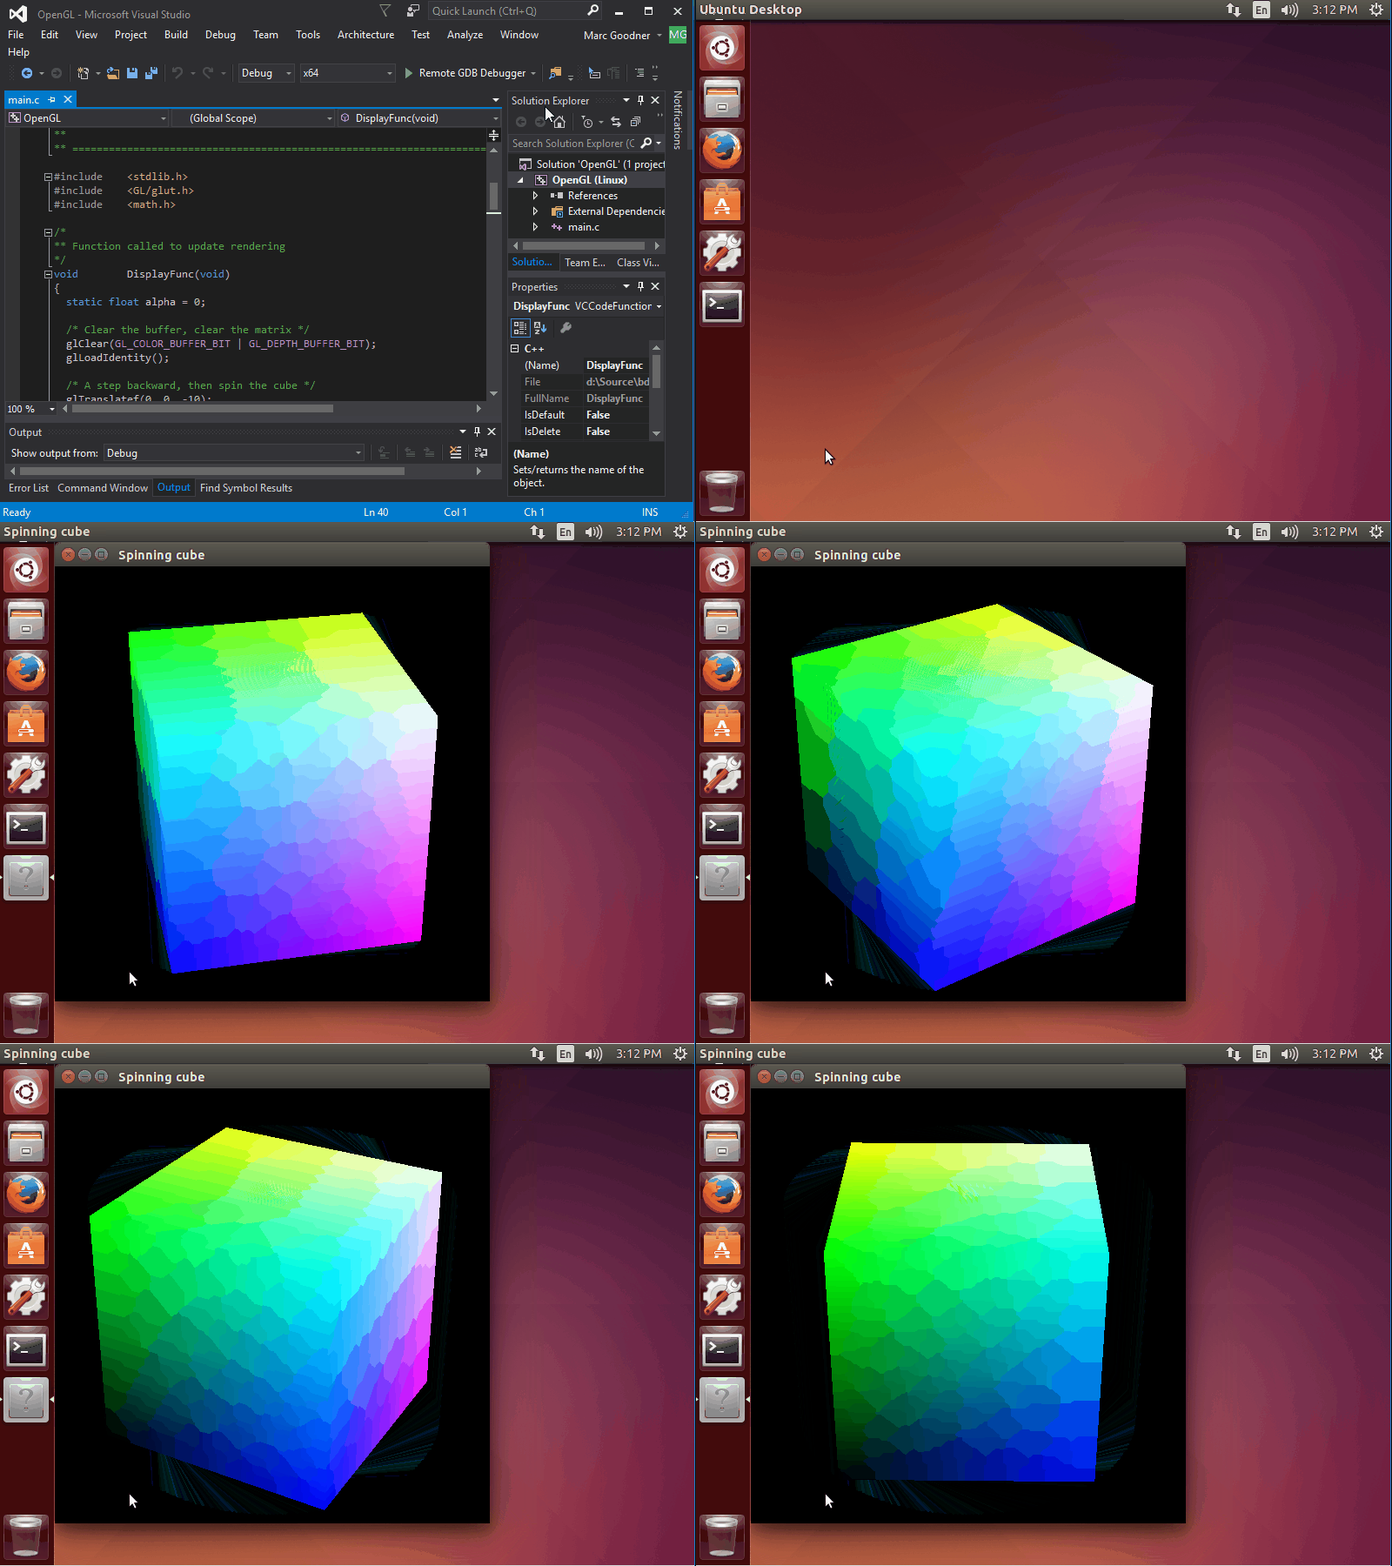
To get interesting results, you can place a breakpoint on line 80, where the rotation of the cube is specified (try changing the alpha value), or on a call to KeyboardFunc, where you can view the values of the pressed key.
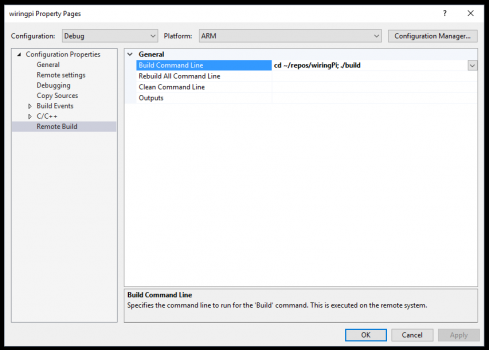
The Makefile project template allows you to use external build systems (make, gmake, CMake, bash scripts, and the like) on the remote computer. It works something like this: on the C ++ project properties page, you can configure local Intellisense paths , then on the remote assembly properties page add commands (separated by semicolons) that initiate your assembly on the remote computer. In this example, we go to the remote directory where the build script is located and run it.
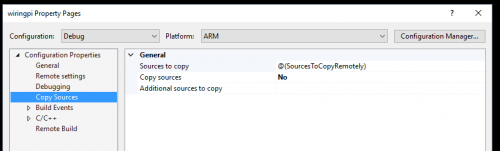
Several bash scripts are combined herethat are capable of generating a makefile project based on your source code files, taking into account the directory structure. In these scenarios, the source code on the Linux computer is assumed to be in the directory that Windows maps. They set a new flag in the project properties so as not to copy files remotely. It is unlikely that this option is suitable for all tasks, but it should be a good starting point for a large project.
The tips in this section will help you make better use of the extension.
There were a lot of questions about which arguments were passed to the GCC. The output that we see during the assembly does not provide the necessary information, but there are two ways to fix it. Search for the word “verbosity” in the quick entry box or select Tools → Options → Projects and Solutions → Build and Run . To configure MSBuild Project output verbosity, select diagnostic. Then in the output window during assembly the most complete information will be displayed. This way you can find out exactly which arguments were passed to GCC when building the program. This information may come in handy if the program does not work correctly.
Everyone loves IntelliSense, but we have not yet implemented the synchronization of connected files from your Linux system. Everyone transfers and copies these files in their own way, and that’s good. We will talk about a very simple way: just copy the entire folder to the local Windows system via PSCP .
Now open the project properties, go to the VC ++ Directories section and add the local path.
At the file and project level, you can specify whether to remotely copy the file. Thanks to this, you can use the existing assembly mechanisms by simply matching existing resources locally and adding them to your project for editing and debugging.
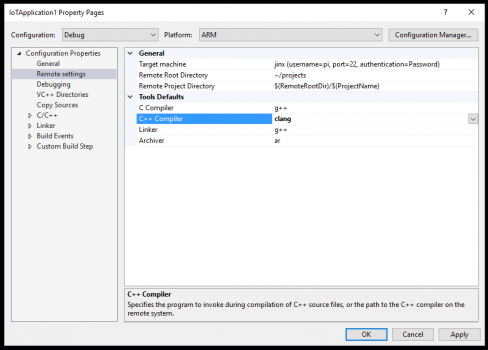
In the Property Pages window, you can override the compiler commands that will be used on the remote computer. So, if necessary, you can choose specific versions of GCC or even another compiler - for example, clang. You can specify both full paths and available commands.
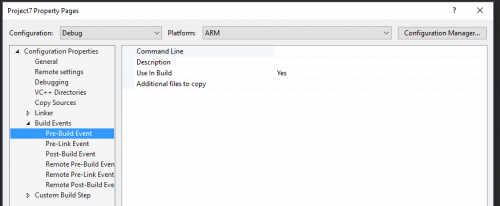
In the Build Events section of the project properties, new types of events are available - those that are run before assembly and assembly, as well as means for copying arbitrary files for any assembly events. With these tools, you can flexibly control the process.
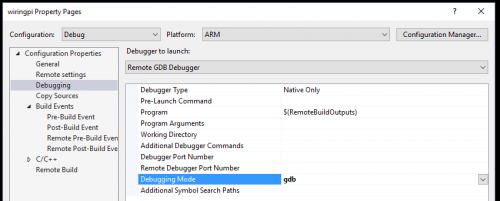
The extension supports not only gdbserver, but also gdb mode, which allows you to increase compatibility if there are no suitable binary gdb client files for a remote target in Windows.
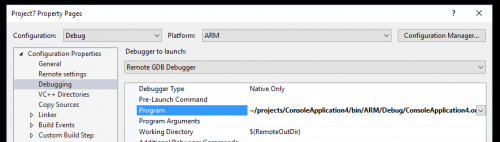
In addition, you can override the debugger command itself. This is useful for debugging external programs that were not built in VS.
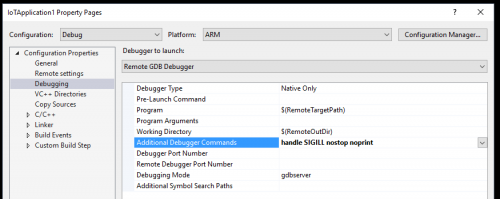
On the Debugging page in the project properties, you can specify additional gdb commands that will be passed to the debugger before it starts. This can be useful, for example, when developing Azure IoT projects. When using the Azure IoT C SDK on a Raspberry Pi, an incorrect exception may be thrown when starting debugging. The reason is because of the interaction between libcrypto and gdb. A discussion of this issue is available here.. You can simply continue debugging or avoid this problem altogether by passing a special instruction to the debugger before starting work - in this case “handle SIGILL nostop noprint”.
So far, the extension only supports remote builds on the target Linux machine. There are no restrictions on the Linux distribution, but certain tools must be installed on the system. In particular, you will need openssh-server, g ++, gdb, and gdbserver. Install them using any package manager. For example, on Debian based systems, you can use the command:
sudo apt-get install openssh-server g++ gdb gdbserverTable of contents
- Installation
- Your first Linux project in VS
- Linux project properties
- Console window
- IoT projects for Linux
- How to work with Intel Edison board through VC ++ for Linux extension
- Classic apps
- Makefile Project Template
- Usage Tips
- Detailed build log
- Where to get the connected files
- Manage copying deleted files
- Overriding the path to the C / C ++ compiler
- Build events
- Debugging options
- useful links
Installation
Download the Visual C ++ for Linux Development extension or install it using the Visual Studio Extension Manager.
To get started, create a new project and choose Templates> Visual C ++> Cross Platform> Linux .
Three templates are currently available: Blink (for IoT devices such as Raspberry Pi), Console Application (a console application, an almost empty framework for your code) and Empty (an empty template for adding source files and settings yourself).
Your first Linux project in VS
First, create a console application. Create a project based on this template and add a breakpoint on the printf line. Then press F5 or click the Remote GDB Debugger button. By default, the debug / x64 configuration will be selected for the console application. If the architecture of the remote target computer is x86 or ARM, then these settings will need to be changed. In this example, I will use the Ubuntu x64 virtual machine.
Since this is the first time we are building a solution for a Linux computer, the environment will ask for connection information. The corresponding form opens when you try to build the project.
The add-on supports password or certificate authorization, including through passphrases with certificates. Successful connection information is saved for future connections. To manage saved connections, select Tools → Options → Cross Platform → Linux . Yes, passwords and passphrases are stored in encrypted form. In a future update, we are going to add the ability to connect without saving data about it.
After connecting, your source files will be copied to the remote Linux computer, and the extension will run gcc to build them with the parameters specified in the project properties. After successful assembly, your code will run on the remote machine and will work until it reaches the previously set breakpoint.
Linux project properties
To understand where files are deployed on a remote Linux computer, take a look at the project properties.
As indicated in Remote settings, by default, the ~ / projects / directory is used as the root folder on the remote computer, and the name of the remote project directory corresponds to the name of our project. If we look at the contents of directories on a remote Linux computer, we find main.cpp and the files generated during the build process in the ~ / projects / ConsoleApplication1 folder.
The General section shows the paths to the output directory and intermediate files. In addition, as you can see, the Application configuration type is set for the project. Therefore, the executable file is saved in the bin / x64 / Debug / directory under the name ConsoleApplication1.out. Please note: two other types of configuration are available - static and dynamic library.
Console window
You can work with remote executable files through the console window. In this window, you can view the result of the program and enter the input data. To activate this window, select Debug → Linux Console . This is how it looks in practice.
Below is the code for a simple program - use it to work with the console yourself.
#include
void log(char filename[], char visitor[])
{
	FILE * pLog;
	pLog = fopen(filename, "a");
	if (pLog != NULL)
	{
		fputs(visitor, pLog);
		fputs("\n", pLog);
		fclose(pLog);
	}
}
int main(int argc, char* argv[])
{
	if (argc != 2)
	{
		printf("Please pass filename as input parameter\n");
		return 1;
	}
	char input[20];
	printf("What IDE are you using?\n");
	scanf("%19[0-9a-zA-Z ]", input);
       printf("%s! You can use that with me?!\n", input);
	log(argv[1], input);
       return 0;
}
In the project properties on the Debugging page, in the Command Arguments field, specify the file name. On this page you can also change the working folder if for some reason your home directory is not suitable.
IoT projects for Linux
Now consider the work with the device of the Internet of things - Raspberry Pi. The extension supports any Pi device running Raspbian. In our Blink template, we will use wiringPi - if you do not have such a system, it can be installed via apt or from the source code. To add a connection, select Tools → Options and enter Linux in the search field. Now click Add to connect to your Raspberry Pi device.
Open the project properties and in the Build Events section, find the Remote Post-Build Events category.
In these parameters, you can specify the execution of the command on the remote Linux computer after the assembly is completed. This template is initially configured to export the GPIO pin for the LED indicator - thanks to this, the executable file does not need to be run as root.
Now connect the pin indicator to pin 17 of your Raspberry Pi, as shown below.
Open main.cpp and set a breakpoint to call delay after the first digitalWrite statement. Press F5. When a breakpoint is reached, execution will pause. In this case, the LED will light. Continue code execution until the next call to digitalWrite. The LED on it will turn off.
How to work with Intel Edison board through VC ++ for Linux extension
Working with the Intel Edison board through the VC ++ for Linux extension is practically no different from using other Linux systems. First of all, you need to configure the board in accordance with the instructions from Intel . After connecting Edison to a Wi-Fi network, you can connect to it using our connection manager. If you need to connect to Edison directly, use the instructions for connecting to Edison via Ethernet via USB - our connection manager also supports this option.
Edison makes it easy to start creating an IoT application that processes data from sensors. Devices such as Arduino expansion cards let you plug in additional modules, such as the Seeve Studios Grove expansion board. This expansion board will help you work with the many Grove sensors available without worrying about wiring to connect to the breadboard — you can start writing code right away. Intel has released the UPM sensor library, which makes the task even easier: it provides support for a wide range of sensors, including Grove.
The image shows an Edison compute module in an Arduino circuit with a connected Grove expansion board and a connected temperature sensor.
Create a new project in Visual Studio. SelectVC ++ -> Cross Platform -> Linux -> Empty Project . When building solutions for Edison, choose x86 as the solution platform. Add the C ++ file to the project. Use the code from Intel's Grove Temperature Sample . UPM libraries are included in the Yocto Linux image, which is used by default in Edison, so you do not need to install them additionally. Modify the include options with the appropriate file location.
#include After that, the code can be assembled and executed. This example shows the result of running this example in Visual Studio debugging mode. Perhaps you were confused by the first line of output. The fact is that the first attempt to read data from sensors of this type usually does not give an entirely accurate result.
To enable IntelliSense, follow the instructions below. You will need to copy the plugins from Edison to your local environment. So far, IntelliSense is working with the error that appears in this example. In a future update, this will be fixed.
Classic apps
So, we looked at creating applications for systems without monitors and for specialized devices running Linux. But what about desktop PCs? We have prepared something special for you. We will now launch the OpenGL application on a Linux desktop. First, make sure your Linux PC is properly configured to develop OpenGL solutions. We used the following apt packages: libgles1-mesa, libgles1-mesa-dev, freeglut3, freeglut3-dev.
Now create an empty Linux project and download the Spinning Cube source code from the link from the Julien Guertault tutorial on OpenGL. Unzip the archive and add main.c to your project. To use IntelliSense technology, you need to add OpenGL header files to VC ++ directories. You can download them fromOpenGL registry . Now open the project properties and in the Pre-Launch Command field, enter "export DISPLAY =: 0.0".
In the Linker Input field, specify the library dependencies: “m; GL; GLU; glut”.
Make sure that the correct computer is specified in the remote connection settings.
Now press F5.
To get interesting results, you can place a breakpoint on line 80, where the rotation of the cube is specified (try changing the alpha value), or on a call to KeyboardFunc, where you can view the values of the pressed key.
Makefile Project Template
The Makefile project template allows you to use external build systems (make, gmake, CMake, bash scripts, and the like) on the remote computer. It works something like this: on the C ++ project properties page, you can configure local Intellisense paths , then on the remote assembly properties page add commands (separated by semicolons) that initiate your assembly on the remote computer. In this example, we go to the remote directory where the build script is located and run it.
Several bash scripts are combined herethat are capable of generating a makefile project based on your source code files, taking into account the directory structure. In these scenarios, the source code on the Linux computer is assumed to be in the directory that Windows maps. They set a new flag in the project properties so as not to copy files remotely. It is unlikely that this option is suitable for all tasks, but it should be a good starting point for a large project.
Usage Tips
The tips in this section will help you make better use of the extension.
Detailed build log
There were a lot of questions about which arguments were passed to the GCC. The output that we see during the assembly does not provide the necessary information, but there are two ways to fix it. Search for the word “verbosity” in the quick entry box or select Tools → Options → Projects and Solutions → Build and Run . To configure MSBuild Project output verbosity, select diagnostic. Then in the output window during assembly the most complete information will be displayed. This way you can find out exactly which arguments were passed to GCC when building the program. This information may come in handy if the program does not work correctly.
Where to get the connected files
Everyone loves IntelliSense, but we have not yet implemented the synchronization of connected files from your Linux system. Everyone transfers and copies these files in their own way, and that’s good. We will talk about a very simple way: just copy the entire folder to the local Windows system via PSCP .
pscp -r [email protected]:/usr/include .Now open the project properties, go to the VC ++ Directories section and add the local path.
Manage copying deleted files
At the file and project level, you can specify whether to remotely copy the file. Thanks to this, you can use the existing assembly mechanisms by simply matching existing resources locally and adding them to your project for editing and debugging.
Overriding the path to the C / C ++ compiler
In the Property Pages window, you can override the compiler commands that will be used on the remote computer. So, if necessary, you can choose specific versions of GCC or even another compiler - for example, clang. You can specify both full paths and available commands.
Build events
In the Build Events section of the project properties, new types of events are available - those that are run before assembly and assembly, as well as means for copying arbitrary files for any assembly events. With these tools, you can flexibly control the process.
Debugging options
The extension supports not only gdbserver, but also gdb mode, which allows you to increase compatibility if there are no suitable binary gdb client files for a remote target in Windows.
In addition, you can override the debugger command itself. This is useful for debugging external programs that were not built in VS.
On the Debugging page in the project properties, you can specify additional gdb commands that will be passed to the debugger before it starts. This can be useful, for example, when developing Azure IoT projects. When using the Azure IoT C SDK on a Raspberry Pi, an incorrect exception may be thrown when starting debugging. The reason is because of the interaction between libcrypto and gdb. A discussion of this issue is available here.. You can simply continue debugging or avoid this problem altogether by passing a special instruction to the debugger before starting work - in this case “handle SIGILL nostop noprint”.