 December 24, 2016 at 16:37
Creating a quest and dialogue editor for Unreal engine: Part 1 plugin description
- Tutorial
Hello my name is Dmitry. I make computer games on the Unreal Engine as a hobby.
At a certain stage in the creation of your game, it becomes necessary to write dialogs and quests. Unfortunately, the Unreal engine does not have a built-in tool to solve this problem. Therefore, I wrote a plugin for editing quests and dialogs. As always, all sources will be provided at the end of the article.
I decided to divide the article into two parts in the first part, I will describe the plugin itself and tell you how to use it. And in the second part I will talk about the technical aspects.
Therefore, I will go straight to the story about the plugin itself. First you need to create a StoryGraph asset. In the panel on the right, you create story objects that can be:
1) Quest - These are your quests after creating this object, it becomes possible to add a quest start node (drag and drop is supported) to which you can already bind the quest phases.
2) Character - A character is an object that contains another graph within itself, this is the dialog editor of this character. Additionally, the character object has an external reference to the ACharecter_StoryGraph object; this is a derivative of ACharecter. The character has several states: Alive (living) and Dead (dead), these states can be considered (more on this later). ACharecter_StoryGraph just switches it to these states. A character can receive messages from the main graph.
3) PlaceTrigger - A trigger is an iterative object that can be found on a map. Also has external references to the APlaceTrigger_StoryGraph object, which is derived from AActor. A trigger, like a character, has a message editor inside of which you can interact with it.
A trigger has only two states active and inactive. In addition, it has several operating modes:
UnInteractive - The trigger is inactive and you must implement the switching of its states yourself using the ChangeState function of Blueprint.
Interactive - The trigger is active when you approach it, just press the e key and it will go into the Active state.
AdvanceInteractive - When you approach it and press e, a window for interacting with messages that are defined in the message editor opens.
Also, a trigger, like a character, can receive messages from the main graph.
4) DialogTrigger - An object introduced by me for the interaction of dialogs and messages with the main graph. I also have two states (Active, inactive). Switch in the character dialog editor and trigger message editor.
5) InventoryItem - The subject of the inventory. It can have several states that are set in the properties. These conditions are added to the existing ones (inactive, at the level and in the inventory). The states change for the first time by selecting an item, and in addition, they can be set in the character dialog editor and trigger message editor as well as DialogTrigger states. The inventory item can also receive messages.
6) Others - Items that do not belong to the above but participate in the development of the plot. These items have no states but can receive messages and will change depending on them.
I want to note that due to the fact that the quest objects and objects that are on the map are different objects. That can work in parallel. For example, you create a plot and your friend creates a map. And when everything is ready, you can combine them.
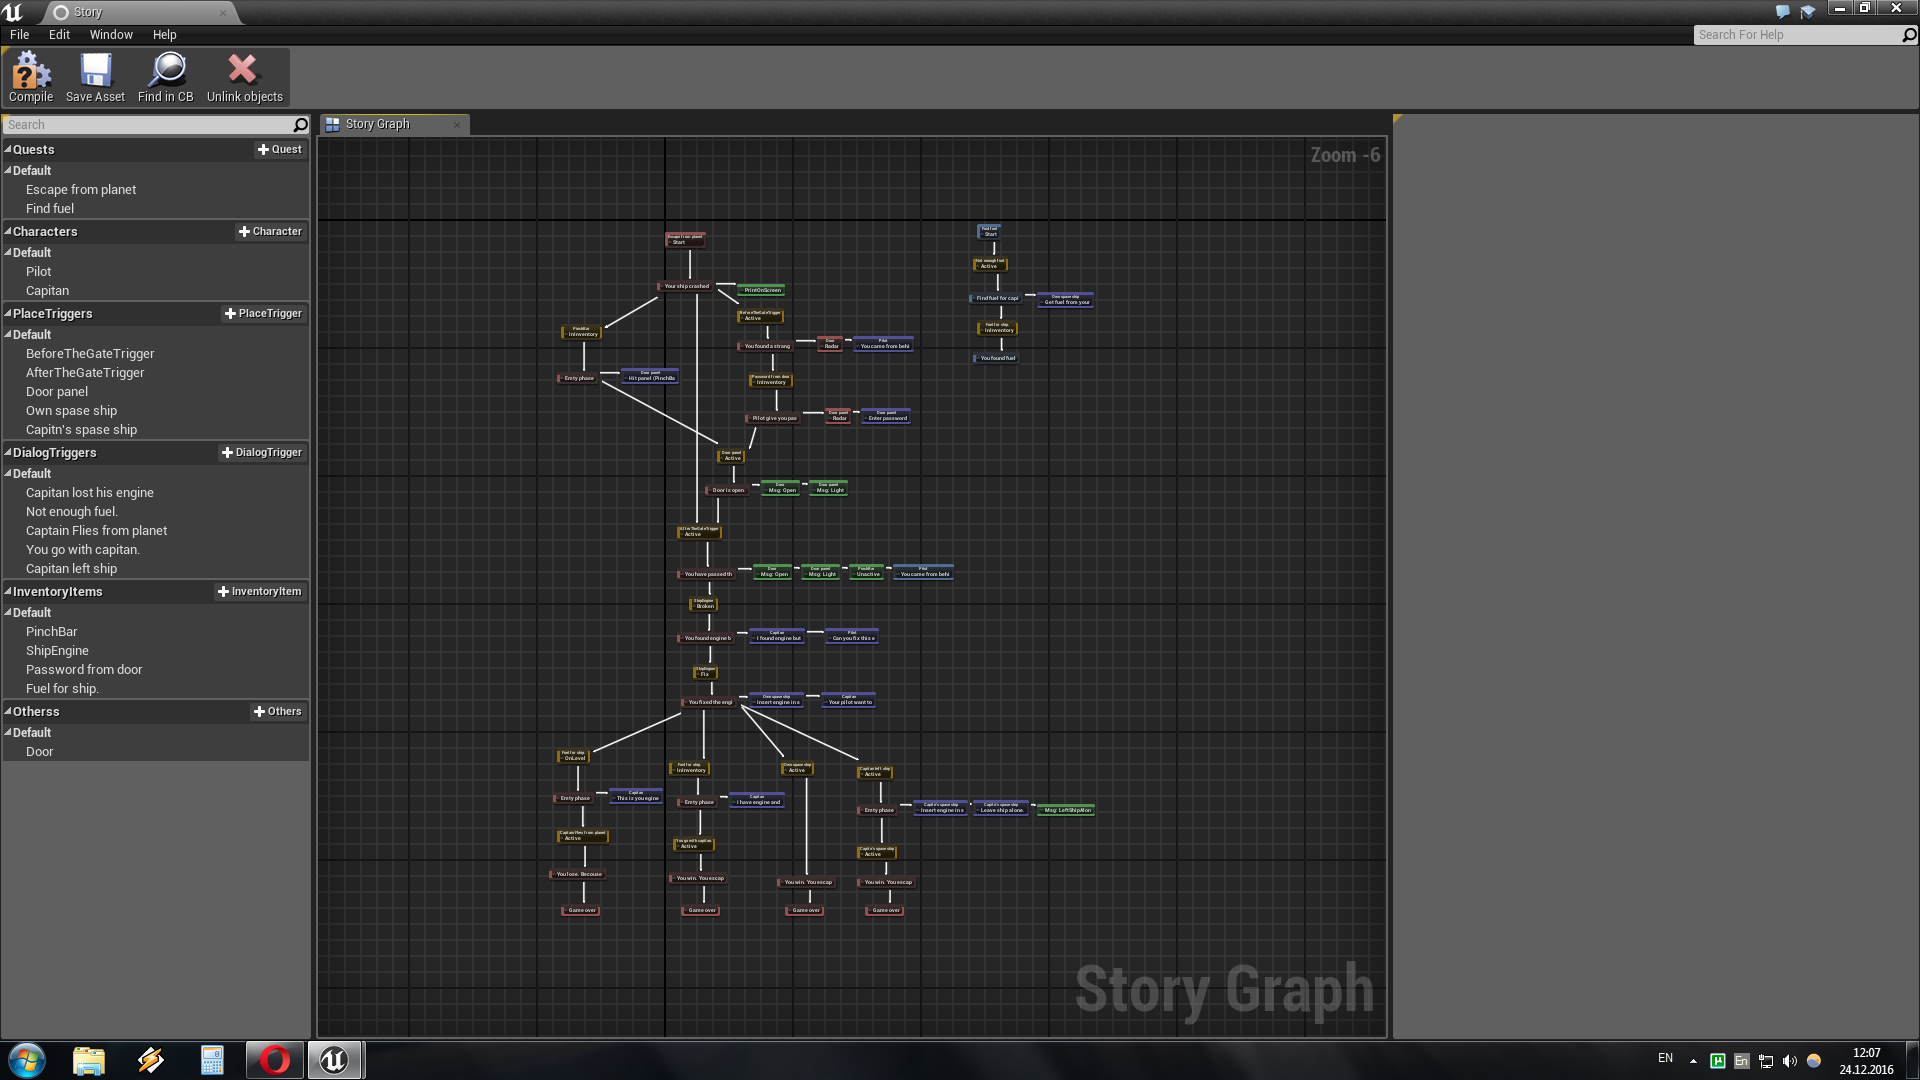
After creating story items, you can already start creating quests. Here you need to clarify that all nodes are divided into two types, these are independent nodes that you can place whenever you want, and dependent nodes that appear only after creating objects that depend on them. In addition, the plugin supports drag and drop technology, so if you drag an object onto the graph field, you will be prompted to create all the nodes that depend on this object.
All nodes have two types of links: vertical links and horizontal ones. A vertical tree is the basis of your quest, it determines its structure and execution order. Horizontal nodes are modifiers of a specific quest phase (a phase node has both vertical and horizontal connections). They can add some objects to the radar or send a message to the object, all this will happen when a specific phase of the quest is activated.
So let's try to create something. First, create a quest. After that, you can place the start node of the quest. Three types of nodes can be attached to this node:
1) AddQuestPhase - The node adds a new phase to the quest when activated.
2) GetObjectState - This node is activated when a particular plot object enters a specific stage specified in the properties of the node. If a node is activated, then it activates the nodes located behind it. Imagine a pipeline that originates from the start node, then the GetObjectState node will be a valve that is closed until a certain time and does not let water pass further, but if it opens, water will go further.
3) GameOver - From the name it is clear that as soon as this node is activated, the game ends.
After you have created a "vertical" tree. You can add horizontal nodes to it, here is their description:
1) Activate / deactivate dialog (message) - Activates or deactivates a branch of a dialog or message.
2) Active / deactive object - Activates or deactivates an object. It means that when de-activated, the object simply disappears from the game. For example, you don’t need any object anymore, you can get rid of it, or vice versa the object will be needed at some stage of the game and so that the character does not find it ahead of time it can also be deactivated.
3) Cancel quest - Cancel the quest, for example, if the quests contradict each other and the character began to perform one of them, then the other can be canceled.
4) Send Message - Send a message to the plot subject so that it somehow changes. The change itself is defined in Blueprinte. All external objects have an event GetMessegeFromStoryGraph which is triggered when this node is activated.
5) Add Screen Message - Display the message that the player sees.
6) Add to radar - Add an object to the radar. The object will be displayed on the radar until the quest phase to which the node is attached is active.
7) Print quest phase on screen - Display the contents of a specific phase of the quest on the screen. It may be useful, for example, at the beginning of the game they will show the character what you want from him.
8) Send message to level blueprint - Same as Send Message but sends a message to the blueprin level. For this node to work, you need to change the base class for level blueprint from ALevelScriptActor to ALevelScriptActor_StoryGraph.
How to change the base blueprint class:
By the way, so that new levels are created with the desired level blueprint, you can change the project settings: ProgectSettings → GeneralSettings → LevelScriptActorClass.
9) Print string - this node stands out as it has both vertical and horizontal connections. It displays a debugging message so you can test your script.
In addition to the chief editor in which quests are created, there are also auxiliary ones. This is a character dialog editor and a message editor for a trigger. Here is a description of the nodes used in these editors. Since they are similar, I will give a description for both of them.
1) New dialog (message) brunch - Create a new dialog branch or a new message. Each dialogue should begin with this node. It can be active and then this branch will be displayed immediately or inactive and then it will need to be activated from the beginning.
2) Dialog (message) node - The nodes of which the dialogue branch consists of one input and several outputs (depending on the number of responses).
3) Dialog (message) end - If after the dialogue branch has passed to the end, it is no longer needed. Putting this node at the end, the de branch is activated and will no longer appear.
4) Dialog (message) exit - Exits the dialog box.
5) Set dialog trigger - Sets the value of the dialog trigger.
6) Activate trigger - The node is present only in the trigger message editor. As you might guess, it activates the trigger itself.
After everything is done, you start the game and nothing happens, for the plot to start working, you need to drag the StoryGraph object to a level or use the corresponding context menu item.
I want to note that at the level you can place several different StoryGraph objects. Let’s say in one place all the main quests, and in another all additional or even each quest should be placed in a separate object.
In the next article I will talk about the technical aspects, and about the problems that I had when creating the plugin.
Part Two:
Creating a quest and dialogue editor for the Unreal engine: Part 2 technical aspects
→ Here are the sources
And if you just want to play the demo (its plot can be seen in the first picture), then you can download it here .
Management in the game is standard:
i - inventory
j-log
f - view switching
PS A little not obvious moment: the quest becomes active when the first phase is added to it. And if the execution reaches the end of one of the branches, then the quest is considered completed.
PPS The ability to save and load (keys [- save,] - load) has been added to the project.
Update: Added export to XML file and import from XML.









