GitHub for Windows Users

If your project is stored only on your disk, then with the breakdown of the disk you are in trouble. Even a regular backup will not always be able to save you.
Some developers can do so much in the project that they themselves are shocked. But remembering what was done and where is difficult. That is still a nuisance.
A version control system will help you avoid these problems. If necessary, you can restore or rollback changes. View and confirm or cancel edits. Well, teamwork without a version control system is simply unthinkable.
If you don’t know each other, then I want to introduce you a bit to a version control system called Git. Under the cat you will find a description of how to use GitHub with Visual Studio.
The current extension is called the GitHub Extension for Visual Studio. It is suitable for Visual Studio 2015 and above. You can download vsix from the github page or from the Visual Studio gallery .
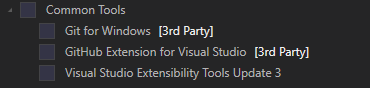
You can install the extension when installing Visual Studio:
Before continuing, you need to learn a few terms. If you know them, then scroll down.
Push - sending changes from the local repository to the remote repository (in our case, it will be located on GitHub).
Fetch - getting changes from a remote repository for comparison and possible subsequent merging.
Merge is a merger. Apply changes made in another repository to the current repository. Something like combining two repositories.
Pull is a combination of fetching and merging. First, a list of changes is obtained from the remote repository, and then the changes are applied to the current repository.
That is, if someone other than you worked and made changes to the GitHub repository, then you can sequentially perform 2 actions: Fetch, and then Merge. Or you can immediately execute Pull. After that, the complete changes will be displayed in your local repository.
After installing GitHub Extension for Visual Studio, the Team Explorer panel will look like this:

If the Team Explorer panel is hidden, you can display it through the “View” menu. By connecting to GitHub (by clicking Connect ... and entering a username with a password) we will be able to clone the GitHub repository or create a new one (Clone and Create buttons):

When cloning, a list of repositories to which you have access will be displayed:

When creating a repository, you can enter its name, description and select a license, according to which the use of the code is allowed:
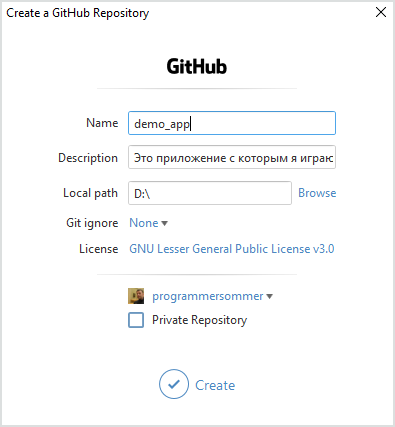
In this case, Git ignore contains presets for projects of various types. And so this file of the .gitignore format is intended to indicate in it which directories and files are to be excluded from the version control system.
In case you want to hide the
GitHub offers a special offer for students - Student Developer Pack , which in particular includes a free unlimited number of private repositories.
After creating the repository, you need to create a project. Personally, I prefer the opposite, first create a project and only then add it to Git. When creating a project, you can also create a Git repository. To do this, just check the box.

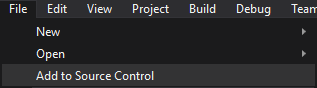
If you do not check this box when creating a project, but simply open the project in VS, then the “Add to Source Control” item will be available on the File menu.
After clicking it, the project will be added to the Git version control system, and a local .git folder will be created inside the project folder. In Team Explorer, it will look like this:

Switching between Team Explorer and Solution Explorer we can make some changes in the project. After any changes, you can commit - a kind of recovery point. To do this, let's return to Team Explorer, whose menu has a button with a house drawn on it. Clicking on it will lead you to the main menu:

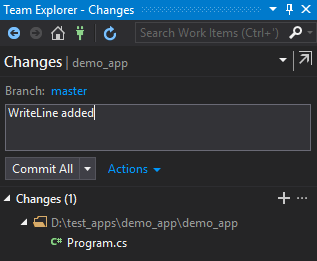
The “Changes” button will allow you to commit the changes (in this case, you must specify a comment with a description of the changes). But all the actions so far will only be committed with the local git repository.
When creating a project, the so-called “Initial commit” is sometimes created, in which something like “The project was created in three days” is written. If you have just created a project, then there are no changes in it yet. And if there are no changes, then the commit cannot be created. I added a line with text, so I tried to describe it briefly, but clearly:
You can view the completed changes. To do this, on the file of interest to us, you need to call the context menu and select "Compare with Unmodified ..." / "Compare with unchanged ..."

Let's get something like this comparison:

In this case, only 2 lines of code were added. Through the same context menu, all changes that have occurred since the last commit can be undone. Very convenient feature.
Now, let's go back to the main menu by pressing the house. In order to send changes to GitHub, you need to click the "Sync" / "Sync" button.

Since our project has not yet been published on GitHub, we will be asked to do this:

By the way, .git can be published not only on GitHub, but also on Visual Studio Team Services.
If we published the project earlier, then our commit will be located in the list of outgoing commits:
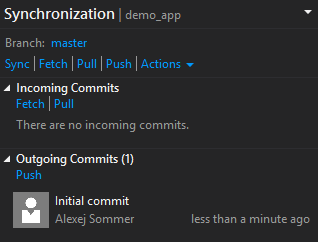
Clicking Push will push the changes to the repository located on the GitHub server.
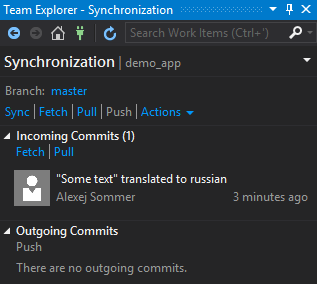
Having made some changes for the sample right through the browser in the repository located on GitHub (yes, this is also possible), I again went into synchronization and clicked Fetch:
Here, with a double click, you can open information about the commit:
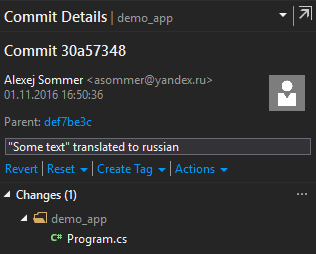
And by clicking on the file to view the changes:

In the same synchronization window, you can view the history:
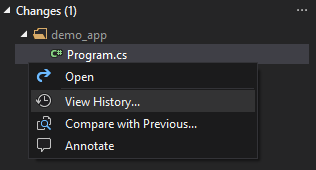
History can be viewed in a simple view and in detail:


Now, let's imagine that we are working in a team and someone else has already made some changes in his local repository and sent them to GitHub. And you, too, made changes in the same file and in the same line. In this case, when synchronizing with GitHub, you will have a conflict:
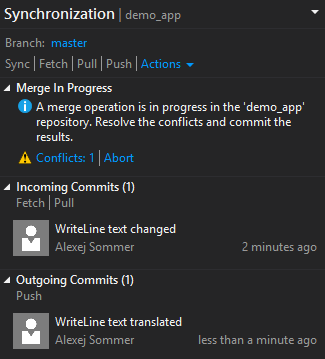
By clicking on Conflicts we get such a window in which, after clicking on the file, a menu with the Merge button opens:

Now we can check the boxes to select the changes that we want to leave in the final version. The final version in the following screenshot is displayed below. The code in it can also be edited:

After making the change, click Accept Merge (in the upper left corner), and then commit:

GitHub extension page itself: github.com/github/visualstudio
Github Desktop and PowerShell environment for Git
Github Desktop is a completely independent utility and is not connected with Visual Studio in any way. You can download it here .

The utility is available for Mac and Windows users. Git Shell command line is installed with it. In fact, this is PowerShell with a set of scripts for integrating with Git. It is called PowerShell environment for Git. Short for posh-git.
On the GitHub page of the posh-git project, you can find brief instructions on how to manually set the posh command line for git.
I will not consider the interface of the utility itself and working with it. I think that it is not complicated and you can deal with it yourself. Let's play a little with the command line. Unlike the GUI, the command line usually provides much more features. But we will consider only the basic teams.
To view the current configuration and verify that Git is present, you can run the command:
git config –list
In order to clone the repository, just run the git clone command . For instance:
git clone https://github.com/programmersommer/Barcode_Scanner_UWP.git BarcodeScanner
After executing this command, a folder with the project will appear in the current directory. In addition to http: // and https: // the SSH and git: // protocols are also supported. If you go to the project folder using the cd command (in the case of the cd BarcodeScanner example), the command line will be transformed:
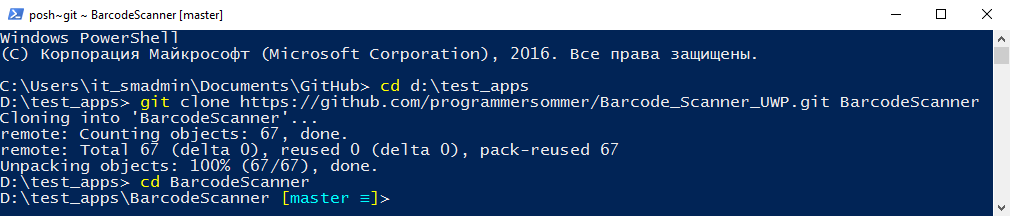
The PowerShell status bar displays the text posh ~ git , which means that you are in the PowerShell environment for Git. You can run the git status command to see if you need to synchronize the local repository. The answer might be:

The most popular commands are those that we have already considered in the framework of the VS extension interface: git fetch , git merge , git push . If you go to the directory (the name of the PortableGit_xxx directory, I think it may be somewhat different):
C:\Users\{user_name}\AppData\Local\GitHub\PortableGit_284a859b0e6deba86edc624fef1e4db2aa8241a9\usr\binthen you will find in it many executable files that emulate commands. As already mentioned, git help can be used, but let's try a few commands for an example.
For example, if a new file appears in the project directory, then the git status command will display:
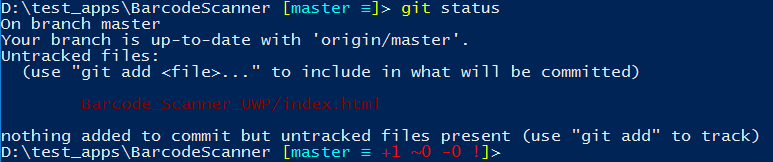
So you need to add the file with the git add index.html command . Now the changes need to be confirmed using git commit . This command will open the text editor, which is installed by default. It is necessary to enter the text describing the changes made in the first line. If you start the line with the # character, it will be a comment. Comments can be left in the lines below. If you do not leave any text describing the commit, then the commit will not happen. You can specify the text of the commit immediately on the command line using the –m option. For example: git commit –m “File index.html added”

Now you can use git push to submit changes to the GitHub repository. If this is your repository. You can copy the foreign repository to yourself by creating a fork / copy of the repository - Fork. Having made some changes, you can offer them to the author of the original repository by creating a pull request.
With this, let me complete the description of the possibilities of working with GitHub for Windows users. If you want to continue studying, then on MVA you can look at the GitHub for Windows Users course