High-performance lighting system for 2D games
- Transfer

Hi, my name is Alexander Birke, I recently released my first Steam game called Laser Disco Defenders. It seems to me that it would be interesting to reveal some of the technical and design solutions included in the game. I'll start with my own lighting system, which allows you to work with many two-dimensional light sources, even on weak computers. LDD was created in Unity, but this approach will work in any other game engine that allows meshes to be created.
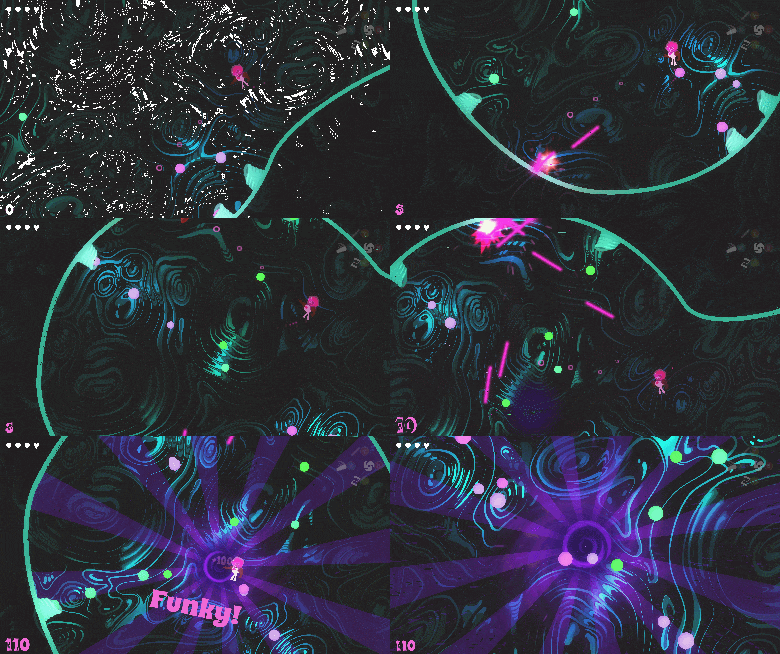
4 MB epileptic gif


Why exactly your own lighting system?
The basic mechanics of LDD is that every laser beam that is shot continues to bounce off the walls and can hit the player, so we called it " bullet helldo it yourself. ”The visual style was inspired by the disco era and the bright dance floors of the time, so I wanted lasers to be able to illuminate the surroundings. Lighting is also useful, as it helps the player understand that a laser beam will be shot soon. The game was also released on the PlayStation Vita, so I needed a more productive solution compared to the standard Unity deferred lighting, which uses a draw call for each light source drawn in the scene. There can easily be up to 30 laser beams on the screen at a time whose portable console cannot handle such a load. I also wanted the lighting to match the shape of the laser beams. The laser beam is usually long and thin, so none of the standard Unity light sources (direction, point, spotlight) are suitable.

The point source on the left does not match the shape of the laser beam. On the right is the desired outline of the light.
Other game elements also had to emit light, so I needed a simple lighting component placed on game objects that the lighting system was supposed to render.

Not only laser shots, but also other light sources should be supported.
Procedural grids go to the rescue!
The main idea of using procedural grids was to “imprint” the lighting data into the lighting buffer, which was then sampled in shaders. This does not differ from the principle of deferred lighting, however, my solution requires working only in 2D, so I could calculate all the illumination in a single rendering pass thanks to rendering the illumination using the procedural grid.
The lasers in the game rendered as a procedural grid, so I already had a texture that can be used to store a decrease in light intensity. I called it (pam-pam-pa-a-am!) ... a laser table!
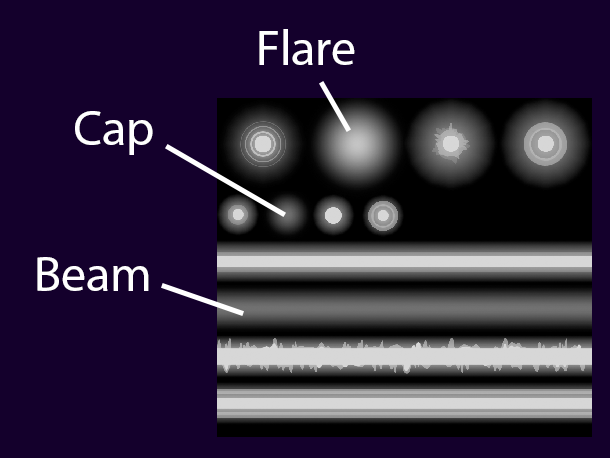
Laser table. From top to bottom: the glow, the ends of the rays, the rays themselves. The marked regions have diffuse scattering for all laser light sources.
For the chosen visual type of laser, I needed the long parts of the beam, its ends and the glow that occurs when it hits the wall. In addition, this glow should hide the fact that each segment of the beam is rendered as a single quadrangular strip, so they do not overlap very nicely. This is a little trick, but visually everything looks good.
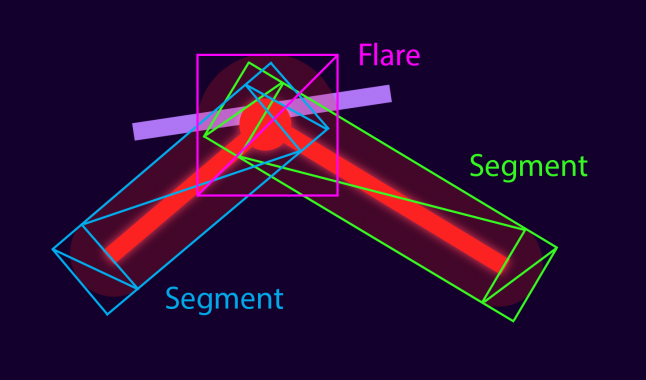
Grid generation scheme for an individual beam. For each segment, you need two quadrangles (quad) of the ends of the beam and one more for the straight segment in the middle. The light from the glow of the wall also needs its quad. The same topology is used to render the laser itself.
To create lighting for each laser, I take the positions of each segment and push their vertices outward, depending on how far the light can travel from the laser. Then vertices are created and added to the grid for other light sources. In LDD, I needed only round sources, but other forms can be easily added. These round sources use the same diffuse glow from the laser table and render like quadrangles.
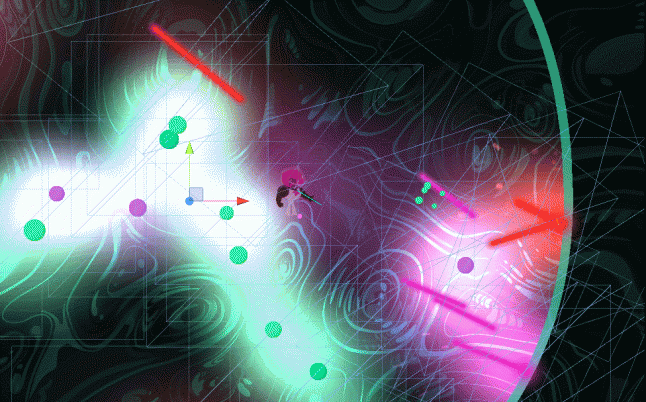
Visible and hidden lighting grid. Usually the lighting grid is far below everything else in the game, so the scene is not displayed when rendering the scene. Here you can see lasers and obstacle spots that cast light.
Then the grid is rendered in a separate color buffer. In Unity, I used a camera with the same layout and size as the main camera. Then it is rendered in RenderTexture using layers to exclude everything except the lighting grid.
The lighting grid and the texture on which it is rendered.
After that, the color buffer is sent to the GPU as a regular texture, so it can be used from any shader. Own shaders were created for sprites, particles and everything else that requires lighting. In the vertex shader, each vertex determines the position of its viewport, therefore it can be used as UV-coordinates when sampling the lighting texture in the fragment shader. The most interesting are the backgrounds of the game. They use an alpha channel to determine the reflectance of a particular texel. This helps a lot to add more depth to the game.

An example of a background texture in Laser Disco Defenders. Color channels are shown on the left, and the alpha channel used for reflectivity, which creates dark cracks in that cave texture, is shown on the right. There's still a skeleton of a space whale ... justbecause we can !
Optimizations
The system contains a couple of optimization techniques. The main one is truncating along the pyramid of visibility of each light source before creating vertices for them. This reduces the amount of computation needed in the processor and limits the number of vertices transmitted to the GPU. As you can see from the image of the lighting grid and texture, the lighting buffer has a much lower resolution than the game. I found out that it can be reduced ten times from the game resolution without any artifacts. When reading texture, bilinear sampling in the shaders provides sufficient interpolation for the game. This reduces the amount of fill work used by the lighting system, leaving enough rendering resources to create a couple of visual effects on top of it.
Conclusion and further work
On the Vita console, the game provides a decent amount of FPS, which I am very proud of, given the visual clarity of the game. A good level of performance was noted in the reviews of the game for PC. I hope you also agree that lighting greatly enhances the psychedelic disco-style of the game.
The system is so far limited by the fact that it cannot create shadows. You can add them, but at the cost of performance. If you decide to make shadows, you most likely will not be able to crank out the focus with the low-resolution lighting buffer. Also, the system cannot provide lighting reflections. They can be created using another laser table that uses color channels representing directions, which are then “imprinted” in a separate direction buffer, but such a system is already more complicated than what I needed for Laser Disco Defenders.
I hope you enjoyed the article. In the next post I will take a closer look at the procedural generation of levels, so stay tuned!
Alexander runs the Bristol gaming studio Out Of Bounds Games. You can subscribe to his Twitter account or to the company’s Facebook page with the most corporate URL in the world. He also organizes the Bristol Unity Meetup.
